Controlling What Appears on Each Page
Microsoft Office Specialist When you create a document that contains more than one page, Word paginates your document by inserting soft page breaks. A soft page break produces separate pages in Print Layout view, and appears as a dotted line across the page in Normal view.
If you want to control how pages break, you can insert manual page breaks. A manual page break produces separate pages in Print Layout view, and appears as a dotted line across the page with the words Page Break in the middle in Normal view.
| Tip | Word repaginates a document as you make changes to it. In other words, as you insert, delete, and move text, Word changes where it inserts soft page breaks. Word does not change the location of manual page breaks; you must do that yourself. |
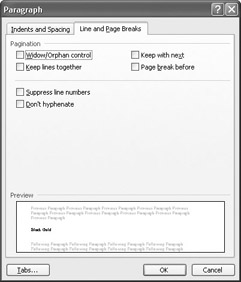
Regardless of whether you keep Word’s soft page breaks or insert your own manual page breaks, you should make sure that these page breaks do not leave widows and orphans—individual lines that don’t stay with their paragraphs. Word defines a widow as the last line of a paragraph printed by itself at the top of a page and an orphan as the first line of a paragraph printed by itself at the bottom of a page. Leaving one line at the top or bottom of a page can interrupt the flow of long documents. To eliminate widows and orphans and to control where Word inserts page breaks, you can use the following options on the Line and Page Breaks tab of the Paragraph dialog box:
-
The “Widow/Orphan control” option prevents Word from printing the last line of a paragraph by itself at the top of a page (widow) or the first line of a paragraph by itself at the bottom of a page (orphan).
-
The “Keep lines together” option prevents a page break within a paragraph.
-
The “Keep with next” option prevents a page break between the selected paragraph and the following paragraph.
-
The “Page break before” option inserts a page break before the selected paragraph.
Tip You can apply the options in the Paragraph dialog box to individual paragraphs, or you can incorporate them into paragraph styles.
In addition to page breaks, you can insert section breaks in your documents. A section break identifies a part of the document to which you can apply page settings, such as orientation or margins, that are different from those of the rest of the document. Dividing a document into sections is especially helpful when you are creating long documents that include elements such as tables that need to be turned sideways or skinny lists that look better when formatted in multiple columns. Several types of section breaks are available:
-
The “Next page” option starts the following text on the next page.
-
The “Continuous” option creates a section break without affecting page breaks.
-
The “Even page” option forces a break to the next even-numbered page.
-
The “Odd page” option forces a break to the next odd-numbered page.
A section break is not displayed in Print Layout view. In Normal view, a section break appears as a double-dotted line across the page with the words Section Break and the type of section break in the middle.
If you have a multi-page document, you might want to insert page numbers. You can do this by using the Page Numbers command on the Insert menu. By default, page numbers appear in the lower-right corner of each page, but you can change their position and alignment by using the Position and Alignment options in the Page Numbers dialog box. For example, you can display page numbers at the top or bottom of a page, and centered or in a corner.
You can also display page numbers and other information on every page of your document by creating headers and footers—regions at the top and bottom of a page that can be created and formatted independently. If your document contains section breaks, you can have different headers and footers for each section. To create a header or footer, you click the Header and Footer command on the View menu. Word then switches to Print Layout view, outlines the header and footer areas with dotted borders, and displays the Header and Footer toolbar. You can enter information in the header and footer areas the same way you enter ordinary text, and you can use the buttons on the toolbar to enter and format items such as page numbers and to move from one header or footer to another.
In this exercise, you will insert page and section breaks, ensure that page breaks do not leave widows and orphans, and add a header and a footer to a document.
| USE | the FormatPage document in the practice file folder for this topic. This practice file is located in the My Documents\Microsoft Press\Word 2003 SBS\ArrangingDoc\ControllingPage folder and can also be accessed by clicking Start/All Programs/Microsoft Press/Word 2003 Step by Step. |
| OPEN | the FormatPage document. |
-
If necessary, switch to Print Layout view, and set your zoom level to 100%.
-
Scroll through the document, noticing any widows or orphans.
-
On the Edit menu, click Select All.
-
On the Format menu, click Paragraph to display the Paragraph dialog box, and then click the Line and Page Breaks tab.
-
Select the Widow/Orphan control check box, select the Keep lines together check box, and then click OK.
Now all the lines of text in each paragraph appear on the same page.
-
Scroll the document, and click to the left of the Hot or Cold? heading.
-
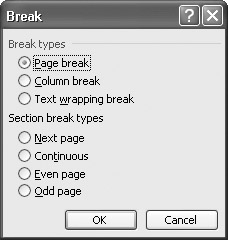
On the Insert menu, click Break.
The Break dialog box appears.
-
In the Break types area, verify that the Page break option is selected, and then click OK.
-
Switch to Normal view, and scroll upward.
A dotted line with the words Page Break indicates the location of a manual page break.
-
Scroll down the document, and click to the left of the Composting DOs and DON’Ts heading.
-
On the Insert menu, click Break to open the Break dialog box, select the Next page option in the Section break types area, and click OK.
A double dotted line with the words Section Break (Next Page) appears.
-
Press [CONTROL]+[HOME] to move the insertion point to the beginning of the document, and then on the View menu, click Header and Footer.
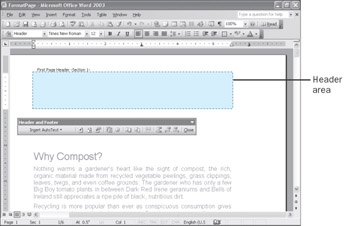
Word switches to Print Layout view, outlines the header area at the top of the page, positions the insertion point in the header, and displays the Header and Footer toolbar.

Center
-
Type The Garden Company, and on the Formatting toolbar, click the Center button. Then select the text, click Font on the Format menu, change the font to Verdana, change the size to 14, and make the text bold and green.
-
Click the Character Spacing tab, change the spacing so that it is expanded by 10 pt, and click OK.

Show Next
-
On the Header and Footer toolbar, click the Show Next button.
Word moves to the page after the section break you inserted earlier. By default, the header for this section is the same as the previous one.

Link to Previous
-
On the Header and Footer toolbar, click the Link to Previous button to toggle it off.
You can now use a different header for this section of the document or leave the header blank.
-
Select The Garden Company, and press [DEL].
The company name is deleted from the header.

Switch Between Header and Footer
-
Click the Switch Between Header and Footer button to switch to the footer text box.
The insertion point is now positioned in the footer.

Show Previous
-
On the Header and Footer toolbar, click the Link to Previous button to toggle it off, and then click the Show Previous button.
Word displays the footer for the previous section.

Insert Page Number
-
Press the [TAB] key twice to move the insertion point to the right tab stop, click the Insert Page Number button on the Header and Footer toolbar, select the number, and make it bold and green.
The first five pages in the first section of the document are now numbered, but the sixth page isn’t.
Tip On the Header and Footer toolbar are buttons you can click to insert the data and time, as well as page numbers and the number of pages in the document. You can also click the Insert AutoText button to drop down a list of other items that can be inserted. These items all insert fields that Word then substitutes with the requested information. You can also insert a field directly in a document by clicking Field on the Insert menu and then clicking an option in the “Field names” list.

-
On the Header and Footer toolbar, click the Close button.
-
Switch to Print Layout view, and scroll through the document to see your formatting.

Save
-
On the Standard toolbar, click the Save button.
Word saves your changes to the document.
CLOSE the FormatPage document, and if you are not continuing on to the next chapter, quit Word.
Formatting Page Numbers
When you insert page numbers in headers or footers, you can format them directly using buttons on the Formatting toolbar as long as the header and footer areas are active. If you want to change the formatting later you can change it by clicking Page Numbers on the Insert menu and making changes in the Page Numbers dialog box.
To format existing page numbers:
-
On the Insert menu, click Page Numbers.
The Page Numbers dialog box appears.
-
Click the Format button.
The Page Number Format dialog box appears.
-
Click the down arrow to the right of the Number Format box, and click the number format you want.
-
Select any other options you want to apply, and then click OK.
-
Click the down arrow to the right of the Position box, and click the location where you want the page numbers to appear.
-
Click the down arrow to the right of the Alignment box, and click the alignment setting you want.
-
Click OK to close the Page Numbers dialog box.
EAN: 2147483647
Pages: 156