Creating, Saving, and Closing Documents
Creating a Word document is as simple as typing text. The insertion point indicates where the text will appear in the document. When the text you’re typing goes beyond the right margin, Word “wraps” the text to the next line. Because of this word wrap feature, which is common in word-processing and desktop-publishing programs, you press [ENTER] only to start a new paragraph, not a new line.
The text you type appears in the document window and is stored by the computer, but only temporarily. If you want to keep a copy of the text, you must save the document as a file. Specifying a name and location for the file ensures that you can retrieve the file later.
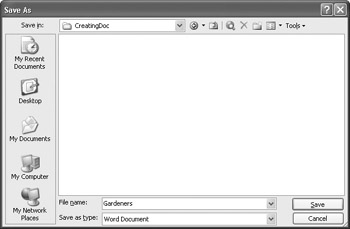
To save a new document in Word, you click the Save button on the Standard toolbar or click the Save As command on the File menu. Either action displays the Save As dialog box, where you can name the file and indicate where you want to save it.
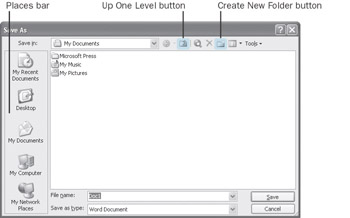
To help you locate the disk and folder where you want to store a new file, you can click the Up One Level button to move up one folder level, or you can use the Places bar on the left side of the dialog box to move to another location on your computer. The Places bar provides quick access to locations commonly used for storing files. For example, to save a file on a floppy disk, you click the My Computer icon on the Places bar, and then double-click 3 Floppy (A:).
To keep your documents organized and easily accessible, you can store relateddocuments in a folder. You can create folders ahead of time in Windows, or you can create them in Word by clicking the Create New Folder button in the Save As dialog box.
After you save a document once using the Save As dialog box, you can save subsequent changes by clicking the Save button on the Standard toolbar. Each time you do, the new version overwrites the previous version. To keep the new version without overwriting the original, you click the Save As command on the File menu and save the new version either in the same folder with a different name or in a different folder. You cannot store two documents with the same name in the same folder.
| Tip | You can tell Word to periodically save a document you are working on in case the program stops responding or you lose power. Word saves the changes in a recovery file according to the time interval specified in the AutoRecover option. To turn on the AutoRecover option and specify a time interval for automatic saving, click Options on the Tools menu, click the Save tab, select the “Save AutoRecover info every” check box, specify the period of time, and then click OK. If your power fails or if Word stops responding while you have documents open, the next time you start Word, the Document Recovery task pane appears with a list of recovered documents. From there you can open a document, view any repairs, and compare recovered versions. |
In this exercise, you’ll enter text in a new document, add a symbol, save your new document, and then close it.
![]()
New Blank Document
-
On the Standard toolbar, click the New Blank Document button.
A new document window opens.

Toolbar Options
Troubleshooting If a button mentioned in this book doesn’t appear on the specified toolbar on your screen, it is probably hidden. You can display the rest of that toolbar’s buttons by clicking the Toolbar Options button at the right end of the toolbar, pointing to Add or Remove Buttons, then pointing to the toolbar’s name and clicking the button you want. You can also double-click the move handle (the four vertical dots) at the left end of a toolbar to quickly expand it.
-
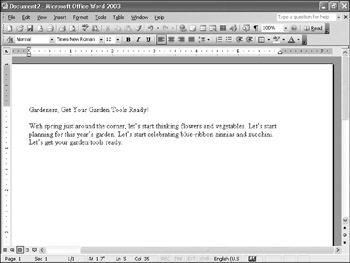
With the insertion point at the beginning of the new document, type Gardeners, Get Your Garden Tools Ready!, and then press [ENTER].
The text appears in the new document.
-
Press [ENTER] again to insert a blank line below the heading.
-
Type With spring just around the corner, let’s start thinking flowers and vegetables. Let’s start planning for this year’s garden. Let’s start celebrating blue-ribbon zinnias and zucchini. Let’s get your garden tools ready.
Notice that you did not need to press [ENTER] when the insertion point reached the right margin because the text wrapped to the next line.
Important If a colored wavy line appears under a word or phrase, Word is flagging a possible error: red indicates spelling, green indicates grammar, and blue indicates inconsistent formatting. A dotted purple line indicates a Smart Tag, which recognizes certain types of text as data that you can use with other programs. For example, Word tags a person’s name as data that you can add to an electronic address book. For now, ignore any errors.
-
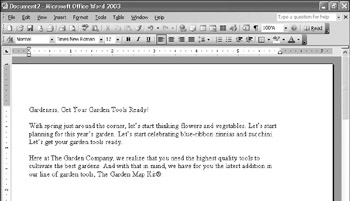
Press [ENTER] two times to insert a blank line between paragraphs, and then type Here at The Garden Company, we realize that you need the highest quality tools to cultivate the best gardens. And with that in mind, we have for you the latest addition in our line of garden tools, The Garden Map Kit.
-
Press the key to move the insertion point one character to the left, between the letter t and the period.
-
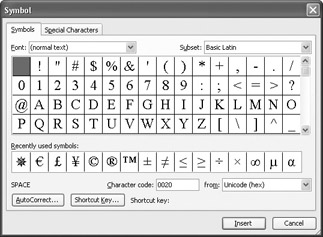
On the Insert menu, click Symbol.
Word displays the Symbol dialog box.
-
In the Recently used symbols area of the Symbols tab, click (the registered sign); or scroll through the list of symbols until you find this sign, and then click it.
-
Click the Insert button, and then click the Close button.
Word places the registered sign before the period in your document.
Tip You can insert some common symbols either by using the Symbol dialog box or by typing characters that Word recognizes as representing the symbol. For example, if you type two consecutive dashes followed by a word and a space, Word changes the two dashes to a professional-looking em-dash—like this one. (This symbol gets its name from the fact that it was originally the width of the character m.)

Save
-
On the Standard toolbar, click the Save button.
The Save As dialog box appears, displaying the contents of the My Documents folder.
-
In the list of the folder and file names stored in your My Documents folder, double- click the Microsoft Press folder, double-click the Word 2003 SBS folder, and then double-click the WorkingDoc folder.
The contents of the folder for this chapter appear in the Save As dialog box.
-
Double-click the CreatingDoc folder.
You can see that the CreatingDoc folder is currently empty. Word has entered the word Gardeners, the first word in the document, in the “File name” box as a suggested name for this file.
Tip Word uses the first few characters (or words) in the document to suggest a file name. You can accept this suggested name or type a new one. Depending on your Windows setup, file names might appear with an extension, which is a period followed by a three-letter program identifier. For Word, the extension is .doc. You don’t have to type the extension after the file name in the Save As dialog box.

Create New Folder
-
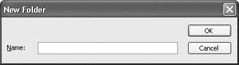
On the toolbar to the right of the Save in box, click the Create New Folder button.
The New Folder dialog box appears so that you can create a new folder within the CreatingDoc folder.
-
Type NewFolder, and click OK.
NewFolder becomes the current folder.
-
In the File name box, double-click Gardeners, type FirstSave, and click the Save button.
The Save As dialog box closes, and the name of the document, FirstSave, appears in the program window's title bar.

Close Window
-
At the right end of the menu bar (not the title bar), click the Close Window button.
The FirstSave document closes.
Saving a File for Use in Another Program
You can save a document in a file format other than the Word document format. A file format is the way that a program stores a file so that the program can open the file later. Saving a document in another format is important if you share documents with people who use previous versions of Word (such as Word 6.0/95) or other programs that have a different file format (such as WordPerfect). For example, if you use Word 6.0 on your home computer, you can create a document in Word 2003 at the office, save it in the Word 6.0 format, and then open and edit the document on your home computer.
If you want to save a Word document in a format that can be opened by the widest variety of programs, you can use one of the following formats:
-
Rich Text Format (*.rtf). Save the document in this format if you want its formatting to be preserved.
-
Text Only (*.txt). Save the document in this format if you want only the text of the document to be preserved.
If you are not sure of the format of a document, you can use the Properties dialog box to display the document's format information, including the version, type, and creator of the file. On the File menu, click Properties, and then click the General tab to display the document format information.
To save a document in another file format:
-
On the File menu, click Save As.
The Save As dialog box appears.
-
In the File name box, type a new name for the document.
-
Click the down arrow to the right of the Save as type box, and click the file format you want to use.
-
Click Save.
EAN: 2147483647
Pages: 156
- Chapter IV How Consumers Think About Interactive Aspects of Web Advertising
- Chapter IX Extrinsic Plus Intrinsic Human Factors Influencing the Web Usage
- Chapter XIV Product Catalog and Shopping Cart Effective Design
- Chapter XVI Turning Web Surfers into Loyal Customers: Cognitive Lock-In Through Interface Design and Web Site Usability
- Chapter XVIII Web Systems Design, Litigation, and Online Consumer Behavior