5.2 Creating and configuring DB2 JDBC Provider
|
| < Day Day Up > |
|
5.1 Environment setup
This section covers the steps to build a basic environment where the DB2 EJB sample application will be deployed and running. The major products covered here include DB2 UDB V8 and WebSphere Application Server V5, as well as IBM HTTP Server.
5.1.1 Installation planning
Before the actual installation begins, the appropriate topology should be chosen via the thorough consideration for both the business requirements and the available resources. In our case, we choose to use separate machines for the database server, application server, and Web server. Certainly, you could also use the single server topology and put all these products into one machine if the capability of the machine is sufficient to get all those products running together well. Or you could also have a clustering environment to serve more concurrent users and requests.
Before installing the products, you also need to consider the products' installation prerequisites, such as the disk requirement, memory requirement, group and user accounts requirement, etc. Sometimes the prerequisites vary considerably depending on which edition of the product you choose and on which platform you want to install the product. You could get this kind of information easily from the products' Web sites or online books. For DB2 UDB V8, to obtain more information about what you need to plan before the installation, please refer to IBM DB2 Universal Database, Quick Beginnings for DB2 Servers, Version 8, GC09-4836. The book can be found at the following URL:
http://www-3.ibm.com/cgi-bin/db2www/data/db2/udb/winos2unix/support/v8pubs.d2w/en_main#V8PDF
Regarding hardware and software requirements for WebSphere Application Server V5 installation, you could refer to the Web page, which can be accessed via the URL as below:
http://www-3.ibm.com/software/webservers/appserv/doc/latest/prereq.html
In addition, the section Installing WebSphere Application Server in WebSphere Application Server InfoCenter also provides necessary information to assist you in performing the installation planning task.
There are also some requirements that are related to specific platforms. For example, when running a large WebSphere configuration on the AIX platform, to avoid the excessive paging behavior, which could impact the performance in WebSphere, you probably need to change the file page frame ratio in the kernel setting to a lower value as the default setting is relatively too high. Some commands such as vmstat and svmon (AIX specific) could be used to monitor the runtime resource consumption details. Based on the monitoring result, some commands such as vmtune (for AIX 5.1 and previous versions) or vmo (for AIX 5.2) could be used to tune those parameters. For WebSphere Application Server V5, there is a special section, Platform-specific tips for installing and migrating, in the WebSphere Application Server InfoCenter. You can refer to that for more details.
We also discuss the steps to use WebSphere Application Server V5 to access the DB2 data source residing on the IBM DB2 UDB for z/OS through the DB2 Connect product. We have separate sections to cover this configuration. For a brief overview of DB2 Connect product installation and configuration, please refer to "Using DB2 for z/OS and OS/390 as the Data Source for WAS" on page 127. Regarding using DB2 for z/OS and OS/390 as the data source for our sample application, refer to "Using DB2 for z/OS as the Data Source" on page 163.
5.1.2 Products' installation briefing
In our laboratory environment, we install DB2 UDB V8 ESE, WebSphere Application Server V5.0.2, and IBM HTTP Server (IHS) 1.3.26 on separate machines (the DB2 Runtime Client is also required on the application server machine in order to use type 2 DB2 JDBC Drivers), as shown in the Table 5-1. Please notice that using DB2 Connect to access DB2 on z/OS is covered separately in the section "Using DB2 for z/OS and OS/390 as the Data Source for WAS" on page 127.
| Machine 1 | Machine 2 | Machine 3 | |
|---|---|---|---|
| Usage/purpose | Database Server | Application Server | Web Server |
| Machine type | pSeries | pSeries | xSeries® |
| Operating system | AIX 5L™ 5.1 | AIX 5L 5.1 | Windows 2000 Server |
| Host name | Atlantic | Kanaga | Helium |
| IP address | 9.1.38.92 | 9.1.38.90 | 9.1.38.185 |
| Products to install | DB2 UDB V8 ESE | WebSphere Application Server V5.0.2 and DB2 UDB V8 Runtime Client | IBM HTTP Server 1.3.26 |
In addition, the following fix packs or maintenance levels are applied for the operating systems and software products, as Table 5-2 shows. The URLs for downloading fix packs or maintenance levels are also provided in the table.
| Category | Product Name | Fix Pack Downloading URL |
|---|---|---|
| Operating system | AIX 5L 5.1 ML5 and Windows 2000 Server with Service Pack 4 | https://techsupport.services.ibm.com/server/mlfixes/51/05/00to05.html (AIX) http://www.microsoft.com (Windows) |
| Database server | DB2 UDB V8 ESE with Fix Pack 4 | http://www-3.ibm.com/cgi-bin/db2www/data/db2/udb/winos2unix/support/download.d2w/report |
| Application server | WebSphere Application Server V5.0.2 | http://www-1.ibm.com/support/docview.wss?rs=860&context=SW600&q=fix+pack&uid=swg24005012&loc=en_US&cs=utf-8&lang=en |
| Web server | IBM HTTP Server 1.3.26 | http://www14.software.ibm.com/webapp/download/product.jsp?s=&id=JHON-4GLTU3&sb=r&cat=webservers&fam=&rs=&S_TACT=&S_CMP=&q=Enter+search+text&k=all&pf=&v=1.3.26.2&x=9&y=15 |
If you want to use the WebSphere-embedded messaging as the JMS provider and install it during the WebSphere Application Server installation, there are some specific requirements that you need to fulfill before and after the installation, such as user group and user account preparation, disk space preparation, and so forth. For more details please refer to the section Installing WebSphere embedded messaging as the JMS provider in the WebSphere Application Server InfoCenter.
The basic steps for applying the operating system maintenance levels and installing software products as well as their associated fix packs are discussed below:
-
Upgrade AIX Operating Maintenance Level to ML5.
In our case, as both application server and database server are residing on the AIX 5L platform, we recommend applying the latest maintenance levels on both machines.
The Web page associated with the URL provided in Table 5-2 for AIX contains the detailed steps to install Maintenance Level 5. You could use oslevel -r to verify if you have successfully installed the ML5. The output of this command should be 5100-05.
-
Install DB2 UDB V8 ESE.
The DB2 UDB V8 ESE is installed on the machine Atlantic in our test case. In addition, we also installed DB2 UDB V8 Run-time Client on the machine Kanaga where the WebSphere application server resides. The latest Run-time Client could be obtained via the URL:
ftp://ftp.software.ibm.com/ps/products/db2/fixes/english-us/db2aix5v8/client/runtime/
You could use the DB2 Setup Wizard (db2setup) to perform the DB2 installation. Regarding detailed steps for DB2 UDB ESE installation, please refer to the Quick Beginnings for DB2 Servers, which can be found via URL:
ftp://ftp.software.ibm.com/ps/products/db2/info/vr8/pdf/letter/db2ise80.pdf
-
Apply DB2 UDB V8 fix pack.
Before applying the fix pack, please read the fix pack readme file. The file is available in the fix pack installation directory after you uncompress the fix pack archive. The file name for the English version is FixPackReadme.txt. The command installFixPak could help you perform this task. Remember to update the instance by using db2iupdt and rebind packages as required.
Note DB2 Enterprise Server Edition (ESE) Version 8.1 for UNIX-based operating systems now supports the coexistence of multiple FixPak levels on the same system through the use of "alternate" fix packs. In our case, the regular fix pack 4 is used.
-
Verify the DB2 UDB V8 installation.
You could use db2sampl command to create the sample database provided by DB2 UDB V8 then try to do some SQL operations against the database to verify if the installation is successful, as shown in Example 5-1.
Example 5-1: DB2 UDB installation verification

$ db2 connect to sample $ db2 "select * from sales fetch first 3 rows only" SALES_DATE SALES_PERSON REGION SALES ---------- --------------- --------------- ----------- 12/31/1995 LUCCHESSI Ontario-South 1 12/31/1995 LEE Ontario-South 3 12/31/1995 LEE Quebec 1 3 record(s) selected.
-
Install WebSphere Application Server V5.
The WebSphere Application Server is installed on machine Kanaga in our case. Before installing the WebSphere Application Server, it is recommended to read through the Getting Started, IBM WebSphere Application Server, Version 5 online book, which is available in the docs subdirectory of the WebSphere Application Server installation directory. You could use the LaunchPad to start the installation. The command to invoke the LaunchPad on AIX is LaunchPad.sh, located under the WebSphere Application Server installation directory. Figure 5-1 shows the basic functions that could be achieved via LaunchPad, such as viewing installation guides, starting the installation of the product, etc.
Figure 5-1: Using LaunchPad to install WAS Version 5Whether or not to choose installing IBM HTTP Server and Web Server Plug-ins along with the WebSphere Application Server on the same machine depends on your application requirements. In our test case, for more convenience of the testing for some WebSphere Application Server sample applications such as snoop, Technology Samples, etc., the IBM HTTP Server and the Web Server Plug-ins are also installed on the Kanaga machine.
-
Apply Fix Pack 2 for WAS V5.
The file named readme_was50_fp2.html, which can be found under the docs subdirectory of the WebSphere Application Server fix pack installation directory after uncompressing the fix pack archive, contains the fix pack introduction information. There is another file named readme_updateinstaller.txt available under the same subdirectory, which includes detailed instructions about how to apply the fix pack. Basically, you could use the command updateWizard.sh to invoke the fix pack installation utility.
-
Verify WAS Fix Pack 2 installation.
The versionInfo utility could be used to obtain the current version information. Thereby we can determine if the fix pack is installed successfully. See Example 5-2 on page 124 for details.
Example 5-2: Using versionInfo.sh to verify the fix pack installation
Kanaga:/usr/WebSphere/AppServer/bin >./versionInfo.sh WVER0010I: Copyright (c) IBM Corporation 2002; All rights reserved. WVER0011I: WebSphere Application Server Release 5.0 WVER0012I: VersionInfo reporter version 1.14, dated 5/9/03 ------------------------------------------------------------------------------- IBM WebSphere Application Server Product Installation Status Report ------------------------------------------------------------------------------- Report at date and time 2003-10-30T15:04:04-08:00 Installation ------------------------------------------------------------------------------- Product Directory /usr/WebSphere/AppServer Version Directory ${product.dir}/properties/version DTD Directory ${version.dir}/dtd Log Directory /usr/WebSphere/AppServer/logs/update Backup Directory ${version.dir}/backup TMP Directory /tmp Installation Platform ------------------------------------------------------------------------------- Name IBM WebSphere Application Server Version 5.0 Technology List ------------------------------------------------------------------------------- BASE installed Installed Product ------------------------------------------------------------------------------- Name IBM WebSphere Application Server Version 5.0.2 ID BASE Build Level ptf2M0325.01 Build Date 06/23/2003 ------------------------------------------------------------------------------- End Installation Status Report -------------------------------------------------------------------------------Up to now, we have got the WebSphere Application Server base configuration installed on the Kanaga machine. To further verify whether the installation is successful or not, you could try to start the application server by using the startServer.sh command, then trying to access the admin console, which is generally installed by default, via the URL link http://kanaga:9090/admin in an Internet browser available in your testing environment. The login prompt should be displayed in the browser window, as shown in Figure 5-2.
Figure 5-2: WebSphere Application Server admin console loginYou could also verify the installation via the available Installation Verification Test (IVT) tool shipped with WebSphere Application Server. It could be invoked by the command ivt.sh. A successful verification should return message like that shown in Example 5-3
Example 5-3: Successful Verification by using ivt.sh
Kanaga:/usr/WebSphere/AppServer/bin >./ivt.sh IVTL0095I: defaulting to host kanaga and port 9080 IVTL0010I: Connecting to the WebSphere Application Server kanaga on port: 9080 IVTL0020I: Could not connect to Application Server, waiting for server to start IVTL0025I: Attempting to start the Application Server osName = AIX IVTL0030I: Running /usr/WebSphere/AppServer/bin/startServer.sh server1 >ADMU0116I: Tool information is being logged in file > /usr/WebSphere/AppServer/logs/server1/startServer.log >ADMU3100I: Reading configuration for server: server1 >ADMU3200I: Server launched. Waiting for initialization status. >ADMU3000I: Server server1 open for e-business; process id is 20658 IVTL0050I: Servlet Engine Verification Status - Passed IVTL0055I: JSP Verification Status - Passed IVTL0060I: EJB Verification Status - Passed IVTL0070I: IVT Verification Succeeded IVTL0080I: Installation Verification is complete
If you encounter problems during the verification, "Installation troubleshooting" on page 133 provides some information about how to deal with such problems. In addition, a port conflict issue that leads to a successful startup of WebSphere application server is also discussed in that section.
-
Install IBM HTTP Server 1.3.26 and Web Server Plug-ins.
You could install the IBM HTTP Server from the WebSphere Application Server product CD-ROM labelled "WebSphere Application Server, IBM HTTP Server". If the Web server and its plug-in running is the only WebSphere Application server component you would like to install on the Web server machine, deselect all options but the IBM HTTP Server and the plug-in for the IBM HTTP Server after choosing the custom installation method. This is the recommended way to install the IBM HTTP Server and its associated plug-in, as the installation wizard could help you to update related configuration files including httpd.conf and plugin-cfg.xml automatically. For more information please refer to the section Preparing to install and configure a Web server in WebSphere Application Server V5 InfoCenter.
In our case, the Web server product IBM HTTP Server is installed on a separate Windows 2000 Server machine, Helium.
In addition, to redirect the HTTP and HTTPS requests to the embedded HTTP Server of the target WebSphere application server, a minor change for the plug-in configuration file plugin-cfg.xml is required. In our case, the configuration file is located under the directory:
C:\Program Files\WebSphere\AppServer\config\cells\
Edit this file and change the host name property of the Transport entry in the ServerCluster block to the desired host name of the machine where the target application server resides. In our case, as application server is running on the machine Kanaga, so we change that to "kanaga", as shown in the Example 5-4.
Example 5-4: ServerCluster block of the plug-in configuration file
<ServerCluster Name="server1_Cluster"> <Server Name="server1"> <Transport Hostname="kanaga" Port="9080" Protocol="http"/> <Transport Hostname="kanaga" Port="9443" Protocol="https"> <Property name="keyring" value="C:\Program Files\WebSphere\AppServer/etc/plugin-key.kdb"/> <Property name="stashfile" value="C:\Program Files\WebSphere\AppServer/etc/plugin-key.sth"/> </Transport> </Server> </ServerCluster>
-
Verify IBM HTTP Server installation.
There are several methods available to start the IBM HTTP Server, such as using a service entry in the Windows Services or using a newly created IBM HTTP Server menu item, or from the command line. After starting up the IBM HTTP Server, visit the home page of the Web server via the URL http://helium/, as shown in Figure 5-3.
Figure 5-3: IBM HTTP Server Welcome PageYou could also verify whether or not the Web server plug-in is successfully loaded by checking the plug-in log file, which is designated in the plug-in configuration file (generally named plugin-cfg.xml). Messages like Plugins loaded as well as system information, should be written into the log file if the plug-in module is loaded by the IBM HTTP Server.
Moreover, in order to verify if the HTTP or HTTPS request could be redirected to the Web container HTTP Transport listeners of the target application server from the Web server plug-in, you could also try to access the hello servlet via the URL http://helium/hello, as Figure 5-4 shows.
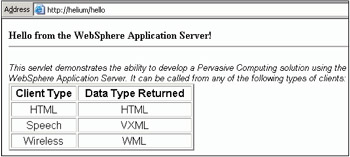
Figure 5-4: Using the hello servlet to verify the Web Server Plugin functionality
Up to this point, we have completed the installation for all the listed software products, including Web server, application server, and database server, as well as their corresponding fix packs on different machines. This installation is commonly used in our sample application testing scenario. The installation and testing about the sample application is covered in detail in "DB2 EJB sample application setup" on page 153.
5.1.3 Using DB2 for z/OS and OS/390 as the Data Source for WAS
You need a powerful e-business infrastructure that lets you leverage your data, deliver customer values, and maintain your competitive edge in the market. IBM delivers the power you need to keep your e-business competitive without compromising the safety, integrity, and availability of your data.
DB2 UDB for z/OS provides the basic foundation of an e-business infrastructure. It is an obvious choice when it comes a question of robustness, reliability, scalability, and open standards. Also there is a great demand to integrate the data on DB2 UDB for z/OS with applications running on Windows and UNIX workstations. DB2 Connect enables local and remote client applications to manage DB2 databases and host systems using Structured Query Language (SQL), DB2 APIs (Application Programming Interfaces), ODBC (Open Database Connectivity), JDBC (Java Database Connectivity), SQLJ (Embedded SQLJ for Java), or DB2 CLI (Call Level Interface). In addition, DB2 Connect supports Microsoft Windows data interfaces such as ActiveX Data Objects (ADO), Remote Data Objects (RDO), and Object Linking and Embedding (OLE) DB.
We have already discussed in "DB2 connectivity to z/OS and S/390®" on page 112, the most common ways to connect a Java application running on a distributive environment to the DB2 UDB for z/OS subsystem is using the Type 2 driver and Type 4 driver.
When using the Type 4 driver, we do not need DB2 Connect to access data from the DB2 UDB for z/OS system, but from a performance point of view we are demonstrating our examples using DB2 Connect and Type 2 driver. Also the DB2 Connect provides certain functionality that is not provided by the Type 4 driver. These include sysplex awareness and connection concentration. These functions can be very valuable in large installations. For a more detailed description of these features, please see Distributed Functions of DB2 for z/OS and OS/390, SG24-6952.
This section is especially dedicated to providing considerations and recommendations while your applications are running on a distributed environment and using DB2 UDB for z/OS as the data source.
Specific considerations for DB2 UDB for z/OS
Before starting work with DB2 Connect, we must ensure that DB2 UDB for z/OS is configured to accept requests from a DB2 Connect client. This section describes the minimum updates required for DB2 Connect client to establish a connection to the DB2 UDB for z/OS.
Following are the steps to configure DB2 UDB for z/OS server to start allowing connections from DB2 Connect clients:
-
Configure TCP/IP for DB2 UDB for z/OS.
-
Configure DB2 UDB for S/390.
Configure TCP/IP for z/OS
Below are the steps required to define connectivity with DB2 UDB for z/OS:
-
TCP/IP communications must be enabled on DB2 Universal Database for z/OS and the partner system.
-
Two TCP/IP port numbers must be assigned. One port is for DRDA and another for re-synchronization for two-phase commit implementation. In this book we are using port number 38050 for database connections, and port number 38051 for re-synchronization.
-
The remote DRDA application server or application requester must use the same port numbers (or service names) as DB2 Universal Database for z/OS.
-
Ensure that the TCP/IP already verified security option is set to YES. Using this option you can specify extended security, which will provide additional diagnostics, such as PASSWORD EXPIRED.
Configure DB2 UDB for z/OS
For the application server to receive distributed database requests over TCP/IP connections, it must be defined to the local TCP/IP subsystem, and have a unique RDB_NAME. Additionally, the DB2 UDB for z/OS Bootstrap Dataset must include the necessary parameters, and you may need to make updates to the DB2 UDB for OS/390 and z/OS Communications Database (CDB).
No CDB updates are required if you will only use inbound database connections, so that if you plan to use DB2 UDB for z/OS only as a server, you do not need to populate the CDB, and default values can be used.
For further details please check with DB2 Connect Connectivity Supplement - db2h1e80.
Specific considerations for DB2 Connect
The IBM DB2 Connect family provides various product offerings like DB2 Connect Personal Edition, DB2 Connect Enterprise Edition, DB2 Connect Application Server Edition and DB2 Connect Unlimited Edition. Before using DB2 Connect you need to understand the different licensing policies, their usability, limitations, and platforms on which they are compatible.
Also, DB2 UDB Enterprise Server Edition includes the DB2 Connect component, but the below-mentioned restriction still applies:
-
In DB2 Universal Database Enterprise Server Edition (ESE), use of the DB2 Connect component is limited to five registered users per server. This product contains a DB2 Connect component to provide connectivity, DB2 for z/OS, DB2 Server for VSE and VM, and DB2 for iSeries database servers. If additional users need to connect to any of the above-mentioned database servers, a separate DB2 Connect Program license must be acquired. For further details check with DB2 Product Offerings at:
http://www-306.ibm.com/software/data/offers/db2.html
Product configuration briefing
You can configure your TCP/IP connection between a DB2 Connect server and DB2 for z/OS subsystem manually through commands or by using the tool Configuration Assistant (CA). Here we are implementing connectivity using the manual option.
To manually configure TCP/IP communications between your DB2 Connect server and a DB2 for z/OS subsystem:
-
Configure TCP/IP on the DB2 Connect server.
-
Resolve the local host system's IP address. The DB2 Connect server must know the address of the DB2 for z/OS subsystem to which it is attempting to establish communications. To resolve the IP address, use a text editor to add an entry to the DB2 Connect server's hosts file for the DB2 for z/OS subsystem system's host name.
-
Update the services file. Skip this step if you are planning to catalog a TCP/IP node using a port number (port_number). You need to update the DB2 Connect server's services file to add the connection service name and port number of the remote host you want to connect to. To update the services file, use a text editor to add the connection service name and port number of the remote host to the DB2 Connect server's services file.
-
-
Catalog the TCP/IP node.
You must add an entry to the DB2 Connect server's node directory to describe the remote node. This entry specifies the chosen node_name, the host name or IP_address, and the service name or port_number that the client will use to access the remote host.
-
Catalog the DB2 for z/OS subsystem as a Database Connection Service (DCS) database.
The remote database must be cataloged as a DCS database so that DB2 Connect can provide access to it.
-
Catalog the DCS database.
Before a client application can access a remote database, the database must be cataloged on the DB2 for z/OS subsystem node and on any DB2 Connect server nodes that will connect to it.
-
Bind utilities and applications to the DB2 for z/OS subsystem.
After completing the steps to configure the DB2 Connect server to communicate with the DB2 for z/OS subsystem, one must bind the database utilities and DB2 CLI bind files to each database before they can be used. If you need to access multiple databases in a network environment, you must bind the utilities once for each operating system and DB2-version combination. The bind command creates a package, which provides all the information that is needed to process specific SQL statements from a single source file. The bind files are grouped together in different .lst files in the $HOME/sqllib/bnd, under the installation directory. Each file is specific to a server, for example, ddcsmvs.lst is for DB2 for z/OS.
-
Test the connection.
For our operational environment we are using DB2 Connect Enterprise Edition V8. We are implementing it by installing both DB2 Runtime Client and DB2 Connect EE on a single pSeries server, Kanaga. Also we are assuming that DB2 Connect EE and DB2 UDB for z/OS system are already installed and in place. Here we only give emphasis on the steps related to connectivity. It is always advisable to collect information as described in Table 5-3 before starting the connectivity procedure.
| DB2 Connect Machine - description | DB2 Connect Machine - value |
|---|---|
| Usage/Purpose | Host environment |
| Machine Type | zSeries—Sysplex of 16 systems |
| Operating System | z/OS |
| Host Name | wtscnet.itso.ibm.com® |
| Host IP Address | 9.12.6.50 |
| Pre Installed Product | DB2 V8 Subsystem |
| DB2 Subsystem Name | wtsc67oe.itso.ibm.com |
| DB2 Subsystem IP | 9.12.6.42 |
| DB2 Location Name | DBC8 |
| DRDA Port | 38050 |
| Resync Port | 38051 |
Figure 5-5 shows an overall operation setup for a DB2 Connect environment and Table 5-3 on page 131 has the details of the parameters required for DB2 UDB for z/OS connectivity. Example 5-5 shows the commands we used to establish the connectivity using the steps defined previously.
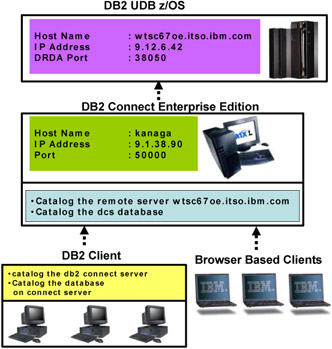
Figure 5-5: DB2 UDB z/OS - DB2 Connect EE - DB2 Client Connectivity
Example 5-5: Cataloging the DB2 UDB z/OS and S/390 subsystem
Kanaga:/home/db2inst1 >vi /etc/hosts 9.12.6.42 wtsc67oe.itso.ibm.com "/etc/hosts" 41 lines, 1437 characters Kanaga:/home/db2inst1 >db2 catalog tcpip node wtsc67oe remote wtsc67oe.itso.ibm.com Server 38050 DB20000I The CATALOG TCPIP NODE command completed successfully. DB21056W Directory changes may not be effective until the directory cache is refreshed. Kanaga:/home/db2inst1 >db2 catalog db dbc8 at node wtsc67oe authentication dcs DB20000I The CATALOG DATABASE command completed successfully. DB21056W Directory changes may not be effective until the directory cache is refreshed. Kanaga:/home/db2inst1 >db2 catalog dcs database dcs8 as dcs8 DB20000I The CATALOG DCS DATABASE command completed successfully. DB21056W Directory changes may not be effective until the directory cache is refreshed. Kanaga:/home/db2inst1 >db2 connect to dbc8 user WASDB2 Enter current password for WASDB2: Database Connection Information Database server = DB2 z/OS 8.1.5 SQL authorization ID = WASDB2 Local database alias = DBC8 Kanaga:/home/db2inst1 >db2 bind /home/db2inst1/sqllib/bnd/@ddcsmvs.lst blocking all sqlerror continue messages mvs.msg grant public Kanaga:/home/db2inst1 >db2 terminate DB20000I The TERMINATE command completed successfully.
5.1.4 Installation troubleshooting
If you failed to install DB2 UDB V8 on the AIX platform, you could refer to db2setup.log generated under the /tmp directory during installation, then correct the problem indicated in the db2setup.log and retry the installation. If the messages are not complete to identify the cause of the issue, the installation trace information could be generated by using the parameter -t for DB2 Setup Wizard. For more information, please refer to Chapter 17, "b2setup - Install DB2" section, "Additional reference topics" in the book Quick Beginnings for DB2 Servers, SC09-4836.
SImilarly, if you encounter problems during installation of WebSphere Application Server V5, a temporary log file named log.txt can be found in the /tmp directory on an AIX platform. If the information that is contained in the log.txt file is not sufficient to determine the cause of the problem, then further details about the installation procedure could be captured by using the additional installation logging or getting the stdout and stderr output reported on the console, etc. For detailed parameters of WebSphere Application Server installation utility to gather more information for installation troubleshooting, refer to Chapter 3, Troubleshooting the Installation section, Installing WebSphere Application Server in the book Getting Started, IBM WebSphere Application Server, Version 5.
There is a common port conflict issue that can happen when you run ivt.sh the first time to verify the WebSphere Application Server on the AIX 5L platform. It leads to the failure of starting up the application server, as shown in the Example 5-6.
Example 5-6: Port Conflict during the installation verification test
Kanaga:/usr/WebSphere/AppServer/bin >./ivt.sh IVTL0035I: Scanning the file /usr/WebSphere/AppServer/logs/server1/SystemOut.log for errors and warnings [10/30/03 14:45:42:955 PST] 67c3b127 WsServer E WSVR0003E: Server server1 failed to start [10/30/03 14:45:42:969 PST] 67c3b127 WsServer E WSVR0009E: Error occurred during startup [10/30/03 14:45:29:744 PST] 67c3b127 WebContainer E SRVE0146E: Failed to Start Transport on host , port 9090. The most likely cause is that the port is already in use. Please ensure that no other applications are using this port and restart the server. com.ibm.ws.webcontainer.exception.TransportException: Failed to start transport http: java.net.BindException: The socket name is already in use. [10/30/03 14:45:27:482 PST] 67c3b127 FreePool E J2CA0046E: Method createManagedConnctionWithMCWrapper caught an exception during creation of the ManagedConnection for resource JMS$SampleJMSTopicConnectionFactory, throwing ResourceAllocationException. Original exception: javax.resource.spi.ResourceAdapterInternalException: JMSException in createConnection [10/30/03 14:45:27:764 PST] 67c3b127 FreePool E J2CA0046E: Method createManagedConnctionWithMCWrapper caught an exception during creation of the ManagedConnection for resource JMS$SampleJMSQueueConnectionFactory, throwing ResourceAllocationException. Original exception: javax.resource.spi.ResourceAdapterInternalException: createQueueConnection failed IVTL0040I: 5 errors/warnings were detected in the file /usr/WebSphere/AppServer/logs/server1/SystemOut.log
This is a common problem due to the conflicting port use on port 9090. If you install on an AIX 5.1 system, with maintenance level 2 or later, it is possible that the Web-based system manager, a standard component of AIX systems, already uses port 9090. When starting the server you get information that port 9090 is already in use. You could use the command netstat to see if port 9090 is used by other applications, as Example 5-7 shows.
Example 5-7: The conflicting port 9090 on AIX
Kanaga:/usr/WebSphere/AppServer/bin >netstat -an|grep 9090 tcp4 0 0 *.9090 *.* LISTEN Kanaga:/usr/WebSphere/AppServer/bin >cat /etc/services|grep wsm wsmserver 9090/tcp
Here it happens that the service entry for port 9090 could be found in the /etc/services file, and we know that the wsmserver is controlled by the Internet Service Management daemon inetd. If you want to use port 9090 for WebSphere Application Server but not other applications, then you could stop the corresponding application if allowed or change the port usage of the conflicting application. In our case, we stopped the web-based system manager by:
-
Commenting the line associated with wsm in /etc/inetd.conf, which is the configuration file of inetd.
-
Refreshing inetd process to read in the new configuration via the command:
kill -1 <pid of inetd>
-
Recheck the wsmserver process. If it is still there, use the kill command to remove it out of the process table.
| Tip | If you do not know which application process is occupying the desired port number (not just port 9090), and that port number is required by your installation, the lsof utility is very useful for this case. This utility could be used to list which process is using the desired network port or ordinary file and directory, etc. The lsof utility can be downloaded from the URL: ftp://lsof.itap.purdue.edu/pub/tools/unix/lsof |
Certainly, to give up using port 9090 for WebSphere Application Server is also a method to resolve the conflicting port use. The port assignment entry for transports the HTTP_TRANSPORT_ADMIN port in the server.xml file could be changed to a non-conflicting port number to avoid the conflict. In our test case, the file path of server.xml is as follows:
/usr/WebSphere/AppServer/config/cells/kanaga/nodes/kanaga/servers/serve r1/server.xml
|
| < Day Day Up > |
|
EAN: N/A
Pages: 90