Chapter 6: Installation Troubleshooting
Allowing for the possibility that, for some reason, you didn’t follow the installation routine outlined in Chapter 5 to the letter, I’ve included undocumented and advanced tips and tricks for installation troubleshooting in this chapter. I offer these as an enhancement to, not a substitute for, the Microsoft Knowledge Base (KB) available at http://support.microsoft.com/default.aspx?scid=fh;EN-US;KBHOWTO. As the approach to installation outlined in Chapter 5 avoids many of the situations listed here, you’ll be well served reading through this chapter entirely if you’ve picked up this book to troubleshoot an installation that didn’t follow the Chapter 5 method.
Troubleshooting SharePoint Team Services Installation
I address SharePoint Team Services (STS) installation issues first, as these are the ones you’re most likely to confront. The purpose of this discussion is to help you solve the more esoteric problems, but I cover the more common issues first by way of elimination. Make sure that none of the following situations applies to you before you delve into the advanced topics in this section.
“Run-Time Error 76” or “Could Not Create the Subweb”
The existence of FrontPage 2000 Server extensions on the server at the time you install STS will cause this error. Only the 2002 version of the extension will work; this is installed with the STS installation that comes with Project Server. This error message is covered by KB article 32302. Make sure that you review and follow the STS uninstall recommendations later in this chapter before you attempt to resolve this issue. Note that there are other resolutions for the “Could Not Create the Subweb” error that might apply to your situation if you aren’t receiving the “Run-Time Error 76” message, which is unique to the cause outlined in KB article 32302.
-
Uninstall STS according to the instructions that appear later in this chapter.
-
Click the Start button, select Settings
 Control Panel, and double-click the Add/Remove Programs icon.
 -
In the Add/Remove Programs dialog box click Add/Remove Windows Components in the left navigation pane.
-
Highlight Internet Information Services in the Windows Components Wizard as shown in Figure 6-1, and click Details.

Figure 6-1. Windows Components Wizard -
In the Internet Information Services (IIS) dialog box, uncheck the box for FrontPage 2000 Server Extensions, as shown in Figure 6-2.
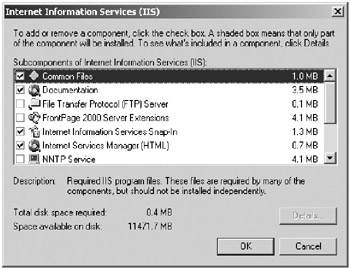
Figure 6-2. Internet Information Services (IIS) dialog box -
When the installer completes, click the Start button, select Run, and enter CMD.
-
Type IISRESET at the command prompt.
-
Reinstall STS.
Errors Adding an STS Server After Project Server Installation
This error is common as many users attempt to install Project Server without first reading through the Project Server Installation Guide. When STS is installed after Project Server, there are configurations that must be made. These are well documented in KB article 322235. The error manifests itself in three variants: In addition to the errors shown in Figures 6-3 and 6-4, the error “VBScript: Microsoft Project Web Access Error occurred when creating subweb. Subweb does not seem to exist” may appear.
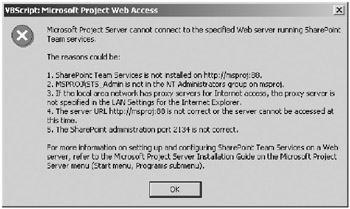
Figure 6-3. “Cannot connect to the specified Web server” error

Figure 6-4. “Cannot connect to the specified SharePoint database” error
There are three key installation/configuration points to Project Server integration with STS. These are as follows:
-
You created identities for SharePoint to connect to its own database (separate from the Project Server database). These are among the local administrator identities that you (should have?) created during installation configuration and are the identities that will be used by COM+. Adding these to the SharePoint database is a manual installation step and commonly missed by inexperienced installers.
-
You ran the COM+ utility provided on your installation drive at drive:\Program Files\Microsoft Project Server\Bin folder or the path you specified at installation. The existence of the accounts and the manual steps in database installation are requisites for running the COM+ utility as referenced in the preceding point. (Note: This includes the OLAP administrator identity covered in Chapter 5.)
-
You were successful in setting the server’s proxy settings by running the proxycfg.exe file provided at drive:\Program Files\Microsoft Project Server\Bin\1033 folder.
The occurrence of the “Connect to the specified Web server” error type, as shown in Figure 6-3, indicates that proxy configuration wasn’t run or wasn’t run successfully. The “Cannot connect to the specified SharePoint database” error type, as shown in Figure 6-4, indicates that either point 1 and/or point 2 were missed. The “Subweb does not seem to exist” error is sometimes caused by an unsuccessful proxycfg.exe run or other seemingly mysterious circumstances. Refer to instructions in provided in the Chapter 5 to execute the preceding installation steps. Familiarize yourself with the next topic to avoid known pitfalls.
Successfully Troubleshooting Proxycfg.exe Issues
In the last section, I referred to “successful” and “unsuccessful” proxycfg.exe runs. There are times when proxy settings errors are difficult to spot, appear to take but don’t, or stop working after a period of working. The flakiness of these settings can lead you to one of your most frustrating software installation experiences if you don’t pay close attention to the troubleshooting tips described here.
Those of you who aren’t used to opening a command window and working in a DOS environment may be thrown by the fact that there isn’t a lot of error handling. The command to be typed has four segments. The first is the command itself, proxycfg, which invokes the proxycfg.exe file. Next there are switches -d and -p followed by a proxy server name and bypass list, both of which require you to type quotes around them. Leaving out the quotes on one can cause the settings to fail in a more subtle presentation than you might notice at first glance. With that in mind, be very careful about your syntax and pay attention the system output after you press Enter. Make sure that what you thought you typed for the values of proxy server and the bypass list displays as the values on the screen. When in doubt, do it again with the next precaution in mind.
I’ve seen significant public discussion conducted over the value to use when typing a fake proxy server name, which Project Server documentation specifies as the standard when proxycfg.exe is run in absence of a Proxy Server. Numerous users have reported that using a variant to the command specified solved a proxy setting issue. The Project Server Installation Guide specifies this as
Proxycfg –d –p "proxyserver" "<local>"
The variant suggested is
proxycfg –d –p "FakeProxy:80" "*;<local>"
In reality, neither choice is more valid than the other. The illusion that one is a better choice than the other is actually the therapeutic effect of typing a different Proxy Server name. When proxy settings are entered correctly but don’t appear to work, rerunning the proxycfg command and changing the name of the Proxy Server may be required to get the system to refresh the settings. (It’s apparently possible for the system to ignore the proxycfg command when the proxy server name isn’t changed.) When in doubt, rerun proxycfg using a different name and then switch it back to what you actually want.
Running the COM+ utility is one event that can cause the proxy settings to stop functioning. Project Server documentation would lead you to believe that the order in which you run COM+ and proxycfg doesn’t matter, but sometimes it does. Rerun proxycfg with a new proxy server name when you can no longer connect to a SharePoint server after running the COM+ utility. Creating additional sites using the Site Editor tool, covered in Chapter 7, can also cause this problem. It’s likely that there are other causes not covered here.
“Could Not Create the Subweb” and Complete Installation Fails
A variant to a cause for this specific error message occurs during installation for unknown reasons. Anecdotally, I suspect the Office XP Web Components SP2 is one potential cause of this error. On affected systems, when running stswiz.exe STS software installation completes to the point that the installation wizard extends the Project Server customizations to the STS Web site and then fails. STS characteristically works when a server is in this state and you can create through the native STS Web interface. Only the Project Server wrapper fails to install.
For systems that experience this issue, it’s possible to work around the problem by installing STS in debug mode and stepping through the installation to the point where the wizard creates the MS_ProjectServer_PublicDocuments folder on the default Web site. Intervening by manually creating the folder at the correct step point can get the job done. A clean uninstall is a requisite to reinstalling STS in debug mode. You must complete all the steps outlined later in this chapter in the section “Uninstalling STS” prior to attempting a reinstall.
EAN: 2147483647
Pages: 185