| In general, a template is anything that acts as a guide and assists you in completing a repetitive task. A document template might have its styles and general format already present, resulting in an easy path to completion because all you have to do is place your text where the template shows you, such as "Place document title here." When creating a static website, you can use HTML templates consisting of a general shell ”the header, navigation elements, and footer might already be there, so your only job would be to type content in the space marked "Body content goes here." Plone templates are used in much the same way as these other types of templates, but without the static content placement. Instead, Plone templates serve as models for the content that is dynamically generated from the application, but no static content is ever held within them. Also, Plone templates do not represent the entire page that you see when you visit a Plone site. Individual areas of a Plone site each have their own template. These templates include references to Plone styles, which, in turn , reference the Plone base_properties . The elements you learned about in the previous chapter play an integral part in the templates you'll learn about next . The Zope Template Language Plone templates are actually Zope templates used within the Plone application. If this book were specifically about Zope and not Plone, the discussion of templates would still be the same. Zope templates use their own Template Attribute Language (TAL), which, as with HTML, DHTML, XML, and any other language you can think of, comes with its own set of tag attributes, called TAL statements. Some common statements are listed here, just as an introduction to the concept: -
tal:attributes ” This statement calls for a dynamic change in element attributes. -
tal:define ” This statement defines variables for use within the template. -
tal:condition ” This statement is used to test a condition before continuing. -
tal:content ” Use this statement to replace the content of an element. -
tal:repeat ” Use this statement to repeat an element. For example, the HTML <title></title> tag pair might look like this in a Zope template:
<title tal:content="here/title">Page Title</title>
Within the opening tag, you see the use of the tal:content statement. This statement is telling Zope (and, thus, Plone) to grab the content from here/title and use it for the page title ”for example, replace the Page Title placeholder text with whatever value is in the here/title object. The closing </title> tag is provided, and all is right with the world. These types of statements might seem completely foreign to you, and they should unless you've spent a great deal of time working with Zope. The point here is just to be familiar with the concept of TAL as its own language, which is used within Zope templates, which are used within Plone. The next section specifically shows you where these templates live, what some of these elements mean, and the types of modifications you can make to existing templates. For a complete discussion of TAL, visit Appendix C of the Zope Book, "Zope Page Templates Reference," at http://zope.org/Documentation/Books/ZopeBook/2_6Edition/AppendixC.stx. Working with Existing Templates To see the standard set of Plone templates, log in to the Zope Management Interface and click on your Plone instance in the navigation pane. Then navigate to the portal_skins object and click on it in the Workspace pane, and select the plone_templates object. You will see a list of files, as shown in Figure 7.1. Figure 7.1. Contents of the plone_templates directory. 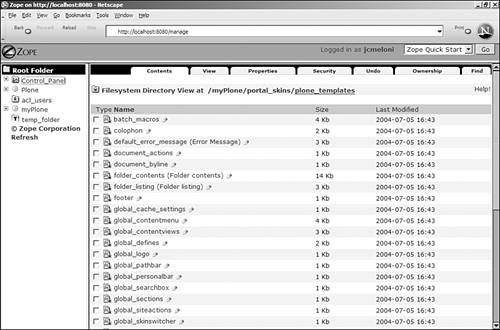
Tip The plone_templates directory is not the only place where templates are found. All of the objects in the plone_portlets directory are technically templates that control the various Plone slots. Other directories also might contain templates, placed there by add-ons to your Plone installation.
As you can see by the numerous templates in this listing, almost all aspects of Plone are compartmentalized into their own individual templates. For example, the search box found in the top right of the standard Plone template is controlled by the global_searchbox template. The contents of this template are detailed in Listing 7.1. Listing 7.1. Contents of the global_searchbox Template 1: <html xmlns="http://www.w3.org/1999/xhtml" xml:lang="en" lang="en" 2: i18n:domain="plone"> 3: <body> 4: <!-- THE SEARCHBOX DEFINITION --> 5: <div metal:define-macro="quick_search"> 6: <form name="searchform" 7: action="search" 8: tal:attributes="action string:${portal_url}/search" > 9: <label for="searchGadget" class="hiddenStructure" 10: i18n:translate="text_search">Search</label> 11: <input 12: name="SearchableText" 13: type="text" 14: size="20" 15: value="" 16: alt="Search" 17: title="Search" 18: accesskey="accesskeys-search" 19: i18n:attributes="alt accesskey title" 20: tal:attributes="value request/SearchableTextnothing; 21: tabindex tabindex/next" class="visibility:visible" /> 22: <input class="searchButton" 23: type="submit" 24: value="Search" 25: accesskey="accesskeys-search" 26: tal:attributes="tabindex tabindex/next" 27: i18n:attributes="value accesskey" /> 28: </form> 29: </div> 30: </body> 31: </html>
Zope templates always look like valid HTML documents, in that they contain the <HTML></HTML> tag pair as well as the <body></body> tag pair. Usually, templates always contain this amount of whitespace, with tag attributes each on separate lines, to make it easy for programmers to find exactly what they're looking for. Zope templates are nothing if not tidy. In this example, there might not be much that you'd ever want to change regarding the search box. You might want to change the length of the text field, from 20 to 30 or more (line 14). You might want to add text such as "Looking for something?" before the search field (at around line 6), or put the Submit button on a different line (put a few <br/> tags at the end of line 21). All of these things are done within this template, but in your own custom version. Tip If you've never seen the <br/> tag, don't be alarmed. It is simply an XHTML-compliant, strict version of the <br> (line break) tag.
You can create a custom version by clicking on the Customize button while viewing the read-only version of the template within the ZMI. An editable version is created that you can modify and then save in the Custom folder. The version in the custom folder overrides the standard template when Plone renders any page, but the standard template entry still is available if you want to revert to it. Any time you create a custom template, you can test its appearance by selecting the Test tab within the ZMI. However, for changes to take effect in the live Plone site, you need to restart Zope. Creating a New Plone Template Within the ZMI, creating a new Plone template is no different than adding a new image object or DTML document, for example. After you have logged in to the ZMI, select your Plone instance from the navigation pane and select Page Template from the drop-down list of items available to add. Press the Add button. You will see a form with two fields: Id and File . The Id field is required; it provides a name for your new template object. The optional File field can be used to upload content from an existing file on your file system. After you enter a value in the Id field, press the Add and Edit button to create the object. When the form is submitted, the resulting screen will be the editing form, shown in Figure 7.2. Figure 7.2. Editing the testing_template template. 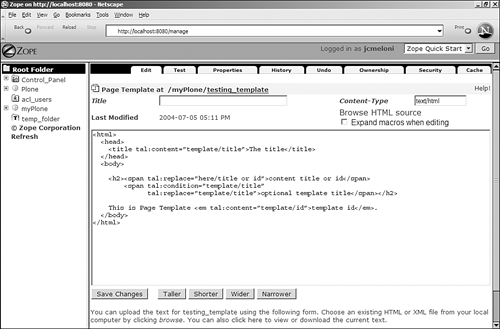
As you can see, a basic template framework was created for you during the addition process. This framework is shown in Listing 7.2. Listing 7.2. Template Framework 1: <html> 2: <head> 3: <title tal:content="template/title">The title</title> 4: </head> 5: <body> 6: <h2><span tal:replace="here/title_or_id">content title or id</span> 7: <span tal:condition="template/title" 8: tal:replace="template/title">optional template title</span></h2> 9: 10: This is Page Template <em tal:content="template/id">template id</em>. 11: </body> 12: </html>
To get a feel for creating your own template, start by editing the title, the form field at the top of the page that is currently blank. Use something similar to My Template, and then press the Save Changes button. You should see a message that your changes have been saved, and the editable form will still be in front of you. At lines 3, 6, 8, and 10, you can see TAL statements, which control which text actually is displayed when this template is rendered. In line 3, now that a title has been added, the text The title will be replaced with the content that you just entered in the form field called Title . In line 6, the text content title or id will be replaced with the Plone instance title or id , whichever is present. Note the difference between template/title in the TAL attribute in line 3 and the here/title value of the TAL attribute in line 6. Line 7 shows an example of a TAL condition statement. This condition says that if there is a value for template/title ”and there is because you added one earlier ”then replace the text optional template title with the actual text (line 8). Line 10 says to replace the text template id with the value of template/id , which you created when you added the new template. As you can see, HTML markup surrounds the TAL statements; the content title and template title printed in lines 6 and 8 are surrounded by the <H2></H2> tag pair. The template id printed in line 10 is surrounded by the <em></em> tag. Both of these tags are defined in the Plone style sheet, using elements stored in the base_properties file. Save your changes and then click on the Test tab. You will see the contents of your template with the appropriate text replaced by the referenced values. Figure 7.3 shows the new template, with the custom different values called out for easy identification. Figure 7.3. Viewing testing_template . 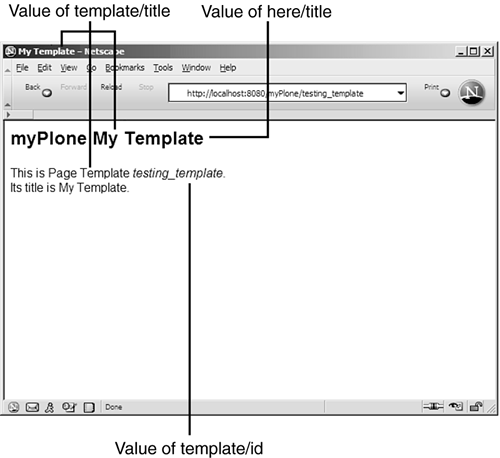
The goal of this brief example was simply to show how content in Plone is rendered via Plone templates and is not meant as a comprehensive example of all the things you can do with TAL. Two excellent tutorials for working with Zope page templates, written by Zope developer Evan Simpson, are an integral part of the Plone documentation set: -
Zope Page Templates ”Getting Started," at http://plone.org/documentation/zpt1 -
Zope Page Templates ”Advanced Usage," at http://plone.org/documentation/zpt2 Depending on the type of website and the level of customization required, a Plone developer might never have to create new templates or even modify existing ones ”you might be able to apply your corporate theme through the use of base_properties and the Plone style sheet. However, if you want to create your own dynamic slots or other content areas, or if you want to modify any of the existing Plone templates, spending time with the previously mentioned articles is highly recommended. The "Getting Started" article shows you how to use the basic attributes of TAL to display dynamic content. The "Advanced" article involves conditional programming and more advanced TAL syntax. |