49. Providing an External RSS Feed  SEE ALSO SEE ALSO
11 Enabling and Publishing Site Feeds 30 Identifying Elements in the Blogger Template Source
All Blogger users have the option to publish a site feed, as shown in 11 Enabling and Publishing Site Feeds. Although the feed published by Blogger is perfectly sufficient for feedreaders, providing an external feed from a company such as FeedBurner allows you to track circulation and usage, increase awareness of your blog content, and utilize additional tools for commerce-related activities. The following steps outline the process of publishing an external site feed through the FeedBurner service. Before you begin, log in to Blogger and click the Change Settings icon in the Blogs section of the Blogger Dashboard. Click the Settings tab, and then click Site Feed in the subnavigational elements. Verify that Publish Site Feed is set to Yes, and then copy the value of the Site Feed URL. This URL is typically in the format http://yourblog.blogspot.com/atom.xml, such as http://bloggerinasnap.blogspot.com/atom.xml. 1. | Start the FeedBurner Process by Entering Your Blog URL
Armed with your blog's site feed URL, go to the main FeedBurner page at http://www.feedburner.com/ and enter your blog's site feed URL in the Your Blog or Feed Address field, as shown in the figure. Click the Next button to continue the registration process.
49. Providing an External RSS Feed  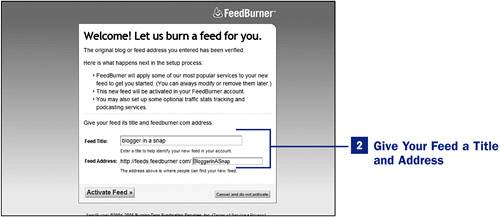 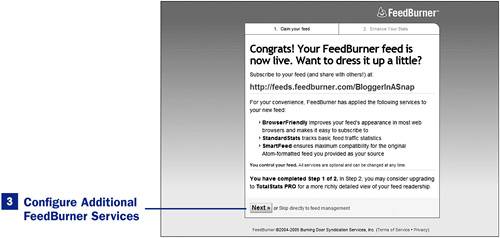 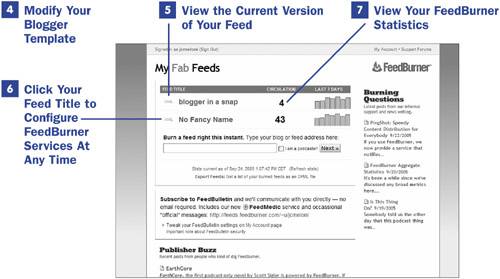
| 2. | Give Your Feed a Title and Address
FeedBurner will retrieve your site feed from the URL provided in the previous step. FeedBurner will suggest a Feed Title and Feed Address based on this retrieved feed and place the suggested text in the appropriate text fields. If you would like to change either field, simply delete the prepopulated text and type your own text in the text fields. When you have completed these actions, click the Activate Feed button.
 NOTE NOTE
If FeedBurner encounters multiple feeds when attempting to retrieve a feed from the URL you provided in step 1, you will be asked to confirm which feed you would like to burn before moving on to the next step, shown here. | 3. | Configure Additional FeedBurner Services
After you click the Activate button at the end of step 2, you will be prompted to continue configuring FeedBurner services. FeedBurner provides a plethora of options to its users, beginning with two levels of statistics packages. If you are a statistics junkie or you are using your blog for business purposes, consider spending a few dollars each month for the Total Stats PRO package. Even though a basic FeedBurner account includes a statistics package that reports your daily feed circulation numbers, complete with a breakdown of the feed readers used, the Total Stats PRO package includes detailed item popularity and statistics related to feed resyndication. To configure an additional statistics package, click the Next button.
If you do not want to configure an additional statistics package, follow the Skip Directly to Feed Management link to view and configure even more features of your FeedBurner feed. These features are broken into several categories: Analyze, Publicize, Optimize, and Monetize. You can modify your configuration settings at this point in the process or at any time hereafter.
NOTE At this point you will be asked to create an account with a username and password, or to log in with existing account credentials. When you have done so, click the Next button to continue the registration process. | 4. | Modify Your Blogger Template
After your FeedBurner feed has been activated, you must modify your Blogger template to include a link to your new feed. First open a new browser window and visit your blog main page. Using the View Source feature of your web browser of choice, view the source code for your blog's index page. Look at the top of your blog source code, and you should see several <meta> and <link> tags, something like the ones here:
<meta http-equiv="Content-Type" content="text/html; charset=UTF-8" /> <meta name="MSSmartTagsPreventParsing" content="true" /> <meta name="generator" content="Blogger" /> <link rel="alternate" type="application/atom+xml" title="your title" href="http://yourblogurl/atom.xml" /> <link rel="service.post" type="application/atom+xml" title="your blog title" href="https://www.blogger.com/atom/yourblogID" /> <link rel="EditURI" type="application/rsd+xml" title="RSD" href="http://www.blogger.com/rsd.g?blogID=yourblogID" />
Copy this entire snippet from your source code. Then access the Blogger template editor by logging in to Blogger, clicking on the Change Settings icon in the Blogs section of the Blogger Dashboard, and then clicking on the Template tab. Find a Blogger template tag that looks like this:
<$BlogMetaData$>
Remove that line, and replace it with the source code you copied. Then add the following additional code:
<link rel="alternate" type="application/rss+xml" title="RSS" href="http://feeds.feedburner.com/YourFeedName" />
Save your template and republish your entire blog, and your new external FeedBurner feed will be available for auto-discovery.
| 5. | View the Current Version of Your Feed
After completing the registration process, and anytime you log in to FeedBurner thereafter, you will be redirected to your personal FeedBurner home page. Follow the XML link to take a look at the current version of your FeedBurner feed, which can alert you to any inconsistencies or errors in its display.
| 6. | Click Your Feed Title to Configure FeedBurner Services At Any Time
Click the linked version of your feed title to view all the various services and options available to you. Give some a try; most are available to free accountholders. If you do not like a service, you can always deselect it.
If you select no other FeedBurner options, go to the Publicize options and click the Chicklet Chooser link. Use this option to generate HTML code to publicize your FeedBurner feed, which you can then place in your Blogger template.
| 7. | View Your FeedBurner Statistics
Click the number in the Circulation column to view the circulation statistics for your FeedBurner feed. These statistics show you the number of individuals reading your feed, the hits from your feed, and the feedreaders used to access your feed. Users who have the Total Stats PRO package will have additional circulation information available to them in this area.
|
|