10. Setting Up Blogger Archives  BEFORE YOU BEGIN BEFORE YOU BEGIN
4 Logging In to Blogger and Navigating the Dashboard
 SEE ALSO SEE ALSO
30 Identifying Elements in the Blogger Template Source
Your blog consists of not only the posts on your main page, but also the pages and pages of posts that make up your archives. In this small group of settings, you can modify the time frame for your archives, as well as enable a setting that creates attractive permalinks for your individual blog posts.  KEY TERM KEY TERM
Permalinks "Permanent links" created for individual blog posts. Permalinks allow you to provide direct access to individual blog posts rather than saying something like "go to the entry for June 27th, 2005 and look for the third post."
To begin, log in to Blogger and click the Change Settings icon in the Blogs section of the Blogger Dashboard. 1. | Click the Settings Tab
The Blogger user interface includes four top-level tabs. Click the Settings tab to display links to the numerous configurable options. The Basic link will be preselected for you, so click the Archiving link to access the archiving settings.
10. Setting Up Blogger Archives 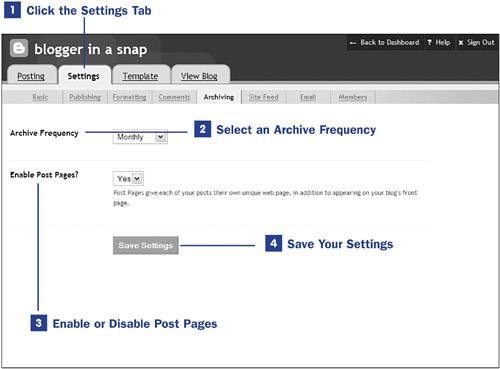
| 2. | Select an Archive Frequency
You can create daily, weekly, or monthly archives by selecting the corresponding entry from the Archive Frequency drop-down list. In this example, I have selected Monthly archives so that all my posts from a particular month are grouped together as one large page of archived posts.
| 3. | Enable or Disable Post Pages
Post pages are enabled by selecting Yes from the Enable Post Pages? drop-down list. By doing so, you ensure that each individual blog entry will be given a permalink that contains either the post title or the first few words of the post (if no title exists). For instance, I have a post called "Busy Busy Busy" on my primary blog and, with post pages enabled, the permalink to the post is http://nofancyname.blogspot.com/2005/07/busy-busy-busy.html. If post pages were disabled, the permalink URL would be the domain name, plus the archive page name (2005_07_01_nofancyname_archive.html) with an ID value appended to it (something like #8792878374387). As you can imagine, post pages provide much tidier URLs.
WEB RESOURCE http://www.tinyurl.com/ Using the tinyURL website or browser plug-in, you can turn any long URL into a short URL that never expires. Although Blogger post pages are easier to deal with than permalinks created without post pages enabled, they're still pretty long. I turned the URL to my "Busy Busy Busy" post referenced earlier into this tiny URL: http://tinyurl.com/cwlfs. It doesn't make any sense, but it sure is shorter! | 4. | Save Your Settings
To save the changes made on the Archiving settings screen, click the Save Settings button. You will see an onscreen confirmation when the settings are saved, and at that point you must click the Republish button to initiate the publishing sequence. When the publishing sequence displays its notice of completion, you can navigate away from the Blogger user interface and view your blog or work with other settings.
|
|