Customizing Tables
As you might already know, a table is a spreadsheet-like presentation of project data, organized into vertical columns and horizontal rows. Each column represents one of the many fields in Project, and each row represents a single task or resource (or in usage views, an assignment). The intersection of a column and a row can be called a cell (if you’re oriented toward spreadsheets) or a field (if you think in database terms).
Project includes several tables that can be applied in views. You’ve already used some of these tables, such as the Entry table and the Summary table. Chances are that these tables will contain the fields you want most of the time. However, you can modify any predefined table, or you can create a new table that contains only the data you want.
In this exercise, you create a table to display the information found on a shooting schedule, a common format for presenting schedule information in film projects.
-
On the View menu, click More Views.
The More Views dialog box appears.
-
Click Task Sheet, and then click the Apply button.
Project displays the Task Sheet view.
-
On the View menu, point to Table: Entry, and then click More Tables.
The More Tables dialog box appears:
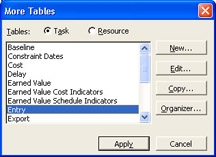
In this dialog box you can see all the available predefined tables for tasks (when in a task view) and resources (when in a resource view).
-
Make sure that Task is the active option, and then in the list of tables, make sure that Entry is selected.
-
Click the Copy button.
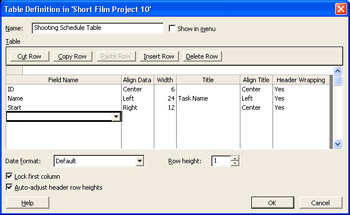
The Table Definition in dialog box appears.
-
In the Name box, type Shooting Schedule Table.
Next you will remove several fields, add others, and then put the remaining fields in the order you want.
-
In the Field Name column, click each of the following field names, and then click the Delete Row button after clicking each field name:
Indicators
Duration
Finish
Predecessors
Resource NamesAfter you’ve deleted these fields, your screen should look similar to the following:
Next you will add some fields to this table definition.
-
In the Field Name column, click the down arrow in the next empty cell below Start, and then select Cast (Text9) from the drop-down list.
-
In the Align Data column in the same row, click Left.
As soon as you click in the Align Data column, Project completes row entries for the Cast field name by adding data to the Width and Align Title columns.
-
In the Width column, type or click 25.
-
In the Field Name column in the next empty row below Cast, click Location (Text10) in the drop-down list.
-
In the Align Data column, click Left.
-
In the Width column, type or click 15.
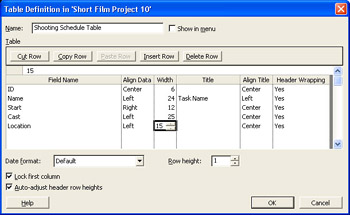
The two customized text fields Cast (Text9) and Location (Text10) contain the character names and film locations for the shooting tasks. These were previously customized in the project plan.
The remaining work to complete this table definition is to reorder the fields to match the order commonly found on a shooting schedule.
-
In the Field Name column, click Start, and then click the Cut Row button.
-
In the Field Name column, click Name, and then click the Paste Row button.
-
In the Date Format box, click 1/28/02 12:33PM.
Your screen should look similar to the following illustration:
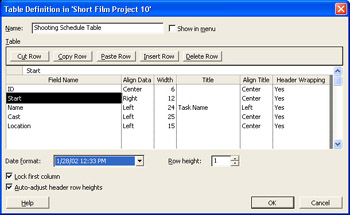
This matches the order in which information is commonly listed on a film-shooting schedule.
-
Click OK to close the Table Definition in dialog box.
The new table appears in the More Tables dialog box.
-
Click the Apply button.
Project applies the new table to the Task Sheet view. If the Start column displays pound signs (###), double-click the column heading’s right edge to widen it.

In the next section, you will combine the custom filter with this custom table to create a shooting schedule view for the film project.
| Tip | To learn more about the tables available in Project, type Available tables into the Search box in the upper right corner of the Project window. |
EAN: 2147483647
Pages: 199