Customizing Views
Nearly all work you perform in Project occurs in a view. A view might contain elements such as tables, groups, and filters. You can combine these with other elements (such as a timescaled grid in a usage view) or with graphic elements (such as the graphic representation of tasks in the chart portion of the Gantt Chart view).
Project includes dozens of views that organize information for specific purposes. You might find that you need to see your project information in some way not available in the predefined views. If Project’s available views don’t meet your needs, you can edit an existing view or create your own view.
In this exercise, you create a film-shooting schedule view that combines the custom filter and custom table you created in the previous sections. The view you create will more closely match a standard format used in the film industry.
-
On the View menu, click More Views.
The More Views dialog box appears:
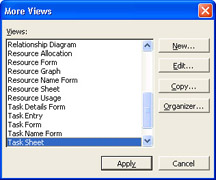
In this dialog box you can see all the predefined views available to you.
-
Click the New button.
The Define New View dialog box appears. Most views occupy a single pane, but a view can consist of two separate panes.
-
Make sure Single View is selected, and then click OK.
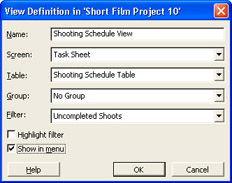
The View Definition in dialog box appears.
-
In the Name box, type Shooting Schedule View.
-
In the Screen box, select Task Sheet from the drop-down list.
-
In the Table box, select Shooting Schedule Table from the drop-down list.
The specific tables listed in the drop-down list depend on the type of view you selected in step 5: task-related tables or resource-related tables.
-
In the Group box, select No Group from the drop-down list.
The specific groups listed in the drop-down list depend on the type of view you selected in step 5.
-
In the Filter box, select Uncompleted Shoots from the drop-down list.
The specific filters listed in the drop-down list depend on the type of view you selected in step 5.
-
Select the Show in menu check box.
-
Click OK to close the View Definition in dialog box.
The new view appears and should be selected in the More Views dialog box.
-
Click the Apply button.
Project applies the new view. Your screen should look similar to the following illustration:
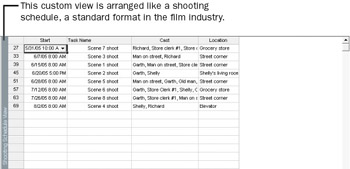
Now only uncompleted shoots are displayed, and the fields appear in an order consistent with a standard shooting schedule for a film project. Also, Project added the Shooting Schedule view to the View menu. This view will be saved with this Project plan, and you can use it whenever you want.
To conclude this exercise, you will adjust row height and column width to display some information that is not currently visible.
-
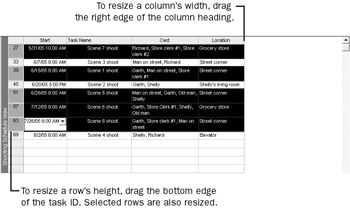
While holding down the [Ctrl] key, click the task ID numbers for tasks 27, 39, 51, 57, and 63.
In each of these selected rows, the names in the Cast column exceed the width of the column.
-
Drag the bottom edge of the task ID for task 27 down approximately one row.
Tip While dragging the edge of the task ID, look at the status bar in the lower left corner of the Project window. The status bar indicates the new row height as you drag the edge of the task ID.
Project resizes the selected rows.
-
Double-click the right edge of the Location column heading.
Project resizes the column width to accommodate the widest value in the column. Your screen should look similar to the following illustration:
| Tip | To learn more about working with views and the views available in Project, type About views into the Search box in the upper right corner of the Project window. |
CLOSE: the Short Film Project 10 file.
EAN: 2147483647
Pages: 199