Maintenance: An Ounce of Prevention
|
|
In my experience, folks tend to fall into two types of categories with regard to PC maintenance: those who maintain their PCs perfectly with never a file out of place or a hint of dust in the keyboard spaces and those—like myself—who operate on the chaos principle that leaves them having to clean up after their slovenly ways.
Maintaining Software
Walk into the utility section of any large software or computer store and you’ll likely find at least a half dozen choices for programs that promise to make your system easier to manage or otherwise take care of some important function you may not know how to do. Likewise, many online download sites offer both free software as well as demos and shareware versions of some utilities.
Some of the functions these packages perform include:
-
Finding and removing duplicate files
-
Removing unused software and device drivers
-
Executing performance tests on various parts of your system, including memory, video, and hard drive tests
-
Disk cleanup and optimization (where the drive’s file storage gets rebuilt for better organization)
-
Scanning for and removing viruses or other contaminants
Warning Make sure that any utilities you use specifically state that they work with your version of Windows. Utilities written for earlier versions of Windows may not load at all; if they do, they can sometimes have catastrophic effects because of incompatibilities with the operating system.
Exactly which packages you want to have for your maintenance collection depends on your needs.
Certainly, the most important needs here are removing unused software (which you can do yourself through Add/Remove Programs in Control Panel), disk cleanup and optimization, and virus scanning. Of the two functions you need software to handle, disk cleanup and optimization is available in Windows itself, as you’ll learn in the next section. This leaves you with the need for anti-virus software, which I’ll discuss later in this chapter.
| Note | While today’s hard drives make it possible to store an incredible amount of material, be careful about clogging your system up with thousands of temporary files created as interim working files while you’re working in applications and utilities, as well as when you’re browsing the Internet. |
Disk Maintenance Utilities that Come with Windows
Let’s take a moment to look at some of the software that comes with Windows to help you maintain the file structure health of your hard drive, one of the hardest working pieces of hardware on your system.
The three major tools—most of them scaled-down versions of other products—included in Windows XP (and most other versions of Windows) are
-
CHKDSK (for Check Disk) in Windows XP and ScanDisk for Windows Millennium and earlier
-
Disk Cleanup
-
Disk Defragmenter (disk optimizer)
ScanDisk
As its name implies, the job of ScanDisk is to look carefully at the overall structure and working of your hard drive and analyze it for problems. ScanDisk runs automatically on the next start whenever your system hasn’t shut down properly. An improper shutdown is one of the culprits in creating file and disk confusion since not all open files may get saved and closed before the system is turned off or restarted. You should always let ScanDisk run to completion when this occurs because it may save you from experiencing problems with files or the drive itself.
In earlier versions of Windows, ScanDisk is available as an option under the System Tools menu (from Windows Start Ø Programs Ø Accessories). In Windows XP, ScanDisk isn’t directly supported, having been replaced by an updated version of an older tool called CHKDSK (for Check Disk), which I’ll tell you about in later chapters when we talk about more serious drive issues.
| Tip | If you’re eager to check out CHKDSK before we get to it, go to Windows Start, choose Help & Support, and search for “CHKDSK” to get a list of switches and options available to you when using it. |
Disk Cleanup
Are you one of the roughly 20–40 percent of users who opt to use special disk cleanup software such as Clean Sweep or the cleanup tools in Norton System Works to remove temporary, duplicate, and no-longer-needed files? It’s understandable why these packages seem attractive because your system works with hundreds of more files than you create yourself. It makes it impossible to know all the files that install with each program, let alone know for sure which ones you still need and which ones you can safely toss.
Yet my experience in working with people who’ve watched these programs remove vital files and cause incapacitating system problems keeps me from recommending them. It’s not that these utilities themselves are bad or necessarily work improperly. It is, however, tough for any software to be able to get this delicate process of sorting out the needed files from the not-perfect files each time it’s run. After all, almost every PC is different in its hardware, its software, how you’ve configured them for use, and so on. This type of software often has to make an educated guess on what you should dump, and sometimes it guesses wrong.
You can opt instead to use the simpler Disk Cleanup included in Windows Start Ø Programs Ø Accessories Ø System Tools Ø Disk Cleanup, which cleans up temporary Internet files, other temporary files on your disk created while using applications, and any unneeded/unused components. You can also empty the files in your Recycle Bin (the repository of files deleted in Windows) from Disk Cleanup.
| Note | If the temporary Internet files grow to represent a large number of files, they can interfere with your disk operation but more likely, they’ll interfere with your ability to move about easily in your Web browser. |
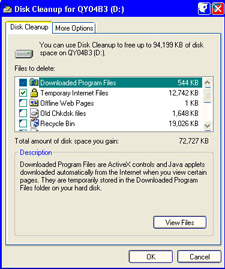
Let’s say you want to remove all your temporary Internet files from your C drive. You take the following steps:
-
From Windows Start, select Programs Ø Accessories Ø System Tools Ø Disk Cleanup.
-
From Disk Cleanup, select the drive you want to clean (choose C:) and click OK.
-
From the Disk Cleanup tab, click to check Temporary Internet Files in the list of available cleanup options (any other files checked will also be processed). You can click View Files to see what’s included in your temporary Internet files, too. Then click OK.
-
When asked to confirm your choice, click OK.
Disk Defragmenter
-
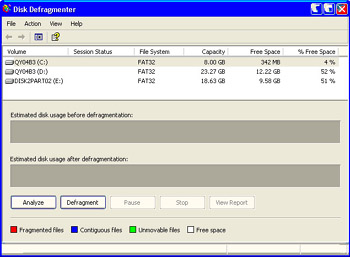
Quit all open programs and files. Any open files or programs can cause Disk Defragmenter to repeatedly stop and restart its processing.
-
From Windows Start, choose Programs Ø Accessories Ø System Tools Ø Disk Defragmenter.
-
From the Disk Defragmenter window, select the drive you want to check, and then click one of the following options:
Analyze Look at the hard drive without moving files.
Defragment Analyze and begin moving files for optimization.
Task Scheduler
You don’t have to work at remembering to perform certain tasks as part of basic maintenance. You can use Scheduled Tasks in Windows to automate these jobs and many other functions.
Let’s walk through an example of the steps you need to take to automate your disk cleanup so that it happens once a week:
-
From Windows Control Panel, choose Scheduled Tasks.
-
From Scheduled Tasks, click Add Scheduled Task, which initiates the wizard to help step you through. Click Next.
-
Select the program you want to run (Disk Cleanup) from the list of applications provided. Click Next.
-
Provide a custom name for the task (if desired) and click the desired frequency at which you want to run Disk Cleanup (weekly). Click Next.
-
Select your start time and the day of the week you want this task to run.
-
Click Finish.
Maintaining Hardware
Believe it or not, one of the best things you can do to maintain your hardware is to keep your PC work area physically clean. The less dust, debris, smoke, and food in the area, the better.
| Tip | Always keep hardware not currently in use stored in its anti-static bag or case to prevent dust, dirt, and moisture from collecting on it. Never install a dusty or dirty part into the PC. |
On a regular basis you should clean around the PC, performing at least these basic chores:
-
Promptly remove any food, dishes, or liquids.
-
Overturn the keyboard to let dust and debris shake out into a wastebasket.
-
Wipe the monitor screen down with a soft, dry, dust-free cloth. You can buy screen wipes but you may need to shop around to find a type you like and that doesn’t produce streaks.
-
Make sure nothing is blocking the PC vents (including the vents on the monitor and any peripherals). If the vents appear dusty, remove the dust with the PC off so the loose dust isn’t sucked into the case.
-
Again with the PC off, remove dust and debris from the vicinity of the desk/workstation area.
-
Store loose disks away in their proper locations; you should wipe dusty CDs and DVDs down with a soft, dry cloth.
-
Wipe down the mouse pad and check the bottom of the mouse for dust or debris.
-
Keep cables and cords organized and out of the way; use twine or non-metal ties to secure them, if desired.
Note Chapter 11, “Avoiding Power and Overheating Problems,” describes how to clean inside your PC to make sure dust isn’t heating up your adapters and your fans aren’t blocked by debris. This should be done at least once a year, and more often if you operate the PC in an environment with a lot of smoke, grease, dirt, or particulate matter.
|
|
EAN: 2147483647
Pages: 140