Working with E-mail Safely and Securely
E-mail is by far the most popular online activity, but it can also be the most frustrating in terms of security and privacy. E-mail viruses are legion; spam gets worse every day; and messages that should be secret are really about as secure as if they were written on the back of a postcard. Fortunately, it doesn’t take much to remedy these and other e-mail problems, as you’ll see over the next few sections.
Protecting Yourself Against E-mail Viruses
Until just a few years ago, the primary method that computer viruses used to propagate themselves was the floppy disk. A user with an infected machine would copy some files to a floppy, and the virus would surreptitiously add itself to the disk. When the recipient inserted the disk, the virus copy would come to life and infect yet another computer.
When the Internet became a big deal, viruses adapted and began propagating either via malicious Web sites or via infected program files downloaded to users’ machines.
Over the past couple of years, however, by far the most productive method for viruses to replicate has been the humble e-mail message. Melissa, I Love You, BadTrans, Sircam, Klez—the list of e-mail viruses and Trojan horses is a long one, but they all operate more or less the same way: They arrive as a message attachment, usually from someone you know. When you open the attachment, the virus infects your computer and then, without your knowledge, uses your e-mail client and your address book to ship out messages with more copies of itself attached. The nastier versions will also mess with your computer; they might delete data or corrupt files, for example.
You can avoid getting infected by one of these viruses by implementing a few commonsense procedures:
-
Never open an attachment that comes from someone you don’t know.
-
Even if you know the sender, if the attachment isn’t something you’re expecting, assume the sender’s system is infected. Write back and confirm that he or she sent the message.
-
Install a top-of-the-line anti-virus program, particularly one that checks incoming e-mail.
Besides these general procedures, Microsoft Outlook Express also comes with its own set of virus protection features. Here’s how to use them:
-
In Outlook Express, select Tools, Options.
-
Select the Security tab.
-
In the Virus Protection section of the dialog box, you have the following options:
-
Select The Internet Explorer Security Zone To Use Later in this chapter we describe the security zone model used by Outlook Express (see “Surfing the Web Securely”). From the perspective of Outlook Express, you use the security zones to determine whether active content inside an HTML-format message is allowed to run:
-
Internet Zone If you choose this zone, active content is allowed to run.
-
Restricted Sites ZoneIf you choose this option, active content is disabled. This is the default setting, and it’s the one we recommend.
-
-
Warn Me When Other Applications Try To Send Mail As Me. As we mentioned earlier, it’s possible for programs and scripts to send e-mail messages without your knowledge. This is done using Simple MAPI calls (MAPI is an acronym for Messaging Application Programming Interface), which can be used to send messages via the default mail client, and it’s all hidden from the user. When this check box is selected, Outlook Express displays a warning dialog box (see Figure 14-1) when a program or script attempts to send a message using Simple MAPI. Click Send to allow the message; click Do Not Send to cancel the message.
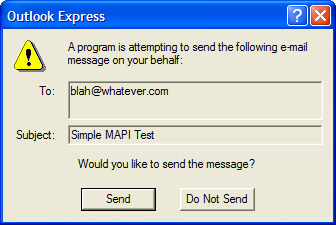
Figure 14-1: : Outlook Express warns you if a program or script uses Simple MAPI to attempt to send a message.Caution Selecting the Warn Me When Other Applications Try To Send Mail As Me option protects you against scripts that attempt to send surreptitious messages using Simple MAPI calls. However, there’s another way to send messages behind the scenes. It’s called Collaboration Data Objects (CDO), and it’s installed by default in Windows XP. Here’s a sample script that uses CDO to send a message:
Dim objMessage Set objMessage = CreateObject("CDO.Message") With objMessage .To = "you@there.com" .From = "me@here.com" .Subject = "CDO Test" .TextBody = "Just testing..." .Send End With Set objMessage = NothingThe Warn Me When Other Applications Try To Send Mail As Me option does not trap this kind of script, so bear in mind that your system is still vulnerable to Trojan horses that send mail via your Windows XP accounts.
-
Do Not Allow Attachments To Be Saved Or Opened That Could Potentially Be A Virus When this check box is selected, Outlook Express monitors attachments to look for file types that could contain viruses or destructive code. If it detects such a file, it halts the ability to open or save that file, and it displays a note at the top of the message to let you know about the unsafe attachment, as shown in Figure 14-2.
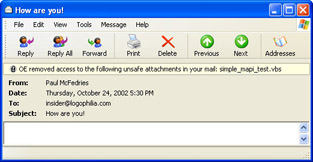
Figure 14-2: : If Outlook Express detects an unsafe file attachment, it displays a notice at the top of the message to let you know that you do not have access to the file.Insider Secret The file types that Outlook Express disables are defined by Microsoft Internet Explorer’s built-in unsafe-file list. This list includes file types associated with the following extensions: .ad, .ade, .adp, .bas, .bat, .chm, .cmd, .com, .cpl, .crt, .exe, .hlp, .hta, .inf, .ins, .isp, .js, .jse, .lnk, .mdb, .mde, .msc, .msi, .msp, .mst, .pcd, .pif, .reg, .scr, .sct, .shb, .shs, .url, .vb, .vbe, .vbs, .vsd, .vss, .vst, .vsw, .wsc, .wsf, .wsh.
-
-
Click OK to put the new settings into effect.
Filtering Out Spam
Spam—unsolicited commercial messages—has become a plague upon the earth. Unless you’ve done a masterful job at keeping your address secret, you probably receive at least a few spam e-mail messages every day, and it’s more likely that you receive a few dozen. The bad news is most experts agree that it’s only going to get worse. And why not? Spam is one of the few advertising mediums where the costs are substantially borne by the users, not the advertisers.
| Insider Secret | The best way to avoid spam is to not get on a spammer’s list of addresses in the first place. That’s hard to do these days, but there are some steps you can take. First, never use your actual e mail address in a newsgroup account. The most common method that spammers use to gather addresses is to harvest them from newsgroup posts. Many people munge their e-mail address by adding text that invalidates the address but is still obvious for other people to figure out: user@myisp.remove_this_to_email_me.com Also, when you sign up for something online, use a fake address if possible. If you need or want to receive e-mail messages from the company and so must use your real address, make sure you clear any options that ask if you want to receive promotional offers. Alternatively, enter the address from a free Web-based account (such as an MSN Hotmail account), so that any spam you receive will go there instead of to your main address. Finally, if you create Web pages, never put your e-mail address on a page, because spammers use crawlers that harvest addresses from Web pages. If you must put an address on a page, hide it using some simple JavaScript code: <script language="JavaScript" type="text/javascript"> <!-- var add1 = "webmaster" var add2 = "@" var add3 = "whatever.com" document.write(add1 + add2 + add3) //--> </script> |
There are a host of commercial “spam-killers” on the market, but with a bit of work you should be able to eliminate most spam by using nothing more than the built-in tools available in Outlook Express. We’re talking specifically about using rules: conditions that look for messages with specific characteristics—for example, certain words in the subject or body—and actions that do something with the matching messages—such as delete them.
To filter spam, your rules need to look for incoming messages that meet one or more of the following criteria:
-
Specific words in the Subject line he sneakier spammers hide their messages behind innocuous Subject lines such as “Here’s the information you requested.” But most spam comes with fairly obvious Subject lines: “Make $$$Money Now!!!” or “FREE Business Cards.” Instead of creating a rule based on an entire Subject line, you need only to watch for certain key words. Here are a few that we use (we’ve removed some of the more explicit terms that filter out pornographic spam):
!!!!!!!, $, %, .name, 18+, adult, adv, are you in debt, bargain, be 18, bulk, buy recommendation, cartridges, casino, collect your money, credit card, credit rating, creditor, debts, dieting, diploma, double your money, dvd movies, e-mail marketing, erotic, excite game, f r e e, find out anything, flash alert, free cell, free credit, free pda, free phone, free trial, free vacation, free!, freee, get out of debt, got debt, guaranteed!, hair loss, hormone, how to make money, increase your sales, klez, loans, lose up to, lose weight, lose while you sleep, losing sleep, low on funds, marketing services, maximize your income, millionaire, mlm, mortgage, new car, over 18, over 21, printer cartridge, promote your business, reach millions, reduce your debt, refinance, refinancing, s e x, satellite, saw your site, secure your future, seen on tv, sex, singles, snoring, steroids, stock alert, thinning hair, too good to be true, trading alert, trading report, uncover the truth, urgent notice, viagra, web traffic, work at home, work from home, xxx, years younger, you are a winner, you have to see this
-
Specific words in the message body The message body is where the spammer makes his or her pitch, so there’s rarely any subterfuge here. You can filter on the same terms as you used for the Subject line, but there are also a few telltale terms that appear only in spam messages. Here are some that we use:
///////////////, 100% satisfied, adult en, adult web, adults only, cards accepted, check or money order, dear friend, extra income, for free!, for free?, satisfaction guaranteed, money-back guarantee, one-time mail, order now!, removal instructions, special promotion
-
Specific names in the From line any spammers spoof their From address by using a random address or, more likely, an address plucked from their distribution list. However, some use addresses that have a common theme, such as “sales@” (for example, sales@blah.com). Here are some common From line names to filter:
@mlm, @public, @savvy, ebargains, free, hello@, link2buy, mail@, profits@, sales@, success, success@
-
Specific names in the To line The To line of spam messages usually contains either an address from the distribution list or “Undisclosed Recipients.” You can’t filter on the latter, however, because many legitimate mailings also use that “address.” However, there are a few common To line names to watch for:
anyone@, creditcard@, free@, friend, friend@, nobody@, opportunity@, public@, success@, winners@
If you notice that a particular address is the source of much spam, the easiest way to block the spam is to block all incoming messages from that address. You can do this using the Outlook Express Blocked Senders list, which watches for messages from a specific address and deletes them automatically. To use this feature, follow these steps:
-
Select a message that comes from the address you want to block.
-
Select Message, Block Sender. Outlook Express adds the address to the Blocked Senders list and asks if you want to delete all messages from that address.
-
Click Yes to delete the messages, or click No to leave them in the folder.
To view the Blocked Senders list, select Tools, Message Rules, Blocked Senders List. Outlook Express opens the Message Rules dialog box and displays the Blocked Senders tab. From here, you can Add another blocked sender, or Modify or Remove an existing blocked sender.
For other types of spam, you need to set up mail rules. Here’s how:
-
Select the Tools, Message Rules, Mail command. Outlook Express displays the New Mail Rule dialog box.
-
In the Select The Conditions For Your Rule list, select the check box beside the rule condition you want to use to label a message as spam. Outlook Express adds the condition to the Rule Description text box, as shown in Figure 14-3. Note that you’re free to select multiple conditions.
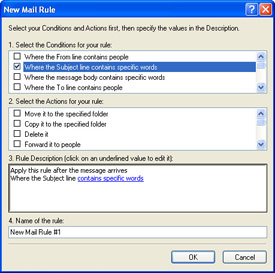
Figure 14-3: : Use the New Mail Rule dialog box to set up a mail rule for filtering incoming messages. -
The condition shown in the Rule Description text box will probably have some underlined text. You need to replace that underlined text with the specific criterion you want to use (such as a word or an address). To do that, click the underlined text to display the Type Specific Words dialog box.
-
Enter the word or phrase and click Add. Most conditions support multiple criteria (such as multiple addresses or multiple words in a Subject line), so repeat this step as necessary. When you’re done, click OK.
Insider Secret You can make a condition adhere to Boolean principles such as AND, OR, and NOT. To do this, click the Options button in the Type Specific Words dialog box. To make a NOT condition, select the Message Does Not Contain The Words Below option. If you entered multiple words or phrases, you can make an AND criterion by selecting the Message Matches All Of The Words Below option; to make an OR criterion, select the Message Matches Any One Of The Words Below option.
-
In the Select The Actions For Your Rule list, select the check box beside the action you want Outlook Express to take with messages that meet your criteria. With spam, for example, you’ll probably want to choose the Delete It option. Again, you may have to click underlined text in the Rule Description text box to complete the action. Also, you can select multiple actions.
-
If you selected multiple conditions, Outlook Express assumes that all the conditions must be true before invoking the rule (Boolean AND). To change this, click the And link in the Rule Description text box, select the Messages Match Any One Of The Criteria option, and click OK.
-
Use the Name Of The Rule text box to enter a descriptive name for the rule.
-
Click OK. Outlook Express displays the Mail Rules tab of the Message Rules dialog box. Click OK to close the dialog box and enable your e-mail filter.
Here are a few notes to bear in mind when working with the list of rules on either the Mail Rules tab or the News Rules tab:
-
Toggling rules on and off Use the check box beside each rule to turn the rule on and off.
-
Setting rule order Some rules should be processed before others. For example, if you have a rule that deletes spam, you want Outlook Express to process that rule before sending out, say, a vacation reply. To adjust the order of a rule, select it and then click either Move Up or Move Down.
-
Modifying a rule To edit a rule, select it and click Modify.
-
Applying a rule If you want to apply a rule to existing Inbox messages or to messages in a different folder, click Apply Now in the Message Rules dialog box. Select the rule you want to apply (or click Select All to apply them all). To choose a different folder, click Browse. When you’re ready, click Apply Now in the Apply Mail Rules Now dialog box.
-
Deleting a rule Select the rule and click Remove. When Outlook Express asks if you’re sure, click Yes.
Maintaining Your Privacy While Reading E-mail
You wouldn’t think that the simple act of reading an e-mail message would have privacy implications, but you’d be surprised. There are actually two scenarios that compromise your privacy:
-
Read receipts A read receipt is an e-mail notification that tells the sender that you’ve opened the message that he or she sent you. If the sender requests a read receipt and you either select the message (so that the message text appears in the preview pane) or double- click the message to open it, by default Outlook Express displays the dialog box shown in Figure 14-4. Click Yes to send the receipt, or click No to skip it. Many people like asking for read receipts because they offer “proof of delivery.” It has been our experience, however, that getting a read receipt back starts a kind of internal clock that the sender uses to “measure” how long it takes you to respond after reading the message. Because of this annoyance, and because we feel it’s nobody’s business to know when one reads a message, we always click No when asked to send a read receipt. In fact, you can go one better and tell Outlook Express to never send a read receipt. To do this, select Tools, Options and select the Receipts tab. In the Returning Read Receipts section of the dialog box, select the Never Send A Read Receipt option.
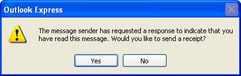
Figure 14-4: : You see this dialog box when you open a message for which the sender has requested a read receipt. -
Web bugs A Web bug is an image that resides on a remote server and is added to an HTML-formatted e-mail message by referencing a URL on the remote server. When you open the message, Outlook Express uses the URL to download the image for display within the message. That sounds harmless enough, but if the message is junk e mail, it’s likely that the URL will also contain either your e-mail address or a code that points to your e-mail address. When the remote server gets a request for this URL, it knows not only that you’ve opened their message but also that your e-mail address is legitimate. If you’ve installed Internet Explorer 6 Service Pack 1 or later, there’s a way to thwart Web bugs. In Outlook Express, select Tools, Options and select the Read tab. Select the Read All Messages In Plain Text check box. This prevents Outlook Express from downloading any Web bugs because it displays all messages in plain text.
Sending and Receiving Secure E-mail
When you connect to a Web site, your browser sets up a direct connection— called a channel—between your machine and the Web server. Because the channel is a direct link, implementing security is relatively easy because all you have to do is secure the channel, which is what Private Communication Technology (PCT) and Secure Sockets Layer (SSL) do.
However, e-mail security is entirely different and much more difficult to set up. The problem is that e-mail messages don’t have a direct link to a Simple Mail Transfer Protocol (SMTP) server. Instead, they must usually “hop” from server to server until the final destination is reached. Combine this with the open and well-documented e-mail standards used on the Internet, and you end up with three e-mail security issues.
-
The privacy issue Because messages often pass through other systems and can even end up on a remote system’s hard disk, it isn’t that hard for someone with the requisite know-how and access to the remote system to read a message.
-
The tampering issue Because a user can read a message passing through a remote server, it comes as no surprise that he or she can also change the message text.
-
The authenticity issue With the Internet e-mail standards an open book, it isn’t difficult for a savvy user to forge or spoof an e- mail address.
To solve these issues, the Internet’s gurus came up with the idea of encryption. When you encrypt a message, a complex mathematical formula scrambles the message content to make it unreadable. In particular, a key value is incorporated into the encryption formula. To unscramble the message, the recipient feeds the key into the decryption formula.
This single-key encryption works, but its major drawback is that the sender and the recipient must both have the same key. Public-key encryption overcomes that limitation by using two related keys: a public key and a private key. The public key is available to everyone, either by sending it to them directly or by offering it in an online key database. The private key is secret and is stored on the user’s computer.
Here’s how public-key cryptography solves the issues discussed earlier:
-
Solving the privacy issue When you send a message, you obtain the recipient’s public key and use it to encrypt the message. The encrypted message can now be decrypted only by using the recipient’s private key, thus assuring privacy.
-
Solving the tampering issue An encrypted message can still be tampered with, but only randomly because the content of the message can’t be seen. This thwarts the most important skill used by tamperers: making the tampered message look legitimate.
-
Solving the authenticity issue When you send a message, you use your private key to digitally sign the message. The recipient can then use your public key to examine the digital signature to ensure the message came from you.
If there’s a problem with public-key encryption, it is that the recipient of a message must obtain the sender’s public key from an online database. (The sender can’t just send the public key because the recipient would have no way to prove that the key came from the sender.) Therefore, to make all this more convenient, a digital ID is used. This is a digital certificate that states the sender’s public key has been authenticated by a trusted certifying authority. The sender can then include his or her public key in outgoing messages.
Setting Up an E-mail Account with a Digital ID
To send secure messages using Outlook Express, you first have to obtain a digital ID. Here are the steps to follow:
-
In Outlook Express, select Tools, Options and then select the Security tab.
-
Click Get Digital ID. Internet Explorer loads and takes you to the Outlook Express digital ID page on the Web.
-
Click a link to the certifying authority (such as VeriSign) you want to use.
-
Follow the authority’s instructions for obtaining a digital ID. (Note that digital IDs are not free; they typically cost about US$15 per year.)
With your digital ID installed, the next step is to assign it to an e-mail account:
-
In Outlook Express, select Tools, Accounts to open the Internet Accounts dialog box.
-
Use the Mail tab to select the account you want to work with and then click Properties. The account’s dialog box appears.
-
Select the Security tab.
-
In the Signing Certificate section of the dialog box, click Select. Outlook Express displays the Select Default Account Digital ID dialog box.
-
Make sure the certificate you installed is selected and then click OK. Your name appears in the Security tab’s first Certificate box.
-
Click OK to return to the Internet Accounts dialog box.
-
Click Close.
Insider Secret To make a backup copy of your digital ID, open Internet Explorer and select Tools, Internet Options. Select the Content tab and click Certificates to see a list of your installed certificates (be sure to use the Personal tab). Click your digital ID and then click Export.
Obtaining Another Person’s Public Key
Before you can send an encrypted message to another person, you must obtain his or her public key. How you do this depends on whether you have a digitally signed message from that person.
If you do have a digitally signed message, open the message, as described later in this chapter in the “Receiving a Secure Message” section. Outlook Express adds the digital ID to the Address Book automatically:
-
If you have one or more contacts whose e-mail addresses match the address associated with the digital ID, the digital ID is added to each contact. (To see it, open the Address Book, open the contact, and then select the Digital IDs tab.)
-
If there are no existing matches, a new contact is created.
Insider Secret If you don’t want Outlook Express to add digital IDs automatically, select Tools, Options, select the Security tab, and click Advanced. In the dialog box that appears, clear the Add Senders’ Certificates To My Address Book check box.
If you don’t have a digitally signed message for the person you want to work with, you have to visit a certifying authority’s Web site and find the person’s digital ID. For example, you can go to the VeriSign site (www.verisign.com) to search for a digital ID and then download it to your computer. After that, follow these steps:
-
Open the Address Book.
-
Open the person’s contact info, or create a new contact.
-
Enter one or more e-mail addresses, and fill in the other data as necessary.
-
Select the Digital IDs tab.
-
In the Select An E-Mail Address list, select the address that corresponds with the digital ID you downloaded.
-
Click the Import button to choose the Select Digital ID File To Import dialog box.
-
Find and select the downloaded digital ID file, and then click Open.
-
Click OK.
Sending a Secure Message
After your digital ID is installed, you can start sending out secure e-mail messages. You have two options:
-
Digitally sign a message to prove that you’re the sender. Start a new message and then either select the Tools, Digitally Sign command or click the Sign toolbar button. A small red “seal” icon appears to the right of the header fields.
-
Encrypt a message to avoid snooping and tampering. In the New Message window, either select the Tools, Encrypt command or click the Encrypt toolbar button. A blue lock icon appears to the right of the header fields.
Tip You can tell Outlook Express to digitally sign and/or encrypt all your outgoing messages. Select Tools, Options and select the Security tab. To encrypt all your messages, select the Encrypt Contents And Attachments For All Outgoing Messages check box. To sign all your messages, select the Digitally Sign All Outgoing Messages check box.
Receiving a Secure Message
The technology and mathematics that underlie the digital ID are complex, but there’s nothing complex about dealing with incoming secure messages. Outlook Express handles everything behind the scenes, including the authentication of the sender (if the message was digitally signed) and the decryption of the message (if the message was encrypted). For the latter, a dialog box tells you that your private key has been used to decrypt the message.
As you can see in Figure 14-5, the preview pane gives you a few visual indications that you’re dealing with a secure message:
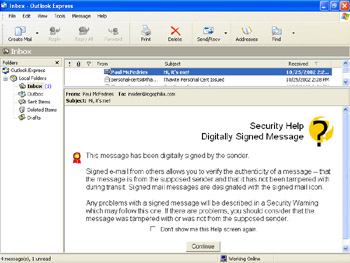
Figure 14-5: For a secure message, the preview pane describes the type of security used.
-
The message text doesn’t appear in the preview pane.
-
The preview pane title is Security Help, and the subtitle tells you the type of security used: Digitally Signed and/or Encrypted.
-
The preview pane text describes the security used in the message.
To read the message, click the Continue button at the bottom. (If you don’t want to see this security preview in the future, select the Don’t Show Me This Help Screen Again check box.)
| Insider Secret | If you change your mind and decide you want to see the preview screen, you have to edit the registry. Open the Registry Editor and head for the key named HKCU\Identities. Open your 32-character identity key and then open the Software\Microsoft \Outlook Express\5.0\Dont Show Dialogs subkey. Open the Digital Signature Help setting and change its value to 0. |
EAN: 2147483647
Pages: 126