Launching Applications
Launching programs is one of the most fundamental operating system tasks, so it isn’t surprising that Windows XP offers an impressive number of ways to go about doing this:
-
Click the Start button to open the Start menu. If you’ve run a program repeatedly, its name should appear in the list of most frequently used applications, so click its icon. Otherwise, click All Programs and then open the menus until you see the program’s icon, and then click the icon.
-
Double-click the executable file’s name. Use Windows Explorer to find the application’s executable file, and then double-click that file name.
-
Double-click a shortcut icon on the desktop. If a shortcut points to a program’s executable file, double-clicking the shortcut will launch the program. Likewise, if the shortcut points to a data file, the associated application program (generally, the program that created the file) is launched, and then the data file is opened in that application.
-
Double-click a document name. If you can use the application to create documents, double-clicking the name of one of those documents in Windows Explorer should launch the program and load the document automatically. (If the document was one of the last 15 that you used, select Start, My Recent Documents, and then click the document name in the submenu that appears.)
-
Use the Open With command. If double-clicking a document name opens the file in the wrong application, right-click the file and then select Open With. One of two things will happen:
-
The Open With dialog box appears, as shown in Figure 6-2.
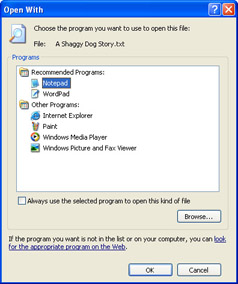
Figure 6-2: Use the Open With dialog box to choose the application you want to use to open the document. -
If the file type already has a defined “Open With” list (see Chapter 7, “Getting the Most Out of Files and Folders”), you’ll see a submenu that lists the applications that can open this file type. Select the application you want. If you don’t see the application, click Choose Program to display the Open With dialog box.
In the Open With dialog box, either click the program you want to use, or click Browse to choose the executable file of a different program. If you want this to be the default application for this file type, select the Always Use The Selected Program To Open This Kind Of File check box.
-
-
Insert a CD or DVD disc. Most CDs and DVDs support Windows XP’s AutoPlay feature that automatically starts a default program when the disc is inserted. The program that launches is determined by the contents of the Autorun.inf file in the disc’s root folder. Open the file in Notepad and look for the open value in the [AutoRun] section.
Insider Secret To disable the AutoRun feature for your CD and DVD drives, open the Registry Editor and find the HKLM \SYSTEM\CurrentControlSet\Services\CDRom key. Change the value of the AutoRun setting to 0.
-
Use the Run dialog box. Select Start, Run to display the Run dialog box. Use the Open text box to specify the application (click OK when you’re done):
-
If the application resides within the %SystemRoot% or %SystemRoot%\System32 folder, within a folder listed as part of the PATH environment variable, or if it has an application- specific path in the registry (described later in this section), just type the primary name of the executable file.
-
For all other applications, enter the full path (drive, folder, and file name) for the executable file.
-
You can also enter the full path of a document. If you want to open the document using a program other than the one associated with the document’s file type, precede the document path with the application’s path (separate the two paths with a space).
Tip A quick way to open the Run dialog box is to press
 +R.
+R.
-
-
Set up the program to run automatically at startup. Refer to Chapter 4, “Starting Up and Shutting Down,” to learn how to launch programs automatically at startup.
-
Use the Scheduled Tasks folder. The Scheduled Tasks folder can run programs automatically at a given date and time, or on a regular schedule.
Launching Programs from the Command Prompt
Running programs within a command prompt session or a batch file is straightforward. At the command prompt (or in the batch file), enter the full path of the executable file. Note that you need use only the file’s primary name if the application resides within the current folder, the %SystemRoot% folder, the %SystemRoot%\System32 folder, or a folder in the PATH variable. For example, the full path of the Registry Editor’s executable file is %SystemRoot%\Regedit.exe, but you can launch this program using only the primary part of the file name: Regedit.
| Caution | To avoid errors when working at the command prompt, either use the 8.3 format for the folder and file’s name, or surround the long folder or file name with quotation marks. |
To gain more control over launching Windows applications from the command prompt or in a batch file, use the START command:
START ["title"] [/B] [/Dpath] [/I] [/MIN] [/MAX] [/SEPARATE |
/SHARED] [/LOW | /NORMAL | /HIGH | /REALTIME | /ABOVENORMAL |
/BELOWNORMAL] [/WAIT]  [program] [parameters]
"title" | The text that is displayed in the title bar of the application’s window. |
/Dpath | The path of the folder in which the application starts. |
/B | Starts the application without creating a new window. The application has Ctrl+C handling ignored. Unless the application enables Ctrl+C processing, Ctrl+Break is the only way to interrupt the application. |
/I | The application’s environment will be the same as the command prompt’s original environment. |
/MIN | Starts the application window minimized. |
/MAX | Starts the application window maximized. |
/SEPARATE | Loads a 16-bit Windows program into a separate memory space. |
/SHARED | Loads a 16-bit Windows program into a shared memory space. |
/LOW | The application’s threads are given the lowest priority. This will make the program run slowly, but it will improve the performance of other running programs. |
/NORMAL | The application’s threads are given normal priority. |
/HIGH | The application’s threads are given the highest priority. This will make the program run as fast as possible, but other programs may run more slowly. |
/REALTIME | The application’s threads are executed with the REALTIME priority class. |
/ABOVENORMAL | The application’s threads are given above normal (but less than the highest) priority. |
/BELOWNORMAL | The application’s threads are given below normal (but more than the lowest) priority. |
/WAIT | Starts the application and then waits for it to terminate before processing more commands. (This is useful in a batch file where you don’t want the next batch command to run until after the program terminates.) |
program | The full path and file name of the application. You need only use the file’s primary name if the application resides within the current folder, the %SystemRoot% folder, the %SystemRoot% \System32 folder, or a folder in the PATH variable. |
parameters | The parameters or switches that are passed to the application. |
Running a Program as a Different User
As we explained earlier in this chapter, some applications—especially installation programs—may fail because the current user account may have insufficient privileges to support some program operations. Similarly, a user account may have privileges that are too high to safely run a program. For either case, you can run a program as a different user with any of the following techniques:
-
Use the Run As menu command. Right-click the executable file and then select Run As on the shortcut menu. In the Run As dialog box, choose The Following User and then choose a user from the User Name list. Enter the user’s Password and click OK. Note that only members of the Administrators group appear in the User Name list, allowing members of the Limited group to run a program as an Administrator, if they have the password, but Administrators will not be able to select the name of a member of the Limited group.
-
Prompt for a user. Create a shortcut to the executable file, right- click the shortcut, and then select Properties. On the Shortcut tab, click Advanced and then select the Run With Different Credentials check box. Click OK. When you launch the shortcut, Windows XP will display the Run As dialog box so that you can choose a user. This procedure is not available to members of the Limited group.
-
Use the RUNAS command-line tool. You use RUNAS at the command prompt to specify the user name, and Windows XP then prompts you to enter the user’s password. Here’s the basic syntax (type RUNAS /? for the complete list of switches):
RUNAS /user:domain\user program
/user:domain\user
The user name under which you want the program to run. Replace domain with either the computer name (for a standalone or workgroup machine) or the domain name.
program
The full path and file name of the application. You need only use the file’s primary name if the application resides within the current folder, the %SystemRoot% folder, the %SystemRoot%\System32 folder, or a folder in the PATH variable.
This procedure allows members of an Administrators group as well as members of the Limited group to run a program as either an Administrator or a Limited user, assuming correct passwords are provided.
Creating Application-Specific Paths
When you install a 32-bit application, it usually stores the path to its executable file in the registry. This is called an application-specific path. It means that you can start almost any 32-bit application simply by entering the name of its executable file either in the Run dialog box or at the command prompt (using the START command). You don’t need to spell out the complete path. For example, here’s the full path for the System Configuration Utility:
%SystemRoot%\PCHEALTH\HELPCTR\Binaries\msconfig.exe
However, to launch this program you need only enter Msconfig.exe in the Run dialog box or enter START Msconfig.exe at the command prompt.
This pathless execution is handy, but it doesn’t work in the following two situations:
-
16-bit applications These older programs don’t store the paths to their executables in the registry.
-
Documents You can’t load a document just by typing its file name and extension in the Run dialog box or at the command prompt (unless the document is in the current folder).
To solve both these problems, and to handle the rare case when a 32-bit application doesn’t create its own application-specific path, you can edit the registry to add a path to an executable file (an application-specific path) or to a document (a document-specific path).
In the Registry Editor, open the following key:
HKLM\SOFTWARE\Microsoft\Windows\CurrentVersion\App Paths
The App Paths key has subkeys for each installed 32-bit application. Each of these subkeys has one or both of the following settings, and possibly some others that we won’t explore:
-
(Default) This setting spells out the path to the application’s executable file. All the App Paths subkeys have this setting.
-
Path This setting specifies one or more folders that contain files needed by the application. An application first looks for its files in the same folder as its executable file. If it can’t find what it needs there, it checks the folder or folders listed in the Path setting. Not all App Paths subkeys use this setting.
To create an application-specific path, select the App Paths key, create a new subkey, and assign it the name of the application’s executable file. For example, if the program’s executable file name is Oldapp.exe, name the new subkey Oldapp.exe. For this new subkey, change the Default setting to the full path of the executable file.
| Tip | You don’t have to give the new App Paths subkey the name of the executable file. You can use any name you like as long as it ends with .exe and doesn’t conflict with the name of an existing subkey. Why does it have to end with .exe? Unless you specify otherwise, Windows XP assumes that anything you enter in the Run dialog box or at the command prompt (via the START command) ends with .exe. So, by ending the subkey with .exe, you need to type only the subkey’s primary name. For example, if you name your new subkey Oldapp.exe, you can run the program by typing oldapp in the Open text box in the Run dialog box, or START oldapp at the command prompt. |
You create document-specific paths the same way. (Note, however, that the document’s file type must be registered with Windows XP.) In this case, though, the Default setting takes on the full path of the document. Again, if you want to load the document just by typing its primary name, make sure that the new App Paths subkey uses the .exe extension.
Restricting Program Launches for Users
Windows XP has several group policies that enable any member of the Administrators group to restrict the usage of Windows programs for each logged-on user. For example, you can prevent users from running the System Configuration Utility, a program that—in the wrong hands—can do much damage to a system. You can also prevent users from accessing the command prompt (where they could start unauthorized programs) or the Registry Editor.
In the Group Policy editor, select User Configuration, Administrative Templates, System. There are five program-restriction policies:
-
Prevent Access To The Command Prompt Enable this policy to prevent each logged-on user from getting to the command prompt.
-
Prevent Access To Registry Editing Tools Enable this policy to prevent each logged-on user from running the Registry Editor.
-
Run Only Allowed Windows Applications Enable this policy to specify a list of executable file names that each logged-on user is allowed to run. Note that this policy doesn’t prevent users from starting other programs at the command prompt, so you should also disable command prompt access.
-
Don’t Run Specified Windows Applications Enable this policy to specify a list of executable file names that each logged-on user is not allowed to run. Again, users can still run these programs via the command prompt, unless that access also has been denied.
-
Turn Off Autoplay Enable this setting to disable the AutoPlay feature for inserted CD or DVD discs.
EAN: 2147483647
Pages: 126