Tips and Techniques for Installing Applications
User accounts, and their inherent permissions and rights, absolutely affect the installation process. Not only that, but there are many other factors to take into account before installing any program. Unfortunately, it’s all too easy to simply launch the software’s installation program and see what happens. Our goal in this section is to make you think twice before installing applications on your system. We show you the relationship between user accounts and installing applications, and we take you through a checklist of actions and precautions to take in order to make installing programs a relatively painless process.
User Accounts and Installing Programs
If you’re coming to Microsoft Windows XP from Windows 9x or Windows Me, you’ll find that something as straightforward as installing software isn’t necessarily what you’ve come to expect. More specifically, the Windows XP security model won’t let just anyone install just any program. If you’re logged on with administrative-level privileges, you’ll have no problem with installation. If, however, you’re logged on as a member of the Users group (a Limited account with more limited privileges than Administrators), then Windows XP will run into problems for any installation program that attempts to either:
-
Install files anywhere other than within the %USERPROFILE% folder (the folder that contains the files of the currently logged-on user).
-
Add or edit registry keys and settings anywhere other than within the HKEY_CURRENT_USER key (or its corresponding subkey in HKEY_USERS).
If you’re having trouble installing an application as a Limited user, you can usually work around the problem by upgrading the software to be Windows XP–compatible, which means that Limited users then are able to install programs safely for their own use.
A related problem occurs when you’re logged on as a member of the Administrators group but you don’t want an installation program to abuse those privileges. For example, you don’t want an installation program to make changes to sensitive portions of the registry of the file system. Here’s how to fix that:
-
In Windows Explorer, right-click the installation program’s executable file and then select Run As.
-
In the Run As dialog box, make sure the Current User option is selected, and also make sure the Protect My Computer And Data From Unauthorized Program Activity check box is selected.
-
Click OK.
When you launch the installation program, Windows XP will run it as though you were a Limited user.
Working Through a Preinstallation Checklist
For those who enjoy working with computers, few things are as tempting as a new software package. The tendency is to just tear into the box, liberate the source disks, and let the installation program rip without further ado. This approach often loses its luster when, after a willy-nilly installation, the system starts to behave erratically. This will happen usually because the application’s setup program has made adjustments to one or more important configuration files and has given one’s system a case of indigestion in the process. That’s the hard way to learn the hazards of a haphazard installation.
To avoid such a fate, you should always look before you leap. That is, you should follow a few simple safety measures before double-clicking that Setup.exe file. Here’s a list of things to check into before you install any program:
-
Verify whether the program is compatible with Windows XP. The easiest and safest setups occur with programs certified to work with Windows XP. See “Understanding Application Compatibility,” later in this chapter, to learn how to tell whether a program is Windows XP–compatible.
-
Set a restore point. The quickest way to recover from a bad installation is to restore your system to the way it was before you ran the setup program. The only way to do that is to set a system restore point just before you run the setup program. See Chapter 13, “Troubleshooting and Recovering from Problems.”
-
Read the Readme.txt and other setup files. Although it’s the easiest thing in the world to skip, you really should peruse whatever documentation the program provides that pertains to the setup. This includes the appropriate installation material in the manual, Readme files found on the disk, and whatever else looks promising. By spending a few minutes perusing these resources, you can glean the following information:
-
Any advance preparation you need to perform on your system.
-
What to expect during the installation.
-
Information you need to have on hand in order to complete the setup (such as a product’s serial number).
-
Changes the installation program will make to your system or to your data files (if you’re upgrading).
-
Changes to the program and/or the documentation that were put into effect after the manual was printed.
-
-
Check downloaded files for viruses. If you downloaded the application you’re installing from the Internet, or if a friend or colleague sent you the installation file as an e-mail attachment, you should scan the file using a good (and up-to-date) virus checker.
-
Understand the effect on your data files. Few software developers want to alienate their installed user base, so they usually emphasize upward compatibility in their upgrades. That is, the new version of the software will almost always be able to read and work with documents created with an older version. However, in the interest of progress, you often find that the data file format used by the latest incarnation of a program is different from its predecessors, and this new format is rarely downward-compatible. That is, an older version of the software will usually gag on a data file that was created by the new version. So you’re faced with two choices:
-
Continue to work with your existing documents in the old format, thus possibly foregoing any benefits that come with the new format.
-
Update your files and thus risk making them incompatible with the old version of the program, should you decide to uninstall the upgrade.
One possible solution to this dilemma is to make backup copies of all your data files before installing the upgrade. That way, you can always restore the good copies of your documents if the upgrade causes problems or destroys some of your data. If you’ve already used the upgrade to make changes to some documents, but you want to uninstall the upgrade, most programs have a Save As command that lets you save these documents in their old format.
-
-
Use the Add Or Remove Programs feature. Launching Control Panel’s Add Or Remove Programs icon displays the dialog box shown at the top of Figure 6-1. If you’re not sure which executable to run to install a program, insert the CD or floppy disk, click the Add New Programs icon, and then click CD Or Floppy to find the file using a wizard. However, most experienced Windows users don’t need a wizard to install a program. Instead, Add Or Remove Programs is useful for two things:
-
Modifying a program’s installation. Clicking the Change Or Remove Programs icon displays a list of your computer’s installed programs. When you select a program, the window shows you the size of the installation; how frequently the program has been used (rarely, occasionally, or frequently); and when the program was last used. You also get a Change button that you can click to modify the program’s installation. (Some programs display a combined Change/Remove button, instead.) Depending on the program, modifying its installation may mean adding or removing program features, reinstalling files, or repairing damaged files.
-
Removing the program. Click the Remove (or Change/ Remove) button to uninstall the program. Note that most items in the Add Or Remove Programs list that are capable of being uninstalled have a corresponding subkey of the HKLM \SOFTWARE\Microsoft\Windows\CurrentVersion\Uninstall registry key, as shown in Figure 6-1, though some of these program subkeys are identified by those long hexadecimal strings enclosed in brackets .
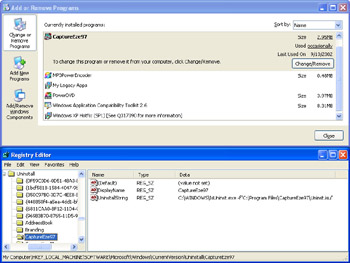
Figure 6-1: Most items that can be uninstalled via Add Or Remove Programs have corresponding registry entries.Insider Secret After you uninstall a program, you may find that it still appears in the list of programs in the Add Or Remove Programs dialog box. To fix this, open the Registry Editor, display the Uninstall key, and look for the subkey that represents the program (if you’re not sure, click a subkey and examine the DisplayName setting, the value of which is the name that appears in the Add Or Remove Programs list) and then delete that subkey.
-
-
Take control of the installation. Some setup programs give new meaning to the term “brain-dead.” You slip in the source disk, run Setup.exe (or whatever name the software manufacturer provides for installation), and the program proceeds to impose itself on your hard disk without so much as a how-do-you-do. Thankfully, most installation programs are a bit more thoughtful than that. They usually give you some advance warning about what’s to come, and they prompt you for information as they go along. You can use these prompts to assume a certain level of control over the installation. Here are a couple of things to watch for:
-
Choose your folder wisely. Most installation programs offer to install their files in a default folder. Rather than just accepting this without question, think about where you want the program to reside. Personally, we prefer to use the Program Files folder to house all applications. If you have multiple hard disks or partitions, you might prefer to use the one with the largest amount of free space. If the setup program lets you select data directories, you might want to use a separate folder that makes it easy to back up the data.
Tip Most installation programs offer to copy the program’s files to a subfolder of %SystemDrive%\Program Files. You can change this default installation folder by editing the registry. In the registry key HKLM\SOFTWARE\Microsoft\Windows\CurrentVersion\ the setting ProgramFilesDir holds the default install path. Change this setting to the path you prefer (say, one that’s on a drive with the most free disk space).
-
Use the custom install option. The best programs offer you a choice of installation options. Whenever possible, choose the Custom option, if one is available. This will give you maximum control over the components that are installed, including where they’re installed and how they’re installed.
-
EAN: 2147483647
Pages: 126