Writing Access Macros
| Unlike writing a VBA program, where you can be as structured or unstructured as you want, writing a macro tends to be a very regimented process. That sounds like a bad thing, but it isn'tbecause this regimentation means that Access macros are easy to learn and you're far less likely to make programming errors. To get started, use any of the following methods:
Figure 13.1 shows the initial screen for creating a new macro. Figure 13.1. The initial screen for a new macro.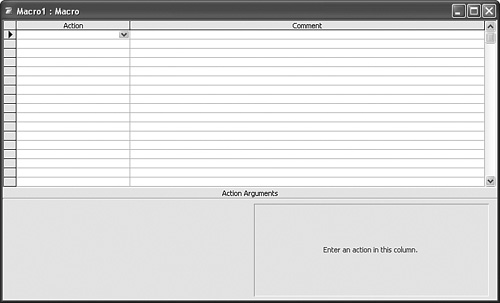 Notice that each line has two columns:
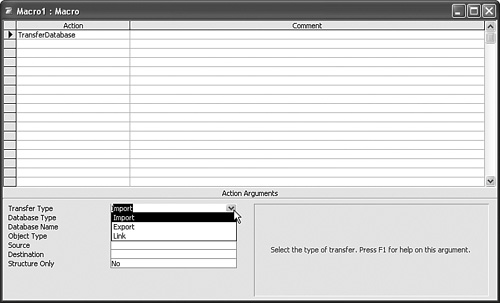
When you choose a cell in the Action column, a drop-down list appears, and this list contains all the possible actions that you can include in your macro. When you choose an action, the arguments for that action appear in the Action Arguments panel, as shown in Figure 13.2. Figure 13.2. When you choose an action, its arguments appear in the bottom panel.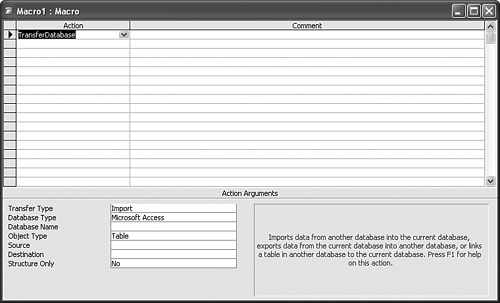 Notice that in some cases, the default arguments for the action are already filled in. For the TransferDatabase action (which you use to import data from or export data to a database), the Transfer Type, Database Type, Object Type, and Structure Only arguments are filled in automatically. You complete the current action by filling in the arguments as required:
Creating an Access macro involves the following steps:
Example: Opening a ReportTo illustrate this a little more clearly, let's look at a sample macro for opening a report. I want this macro to perform three actions:
Figure 13.4 shows the completed macro, and Table 13.1 lists the actions as well as their arguments and values. Figure 13.4. An Access macro that opens a report.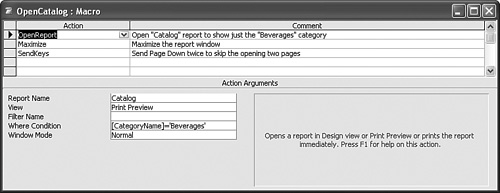
You open a report by using the OpenReport action. In this example, I set the Report Name argument to Catalog, the View argument to Print Preview, set the Where Condition argument so that only the Beverages category will display, and set the Window Mode argument to Normal. I then used the Maximize action (which takes no arguments) to maximize the report window. Finally, I used the SendKeys action to send the Page Down key{PGDN}twice to bypass the report's two introductory pages.
Running Your MacroThere are several ways to run a macro after it's written and saved (you must save your macro before you can run it):
Modifying Existing MacrosAfter you have a macro, you might decide to make changes to it. Or you might need to modify someone else's macro to perform a specific task for you. To modify an existing macro, activate the Macros tab, highlight the macro you want to edit, and click the Design button. This brings the macro sheet back up. To modify a macro, you usually have several choices:
Using Names to Create Macro GroupsIf you use Access macros a lot, you may find that you have a number of related macros. For example, you could have several macros that perform similar tasks, such as opening reports. Similarly, you may have several macros associated with the events of a specific form or report (see "Associating Macros with Events," later in this chapter). Rather than cluttering the Macros tab with all these different macros, Access enables you to group related macros within a single macro object. You do this by assigning a name to each macro within the object. This requires the Macro Name column, which you display as follows:
Access adds the Macro Name column to the macro sheet. Type the name of the macro in the Macro Name column beside the first action, as shown in Figure 13.5. Figure 13.5. Use the Macro Name column to name multiple macros within a single macro object.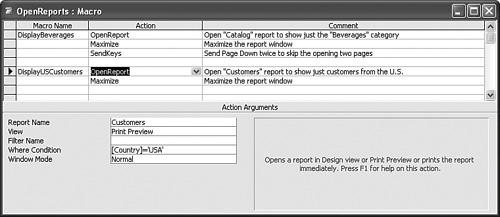
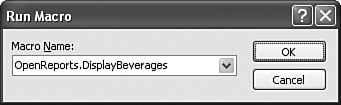
MacroObjectName.MacroName For example, if the macro object is named OpenReports and the macro is named DisplayBeverages, the full macro name is OpenReports.DisplayBeverages, as shown in Figure 13.6. Figure 13.6. When you use macro names, you run a macro by specifying both the macro object and the macro name. Example: Creating Access Shortcut KeysMacro names are useful for keeping related macros together in a single object and for reducing the number of objects that appear in the database window's Macros tab. However, macro names also have another, rather unexpected, benefit: you can use them to create shortcut keys that launch Access macros. To do this, you first need to create a new macro object and give it the name AutoKeys. Within that macro object, type the shortcut key combination as the macro name and then set up one or more macro actions to run when the user presses the shortcut key. Specify the shortcut keys using the same strings as in the SendKeys action. For example, the string ^+b corresponds to the shortcut key combination Ctrl+Shift+B. In Figure 13.7, you can see that I've set up this shortcut to run the DisplayBeverages macro. However, you can select any action, so you could use the shortcut to open a form, show a toolbar, or run a VBA procedure. Note that the shortcut keys are ready to go as soon as you save the AutoKeys macro object. Figure 13.7. In a macro object named AutoKeys, use the Macro Name column to enter shortcut key strings and associate them with one or more macro actions.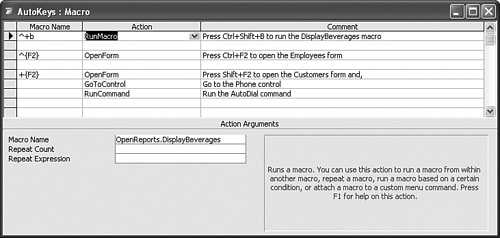 Adding Macro ConditionsIn Figure 13.7, the third macrothe one that sets up the Shift+F2 shortcut keyopens the Customers form, selects the Phone field, and then runs the Access AutoDialer feature. Table 13.2 summarizes the macro actions and argument values.
This works well as long as there is a value in the Phone field. It would be nice if the macro could somehow check the value of the Phone field in advance and then bail if no phone number is present. This is possible by using a macro condition, which requires the Condition column. To display the Condition column, follow these steps:
Access adds the Condition column to the macro sheet. The idea here is that you add a logical expression to the Condition column: If the expression returns true, Access runs the macro action in the same row as the condition; if the expression returns False, Access skips the macro action in the same row as the condition. Either way, Access then continues with the rest of the macro's actions. For the AutoDialer example, we can use the following condition to test whether the Phone field is blank: Forms!Customers!Phone Is Null If this expression returns True, no phone number is present. Figure 13.8 shows a revised version of the macro that uses this expression. (Notice that Access adds square brackets around each term; I've left these off here in the chapter to make the expression easier to read.) Table 13.3 shows the complete macro. Figure 13.8. Use the Condition column to use logical expressions that determine whether a macro action runs.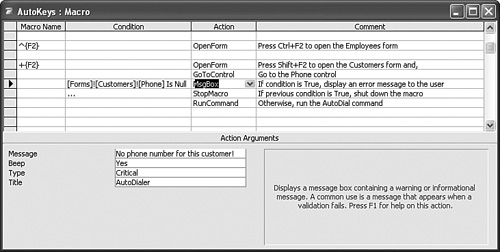
If the condition returns TRue, no phone number is present, so the macro runs the MsgBox action to display the message No phone number for this customer!, as shown in Figure 13.9. On the next line, the Condition column shows an ellipsis (...); this tells Access to apply the previous condition to the current line. Because the condition is TRue, the next action runs as wellin this case, StopMacrowhich shuts down the macro so that the AutoDial command doesn't run. Figure 13.9. If the Phone field is blank, the MsgBox action displays this message to the user.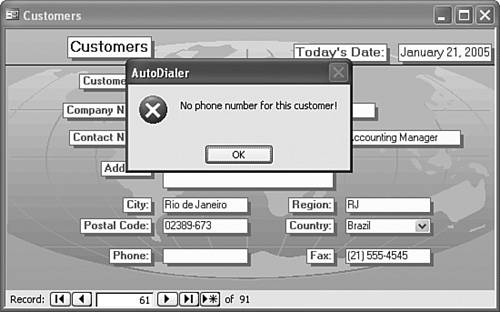 |
EAN: 2147483647
Pages: 129