Section 11.4. The Actions, One by One
While events get the ball rolling, actions are, yes, where the action is. Whether it's opening a 200 x 200 pixel browser window or using HTML to control the playback of a Flash movie, you'll find an action for almost every interactivity need.
In some cases, alas, the actions aren't very good. Macromedia hasn't added many behaviors since version 4, and, unfortunately , they haven't gone through and weeded out the behaviors that aren't very useful or that don't work well. In those cases, this book makes clear which are the rotten eggs to steer clear of.
After you complete the steps required to set up an action, the new action appears in the Behaviors panel, and your Web page is ready to test. At that point, you can click the behavior's name in the Behaviors panel, whereby clicking the Events pop-up menu, as shown in Figure 11-1you can change the event that triggers it.
Note: Although Macromedia hasn't added any new behaviors to Dreamweaver 8, you can add an almost unlimited number of new behaviorsif you know where to look. You can find loads of behaviors (written by non-Macromedia programmers) at the Dreamweaver Exchange or at one of the many extension Web sites listed on Section 19.2.3.
11.4.1. Navigation Actions
Many of Dreamweaver's actions are useful for adding creative navigational choices to your Web sites, giving you the opportunity to go beyond the simple click-and-load approach of a basic Web page.
11.4.1.1. Pop-Up Menu
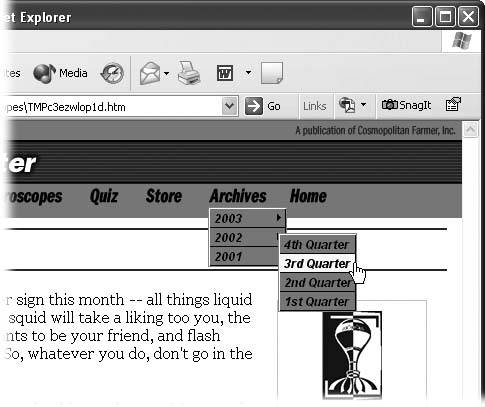
As the appetites of Web surfers grow, Web sites are getting bigger and more complex, sometimes making it harder to navigate them. Instead of a handful of links cleanly placed on the home page, you may have hundreds of links that could easily overwhelm your visitors . To maintain order, use Dreamweaver's Show Pop-Up Menu behavior to add navigation menus that appear only when the mouse moves over related links (see Figure 11-4).
Figure 11-4. Dreamweaver's Show Pop-Up Menu behavior adds complex navigation menus to a page. You can even add nested menus, as in this example, where moving the mouse over the Archives button pops up a menu with three options. Moving the mouse over the second option pops up yet another menu with four additional choices. The only limit to the number of submenus you can create is the width of your monitor: if there are too many submenus, they'll disappear off the right edge of the screen.
The pop-up menu is composed of invisible layers (see Section 8.3.1.3) that become visible when you move your mouse over a link. Aside from the wow factor of making things appear out of nowhere, the main benefit of this behavior is that you can provide lots of navigation options without squandering valuable screen space. One drawback is that you can only use text in these menus, not cool graphic buttons to match your main navigation elements. Another drawbackone that fills the Macromedia Dreamweaver Forums with hand-wringing anguishis that, unlike all other aspects of the program, Dreamweaver doesn't update the links in the pop-up menus; so if you move the page into a subfolder of your site, all document-relative links in the menu break. And unfortunately, there are a few additional problems with pop-up menus (see the box on Section 11.4.1.1).
If you aren't scared off and still want to give the Show Pop-Up Menu behavior a try, here's what you do: Start by selecting a link on the page. The menu pops up when the visitor's mouse passes over this link, so pick a link that's related to the menu you're creating. For example, if you want to create a menu that lets visitors select one of the five products you sell, using a link labeled Products would make sense.
Tip: Pop-up menus don't work if the visitor doesn't have JavaScript turned on in her Web browser. In addition, search engines can't access the links on your pop-up menus. For this reason, it's a good idea to make the top-level links (the ones you mouse over to make the pop-up menus appear) link to a main pageone for each top-level link, representing each section of your site. On each of those pages you'll also want to include links to the other pages listed on each pop-up menu.
| WORKAROUND WORKSHOP Are Pop-Up Menus All Pooped Out? |
| There are several problems with Dreamweaver's Show Pop-Up Menu behavior. First, the JavaScript code is rather bulkyaround 30 KB of extra data stored in an external JavaScript filemeaning the page first needs to download that file, taking longer to load. In addition, the code used isn't accessible by browsers with JavaScript turned off, or by search engines; so if you want to make your Google rank soar, you should steer clear of pop-up menus, or provide other (non-pop-up) links to the same pages. But the most glaring error in the Show Pop-Up Menu behavior is that Dreamweaver doesn't update links you create with it. In other words, if you add a pop-up menu to a page in the root folder of your site and then save the page into another folder, Dreamweaver doesn't automatically update the links in the pop-up menu. If you've used document-relative links, your beautiful pop-up menu is now filled with broken links. You're faced with two solutions. You could use root-relative links, which has the unfortunate side effect that you can't actually see if the links work until you move your site onto a Web server; or, if you're using document-relative links, you could keep all of your files in a single folder. You won't be able to add subfolders to organize your site, since that would require the paths of the links to change. In addition, if you plan to use template pages (Chapter 17), add the pop-up menu before saving the file as a template. If you add the pop-up menus later, the links won't work. (For more on the difference between document- and site-root-relative links see Section 4.1.2.) There's one other solution: just don't use Dreamweaver's pop-up menus. You'll find a more advanced pop-up menu system in Fireworks 8, the graphics companion program to Dreamweaver. You can use Fireworks to build a much more functional pop-up menu, and then export it for use in Dreamweaver. In addition, you'll find many extension developers who provide a variety of interesting, reliable, and powerful pop-up menu systems. Here are a few:
|
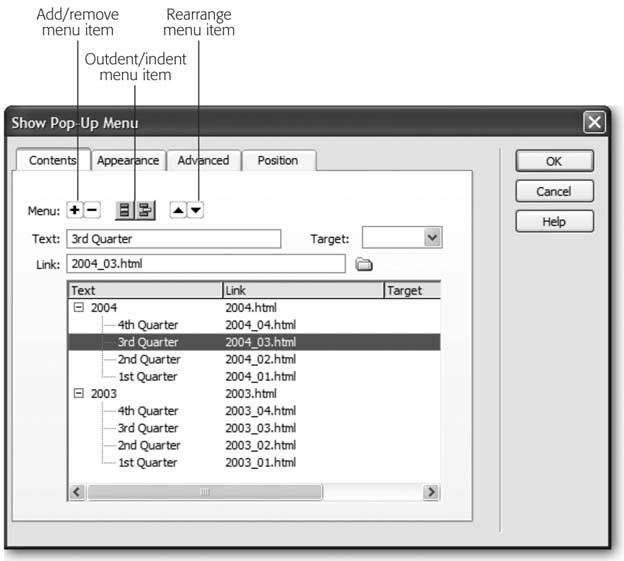
Once you've selected Show Pop-Up Menu from the + (Add Action) menu in the Behaviors panel, you see the dialog box shown in Figure 11-5. If you simply want to create a quick pop-up menu, you only have to use the first tab, Contents, which lets you create and arrange menu items. The other three tabs control the appearance and placement of menu items:
-
Adding menu items . To add a menu item, click the + button on the Contents tab. Next , in the Text field, type the words you'd like to appear for one of your menu items. You can then type a link into the Link field or click the folder icon and select a file in your site.
If you're using frames , you can direct the link to open in a specific frame by choosing its name from the Target menu. Alternatively, to open the link in a new blank window, choose "_blank." Continue, as shown in Figure 11-5, until you've covered all your menu items.
Figure 11-5. If you're not satisfied with the default color scheme, font, or layout of pop-up menus, Dreamweaver offers plenty of tools for tweaking them in the other three tabs of the Show Pop-Up Menu dialog box.
-
Deleting menu items . To delete a menu item, select it from the list on the Contents tab and click the minus sign () button.
-
Changing the order of menu items . To rearrange the menu you've built, select a menu command from the list on the Contents tab, and press the up or down arrow buttons. The order in which the items are listed in the dialog box is the order they'll take in the onscreen pop-up menu.
-
Creating a submenu . You can also create submenusadditional menus that appear when you move your mouse over an item in the main pop-up menu. For example, in Figure 11-4, moving the mouse over the "2002" link opens another menu with four additional items.
To create a submenu, select a menu item and then click the Indent button (Figure 11-5) on the Contents tab. The link becomes the first item of the submenu. As you add additional items using the + button, they become other members of the submenu. (You can't indent the top item in a menu in this way.)
-
Removing an item from a submenu . To move a submenu item back into the main menu, select it and then click the Outdent button (Figure 11-5).
The Appearance tab offers some useful options of its own:
-
Orientation . Select either vertical ( stacked ) or horizontal (side-by-side) menu items. Be careful with the horizontal optionit's easy to build a menu that extends off the right edge of the browser window, where no one can click it!
-
Font options . Choose a font, font size , and formatting (bold or italic) for menu items. You can even set the alignment of text within each menu itemleft, center, or right. These settings apply to all text in the pop-up menu.
-
Colors . These menu items have two different sets of colors: one for a menu item's up state (its appearance when the menu appears) and one for its over state (its appearance when the mouse is on a menu command). Use the color boxes to select contrasting colors for the background color of the menu item and the color of the text inside the menu.
Tip: After you add the pop-up menu behavior to a page, Dreamweaver puts a file called mm_menu.js in the folder containing that page. It's a JavaScript file containing most of the complex programming required to make the pop-up menu feature work. Don't delete this file! Doing so breaks your pop-up menus and causes JavaScript errors in your page. Also, remember to upload this new file to the Web site (Chapter 15) when you're ready to make your site "live." If you do happen to delete it, just add another Pop-Up Menu behavior to another page in that folder. (If you add a submenu to a menu item, Dreamweaver also adds a graphic file called arrows.gif . Don't delete this, either.)
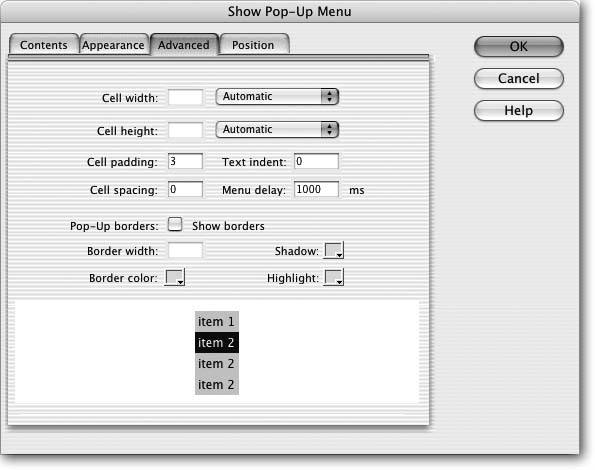
For more detailed design of a pop-up menu, click the Advanced tab (see Figure 11-6):
-
Cell width . Each item in a pop-up menu acts like a cell in a table (see Section 7.2), with a background color, content (text of the menu item), width and height, and other properties. You can set the width to an exact pixel size by selecting Pixels from the pull-down menu and typing a number in the "Cell width" box. Setting an exact width is a good option if you're adding several pop-up menus to a pageone for each of the buttons of the main navigation bar, for exampleand you want each menu to be the same width for visual consistency. (You can set only one pixel setting, which applies to both the menu and any submenus. Dreamweaver won't let you set this smaller than the space taken up by the text in a button.)
If you accept the proposed setting, Automatic, Dreamweaver determines the width of the menu based on the longest menu item, and determines separate widths for the submenus. For example, in Figure 11-4, Dreamweaver calculated the width of the submenu with its three short items4th Quarter, 3rd Quarter, and so onautomatically.
-
Cell height . You can change the height of menu items in the same manner.
-
Cell padding . To adjust the space from the edge of a menu to the text inside the menu, type a pixel value in this box. Cell padding here works exactly like cell padding in a table, as described on Section 7.2.
-
Cell spacing . You can also adjust the space between menu items, as you would the space between cells in a table, as described on Section 7.2.
-
Text indent . To add space between the left edge of the menu and text, type a pixel value in the "Text indent" box. You'll probably find that the "Cell padding" option adds enough spacing to the menu, and you won't need this one.
-
Menu delay . When you move your mouse off a menu, you may notice a slight delay before the menu disappears. This delay is controlled by the "Menu delay" property. It's specified in milliseconds , so a delay of 1000 means the menu takes 1 second to disappear.
Figure 11-6. You can tweak the appearance of pop-up menus using the Advanced tab of the Show Pop-Up Menu dialog box. Bear in mind that the preview in the bottom half of the window isn't very accurate. It doesn't show shadow and highlight colors, or any text indents. To get an accurate view, you'll need to close this box and press the F12 key (Option-F12 on the Mac) to preview your new menu in an actual Web browser.
Of course, your first reaction might be: "I don't want no stinkin' delay! Just make the menu disappear when I move my mouse off!"
Unfortunately, if you set the delay too low, the pop-up menu won't appear at all. Without any delay, the menu would disappear the instant your mouse moved off the triggering link (the link you originally attached the behavior to), making the menu disappear before you could click your choice. You need some delay to allow enough time to choose from the menu; 500 ms is a good compromise.
-
Borders . Here's where you get to decide whether any borders appear around each menu item. To turn off borders entirely, turn off the "Show borders" checkbox.
Dreamweaver even lets you specify colors for three different border elements. The Border color affects the outside bordera line that encloses the entire menu. The Shadow color applies to a menu's shadow lines, which appear along the right and bottom edges of the menu, just inside of the outer border. (It's also the color of the lines that separate each menu item.) The Highlight color applies to the borders at the top and left edge of the menu. Together, these colors give a menu a 3-D appearance.
Tip: Web browsers hide any menu items that aren't visible within the available space of a frame. If your page uses frames, therefore, make sure your frame is deep enough to accommodate the expanded menu. (That's a particular concern if you create a nifty navigation bar that sits in a frame at the top of the window.)
| POWER USERS' CLINIC Taking Control of Submenus |
| Although Dreamweaver lets you set the position of the main pop-up menu, it doesn't offer any controls for positioning submenus. They always appear in the same place: 5 pixels in from the right edge of the menu item that triggers the submenu and 7 pixels below the top. But you're not stuck with these settingsif you're willing to dig into the HTML of the page. When you create a pop-up menu, Dreamweaver adds a chunk of JavaScript code to the page. You need to locate a particular line of code, located in the <head> section of the page that looks something like this: window.mm_menu_0514155110_0 = new Menu ("root",188,18,"Arial, Helvetica, sansserif", 12,"#FFFFFF","#000000","#000000","#FFFFFF ","left","middle",3,0,500, -5,7,true,true,true,0,true,true); Zero in on the two numbers near the end: 5 and 7. These represent the position for any submenus added to items in the menu. However, in this case, the submenu position is relative to the upper-right corner of the menu. So the 5 means 5 pixels in from the right edge of the menu item, and the 7 means 7 pixels down from the top edge. Two other useful numbers appear near the beginning of line, right after "new Menu." In this example, they're 188 and 18, but these numbers vary from menu to menu. The 188 stands for the width of each item in the menu, and the 18 is the height. Thus, if you want submenus to appear directly below an item in this menu, replace the 5 with 188 and the 7 with 18. If you decide to delve into the HTML code in this way, remember that every menu you addand this includes submenusadds a line like the one above to your Web page. So make sure you're working on the correct line. |
By default, a pop-up menu is positioned to the right of its triggering link, and 10 pixels below. The Position tab lets you change the following:
-
Positioning options . The Position tab offers four preset positioning options, represented by four buttons. The first button is the default position. The second button places the menu directly below the triggering link. The third button places the menu directly above the triggering link (good if you're adding the pop-up menu to a link near the bottom of a page). And the fourth button places the menu directly to the right of the triggering link.
-
Pixel location . If none of those four options suits your taste, you can use these controls to pinpoint a location for the menu, expressed in pixels measured from the top-left corner of the triggering link.
For example, if you enter 0 in the X box (the horizontal measurement), the menu lines up with the left edge of the triggering link. Typing 0 in the Y box (the vertical dimension) produces a menu whose top aligns with the top of the triggering link. Using 0 in both boxes places the menu smack-dab on top of the trigger.
Submenus are unaffected by these settings; they always overlap the right edge of the corresponding main-menu item (Figure 11-4). (If you're up for it, there's an HTML workaround in the box "Taking Control of Submenus" on Section 11.4.1.1.)
-
Hide Menu checkbox . Keep the "Hide Menu on onMouseOut" event turned on. It ensures that the menu disappears when you move your mouse off it.
11.4.1.2. Open Browser Window
No matter how carefully you design your Web page, chances are it won't look good in every size window. Depending on the resolution of your visitor's monitor and the dimensions of his browser window, your Web page may be forced to squeeze into a window that's 400 pixels wide, or it could be dwarfed by one that's 1200 pixels wide. Designing your Web pages so they look good at a variety of different window sizes is challenging.
It's the Open Browser Window action to the rescue (Figure 11-7). Using this behavior, you can instruct your visitor's browser to open a new window to whatever height and width you desire . In fact, you can even dictate what elements the browser window includes. Don't want the toolbar, location bar, or status bar visible? No problem; this action lets you include or exclude any such window chrome.
To open a new browser window, you start, as always, by selecting the tag to which you wish to attach the behavior. You can attach it to any of the tags discussed on pages Section 11.3.1Section 11.3.5, but you'll usually want to add this action to a link with an onClick event, or to the <body> tag with the onLoad event.
Note: Most new browsers have "pop-up blockers." This nifty feature prevents the browser from opening a new browser window unless the visitor initiates the request. In other words, browser windows that are meant to open when a new page is loaded won't, but browser windows that open based on a visitor's actionlike clicking a linkwill.
Figure 11-7. You, too, can annoy your friends , neighbors, and Web site customers with these unruly pop-up browser windows. Just add the Open Browser Window action to the <body> tag of your document. Now, when that page loads, a new browser window opens with the ad, announcement, or picture you specify. To be even more annoying, use the onUnload event of the <body> tag to open a new browser windowwith the same Web pagewhen your visitors try to exit the page. They won't be able to get to a different page, and may even encounter system crashes. Now that's annoying! Most current Web browsers, however, prevent these kinds of automatic window-opening tricks.

Once you've selected this action's name from the + menu in the Behaviors panel, you'll see the dialog box shown in Figure 11-8. You have the following settings to make:
-
URL to display . In this box, type in the URL or path of the Web page, or click Browse and find the Web page on your computer (the latter option is a more foolproof method of ensuring functional links.) If you're loading a Web page on somebody else's site, don't forget to type an absolute URL, beginning with http:// (see Section 4.1.2).
-
Window width, Window height . Next, type in the width and height of the new window. These values are measured in pixels; in most browsers, 100 x 100 pixels is the minimum size. Also, strange visual anomalies may result on your visitors' screens if the width and height you specify here are larger than the available space on their monitors .
-
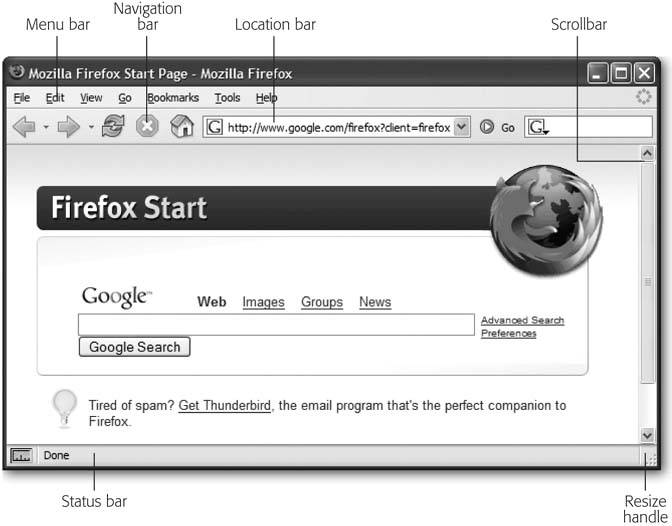
Attributes . Turn on the checkboxes for the window elements you want to include in the new window. Figure 11-9 shows the different pieces of a standard browser window.
-
Window name box . Give the new window a name here ( letters and numbers only). If you include spaces or other symbols, Dreamweaver displays an error message and lets you correct the mistake. This name won't actually appear on your Web page, but it's useful for targeting links or actions from the original window.
Figure 11-8. Here, you can define the properties of the new window, including what Web page loads into it, its dimensions, and so on. If you leave the "Window width" and "Window height" properties blank, the new window is the same size as the window it opens from.
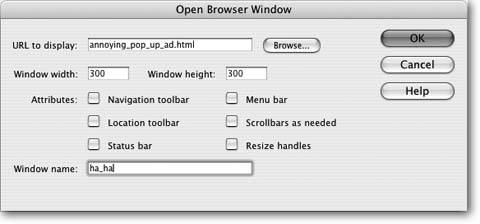
Figure 11-9. The parts of a browser window. Note: The menu bar only appears as part of the browser window on Windows machines. On Macintosh systems, the menu bar appears at the top of the screen and can't be hidden; in addition, the Safari browser won't hide the resize handle or the scroll bars (if they're needed).
Once a new window is open, you can load other Web pages into it from the original page that opened the window; simply use the name you give to the new window as the target of the link. For example, you could add this behavior to the <body> tag of a page so that when the page opens, a small new window also appears, showcasing a photo. You could add links to the main page, that, when clicked, load additional photos into the small window.
If you use more than one Open Browser Window behavior on a single page, make sure to give each new window a unique name. If you don't, you may not get a new window for each Open Browser Window action.
When you click OK, your newly created behavior appears in the Actions list in the Behaviors panel.
11.4.1.3. Go to URL
The Go to URL action works just like a link, in that it loads a new Web page. However, while links work only when you click them, this action can load a page based on an event other than clicking. For instance, you may want to load a Web page when your visitor's cursor merely moves over an image, or when she clicks a particular radio button.
Once you've selected a tag and chosen this action's name from the + menu in the Behaviors panel, you can make these settings in the resulting dialog box:
-
Open in . If you aren't using frames, only Main Window is listed here. But if you're working in a frameset file and have named each of your frames, they're listed in the "Open in" list box. Click the name of the frame where you want the new page to appear.
URL . Fill in the URL of the page you wish to load. You can use any of the link-specifying tricks described on Section 4.1.5: type in an absolute URL starting with http:// , type in a path, or click the Browse button and then select a page from your site.
11.4.1.4. Jump Menu and Jump Menu Go
Conserving precious visual space on a Web page is a constant challenge for a Web designer. Putting too many buttons, icons, and navigation controls on a page can quickly clutter your presentation and muddle a page's meaning. As sites get larger, so do navigation bars, which can engulf a page in a long column of buttons.
The Pop-Up Menu behavior (see Section 11.4.1.1) is one solution. But it requires lengthy JavaScript code and has a few problems of its own (see the box on Section 11.4.1.1). A simpler way to add detailed navigation to a site without wasting pixels is to use Dreamweaver's Jump Menu behavior. A jump menu is a pop-up menu that lets visitors navigate by choosing from a list of links.
The Jump Menu behavior is listed in the Behaviors panel, but for a simpler, happier life, don't insert it onto your page that way. Instead, use the Insert bar or Insert menu, like this:
-
Click where you want the jump menu to appear on your Web page .
It could be in a table cell at the top of the page, or along the left edge, for example.
-
Under the Forms tab on the Insert bar, click the Jump Menu icon (see Figure 10-2 on Section 10.2). Or choose Insert
 Form Jump Menu .
 If you use the Behaviors panel instead, you first have to add a form and insert a menu into it. The Insert Jump Menu object saves you those steps.
Tip: Even though the jump menu uses a pop-up menu, which is a component of a form , you don't have to create a form first, as described in Chapter 10. Dreamweaver creates one automatically when you insert a jump menu.
The Jump Menu dialog box opens, as shown in Figure 11-10.
-
Type an instructive label, like Select a Destination , in the text box .
What you enter in the text box sets the menu's default choicethe first item listed in the menu when the page loads. Dreamweaver provides two methods for triggering the jump-menu behavior: when the visitor makes a selection from the listwhich is an onChange event, since the visitor changes the menu by selecting a new optionor when the user clicks an added Go menu button after making his selection. The second method requires extra effort from the visitormaking a selection and clicking a button. The first method, therefore, offers a better visitor experience. But it does mean that you can't include an actual link in the first item in the menu; after all, the behavior is triggered only when a visitor selects an item other than the one currently listed.
If you do intend to add a Go button, you can skip this step and the next two.
-
Leave the "When selected, go to URL" box empty .
Since the first item in the list is just an instruction, you don't link it to any page.
-
To add a link, click the + button .
Doing so adds another item to the menu.
-
Type the name of the link in the text field .
You're specifying the first link in your pop-up menu.
The name you type here doesn't have to match the page's title or anchor's name; it's whatever you want your menu to say to represent it. For instance, you can call a menu choice Home even if the title of your home page is "Welcome to XYZ Corp."
-
Enter a URL for this link in the "When selected, go to URL" field .
Use any of the usual methods for specifying a link (see Section 4.1.5).
-
To add the next link in your pop-up menu, click the + button and repeat steps 6 and 7. Continue until you've added all of the links for this menu .
If you want to remove one of the links, select it from the Menu Items list and then click the minus sign () button. You can also reorder the list by clicking one of the link names and then clicking the up and down arrow buttons.
Figure 11-10. Top: The Insert Jump Menu dialog box shown here is set up so that the onChange event of the <select> tag triggers the Jump Menu action. That is, the Jump Menu behavior works when your visitor selects an item other than the one currently listed.
Bottom: Unless you include the "Insert go button after menu" option, the first item of a jump menu should never be used as a link. Instead, use some descriptive textsuch as "Select a Sign"to let visitors know what the menu does. Then leave the URL blank in the Insert Jump Menu dialog box. When placed on a page, the resulting menu is very compact, but it can offer a long list of pages.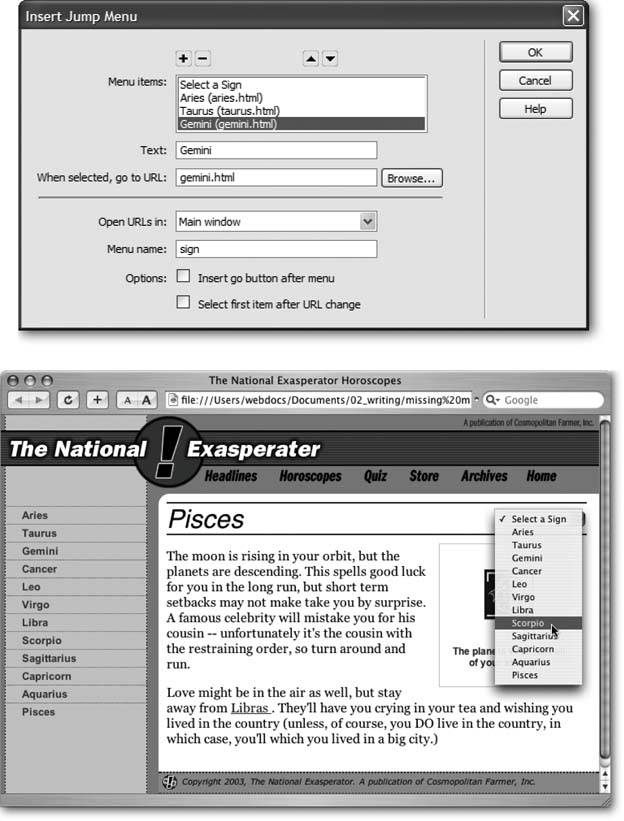
-
If you're using frames, use the "Open URLs in" pop-up menu to specify a frame in which the indicated Web page should appear .
Otherwise , the Main Window option loads links into the entire browser window.
-
In the "Menu name" box, give the menu a name .
This step is optional; you can also just accept the name Dreamweaver proposes. Since Dreamweaver uses this name only for the internal purposes of the Java-Script that drives this behavior, it doesn't appear anywhere on the page.
-
If you want a Go button to appear beside your jump menu, turn on "Insert go button after menu."
You need to use this option only when the jump menu is in one frame and is loading pages into another, or when you want to make the first item in your jump menu a link instead of an instruction.
When you include a Go button, Dreamweaver adds a small form button next to the menu, which your visitor can click to jump to whatever link is listed in the menu. But most of the time, your visitors will never get a chance to use this Go button. Whenever they make a selection from the menu, their browsers automatically jump to the new page without waiting for a click on the Go button.
The Go button's handy, however, when there's no selection to make. For example, if the first item in the menu is a link, your visitors won't be able to select it; it's already selected when the page with the menu loads. In this case, a Go button is the only way to trigger the "jump."
-
If you want to reset the menu after each jump (so that it once again shows the first menu command), turn on "Select first item after URL change."
Here's another option that's useful only when the jump menu is in one frame, loading pages into another frame. Resetting the menu so that it shows its default command makes it easy for your visitor to make another selection when ready.
-
Click OK to apply the action and close the Jump Menu dialog box .
Your newly created pop-up menu appears on your Web page, and the newly created behavior appears in the Actions list in the Behaviors panel.
Tip: To edit a jump menu, click the menu in your document and then, in the Behaviors panel, double-click the Jump Menu action in the Actions list. The settings dialog box reappears. At this point, you can change any of the options described in the previous steps, except you can't add a Go button to a jump menu that didn't have one to begin with. Click OK when you're finished.
The Jump Menu Go action (available on the Behaviors panel) is useful only if you didn't add a Go menu in step 11 earlier. In this case, if there's a jump menu on the page and you wish to add a Go button to it, click next to the menu, add a form button, and then attach this behavior to it. (For more on working with forms, see Chapter 10.)
11.4.1.5. Check Browser
Dinosaur alert! This behavior was once useful. As noted earlier, not all Web browsers work the same way. The Check Browser behavior lets you shuffle visitors off to different pages based on the type of browser they have. For example, you could send a Netscape Navigator 4 browser off to a simplified version of your site, letting it bypass pages that included more complex code that Navigator 4 simply didn't understand.
But since this behavior was put into Dreamweaver, the browser landscape has changed significantly. Netscape Navigator 4 is dead (except for one lone computer locked in a fallout shelter in Appalachia), and many new browsersFirefox, Opera, Safari, to name a feware in use. Check Browser only sniffs out Netscape and Internet Explorer, and just doesn't work in today's multibrowser world. You're better off skipping this one.
11.4.2. Image Actions
Images make Web pages stand out. But adding Dreamweaver behaviors can make those same images come to life.
11.4.2.1. Preload Images
It takes time for images to load over the Internet. A 16 KB image, for instance, takes about 4 seconds to download over a standard dial-up modem. However, once a Web browser loads an image, it stores the image in its cache , as described on Section 14.8, so that it loads extremely quickly if a page requires the same graphic again. The Preload Images action takes advantage of this fact by downloading an image or images and storing them in the browser's cache, even before they're actually needed.
Preloading is especially important when using mouse rollover effects on a Web page (see Section 5.4.1). When a visitor moves the mouse over a particular button, it may, for example, appear to light up. If you couldn't preload the image, then the lit up graphic wouldn't even begin to download until the cursor rolled over the button. The resulting delay would make your button feel less like a rollover than a layover.
In general, you won't need to apply this action by hand, since Dreamweaver adds it automatically when you use the Insert Rollover Image command (see Section 5.4.1). But there are exceptions, such as when you use the Preload Images action to load graphics that appear on other pages in your site.
For example, suppose you build a graphics-heavy Web site. People hate to wait too long for a Web page to load, but they're slightly more patient when waiting for the first page of a site to load. You could capitalize on that fact by adding a Preload Images action to the body of a home page (or even a page that says "Loading Web Site") that preloads most of the site's graphics. Be careful, though: if any page preloads too many images, even the most patient Web surfer may not stay around to watch the show. Remember to refer to the download stats listed in the document's status bar for the size of your Web page, as discussed on Section 14.8.
Tip: If you use background images in your style sheets, the Preload Images behavior may also come in handy. If you swap a background image using the CSS Hover property (see Section 6.6.1), you'll notice a delay when the graphic loads the first time. Use the Preload Image behavior to rid you pages of that dis- orienting delay.
To add the Preload Images action, select the tag to which you want the behavior attached. Most often you'll use the <body> tag with an onLoad event.
If you've added rollover images or a navigation bar to your page, this behavior may already be in the <body> of the page. In this case, just double-click the Preload Images action that's already listed in the Behaviors panel. If not, just choose this action's name from the + menu in the Behaviors panel. Either way, you're now offered the Preload Images dialog box.
Click the Browse button and navigate to the graphics file that you wish to use for preloading purposes, or type in the path or (if the graphic is on the Web already) the absolute URL of the graphic. Dreamweaver adds the image to the Preload Images list. If you want to preload another image, click the + button and repeat the previous step. Continue until you've added all the images you want to preload.
You can also remove an image from the list by selecting it and then clicking the minus sign () button. (Be careful not to delete any of the images that may be required for a rollover effect you've already createdthe Undo command doesn't work here.)
When you click OK, you return to your document; your new action appears in the Behaviors panel. Here you can edit it, if you like, by changing the event that triggers it. But unless you're trying to achieve some special effect, you'll usually use the onLoad event of the <body> tag.
That's all there is to it. When your page loads in somebody's browser, the browser continues to load and store those graphics quietly in the background. They'll appear almost instantly when they're required by a rollover or even a shift to another Web page on your site that incorporates the graphics you specified.
11.4.2.2. Swap Image
The Swap Image action exchanges one image on your page for another. (See the end of this section for detail on Swap Image's sibling behavior, Swap Image Restore.)
Simple as that process may sound, swapping images is one of the most visually exciting things you can do on a Web page. Swapping images works something like rollover images, except that a mouse click or mouse pass isn't required to trigger them. In fact, you can use any tag and event combination to trigger the Swap Image action. For instance, you can create a mini slide show by listing the names of pictures down the left side of a Web page and inserting an image in the middle of the page. Add a Swap Image action to each slide name, so that the appropriate picture swaps in when your visitor clicks any one of the names.
To make this behavior work, your Web page must already contain a starter image, and the images to be swapped in must be the same width and height as the original graphic. If they aren't, the browser resizes and distorts the subsequent pictures to fit the "frame" dictated by the original.
To add the Swap Image behavior, start by choosing the starter image file that you want to include on the page. (Choose Insert Image, or use any of the other techniques described in Chapter 5.) Give your image a name in the Property inspector, so that JavaScript knows which image to swap out. (JavaScript doesnt really care about the original graphic image itself, but rather about the space that it occupies on the page.)
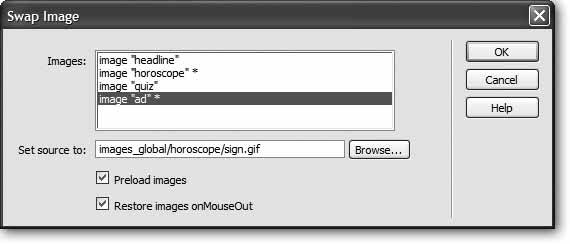
Tip: You can swap more than one image using a single Swap Image behavior (Figure 11-11). Using this trick, not only can a button change to another graphic when you mouse over it, but also any number of other graphics on the page can change at the same time. An asterisk (*) next to the name of an image in the Swap Image dialog box (see Figure 11-12) indicates that the behavior will swap in a new image for that particular graphic. In the example in Figure 11-12, you can see that two images horoscope and ad , both marked by asterisksswap with a single action.
Now select the tag to which you want the Swap Image behavior attached. When you choose this action's name from the Behaviors panel, the Swap Image dialog box appears, as shown in Figure 11-12:
-
Images . From the list, click the name of the starter image.
-
Set source to . Here's where you specify the image file that you want to swap in. If it's a graphics file in your site folder, click Browse to find and open it. You can also specify a path or an absolute URL to another Web site, as described on Section 4.2.3.
-
Preload images . Preloading ensures that the swap action isn't slowed down while the graphic downloads from the Internet.
-
Restore images onMouseOut . You get this option only when you've applied this behavior to a link. When you turn this checkbox on, moving the mouse off the link makes the previous image reappear.
11.4.2.3. Swap Image Restore
The Swap Image Restore action returns the last set of swapped images to its original state. Most designers use it in conjunction with a rollover button, so that the button returns to its original appearance when the visitor rolls the cursor off the button.
Figure 11-11. You can use the swap image behavior to make multiple graphics change with a single mouse-over. A humble Web page (top) comes to life when the mouse is moved over the Horoscopes button (bottom). Not only does the graphic for the Horoscopes button change, but the ad on the left sidebar is also replaced with a tantalizing look at the "Sign of the Month." This type of effect, sometimes called a disjoint rollover, is easy with the Swap Image action.

You'll probably never find a need to add this behavior yourself. Dreamweaver automatically adds it when you insert a rollover image and when you choose the Restore Images onMouseOut option when setting up a regular Swap Image behavior (see Figure 11-12). But, if you prefer, you can add the Swap Restore Image behavior to other tag and event combinations, using the general routine described on Section 11.2.2. (The Swap Image Restore dialog box offers no options to set.)
Figure 11-12. Some actions, like the Swap Image action, can automatically add behaviors to a Web page. In this case, the "Preload images" and "Restore images onMouseOut" options actually add a Swap Image Restore action to the onMouseOut event of the currently selected tag, and a Preload Images action to the onLoad event of the <body> tag.
11.4.2.4. Set Navigation Bar Image
The Navigation Bar object's enticing name tricks many people into thinking that they can quickly and easily build a useful navigation bar for their sites. They can, sort of, but the object adds lots of additional JavaScript code that's easily avoided by simply using Dreamweaver's "Rollover image" feature. The Navigation Bar is really a tool for those outdated dinosaursframes-based Web sites (see the box on Section 4.2.3).
You're better off avoiding the Navigation Bar object and its companion behavior.
11.4.3. Message Behaviors
Communication is why we build Web sites: to tell a story, sell a product, or provide useful information that can entertain and inform our visitors. Dreamweaver can enhance this communication process with actions that provide dynamic feedback. From subtle messages in a browser's status bar to dialog boxes that command a visitor's attention, Dreamweaver offers numerous ways to respond, in words, to the things your visitors are doing on your Web pages.
11.4.3.1. Popup Message
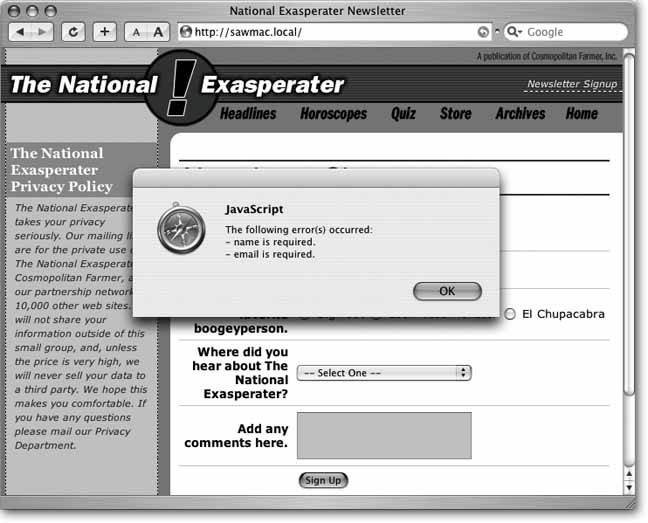
Use the Popup Message behavior to send important messages to your visitors, as shown in Figure 11-13. Your visitor must click OK to close the dialog box. Because a pop-up message demands immediate attention, reserve this behavior for important announcements.
To create a pop-up message, select the tag to which you want the behavior attached. For example, adding this action to the <body> tag with an onLoad event causes a message to appear when a visitor first loads the page; adding the same behavior to a link with an onClick event makes the message appear when the visitor clicks the link. (You've seen an example of the pop-up message used with the form-validation behavior on Section 10.4.)
From the Add Action menu (+ button) in the Behaviors panel, choose Popup Message. In the Popup Message dialog box, type the message that you want to appear in the dialog box. (Check the spelling and punctuation carefully; nothing says " amateur " like poorly written error messages, and Dreamweaver's spell-checking feature isn't smart enough to check the spelling of these messages.) Then click OK.
Tip: A note to JavaScript programmers: Your message can also include any valid JavaScript expression. To embed JavaScript code into a message, place it inside braces ({ }). If you want to include the current time and date in a message, for example, add this: { new Date( ) }. If you just want to display a brace in the message, add a backslash, like this: \{. The backslash lets Dreamweaver know that you really do want a { character, and not just a bunch of JavaScript, to appear in the dialog box.
Figure 11-13. Here, a pop-up message indicates that a Web form wasn't correctly filled out.
11.4.3.2. Set Text of Status Bar
Pop-up messages, like those described above, require your visitors to drop everything and read them. For less urgent messages, consider the Set Text of Status Bar behavior. It displays a message in the status bar of a browser windowthe strip at the bottom of the window. You can add a message to a link, for example, that lets surfers know where the link takes them. Or you could set things up so that when a visitor moves the cursor over a photograph, copyright information appears in the window's status bar.
Note: The Set Text of Status Bar effect was common in the early days of the Web, but its popularity has waned for several reasons: People don't always notice their status bars. The bar is down at the bottom of the browser window and doesn't change dramaticallyflash, blink, or sing, for examplewhen text appears. What's worse , visitors can hide the status bar and never see your message. And finally, your message is likely to be missed for another reason: the behavior doesn't work in many newer browsers like Opera, Safari, and Firefox.
To apply the Set Text of Status bar action, select a tag (a very common example is a link [<a>] tag with the onMouseOver event); choose this behavior's name from the Add Action menu (+ button) in the Behaviors panel; and then, in the Set Text of Status Bar dialog box, type your message. Keep the message short, since browsers cut off any words that don't fit in the status bar. Your message can also include any valid JavaScript expression, exactly as described in the Tip on Section 11.4.3.2.
11.4.3.3. Set Text of Text Field
Normally, a text field in a form (see Section 10.3.2) is blank. It sits on the page and waits for someone to type into it. The Set Text of Text Field behavior, by contrast, can save your visitors time by filling in form fields automatically with answers that have become obvious.
For instance, imagine you've created a Web survey that has a series of questions. The first question might require a yes or no answer, along the lines of "Do you own a computer?" And you've provided radio buttons for Yes or No. The second question might be "What brand is it?" followed by a text field where your visitors can type in the computer brand.
But if someone answers "No" to question 1, there's no point in her typing a response to the second question. To help keep things moving along, you can set the second question's text field so that it says, "Please skip to Question 3." To do so, simply add the Set Text of Text Field action to the onClick event of the No radio button of Question 1.
To apply the Set Text of Text Field action, make sure your page includes a form and at least one text field. Because this behavior changes the text in a form text field, you won't get very far without the proper HTML on the page.
Select the tag to which you want the behavior attached. In the example above, you'd attach the behavior to the form's No radio button with an onClick event. However, you aren't limited to just form elements. Any of the tags discussed on Section 11.3.1, Section 11.3.2, Section 11.3.4Section 11.3.5 work.
Tip: You can also use this behavior to erase text in a field. This way, you can present your visitor with a text field that's already filled out with explanatory text like "Please type your name in this box." When someone clicks in the field, triggering the field's onFocus event, the box empties itself in readiness to accept input.
When you choose Set Text of Text Field from the + menu in the Behaviors panel, the Set Text of Text Field dialog box opens. Make the following changes:
-
Text field . The menu lists the names of every text field in the form; choose the name of the text field whose default text you'll want to change. (See Chapter 10 for the full story on building online forms in Dreamweaver.)
-
New text . Type the text you want that field to display. Make sure you don't make the message longer than the space available in the field.
(Once again, your message can include a JavaScript expression, as described in the Tip on Section 11.4.3.2.)
11.4.3.4. Set Text of Layer
Another way to get your message across is to change the text that appears in a layer (see Chapter 7). This action has an added benefit: it lets you use HTML code to format the message that appears in the layer. (Actually, the "Set Text" part of this action's name is a bit misleading, since this action also lets you include HTML code, images, forms, and other objects in the layernot just text.)
As always, you start by selecting a tag. In this case, you could select a link, for example, so that moving the mouse over the link changes the text in the layer to read, "Click here to see our exclusive photos of unexplained phenomena."
When you choose this action's name from the + menu in the Behaviors panel, you get these controls in a dialog box:
-
Layer . The menu lists the names of every layer on the Web page (Chapter 8); choose the name of the layer whose text you want to set. (This list includes not just layers created using Dreamweaver's Layer tool but any CSS style that uses absolute positioning and an ID selector, as described on Section 8.3.)
-
New HTML . In this field, type the text you wish to add to the layer. You can type in a plain-text message, for example, or use HTML source code to control the content's formatting.
For instance, if you want a word to appear bold in the layer, place the word inside a pair of strong tags like this: <strong>important</strong>. Or if you'd rather not mess around with HTML code, you can also design the content using Dreamweaver's visual Design viewthat is, right out there in your document window. Copy the HTML source from the Code view (Chapter 9), and then paste it into this action's New HTML field.
Tip: To create a similar effect to a rollover button, you could add another "Set Text of Layer" behavior to the same link, include the HTML that originally appears inside the layer, and change the event to onMouse-Out. So when the visitor mouses over the link, the layer changes to one message, but when he mouses off, it reverts back to the original message.
11.4.3.5. Text of Frame
Like the Set Text of Layer action, the Set Text of Frame action replaces the content of a specified frame with HTML you specify. It's like loading a new Web page into a frame, only faster. Since the HTML is already part of the page that contains this action, your visitors don't have to wait for the code to arrive from the Internet.
To apply the Set Text of Frame action, create frameset and frame pages (for more about frames, see the online chapter about frames, which you can find at www.sawmac.com/dw8/frames.pdf). When you select a tag in any of the frameseven the one whose content you intend to replaceand then choose this action from the + menu in the Behaviors panel, the Set Text of Frame dialog box opens:
-
Frame . The menu lists the names of every available frame. Choose the name of the frame where you want the text to appear.
-
New HTML . Type the text you want the frame to show. You can type in a plaintext message, or use HTML source code to control the content's formatting: <strong> like this </strong> for bold, for example.
You can also copy the HTML currently in the frame by clicking the Get Current HTML button, which copies the HTML source into the New HTML Field. Once it's there, you can modify it as you see fit. Use this technique if, for example, you want to keep much of the formatting and HTML of the original page. Be careful, however. This action can only update the body of the frame; any code in the <head> of the frame is lost. You can't add behaviors, meta tags, or other <head> content to the frame.
-
Preserve Background Color . This option ensures that the background color of the frame won't change when the new text appears.
11.4.4. Multimedia Actions
Multimedia, from background sounds to fully interactive Flash movies, can add a depth of experience that goes well beyond basic HTML. Several Dreamweaver actions let you play sounds, Flash movies, and Shockwave movies. (For more information on incorporating multimedia elements into your Web pages, see Chapter 12.)
11.4.4.1. Control Shockwave or Flash
Flash and Shockwave have become standard elements of many Web sites, and as more and more sites combine Flash and Shockwave movies with regular HTML, it becomes increasingly useful to be able to control how those movies play. With the Control Shockwave or Flash action, regular HTML objects can control the playback of a movie. For example, you could add a set of small, VCR-like control buttonsPlay, Stop, and Rewindto a page. These graphicsregular HTML on the pagecould control the playback of a Flash or Shockwave movie:
-
Add a Flash or Shockwave movie to the page .
See Chapter 12 for details.
-
Select the movie and name it in the Property inspector (see Section 12.1.2.1) .
Dreamweaver uses this name to identify the movie in the JavaScript that runs the behavior.
-
Select the tag to which you want the behavior attached .
This tag can be a dummy link (see Section 11.1.2) attached to a button graphic. Using the onClick event would help simulate the function of a button.
-
From the + menu in the Behaviors panel, choose Control Shockwave or Flash .
The Control Shockwave or Flash dialog box opens, as shown in Figure 11-14.
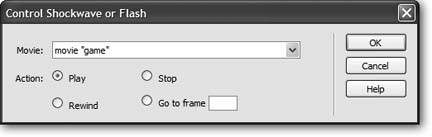
Figure 11-14. The Control Shockwave or Flash action can only choose one type of control per action. So if you want to play a movie from a particular frame, you would need to add two actions: the first would use the "Go to frame" option, and the second would use the Play option to start the movie.
-
Choose how you want this action to control the movie .
You have four options for controlling a movie: Play (starts the movie from the current frame), Stop, Rewind (to the first frame), or Go to Frame ( jumps to a frame you specify by typing its number into the "Go to frame" field).
-
Click OK .
11.4.4.2. Play Sound
The Play Sound action lets you embed a sound file in a Web page and trigger its playback using any available event.
That's the theory, anyway. Here's another behavior you should avoid. Because browsers don't have a built-in sound feature, they rely on plug-ins to play sound files. But JavaScript (that is, Dreamweaver behaviors) can't control some plug-ins, and some plug-ins can handle only certain types of sound files. The bottom line is that in all likelihood , you may wind up with a silent Web page.
If sound is absolutely essential for your Web page, you're better off using a Flash or Shockwave movie (see Chapter 12) and including a Control Shockwave or Flash Movie behavior (described in the previous section).
11.4.4.3. Check Plugin
Flash animations, QuickTime movies, and Shockwave games can add a lot of excitement to any Web site. Unfortunately, they don't work unless your visitors have downloaded and installed the corresponding browser plug-ins (see Section 5.6.1 for more on this topic).
The Check Plugin behavior can detect whether or not your visitor's browser has the required plug-in installed (Flash, Shockwave, LiveAudio, Netscape Media Player, or QuickTime)and if not, it can redirect your visitor to a special page for such less-fortunate Web surfers. Again, this behavior works in theory. In reality, this behavior doesn't work with Internet Explorerthe most popular Web browserexcept in the case of the Flash and Shockwave players. That's because Internet Explorer doesn't have an easy way to determine which plug-ins are installed. In the case of Flash and Shockwave, however, Dreamweaver adds some additional code in VBScript, a language understood by Internet Explorer.
Because of this limitation, it's really best to use this behavior just for determining if the plug-ins for these Macromedia technologies are installed, and skip the other plug-in options.
You can attach this behavior to the <body> tag and trigger it with the onLoad event. For example, you may want to include this behavior on your home page to immediately detect if the Flash plug-in is installed in your visitor's browser; if it is, you can either send visitors off to your crazy Flash page, or keep them on the home page. Alternatively, you could add this behavior to a link with an onClick event. That way, when your visitors click the link, they see one page if they have the plugin, and another if they don't.
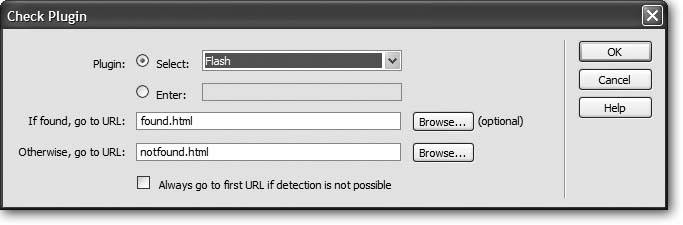
When you choose Check Plugin from the + menu in the Behaviors panel, a dialog box (Figure 11-15) lets you make the following settings:
-
Plugin . From the pop-up menu, choose the plug-in's name, or type its name in the Enter field.
The plug-in options in the menu are Flash, Shockwave, LiveAudio, Netscape Media Player, and QuickTime. Only the Flash and Shockwave options work with Internet Explorer, and some don't work with other browsers. In Safari, for example, this behavior doesn't work for detecting Apple's QuickTime player.
Figure 11-15. If you leave the "If found, go to URL" field empty, the visitor who has the correct plug-in installed stays right there on the same page. Use this arrangement when you apply the action to a <body> tag with an onLoad event and the page contains the plug-in object.
-
If found, go to URL/Otherwise, go to URL . Using these text fields, specify the Web pages to which your visitor is directed if the plug-in is, or isn't, installed.
You can indicate these pages just as you would any link (see Section 4.1.5). For example, if the Web page is part of the site you're working on, click Browse to locate and open the Web page document.
The "Otherwise, go to URL" page could let visitors know that they need a plugin to view the site. Furthermore, it should offer a link to the site where the plugin can be found.
-
Always go to first URL if detection isn't possible . Remember that Internet Explorer can't detect all plug-ins. It wouldn't make sense to send Internet Explorer people to a "You don't have the correct plug-in" page when they may very well have the plug-in installed. If you turn on this checkbox, your Web page assumes that the plug-in is installed if it can't determine otherwise.
Tip: However you plan to use this action, always make sure that you give visitors who don't have the plug-in a way to quickly and easily download and install it, so they can return to your site to bask in the glorious multimedia experience you've created for them.
11.4.5. Layer Actions
Dreamweaver layers (called "absolute positioned divs" in CSS-speak) let you place Web page elements with absolute precision. Since you can control layers using JavaScript, Dreamweaver includes several behaviors for manipulating layers.
11.4.5.1. Show-Hide Layers
Do you ever stare in awe when a magician makes a handkerchief disappear into thin air? Now you, too, can perform sleight of hand on your own Web pages, making layers disappear and reappear with ease. Dreamweaver's Show-Hide Layers behavior is a piece of JavaScript programming that lets you make your own magic.
Show-Hide Layers takes advantage of the Visibility property. You can use it for things like adding pop-up tooltips to your Web page, so that when a visitor's mouse moves over a link, a layer appears offering a detailed explanation of where the link goes (see Figure 11-16).
The following steps show how to create this effect:
-
Add layers to your Web page using the techniques described in Chapter 8. Use the Visibility setting (Section 8.3.1.3) to specify how you want each layer to look when the page loads .
If you want a layer to be visible at first and then disappear when your visitor performs a specific action, set the layer to Visible. If you want it to appear only after some specific event, set it to Hidden.
Note: You don't have to use Dreamweaver's Layer tool to take advantage of this behavior; any CSS ID type style that uses absolute positioning works. (See Section 6.6.2 for more on IDs and Section 8.3 for more on absolute positioning.)
-
In the tag selector, click the tag to which you want the behavior attached .
Web designers often attach behaviors to link (<a>) tags. But you can also attach them to images or, as in Figure 11-16, to an image map, which defines hotspots on a single graphic.
Figure 11-16. Using Dreamweaver's Show-Hide Layers behavior, you can make layers appear and disappear. In this example at www.safetreekids.net/ awesome /parts.html, several layers lay hidden on the page. When a visitor moves the mouse over different parts of the tree cross-section, informative graphics (each placed in a hidden layer) suddenly appear. Moving the mouse away returns the layer to its hidden state. Notice how the information bubble overlaps the tree image and the text above ita dead giveaway that this page uses layers.
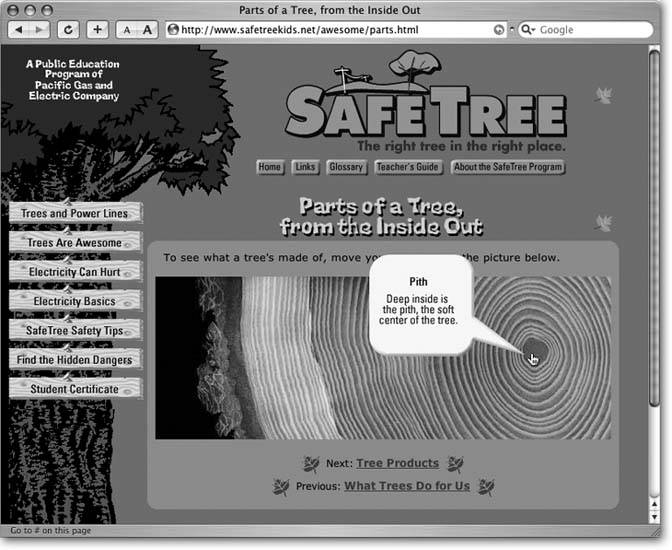
To create this effect, attach two behaviors to each hotspot in the document window (that is, to each <area> tag in HTML): one to show the layer, using the onMouseOver event, and one to hide the layer, using the onMouseOut event.
Note: If this is all Greek to you, see Section 5.4 for more on image maps and hotspots.
-
If it isn't already open, choose Window
Behaviors to open the Behaviors panel . The Behaviors panel (as pictured in Figure 11-1) appears. It lets you add, remove, and modify behaviors.
-
Click the + button on the panel. Select Show-Hide Layers from the menu .
The Show-Hide Layers dialog box appears (see Figure 11-17). You'll use this box to tell Dreamweaver what layer you intend to work with first.
-
Click a layer in the list of named layers .
Here's an example of why it's useful to give your layers descriptive names. It's difficult to remember which layer is which when all have the Dreamweaver default names (Layer1, Layer2, and so on).
-
Choose a Visibility setting for the layer by clicking one of the three buttons: Show, Hide, or Default .
You're now determining what happens to the layer when someone interacts with the tag you selected in step 2. Show makes the layer visible, Hide hides the layer, and Default sets the layer's Visibility property to the browser's default value (usually the same as the Inherit value described on Section 8.1).
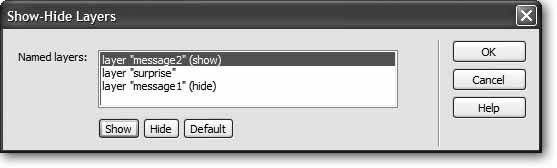
The choice you selected appears in parentheses next to the layer's name, as shown in Figure 11-17.
Figure 11-17. This box lets you hide or show any layer on the page. In fact, you can control multiple layers at once. Here, the "message2" layer appears, while the layer "message1" disappears, when the behavior is triggered. The layer "surprise" is unaffected by this particular action.
-
If you like, select another layer and then apply another visibility option .
A single Show-Hide Layers action can affect several layers at once. A single action can even make some visible and others invisible. (If you apply an action to a layer by mistake, select the same option again to remove it from the layer.)
-
Click OK to apply the behavior .
The Show-Hide Layers action is now listed in the Behaviors panel, as is the event that triggers it.
Once you've added Show-Hide Layers, you can preview the behavior in a Web browser (Dreamweaver can't display behaviors by itself). Like other Dreamweaver behaviors, you can edit or delete this action; see Section 11.2.3.
11.4.5.2. Draggable and Animated Layers
Dreamweaver includes a few other behaviors for working with layers: onethe Drag Layer behaviorlets you create pages with layers that you can freely position anywhere on the Web page (think interactive jigsaw puzzle), and anotherthe Timelinelets you create animationsletting your layers travel freely around a page. Both of these were cool behaviors in their day, but they haven't been updated for years . Not only do they add lots and lots of JavaScript code that really weighs down your Web page, but they're also based on really old code that isn't guaranteed to work in any new browser. In fact, Macromedia even recognized that the code was so old; when they first released Dreamweaver MX 2004, they temporarily removed the animation features. (The few, die-hard fans of the animation tools raised such a ruckus that Macromedia put them back in.)
At any rate, the tools still sort of work. If you're interested in them, you'll find instructions on how to use them online at www.sawmac.com/dw8/.
11.4.6. Advanced Actions
Dreamweaver has two advanced behaviors that let you call custom JavaScript functions and change the properties of various HTML elements. Both of these actions require familiarity with JavaScript and HTML (Chapter 9). Unlike the other Dreamweaver behaviors, these two can easily generate browser errors if used incorrectly.
11.4.6.1. Call JavaScript
You can use the Call JavaScript behavior to execute a single line of JavaScript code or to call a JavaScript function that you've added to the <head> section of your Web page.
When you select a tag and choose this behavior's name from the Behaviors panel, the Call JavaScript dialog box opens. If you want to execute a single line of JavaScript code, simply type it in. For instance, if you wanted to make the browser window close, you would type window.close( ) . If you want to call a JavaScript function, type the function name, like this: myFunction( ) .
| POWER USERS' CLINIC Closing Browser Windows with the Call JavaScript Behavior |
| Suppose you've added an Open Browser Window behavior to your home page, so that when visitors come to your site, a small window opens, displaying a Web page that advertises some new feature of your site. After they've read the ad, your visitors will want to close the window and continue visiting your site. Why not make it easy for them by adding a "Close this Window" button? To do so, simply add a graphic buttontext works fine, tooand then add a dummy (null) link to it (that is, in the Property inspector, type javascript :; into the Link field). Next, add the Call JavaScript behavior; in the Call JavaScript window that appears, type the following line of JavaScript code: window.close( ) . Finally, after you click OK, make sure that the event is set to onClick in the Behaviors panel. That's all there is to it. The link you've added to the pop-up window offers a working Close button. |
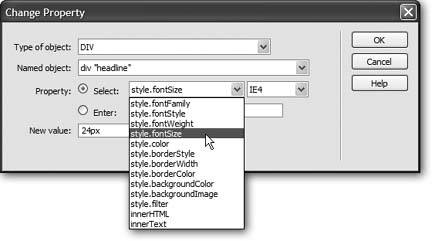
11.4.6.2. Change Property
The Change Property action can dynamically alter the value of a property or change the style of any of the following HTML tags: <div>, <span>, <img>, <form>, <textarea>, or <select>. It can also change properties for radio buttons, checkboxes, text fields, and password fields on forms (see Chapter 10). As with the previous behavior, this one requires a good knowledge of HTML, CSS, and JavaScript. Dreamweaver's built-in HTML, CSS, and JavaScript references (see Section 9.6) can help you get up to speed.
Select a tag, choose this behavior's name from the + menu in the Behaviors panel, and then fill in the following parts of the Change Property dialog box (see Figure 11-18):
-
Type of object . This pop-up menu lists the 11 HTML tags that this behavior can control. Choose the type of object whose property you wish to change.
Note: Ignore the <layer> option in the "Type of object" menu. It's a really old tag that was only ever supported in Netscape 4.
-
Named object . From this pop-up menu, choose the name of the object you want to modify. Names are more common for form elements. You'll more often use an ID (see Section 6.6.2) to identify a <div> tag.
-
Property . Choose the property you want to change (or, if you know enough about JavaScript and CSS, just type the property's name in the Enter field). Any of the options in the menu that begin with "style" refer to CSS style properties. For example, "style.fontFamily" refers to the Font-family property discussed on Section 6.7.
Ignore all but the IE 4 option in the right-side menuthe other browsers listed are uncommon, and incompatible with current browsers. The IE 4 option actually works with IE 5 and IE 6 as well as Firefox and Safari, so it's really more versatile than its name suggests.
Figure 11-18. Caution: The Change Property behavior requires a bit of knowledge about HTML, JavaScript, and CSS. You'll find that modern browsers like Firefox, Safari, and Opera understand all but the style.filter property, which works only in Internet Explorer. In addition, Firefox doesn't understand the innerText option. The options beginning with the word "style" refer to CSS properties. For example, style.backgroundImage is the same as the Background Image property discussed on Section 6.7.2.1.
-
New value . Type the new value you wish to set for this property. This value should be appropriate to the type of property you'll be changing. For example, if you're changing a background color, the value should be a color, like #FF0066. Many of the options in the Property menu refer to CSS properties, so you'll find that the different possible values listed for the different CSS properties in Chapter 6 should work. For example, the style.fontWeight property is the CSS Font Weight property (Section 6.7.1), so you could enter a value of "bold" to change text in an object (inside a <div> tag, for instance) to bold.