Section 3.2. Lists
Lists organize the everyday information of our lives: to-do lists, grocery lists, top-10 lists, and so on. On Web pages, lists are indispensable for presenting groups of items such as links, company services or employees , or a series of instructions.
HTML offers formatting options for three basic categories of lists (see Figure 3-4). The two most common types of lists are bulleted (called unordered lists in the HTML language) and numbered (called ordered in HTML). The third and lesser-known list type, a definition list, comes in handy for creating glossaries or dictionary-like entries.
3.2.1. Bulleted and Numbered Lists
Bulleted and numbered lists share similar formatting. Dreamweaver automatically indents items in either type of list, and automatically precedes each list item by a charactera bullet, number, or letter, for example:
-
Unordered or bulleted lists, like this one, are good for groups of items that don't necessarily follow any sequence. They're preceded by a bullet.
-
Ordered lists are useful when presenting items that follow a sequence, such as the numbered instructions in the following section. Instead of a bullet, a number or letter precedes each item in an ordered list. Dreamweaver suggests a number (1, 2, 3, and so on), but you can substitute Roman numerals, letters , and other variations.
You can create a list from scratch within Dreamweaver, or add list formatting to text already on a Web page.
3.2.1.1. Creating a new bulleted or numbered list
When making a new list in Dreamweaver, you start by choosing a list format, and then typing the list items:
-
In the document window, click where you wish to start a list .
See Chapter 2 for full details on adding text to a Web page.
-
In the Property inspector, click the Ordered or Unordered List button to apply the list format .
Alternatively, you can choose Text
 List Unordered List or Ordered List. Either way, the first bullet or number appears in your document automatically.
 -
When you've finished the list, press Enter or Return twice
The double carriage return ends the list and creates a new empty paragraph.
Figure 3-4. HTML has several predefined list formats, including bulleted lists and definition lists, which let you organize information into orderly units. Once you've told Dreamweaver that you intend to create a bulleted or numbered list, it adds the bullets or the numbering for you automatically.

3.2.1.2. Formatting existing text as a list
You may have several paragraphs of text that you've already typed or pasted in from another program. It's a simple process to change any such group of paragraphs into a list.
-
Select the text you wish to turn into a list .
The easiest way to select text is to drag from the first list item straight down into the last item of the list. Lists are block-level elements; each paragraph, whether it's a headline or regular paragraph, becomes one bulleted or numbered item in the list. In other words, you don't actually need to select all of the text in either the first or last paragraph.
-
Apply the list format .
As when creating a list from scratch as described above, click either the Unordered or Ordered List button in the Property inspector, or choose from the Text
List submenu. The selected paragraphs instantly take on the list formatting, complete with bullets and automatic numbering.
Note: You may sometimes run into this problem: You select what looks like a handful of paragraphs and apply the list format, but only one bullet (or number) appears. This glitch arises when you've used the line break <br> tag to move text down a line in a paragraph. While doing so visually separates lines in a paragraph into separate blocks, the text is still part of single paragraph, which will appear as only one bulleted or numbered item. See Section 2.1.3 for more on the <br> tag and how to avoid this situation.
Whichever way you started making a listeither by typing from scratch or reformatting existing textyou're not stuck with the results of your early decisions. You can add onto lists, add extra spaces, and even renumber them, as described in the following section.
3.2.2. Reformatting Bulleted and Numbered Lists
HTML tags define lists, just as they define other Web page features. Making changes to an existing list is a matter of changing those tags, using Dreamweaver's menu commands and Property inspector tools.
Note: Web browsers generally display list items one on top of the other. If you want to add a little breathing room between each list item, use the CSS margin properties, as described on Section 6.7.4.1.
3.2.2.1. Adding new items to a list
Once you've created a list, it's easy to add items. To add an item at the beginning of a list, click before the first character of the first list item, type the item you wish to add, and press Enter or Return. Dreamweaver makes your newly typed item the first in the list, adding a bullet or number accordingly (and renumbering the other list items, if necessary).
To add an item at the middle or end of a list, click at the end of the previous list item and press Enter or Return. The insertion point appears after a new bullet or number; type your list item on this new line.
3.2.2.2. Changing bullets and numbers
Bulleted and numbered lists aren't limited to just the standard round, black bullet or the numbers 1, 2, and 3. You can choose from two bullet types and a handful of different numbering schemes. Here's how to change their settings:
-
Click once inside any list item .
Strangely enough, you can't change the properties of a list if you've first selected the entire list, an entire single list item, or several list items.
-
Open the List Properties dialog box (Figure 3-5) .
To do so, either click the List Item button in the bottom half of the Property inspector or choose Text
List Properties. (If the list is inside a table cell , your only choice is to use the Text menu. In this situation, the List Item button doesnt appear in the Property inspector.) Figure 3-5. The List Properties dialog box lets you set the type and style of a list. For example, if you select a Numbered List, you can choose from five different styles: Number (1, 2, 3); Roman Small (i, ii, iii); Roman Large (I, II, III); Alphabet Small (a, b, c); and Alphabet Large (A, B, C).

-
Choose a type from the "List type" pop-up menu .
You can turn a numbered list into a bulleted list, or vice versa. You should avoid the two other options in the menuDirectory List and Menu List. These are old list types that won't necessarily work in modern Web browsers.
-
Choose a bullet or numbering style .
Bulleted lists can have three different styles: default, bullet , and square . In most browsers, the default style is the same as the bullet style (a simple, solid, black circle). As you might guess, the square style uses a solid black square for the bullet character.
Numbered lists, on the other hand, have a greater variety of style options. Dreamweaver starts you off with a simple numbering scheme (1, 2, 3, and so on), but you can choose from any of five styles for ordered lists, as explained in Figure 3-5.
-
Set the starting number for the list .
You don't have to begin a numbered list at 1, A, or the Roman numeral I. You can start it at another number, if you wisha trick that can come in handy if, for example, you're creating a Web page to explain how to rebuild a car's engine.
As part of each step, say you want to include a photograph. You create a numbered list, type in the directions for step 1, hit Return, and insert an image (as described in Chapter 5). You hit Return again and type in the text for step 2. Unfortunately, the photo, because it's technically an item in an ordered list, now has the number 2 next to it, and your real step 2 is listed as 3!
If you remove the list formatting from the photo to get rid of the 2, you create one list above it and another below it (as described on Section 3.2.4). Step 2, below the photo, now thinks it's the beginning of a new listand starts over with the number 1!
The solution is to make the list below the photo think it's a new list that begins with 2.
To start the list at something other than 1, type the starting number in the "Start count" field (Figure 3-5). You must enter a number, even if you want the list to use letters. So to begin a list at D instead of A, type 4 in the "Start count" field.
In fact, you can even change the style of a single list item. For instance, you could change the third item in a numeric list from a 3 to the letter C. (Of course, just because you can doesn't mean you should. Dreamweaver is very thorough in supporting the almost overwhelming combination of options available in HTML, but, unless you're building a Dadaist revival site, how often do you want a list that's numbered 1, 2, C, iv, 1?)
-
Click OK to apply the changes .
| FREQUENTLY ASKED QUESTION When Not to Approach the Insert Bar |
| I like the convenience of the Insert bar. Should I use the Insert bar's Text tab for formatting text ? In a word, no. Unlike most of the other panels in the Insert bar, the Text tab is mainly used when working in Code view (see Chapter 10) or to insert special characters like the copyright symbol, as described on Section 2.1. It contains many of the same formatting options as the Property inspector; the h1, h2 , and h3 in this figure, for instance, are the same as Headings 1, 2, and 3 in the Property inspector's format pop-up menu. However, using some of the options, such as li , can generate invalid HTML if not used correctly. Furthermore, despite its usual tidiness, Dreamweaver doesn't clean up code produced this way. In fact, some of these options, when used in Design view, actually split the document window in two, showing the HTML code on top and Design view on bottom. This arrangement is confusing if you're not accustomed to seeingor are just uninterested inthe raw HTML code. All major text-formatting options are available from the Property inspector and Text menu. If you stick to these two tools, you can safely avoid the Text tab. |
Note: Once again, you can access more advanced formatting options for lists using Cascading Style Sheets. For example, you can use a graphic of your own creation to begin each bulleted list item, instead of choosing from the same boring set of square or circular bullets. See Section 6.7.6 for the details.
3.2.2.3. Nested lists
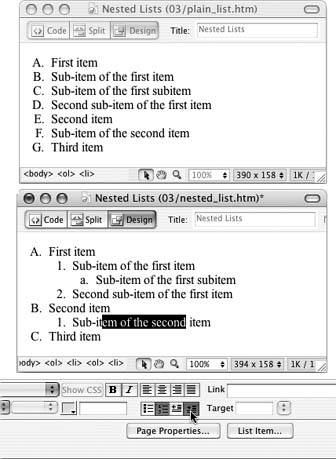
Some complex outlines require multiple levels of lists. Legal documents, for instance, may list major clauses with capital letters (A, B, C, and so on) and use roman numerals (i, ii, iii, and so on) for subclauses (see Figure 3-6).
It's easy to create such nested lists in Dreamweaver; Figure 3-6 shows the steps.
Figure 3-6. Top: To create a nested list, start with a single listin this case, a numbered list using capital letters instead of numbers. Select a subtopic and click the Indent button (where the cursor is in the bottom figure) or choose Text Indent.
Bottom: The item becomes a nested list, indented from the main list and with its own numbering. Notice, too, that the major points have been renumberedletter E from the first figure is letter B in the second figureto reflect the new ordering of the list.
3.2.3. Definition Lists
Definition lists can be used to display items in a dictionary or glossary, or whenever you need to present a term and its definition. Each item in a definition list is composed of two parts : a word or term, and a definition.
As you can see in Figure 3-4, definition lists aren't as fancy as they sound. The first item in the listthe word or termis presented on its own line with no indent, and the second itemthe definitionappears directly underneath, indented.
Note: Behind the scenes, Dreamweaver creates an entire definition list using the <dl> tag. Each item in the list is then composed of two tags: <dt> for the definition term or word, and <dd> for the definition itself.
You can't create a definition list using the Property inspector. Instead, start by highlighting the paragraphs that contain the terms and definitions you wish to include in the list, and then choose Text List Definition List.
To turn a definition list back to regular paragraphs, select it and choose Text List None, or click the Outdent button in the Property inspector.
3.2.4. Removing and Deleting List Items
Dreamweaver lets you take items out of a list in two ways: either by removing the list formatting from an item or items (and changing them back into normal paragraphs) or by deleting their text outright .
3.2.4.1. Removing list items
To remove list formatting from one or more list items (or an entire list), highlight the lines in question and then choose Text List None (or just click the Outdent button on the Property inspector). Youve just removed all list formatting; the text remains on the screen, now formatted as standard paragraphs. (For nested lists, you'll need to click the Outdent button several times.)
If you reformat an item in the middle of a list using this technique, it becomes a regular paragraph. Dreamweaver turns the items above it and below it into separate lists.
3.2.4.2. Deleting list items
A simple way to delete a list or list item is to use the tag selector in the status bar of the document window (see Figure 3-7). To delete an entire list, click anywhere inside the list, and then click its tag in the tag selector<ul> for a bulleted list or <ol> for a numbered listand press Delete. You can also, of course, drag through all the text of the list and then press Delete.
Figure 3-7. The tag selector is a great way to quickly and accurately select an HTML tag. Clicking the <ol> (ordered list) tag, for instance, selects the entire numbered list.

To delete a single list item, click that item in the document window, click the <li> tag in the tag selector, and then press Delete.
Tip: You can rearrange a list by dragging a list item to another position within the list. If it's an ordered list (1, 2, 3, and so on), Dreamweaver automatically renumbers the list. For example, if you select an item numbered 4 (or D, if it's an alphabetical list) and drag it to the second position in the list, Dreamweaver changes the item to 2 (or B) and renumbers all items that follow.However, selecting a list item can be tricky. If you simply drag to select the text, you don't actually select the list item itself, with all its formatting and numbering. To be sure you've selected a list item, click the <li> tag in the tag selector in the document window's status bar (see Figure 3-7). Now, when you drag the selection to a new position in the list, the number (or bullet) follows . You can also select a list item in this way, copy or cut it, and paste it back into the list in another position.