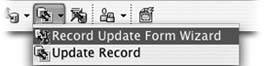
22.2. Updating Database Records Maybe someone made an error while entering data into the database. Maybe the price of your product changes. Or maybe you want to provide a way for your Web visitors to update their email addresses. In any case, the time will come when editing an online database is a necessity. Creating Update Record Forms in Dreamweaver is very similar to creating Insert Record Forms. Both require an HTML form that your audience can fill out and submit. The primary difference is that an update form is already filled out with information from the database. It's like a combination of an Insert Record Form and a record detail page (such as the one created by the Master Detail Page set described on Section 21.6). The first step in creating an update form is to add a recordset to the update page (Section 21.1.2). The recordset will retrieve the data that appears in each field of the update form. The recordset should contain only a single recordthe one to be updated. Therefore, you must use a form or URL parameter to filter the recordset (see Section 21.1.3 for more on filtering). For example, on a page listing company employees , you could add an Edit button that would link to the page containing the update form. If you added a Go To Detail Page server behavior (see Section 21.7) to the employee listing page, you could then pass the ID for a specific employee to the update page. In turn , the update page would use that ID to filter the database for a single record and display the employee information in the form. (If all of this sounds confusing on paper, try the tutorial starting on Section 22.5, which takes you step by step through the process.) After you add the recordset to the update-form page, you have two options for building an update form. You can either let Dreamweaver automate the process with its Insert Update Record Form wizard, or build a form yourself and add the Update Record server behavior. The following pages cover both methods . 22.2.1. The Update Record Form Wizard Dreamweaver can automate most of the steps involved in creating an update form: -
Open a dynamic page with a recordset already added . Remember, the recordset should contain only a single recordthe one to be updated. So you must add a filter when you create the recordset (see Section 21.1.3 for more on filtering recordsets).
Warning: Make sure the recordset used to retrieve the information for the update form is the first recordset added to the page. If it isn't, Dreamweaver won't automatically fill out the Default Value field for each form element (see Figure 22-5).
Figure 22-5. A form field's default value is the information visible when the form first appears on the page. In the case of an update form, each form element will already be filled out with information from the database. After all, this page is meant for editing data that already exists, not for adding a new record. When using the Update Record Form wizard, Dreamweaver is smart enough to fill out the default value for each form field with the proper information from the database (circled in this image). (See the previous Warning above, however.) 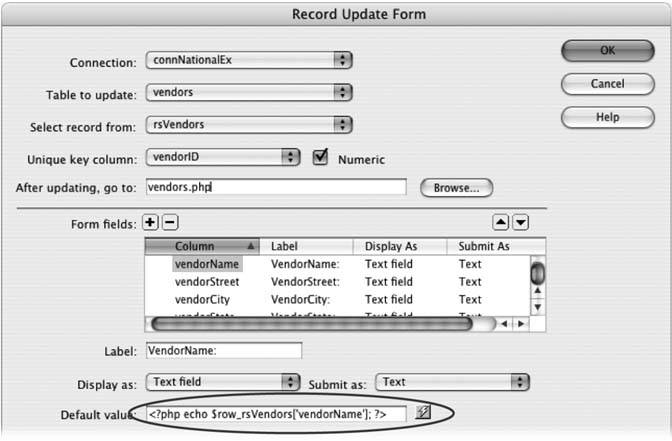 -
-
From the Connection menu, select the database connection . If your site works with several databases, select the connection for the database that this form will add information to. (Database connections are described on Section 20.5.) -
From the "Table to update" menu, choose a table to work with . A list of all tables available in the database appears in this menu. You can edit data only from a single table, and a page can hold only one Update Record behavior. (In fact, a single page can contain only one record-editing server behavior. Therefore, you can't use a single page to add, edit, and delete records; you must create a separate page for each operation.) -
Make sure the recordset you created earlier is selected in the "Select record from" menu . The recordset should be selected already. If it's not, you must have created another recordset first. As a result, the Record Update Form command may function incorrectly (see the Warning on Section 22.2.1). -
In the "Unique key column" pop-up menu, make sure the table's primary key column is selected. If the column contains a numberand it usually doesverify that the Numeric checkbox is turned on . The "Unique key column" is used to identify which record to change during the update process. (For a description of primary keys, see Section 20.3.2.)
Tip: If you get the following error"Please choose a unique key from the selected Recordset, or Click Cancel"then the recordset you added to the page did not include the table's primary key. Edit the recordset and click the "All" button next to the word Columns .
-
Click the Browse button; navigate to and select a file from the Web site . This represents the page that will appear after a record has been updated. A good technique is to select a page that lists the details of the record that's being edited (like the detail page in the master/detail pages discussed on Section 21.6). Then, after updating the page, the visitor will immediately see a page showing the changes. -
If you like, change a column's settings . After clicking a row in the Form fields list, you can change the Label, Display As menu, and Submit As properties of the database column, the same as when inserting a record as described on Section 22.1.1. For example, if the table includes a Description column that might hold a fair amount of text, then select Text Area from the Display As menu. This way, the form will include a larger text box that can display all of the description. You usually don't change the Submit As option, which determines what kind of data to submittext, a number, and so onbecause Dreamweaver automatically gets this information from the database. In addition, you would rarely change the Default Value property. Since this represents the data pulled out of the database for a particular record, modifying the default value will always change that information in the database.
Tip: Sometimes you want to change the Default Value for a column. For example, say a table includes a column to track the date a record was last updated. In this case, you would make the Default Value show the current date (instead of the date already stored in the database). When someone updates a record, the database automatically records the current date in the "last update" field. You can find the ASP and PHP code needed to do just that on Section 22.1.2.
To delete a field so it doesn't appear in the form, click the Remove (minus sign []) button. You should always take this opportunity to remove the table's primary keythe column you selected in step 5. Since the key identifies the record, allowing someone to edit this could cause problems to your database, such as overwriting data for another record. -
Click OK to close the window . Dreamweaver inserts a table, form, and all of the form elements you specified. Once you click OK to close the Record Update Form dialog box, you can never again return to it. From now on, you make any changes by editing the Update Record Server behavior, as described next. You're also free to use any of Dreamweaver's editing tools to format the table, labels, and form elements any way you wish.
Note: After using the Update wizard, don't change the name of the form or its fields. Because the program that updates the database relies on these names , changing them will stop the update code from working.
22.2.2. The Update Record Server Behavior Dreamweaver's Record Update Form wizard makes it delightfully easy to add the table, form, and programming code required to create a Web page for editing database records. But when you need more flexibilityif you've already designed a form that you'd like to use or created a table design for your formthe Update Record server behavior lets you keep your own beautiful design and give it the power to update a database. You must start with a page that has a filtered recordset, as described on Section 22.2Section 22.2.1. Then add a form to the page (see Chapter 10). Make sure the form has one form field for every database column that is to be edited. Don't include a form field for the database table's primary key. (Allowing anyone to change the primary key could have disastrous effects on your database.)
Tip: Giving your form fields the same names used for the database table's columns will speed up the process of adding the Update Record server behavior.
At this point, the form is full of empty fields. If you preview the page, none of the data you retrieved from the recordset appears. To fill the form with data, you must bind data from the recordset to each form field, as follows : -
In the document window, select the form field . Just click the form field to select it.
Note: These instructions apply to text and hidden fields. Information on binding data to radio buttons , checkboxes, and menus appears on Section 22.3.2.
-
In the Property inspector, click the dynamic data button (the lightning bolt) to the right of the Init Val box . The Dynamic Data window appears (Figure 22-7). Figure 22-7. The Dynamic Data window lets you add information from a recordset to form fields, so parts of a form can be pre-filled out. This is exactly what you want to do when updating information already in the database. In fact, the Dynamic Data window will display and let you use additional data sources (like URL variables ) that you've added to the page (see Section 23.2.1). 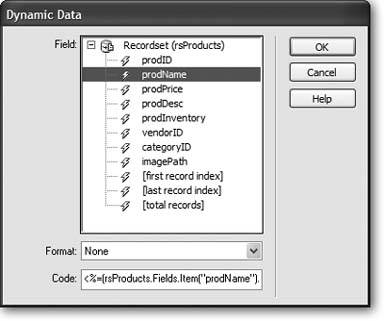
Tip: You can also bind data from a recordset to a form field by dragging the database column from the Bindings panel (Section 21.2.1) and dropping it onto the form field.
-
Click the + button next to the recordset used for the update page . A list of all columns retrieved by the recordset appears. -
Select the name of the table column you wish to bind to the form field. Click OK . You should ignore the Format menu and Code box. The form field is now set to display information from the recordset. Once you've created the form and added recordset information to each field, add the Update Record server behavior: -
Choose Window  Server Behaviors to open the Server Behaviors panel . Server Behaviors to open the Server Behaviors panel . The keyboard shortcut is Ctrl+F9 (  -F9). -F9). -
Click the + button on the panel and select Update Record . The Update Record window opens (see Figure 22-8). Figure 22-8. The Update Record window is very similar to the Record Update Form window (Figure 22-5). The main difference is that here you must manually associate a form element with the correct database column.  -
Change the first five options, if you like . They're the same as described in steps 37 for the Record Update Form tool on Section 22.2.1. They tell Dreamweaver which database to use, which table to update data to, which recordset the record information is coming from, the table's primary key, and which page to go to once the edited information is added to the database. -
From the "Get values from" menu, select the name of the form . Even though you can have only one Update Record behavior per page, it's still possible to have multiple forms on a single page: a form for editing a record and a form for searching the site, for example. Select the name of the form used for editing data. -
Select a form element from the list, and then select the matching database column from the Column menu . For the form's information to end up in the proper database columns, you must tell Dreamweaver which database column you want to store the selected form field's information.
Tip: If you use the name of your database columns to name the form fields too, Dreamweaver automatically associates the two, so you can skip this step.
Let Dreamweaver choose the proper type from the Submit As menu. As with step 6 on Section 22.1.1, this choice depends on how your database is set up (which Dreamweaver can figure out). -
Click OK to close the window and apply the server behavior . The page is now capable of editing information from the database. As with any server behavior, double-clicking its name on the Server Behaviors panelin this case, Update Recordopens the behavior's dialog box so you can make changes to its properties. |