Section 22.1. Adding Data
As noted in Chapter 9, the primary method of collecting information over the Internet is the HTML form . Its basic elementstext boxes, radio buttons , pop-up menus , and so oncan collect a wide assortment of data. But to put this information into a database, you need to either write your own program or simply use Dreamweaver's built-in tools. With its Record Insertion Form wizard and Insert Record server behavior, Dreamweaver makes adding data a simple process.
Warning: You might not want just anyone adding, editing, or deleting database information. To control access to these types of pagesor any page, for that matteruse Dreamweaver's User Authentication server behaviors, as discussed on Section 23.1.
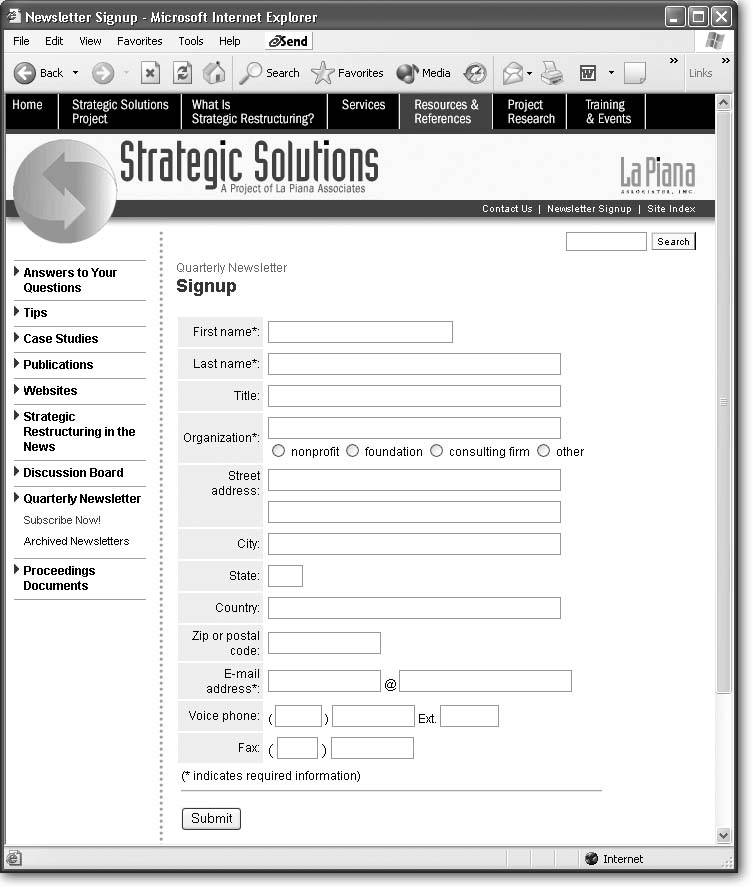
Figure 22-1. Whether you're collecting credit card information for an e-commerce site or gathering sign-up information for an online newsletter, Dreamweaver simplifies the process of collecting information from a Web page and storing it in a database.
22.1.1. Dreamweaver's Record Insertion Form Wizard
Dreamweaver's Record Insertion Form wizard is the quickest way to build a page for adding records to a database. It builds a form, creates a table, and adds all of the necessary programming code in just a couple of steps. To use it:
-
Create a new Web page and save it to your site (or open a dynamic Web page that you've already created) .
Make sure the page uses the extension (.asp, .aspx, .cfm, .php, .jsp) that matches the server model (Section 20.1.1) of your site. (See Section 20.4 for info on creating new dynamic pages.)
-
In the document window, click where you want the insertion form to appear. Choose Insert
 Application Objects Insert Record Record Insertion Form Wizard .
 You can also select Record Insertion Form Wizard from the Insert Record menu on the Application tab of the Insert bar. Either way, the Record Insertion Form window opens (Figure 22-2).
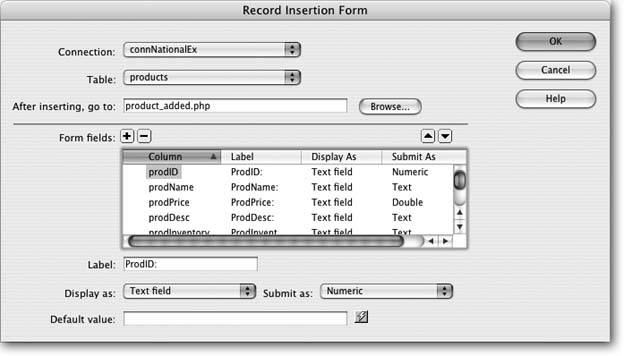
Figure 22-2. When creating a form, it's a good idea to remove columns the database creates for its own use, such as record ID numbers . Here, the column prodID is a unique ID number created by the database. Whenever someone adds a new record, the database creates a new, unique product ID number. You wouldn't want anyone to tamper with this number, so leave it off the form.
-
From the Connection menu, select the database connection .
Dreamweaver needs a place to put the data your forms are collecting. If your site works with several databases, select the connection for the database that this form will add information to. (Database connections are described on Section 20.5.)
-
Choose a table from the Table menu .
A list of all tables available in the database appears in this menu. You can insert data only into a single table, and one page can hold only one Insert Record behavior. This means if you need to add records to multiple tables, you must create multiple Web pages, each with its own Record Insertion form.
If you have a table for customers and another for products, you'll need separate Add Customers and Add Products pages. You could then create a main Administration page that provides links to each of these table-updating pages.
-
Click the Browse button. Navigate to and select a file from your Web site .
Choose the page your visitors will see after adding a record to the database. It could simply be a page saying, "Thanks for signing up with our Web site." Or if the insertion form adds a new employee to your company's employee database, you could choose the page that lists all of the employees (including the one just added to the database).
Note: ASP.NET note : On ASP.NET pages, you also have the option of specifying an "error page," which appears when the addition to the database fails for some reason.
You can also change how the menu item for each database column is formatted on the page, as follows .
-
In the "Form fields" box, select a database column and change its settings, if you like .
Your options include:
-
Label is the text Dreamweaver adds next to the form field on the page. It identifies what someone should type in the field, like First Name. Dreamweaver just uses the name of the column in the databasefName, for instanceso it's usually best to change this text to something more understandable.
-
The "Display as" menu lets you select the type of form element you want to use to collect the column's information. For example, if the column is someone's first name, select Text Field. This selection will add a text box to the form, where visitors can type their names . On the other hand, if people are supposed to choose from a limited number of choices (U.S. Postal Service, FedEx2 day, and FedExnext morning, for example), you might select Radio Group instead.
Radio buttons or pop-up menus can also ensure consistency and rule out typos. On a form that asks visitors to indicate the state they live in, you could offer a pop-up menu that lists the 50 states. If you provided a text box instead, your visitors would be able to type in every conceivable abbreviation and misspelling. (For a description of the different types of form elements, see Section 10.3.)
Note: Dreamweaver can also create dynamic menus, which display data taken from a database. See Section 22.3.3.
-
The " Submit as" menu is automatically determined according to how you've set up your database. It tells Dreamweaver what kind of data the field contains: text, number, date, and so on. In most cases, Dreamweaver figures this information out correctly, so you won't need to change anything.
-
The " Default value" text box lets you preload a form field with information. It's actually the same as a text field's initial value , as described on Section 10.3.2. You can also add a dynamic value generated by your server model's programming language. If you had a field called date , for example, you could add today's date to the field automatically by typing <%= date %> (in the ASP/VBScript server model).
Depending on what type of field you selected from the "Submit as" menu, the Default value text box might be replaced with one of three different types of controls: for a checkbox, radio buttons provide the simple choice of either checked or not checked; if you selected Menu or Radio Group, a properties button appears that lets you set the options that appear in the drop-down menu or radio group on the insert formthe process is the same as adding a dynamic menu or dynamic radio button group, as described on Section 22.3.3.
Note: PHP note : To generate the current date (year, month, and day) in a format that can be stored in a MySQL date field, use this code: < ?php echo date("Y-m-d") ? >. MySQL stores dates in a special format, so a date like 1/15/2005 is stored in a MySQL date field as 2005-01-15.
In most cases, you'll change the label of every column. But for now, leave the other options alone.
-
Click OK to close the window and create the form .
Dreamweaver inserts a table, form, and all of the form elements you specified. At this point, the page is complete and ready to accept information. Unfortunately, Dreamweaver doesn't let you return to this window to make any changes. (If you quickly realize that you made a mistake, you can always use Ctrl+Z [
 -Z] to undo the operation and then reapply Insert Record Form.)
-
To ensure your form works correctly and doesn't produce any errors when it's submitted, add form validation (see the box "Validate That Form" on Section 22.1.2).
Warning: Once you've added the form, don't rename any form fields. You'll break the script responsible for inserting the record. If that happens, see Section 22.2 for information on updating the Insert Record server behavior.
22.1.2. Using the Insert Record Behavior
Dreamweaver's Record Insertion Form wizard makes quick work of adding the table, form, and programming code required to create a Web page for adding data to a table. At times, though, you might want a more customized approach. Perhaps you've already designed a form that you'd like to use or created a beautiful table design for your form. Rather than relying on Dreamweaver's rather pedestrian table and form design, you can supercharge your own design with the Insert Record server behavior.
To build a page for adding database records, start by creating a Web page for your server model (ASP, PHP, ASP.NET, or whatever). Add a form to the page (see Chapter 10). Make sure it has one form field for every column you wish to add data to. Every time a visitor fills out the form, the database acquires a new record.
In some cases, you won't include certain form fields. For example, a database table's primary key (a unique identifier for each record) is usually generated automatically by the database for each new record. In this case, you wouldn't add a field for this column.
| TROUBLESHOOTING MOMENT Validate That Form |
| You never know what someone might type into a Web form and try to submit to a database. Maybe the form field asks for the visitor's age. Aside from the fact you probably won't get an honest answer, the visitor may make an honest mistake by typing the wrong keysew instead of 32, for example. If you set up the database to accept only numbers for the age column, the person submitting the form will receive a stern error message. In another situation, you may require a name and email address. However, someone could easily overlook or ignore these form fields. Dealing with missing and incorrect data is the bane of all database developers. To circumvent these problems, it's a good idea to turn to form validation . You've already encountered Dreamweaver's Form Validation behavior on Section 10.4. It prevents a form from being submitted if information is missing or in the wrong formatif the information in a field is not a number, for instance. Better still, you can download the ultimate extension for validating forms from renowned extension developer Jaro Von Flocken: the Check Form MX extension. It can validate not just text fields but menus, checkboxes, and radio buttons. You can also make sure a value typed into a field is a date, or that two fields have the same value. (You'd want to check that two fields match, for example, in situations where you require visitors to register and make up a password before using your site. To rule out typos, you might require two Password fieldsone labeled Password and another called Confirm Password.) To download the Check Form MX extension, point your Web browser to www.yaromat.com/dw/?t=Behavior&r=validation. Both Dreamweaver's built-in validation tool and Check Form MX are client-side JavaScript programs. That is, when someone submits the form containing a validation error, a JavaScript alert window pops up with the error message. Dreamweaver doesn't include any server-side validation featuresprograms that check the form after it's submitted to the Web server, and then return a Web page listing the errors. This latter option is usually more attractive and professional-looking, but it requires knowledge of programming in VBScript, PHP, or whatever server language your site uses. If you don't know how to do the programming, there's free help, at least for the PHP/MySQL and ASP.NET server models. X-Code.com offers the VDaemon Extension (www.xcode.com/vdaemon_web_form_validation.php) to simplify server-side form validation for PHP. You have a choice of either a basic, free extension, or a souped-up commercial product. ASP.NET aficionados can download WWWeb Concepts' free ASP.NET Form Validation Tool Kit v1.1.5 (www.ebconcepts.com/asp/extension_details.asp?MXP_ID=4). If you're willing to spend some money, WebAssist offers a commercial extension for server-side and client-side Java-Script validation that works with PHP, ASP, and ColdFusion (www.webassist.com/Products/ProductDetails.asp?PID=33). |
In other cases, you might add hidden fields (Section 10.3.7) that aren't set by someone filling out the form. Suppose someone signs up for your online newsletter, and you want to store the date of registration. Instead of letting the visitor fill out the date, add a hidden form field with the current date.
Once you've created the form, add the Insert Record server behavior like this:
-
Choose Window
Server Behaviors to open the Server Behaviors panel . The keyboard shortcut is Ctrl+F9 (
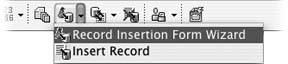
-F9). You can also use the Insert Record menu (see Figure 22-3). Figure 22-3. The Insert Record menu (found on the Application tab of the Insert bar) lets you use either an automated wizard (Record Insertion Form Wizard) or a basic server behavior (Insert Record) to add a record to a database.
-
Click the + button on the panel and select Insert Record .
The Insert Record window opens (see Figure 22-4). It's very similar to the Insert Record Form window, but one key difference is that you must manually associate a form element with the correct database column. (Another difference is that you can't define default values for each form element in this window. You can, however, still apply default values to a form field using the Property inspector, as described on Section 10.3.2.)
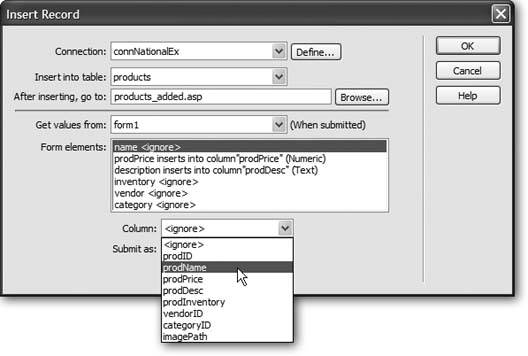
Figure 22-4. In this example, the form contains a field named "name." To ensure that data typed into this field goes into the proper place in the database, you must select prodName from the Column menu. This tells Dreamweaver to store whatever visitors type into the "name" field in the "prodName" column. (You may not have to worry about selecting anything; see the Tip on Section 22.2.)
-
Make your selections from the first three options .
They're the same options described in steps 35 for the Insert Record Form tool (see Section 22.1.1). You're telling Dreamweaver which database to use, which table to add data to, and which page to go to once the information is added to the database.
-
Using the "Get values from" pop-up menu, select the name of the form .
Even though you can have only one Insert Record behavior per page, it's still possible to have multiple forms on a single pagea form for adding a record and a form for searching the site, for example. Select the name of the form used for adding data to the database.
-
Select a form element from the list. Choose the matching database column from the Column menu .
For the form's information to end up in the proper columns of the database, you must tell Dreamweaver which database column will store the selected form field's information. You can let Dreamweaver choose the proper type from the Submit As pop-up menu. As with step 6 on Section 22.1.1, this choice depends on how your database is set up (which Dreamweaver can figure out).
Tip: You need to perform step 5 only if the names of the form fields differ from the names of the columns in the database. If you name a form field prodName , for example, and there's also a database column named prodName , Dreamweaver automatically connects the two in the Insert Record window.
-
Click OK to close the window and apply the server behavior .
The page is now capable of adding information directly to the database.
If you change the name of a form field, add a form field, or wish to change any of the settings for this behavior, you can edit it by double-clicking Insert Record on the Server Behaviors panel. This selection opens the Insert Record window once again.