Section 3.2. Class Selectors: Pinpoint Control
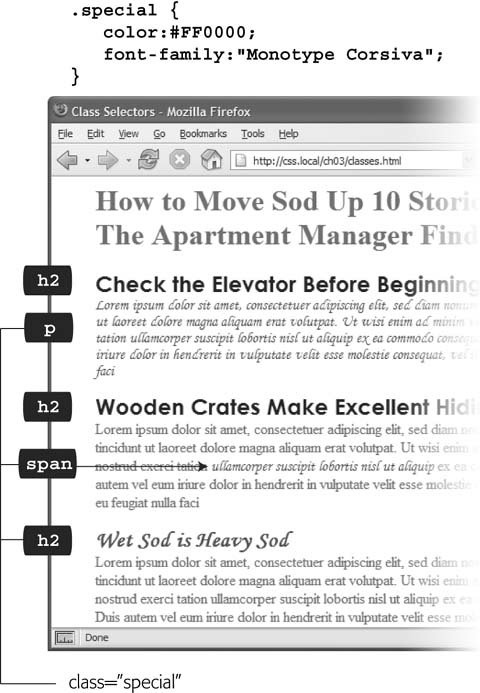
3.2. Class Selectors: Pinpoint ControlWhen you don't want every instance of a paragraph or heading tag to get the same styling, CSS lets you create a class selector with a name of your choosing, and then selectively apply it to certain bits of HTML on your page. For example, you can create a class style named .copyright and then apply it only to a paragraph containing copyright information, without affecting any other paragraphs. Class selectors also let you pinpoint an exact element on a page, regardless of its tag. Say you want to format a word or two inside of a paragraph, for example. In this case, you don't want the entire <p> tag affected, just a single phrase inside it, so you can use a class selector to indicate just those words. You can even use a class selector to apply the same formatting to multiple elements that have different HTML tags. For example, you can give one paragraph and one second-level heading the same stylingperhaps a color and a font that you've selected to highlight special information, as shown in Figure 3-3. Unlike tag selectors which limit you to the existing HTML tags on the page, you can create as many class selectors as you like and put them anywhere you want. Note: When you want to apply a class selector to just a few words contained inside another tag (like the middle paragraph in Figure 3-3), you need a little help from the <span> tag (Section 1.2.1). See the box in Section 3.1 for more detail. You've probably noticed the period that starts every class selector's namesuch as .copyright and .special . It's one of a few rules to keep in mind when naming a class:
Figure 3-3. Class selectors let you make highly targeted design changes. For example, you can stylize one instance of an <h2> heading ("Wet Sod is Heavy Sod"). The class selector .special tells the browser to apply the style to just that single <h2> tag. Once you've created a class selector, you can use it on other tags, like the top paragraph on this page. Apart from the name, you create class styles exactly like tag styles. After the class name, simply slap on a declaration block containing all of the styling you desire : .special { color:#FF0000; font-family:"Monotype Corsiva"; } Because tag styles apply across the board to all tags on a Web page, you merely have to define them in the head of the page: the HTML tags that make them work are already in place. The extra freedom you get with class styles, though, comes with a little more work. Using class selectors is a two-step process. After you create a class rule, you must then indicate where you want to apply that formatting. To do so, you add a class attribute to the HTML tag you wish to style. Say you create a class .special that you'll use to highlight particular page elements. To add this style to a paragraph, add a class attribute to the <p> tag, like so: <p class="special"> Note: In the HTML, as part of the class attribute, you don't put a period before the class name; the period's only required for the class selector name in a style sheet. When a Web browser encounters this tag, it knows to apply the formatting rules contained in the .special style to the paragraph. You can also apply class formatting to only part of a paragraph or heading by adding a < span> tag as described in the box below. Once you create a class style, you can apply it to just about any tag on the page. Although they give you almost limitless formatting possibilities, classes aren't always the right tool when using CSS for laying out a page. Enter the ID selector, which lets you designate a formatting rule for one specific use on a page, as described next .
|
EAN: 2147483647
Pages: 154