2.5. Tutorial: Creating Your First Styles The rest of this chapter takes you through the basic steps for adding inline styles, writing CSS rules, and creating internal and external style sheets. As you work through this book, you'll help design a fictitious Web site called CosmoFarmer.com, creating various aspects of its design, and eventually styling entire pages of the site. To get started, you need to download the tutorial files located on the book's companion Web site at www.sawmac.com/css/. Click the tutorial link and download the Zip archive containing the files (detailed instructions for unzipping the files are on the Web site as well). Each chapter's files are in a separate folder, named chapter_2, chapter_3 , and so on. Next , you need to launch your favorite Web page editing software, whether it's a simple text editor like Notepad or TextEdit, or a visually oriented program like Dreamweaver or Microsoft Expression Web Designer (for information on selecting an editor, see Section 3.6). WORKAROUND WORKSHOP
Don't Get Caught in the Cache | | A browser's cache is a great speed-boost for Web surfers. Whenever the cache downloads and stores a frequently used filelike an external CSS file or an imageit saves precious moments traveling the relatively sluggish highways of the Internet. Instead of redownloading the next time it needs the same file, the browser can go straight to the new stufflike a yet-to-be- viewed page or graphic. But what's good for your visitors isn't always good for you. Because the Web browser caches and recalls downloaded external CSS files, you can often get tripped up as you work on a site design. Say you're working on a page that uses an external style sheet, and you preview the page in a browser. Something doesn't look quite right, so you return to your Web editor and change the external CSS file. When you return to the Web browser and reload the page, the change you just made doesn't appear! You've just been caught by the cache. When you reload a Web page, browsers don't always reload the external style sheet, so you may not be seeing the latest and greatest version of your styles. You have two ways around this snafu: turn off the cache or force the browser to reload everything. In most browsers you can force reload a page (which also reloads all linked files) by pressing the Ctrl (  ) key and pressing the browser's Reload button; Ctrl+F5 also works on Windows for Internet Explorer; and Ctrl+Shift+R ( -Shift-R) is Firefox's keyboard shortcut. ) key and pressing the browser's Reload button; Ctrl+F5 also works on Windows for Internet Explorer; and Ctrl+Shift+R ( -Shift-R) is Firefox's keyboard shortcut. You can also completely turn off the cache. In Internet Explorer, choose Tools  Internet Options General tab; in the Temporary Internet Files section, click Settings. Make sure the "Check for newer versions of stored pages option's set to "Every visit to the page." Click OK twice to close the Internet Options window. In Firefox, choose Tools Options (on Windows), or Firefox Preferences (Mac) to open Firefoxs Preferences window; click the Privacy button, then the Cache tab, and then set the cache disk space to 0. Internet Options General tab; in the Temporary Internet Files section, click Settings. Make sure the "Check for newer versions of stored pages option's set to "Every visit to the page." Click OK twice to close the Internet Options window. In Firefox, choose Tools Options (on Windows), or Firefox Preferences (Mac) to open Firefoxs Preferences window; click the Privacy button, then the Cache tab, and then set the cache disk space to 0. For Safari on the Mac, download the free Safari Enhancer at www. versiontracker .com/dyn/moreinfo/macosx/17776. Turning off the cache can drastically slow your regular Web surfing activity, so make sure you turn it back on once you're done editing your CSS files. |
Note: If you use Dreamweaver, then check out Appendix B to learn how to use that program to create styles and style sheets. Dreamweaver, along with many other HTML-editing programs, also lets you work on the raw HTML code by switching to Code View: Give that a shot for this tutorial.
2.5.1. Creating an Inline Style When you type a CSS rule (just like the ones described in Section 2.1) directly into a page's HTML, you're creating an inline style. Inline styles offer none of the time-and bandwidth-saving benefits of style sheets, so the pros hardly ever use them. Still, in a pinch , if you absolutely must change the styling on a single element on a single page, then you may want to resort to an inline style. And if you do, you at least want the style to work properly. The important thing is to carefully place the style within the tag you want to format. Here's an example that shows you exactly how to do it: -
In your Web page editing program, open the file chapter_2 basic.html . This simple-but-elegant XHTML file contains a couple of different headings, a paragraph, an unordered list, and a copyright notice inside an <address> tag. You'll start by creating an inline style for the <h1> tag. -
Click inside the opening <h1> tag and type style=" color : red;" . The tag should look like this: <h1 style="color: red;"> The style attribute is HTML, not CSS so you use the equals sign after it and enclose all of the CSS code inside quotes. Only the stuff inside the quotes is CSS. In this case, you've added a property named colorwhich affects the color of textand you've set that property to red (Section 6.1.2 talks more about coloring text). The colon separates the property name from the property value that you want. Next you'll check the results in a Web browser. -
Open the basic.html page in a Web browser . For example, choose File Open File, depending on your browser. Many HTML editors also include a "Preview in Browser function, which, with a simple keyboard shortcut, or menu option, opens the page in a Web browser. It's worth checking your program's manual to see if it includes this timesaving feature. When you view the page in a browser, the headline is now red. Inline styles can include more than one CSS property. You'll add another property next. -
Return to your HTML editor, click after the semicolon following the word "red" and type font- size : 4em; . The semicolon separates two different property settings. The <h1> tag should look like this: <h1 style="color: red;font-size: 4em;"> -
Preview the page in a Web browser. For example, click your browser window's Reload button (but make sure you've saved the XHTML file first.) . The headline's now massive in size. And, you've had a taste of how labor- intensive inline styles are. Making all the <h1> headings on a page look like this one could take days of typing and add acres of HTML code. -
Return to your page editor and delete the entire style property, which returns the heading tag back to its normal <h1> . Next, you'll create a style sheet within a Web page. 2.5.2. Creating an Internal Style Sheet A better approach than inline styles is using a style sheet that contains multiple CSS rules to control multiple elements of a page. In this section, you'll create a style that affects all top-level headings in one swoop. This single rule automatically formats every <h1> tag on the page. -
With the file basic.html open in your text editor, click directly after the closing </title> tag. Then hit Return and type < style type="text/css "> . The HTML should now look like the following (the stuff you've added is in bold): <title>Basic Web Page</title> <style type="text/css"> </head> The opening <style> tag marks the beginning of the style sheet; you'll follow this tag with a CSS selector that marks the beginning of your first style. -
Press the Enter or Return key, and type h1 { . The h1 indicates the tag to which the Web browser should apply the upcoming style. The weird bracket thingy after the h1 is called an opening brace , and it marks the beginning of the CSS properties for this style. In other words, it says, "the fun stuff comes right after me." -
Press Enter (Return) to create a new line, hit the Tab key, and type color :red ; . You've typed the same style property as the inline version color and set it to red . As explained back in Section 2.1, the final semicolon marks the end of the property declaration.
Note: Technically, you don't have to put the style property on its own line, but it's a good idea. With one property per line, it's a lot easier to quickly scan a style sheet and see all the properties for each style. Also, the tab's another helpful visual organizing technique (you can also insert a few spaces instead). The indentation makes it easy to discern all of your rules at a glance, since the selectors (like h1 here) line up along the left edge, with the properties spaced a bit out of the way.
-
Press Enter (Return) again and add four additional properties, like so : font-size: 2em; font-family: Arial, sans-serif; margin: 0; border-bottom: 2px dashed black; Each of these properties adds a different visual effect to the headline. The first two assign a size and font to the text, the third removes space from the around the headline, and the last property adds a line underneath the headline. Part Two covers all these properties in detail. Your work on this style is complete, so next you'll indicate its end. -
Press Enter (Return) and type a single closing brace on the last line: } . As the partner of the opening brace you typed in step 2, this brace's job is to tell the Web browser "here ends this particular CSS rule." All you need to wrap up the style sheet is a closing tag. -
Press Enter (Return) and type </style> . The closing </style> tag marks the end of the style sheet. Congratulationsyou've just created an internal style sheet. The code in your page should now look like so: <title>Basic Web Page</title> <style type="text/css"> h1 { color: red; font-size: 2em; font-family: Arial, sans-serif; margin: 0; border-bottom: 2px dashed black; } </style> </head> -
Preview the page in a Web browser . You can preview the page by opening it in a Web browser as described in step 3 in Section 2.5.2, or, if the page is still open in a browser window, then just click the Reload button. In either case, the page should now look like Figure 2-3. Next you'll add another style.
Note: Always remember to add the closing </style> tag at the end of an internal style sheet. When you don't, a Web browser displays the CSS style code followed by a completely unformatted Web pageor no Web page at all.
-
Back in your text editing program, click after the closing brace of the h1 style you just created, press Return, and then add the following rule : p { color: #003366; font-size: .9em; line-height: 150%; margin-top: 0; } This rule formats every paragraph on the page. Don't worry too much right now about what each of these CSS properties is doing. Later chapters cover these properties in depth. -
Preview the page in a browser . The page is starting to shape up. You can see what stylistic direction the page is headed in. To finish the page, add rules to format the Heading 2, unordered list, and copyright notice. Figure 2-3. CSS easily formats text in creative ways, letting you change fonts, text colors, font sizes, and even adding decorative borders and underlines. 
The process you've just worked through is CSS in a nutshell : Start with an HTML page, add a style sheet, and create CSS rules to make the page look great. In the next part of this tutorial, you'll see how to work more efficiently using external style sheets. 2.5.3. Creating an External Style Sheet Since it groups all of your styles at the top of the page, an internal style sheet's a lot easier to create and maintain than the inline style you created a few pages ago. Also, an internal style sheet lets you format any number of instances of a tag on a page, like the <h1> tag by typing one simple rule. But an external style sheet's even betterit can store all of the styles for an entire Web site . Editing one style in the external style sheet updates the whole site. In this section, you'll take the styles you created in the previous section and put them in an external style sheet. -
In your text editing program, create a new file and save it as global.css in the same folder as the Web page you've been working on . External style sheet files end with the extension .css. The file name global.css indicates that the styles contained in the file apply throughout the site. (But you can use any file name you like, as long as it ends with the .css extension.) Start by adding a new style to the style sheet. -
Type the following rule into the global.css file : body { background-image: url(/books/2/835/1/html/2/images/bg.jpg); background-repeat: repeat-x; } This rule applies to the body tagthe tag that holds all the content visible in a Web browser windowand adds a background image to the page. Unlike a similar property in HTML, the CSS background-image property can display the graphic in many different waysin this case, tiled horizontally across the top of the page. You can read more about background image properties in Section 8.2. Instead of recreating the work you did earlier, just copy the styles you created in the previous section and paste them into this style sheet. -
Open the basic.html page that you've been working on and copy all of the text inside the <style> tags. (Don't copy the <style> tags themselves .) Copy the style information the same way you'd copy any text. For example, choose Edit Copy or press Ctrl-C ( -C). -
In the empty global.css file, paste the style information by selecting Edit Paste, or pressing Ctrl-V ( -V) . An external style sheet never contains any HTMLthat's why you didn't copy the <style> tags. -
Save and close global.css . Now you just need to clean up your old file and link the new style sheet to it. -
Return to the basic.html file in your text editor and delete the <style> tags and all of the CSS rules you typed in earlier . You no longer need these styles, since they're in the external style sheet you're about to attach. -
In the space where the styles used to be (between the closing </title> tag and the opening <body> tag) type the following : <link href="global.css" rel="stylesheet" type="text/css" /> The <link> tag is one way to attach a style sheet to a page; another option is the CSS @import directive, as discussed in Section 2.4.2. The link tag specifies the location of the external style sheet. (You can read up on the two other attributes rel and type in Section 2.4.2.)
Note: In this example, the style sheet file's in the same folder as the Web page. If it were in a different folder from the page, then you'd use a document- or root- relative path to indicate where the file is. The routine's the same as when you link to any Web page. (For a brief primer on document-and root-relative links visit: www.communitymx.com/content/article.cfm?cid=230AD.)
-
Save the file and preview it in a Web browser . It should look the same as in step 9 in Section 2.5.2, with the one addition of a groovy graphic running along the top edge of the page (thanks to the CSS you added in step 2). The CSS rules in this external style sheet are the same as the ones from the internal style sheet; they're just located in a different place. To demonstrate how useful it can be to keep your styles in their own external file, you'll attach the style sheet to another Web page.
Note: If the Web page doesn't have any formatting (for example, the CosmoFarmer heading isn't red), then you've probably mistyped the code from step 6, or saved the global.css file in a folder other than the one where the basic.html file is. In this case, just move the global.css into the same folder.
-
Open the file chapter_2 linked_page.html . This lead story from CosmoFarmer.com contains some of the same HTML tagsh1, h2, p, and so onas the other Web page you've been working on. -
Click after the closing </title> tag and press Enter (Return) . You'll now link to the style sheet. -
Type the same <link> tag you did in step 6 above . The Web page code should look like this (the code you just typed appears in bold): <title>Explaining Irrigation Problems To Your Downstairs Neighbors</title> <link href="global.css" rel=" stylesheet" type="text/css" /> </head> -
Save the page and preview it in a Web browser . Ta-da! Just one line of code added to the Web page is enough to instantly transform its appearance. To demonstrate how easy it is to update an external style sheet, you'll do so by editing one style and adding another. -
Open the global.css file and add the CSS declaration margin-left: 25px ; at the end of the p style . The code should look like this (the bold text is what you've just added): p { color: #003366; font-size: .9em; line-height: 150%; margin-top: 0; margin-left: 25px; } Last but not least, create a new rule for the h2 tag. -
Click at the end of the p style's closing }, press Enter (Return), and add the following rule : h2 { color: #FFFFCC; margin-bottom: 0; padding: 5px 0px 3px 25px; background-color: #999999; } Most of these CSS properties you've encountered already. You'll learn about padding and backgrounds in Chapter 7. -
Save the file global.css and preview both the basic.html and linked_page.html files in a Web browser. Figure 2-4 shows the completed linked_page.html file . Notice that the appearance of both pages changes, based on the simple edits you made to the CSS file. Close your eyes and imagine that your Web site has a thousand pages. Aaaahhhhhhh, the power. Figure 2-4. Using an external style sheet, you can update an entire site's worth of Web pages by editing a single CSS file. In addition, by moving all of the CSS code out of an HTML document and into a separate file, you cut down on the file size of your Web pages so they load much faster. 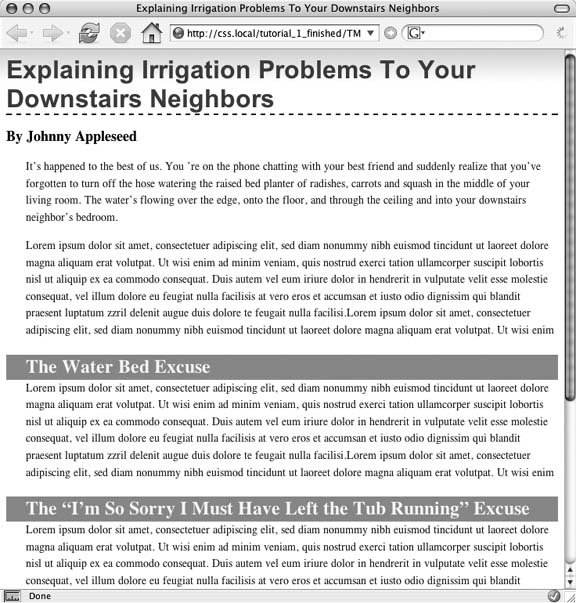
|