| You begin most CSS- related tasks in the CSS Styles panel, which is the command center for creating styles (see Figure 6-1). To open it, choose Window  CSS Styles (or press Shift-F11). CSS Styles (or press Shift-F11). NOTE If you're used to Dreamweaver MX, you'll find that Dreamweaver MX 2004 introduces significant changes to how you create and use styles. The CSS Styles panel (Figure 6-1) now only displays CSS styles; you can no longer use it to apply styles. In addition, it now lists all styles, not just class (or what Dreamweaver used to call custom ) styles. The CSS Styles panel lists the names of all styles available to the page, including external and internal style sheets. In this example, one external style sheet ”global.css ”contains five styles. The top three are tag styles (notice that the names match various HTML tags), while the bottom two are class styles (note the period at the beginning). There's also one tag style defined in an internal style sheet ”the one listed below "<style>." Click the - icon to the left of the style sheet to collapse the list of styles, hiding them from view. 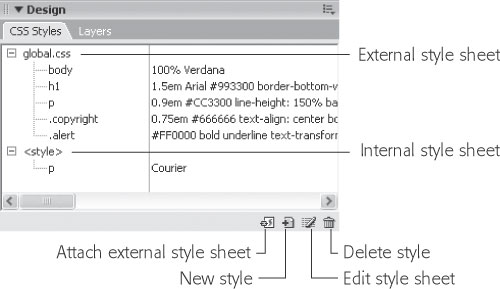 6.2.1 Phase 1: Set Up the CSS Type To create a new style, click the New Style button on the CSS Styles panel (see Figure 6-1), or choose Text CSS Styles New CSS Style. The New CSS Style dialog box appears (Figure 6-2), where you begin the process of creating your new style: -
Selector Type. Click the appropriate radio button for the kind of style you're creating: Class (to create your own style from scratch) or Tag (to create an HTML tag style that Dreamweaver will automatically apply to each occurrence of the tag). See the facing page for a discussion of these two types. The third type offered here, Advanced, lets you create advanced style types such as IDs, pseudo-classes, and contextual selectors. (These are discussed beginning on Section 6.6.) -
Name . If you clicked the Class button, type a name for the new style, to replace Dreamweaver's bland default name ( .unnamed1 ). All class styles begin with a period, according to standard Cascading Style Sheet convention.  | If you're in a desperate hurry, you can leave the period out. Dreamweaver adds it automatically when it puts the style in the style sheet. | |
Class style names must begin with a letter, too, and can only contain letters and numbers . Dreamweaver lets you know if you use any invalid characters for the name. If you chose Tag instead, select the HTML tag you want to redefine from the Tag pop-up menu (which appears when you click the Redefine HTML Tag button). | | If you're an HTML guru, you may find it faster to type the tag (minus the brackets) in the Name box. For example, if you want to create a style for all unordered (bulleted) lists, type ul . | |
If you clicked the Advanced button, Dreamweaver lets you type any valid CSS selector type (Section 6.2.2). You'll use this feature for some advanced CSS tricks, but you can also use it just to create a tag or class style. -
Define In. Click This Document Only if you want the styles to apply only to the current Web page (creating an internal style sheet, as described on Section 6.1.2). To create a new external style sheet, choose New Style Sheet File from the Define In pop-up menu. This option not only creates a new external CSS file (which you can save anywhere in your site folder), but adds the necessary code in the current document to link it to that file. If you've previously linked this document to an external style sheet (Section 6.1.2), that style sheet's name will appear in the pop-up menu, indicating that Dreamweaver is going to store the new style in this style sheet file.
In the New CSS Style dialog box, you choose a type of style and give it a name. The label next to the naming box changes depending on the type of style you choose. In this example, since Class is selected, the Name label appears; if you choose the Tag option, it changes to Tag (or Selector, if you're using the Advanced option). 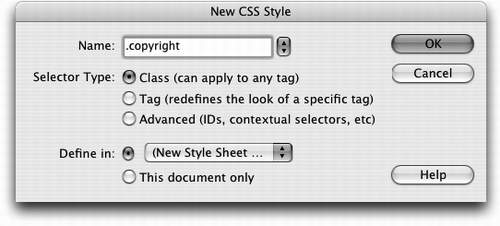 If you indicated that you want to create an external style sheet, clicking OK makes a Save Style Sheet As dialog box appear. Navigate to your site's folder and type a name for the new external CSS file. Just as HTML files end in .html, CSS files end in .css. | | If you'll be using this style sheet for all of the pages in your site, you might want to save it in the root folder of your site and give it a general name like site_styles.css or global.css . (You don't have to type the .css file name extension, by the way. In this case, Dreamweaver adds it.) | |
No matter what "Define in" option you selected, clicking OK eventually brings you to the Style Definition window. 6.2.2 Phase 2: Defining the Style The CSS Style Definition window provides access to all of the formatting options available to you and your Web page text and graphics (see Figure 6-3). A blow-byblow description of these various options begins on Section 6.7. POWER USERS' CLINIC
Anatomy of a Style Dreamweaver automatically handles the details of adding the proper CSS code to your pages, but if you're looking for something to read in bed, here's the behind-the-scenes scoop on how it works. When you create an internal style sheet, Dreamweaver adds a pair of <style> tags to the head of the page (and a pair of HTML comment tags that hide the CSS from very old browsers). The opening <style> tag tells a Web browser that the following information is not HTML ”it's CSS code. When the Web browser encounters the closing </style> tag, it knows the CSS style information has ended. Each line inside the <style> tag is a single style. An HTML tag style for the Heading 1 tag (<h1>), for example, might look like this: h1 { font-size: 24px; color: #003399} The first part ”h1 ”is called a selector (in CSS-speak), and indicates what the style applies to. In this case, wherever the <h1> (Heading 1) tag appears in the Web page's code, this style will apply. The information between the braces ”{ } ”states what formatting the browser should apply. For example, the code shown above contains two formatting rules for the <h1> tag. Each rule is called a declaration and is composed of a property and a value. For example, font-size : 24px is one declaration with a property of font-size and a value of 24px . In other words, this rule tells a Web browser that text inside an <h1> tag should be 24 pixels tall. The second declaration in the code makes the text of all <h1> tags show up using the color #003399. A class style looks just like an HTML tag, except that instead of a tag, the selector is a name you've supplied preceded by a dot, like this: .company { font-size: 24px; color: #003399} Styles stored in an external style sheet look exactly the same; the only difference is that external style sheets don't include the <style> tags and shouldn't include any HTML code. You can open a page in Code view (choose View Code) and edit an internal style sheet, just as you would the HTML of the page (see Chapter 9). In Dreamweaver MX 2004, you can also look at the raw style information of an external style sheet by opening the .css file within Dreamweaver. Simply choose File Open and navigate to the CSS file in the site. Click Open, and then edit away. Dreamweaver MX 2004 also opens the external style sheet of any style you double-click in the CSS styles panel (see Figure 6-1). |
Once you've defined the style, click OK in the Style Definition window. Dreamweaver adds the style to the specified style sheet, and makes it appear in the CSS Styles panel (Figure 6-1). For ultimate formatting control, Dreamweaver lets you set 67 different Cascading Style Sheet properties from the CSS Style Definition window. To learn about these options, see Section 6.7. 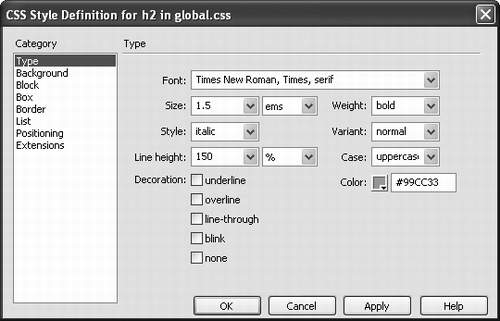 The real trick to creating a style is mastering all of the different properties available, such as borders, margins, and background colors, and then learning which ones work reliably in the different browsers. |