| Once you've created styles, applying them is easy. In fact, if you created HTML tag styles, you needn't do anything to apply them, because their selectors (see the box on Section 6.2.2) automatically dictate which tags they affect. 6.3.1 Linking to an External Style Sheet Whenever you create an external style sheet, Dreamweaver automatically links it to the current document. To use its styles in a different Web page, however, you must attach it to the page. To do so, open the Web page to which you wish to add the style sheet. Click the Attach Style Sheet button (see Figure 6-1) on the CSS Styles panel. (If the CSS Styles panel isn't open , choose Window  CSS Styles or press Shift-F11.) CSS Styles or press Shift-F11.) The Link External Style Sheet window appears. Click the Browse button. In the Select Style Sheet File dialog box that appears, navigate to and double-click the CSS (.css) file you wish to attach to the document. If Dreamweaver offers to copy the style sheet file into your site's root folder, click Yes. The Link External Style Sheet window provides two other options: Link or Import. These two choices are nearly identical; they're simply two different methods of attaching an external style sheet to a Web page. The only real difference is that Netscape Navigator 4 doesn't understand the Import method. For greatest compatibility, use the Link option.  | Some sneaky Web developers take advantage of Netscape Navigator 4's inability to understand the Import method. Since Netscape 4 doesn't display many CSS properties correctly, some designers create two external style sheets: one with basic formatting that Netscape understands, and one with more complex CSS options that more advanced browsers can display. First attach the Netscape style sheet using the Link option, and then attach the second style sheet using the Import method. Make sure to attach the linked style sheet first. Although Netscape will only read the linked style sheet, other browsers will read both. But because you attached the imported style sheet second, it appears below the other style sheet in the code of the page, and its styles will take precedence. (That's the "cascading" part of Cascading Style Sheets; see Section 6.5.2.) | |
Dreamweaver adds the necessary HTML code to the head of the Web page, and automatically formats any tags in the document according to the style sheet's HTML tag styles. You'll see the formatting changes take place in the document window immediately after attaching the external style sheet. If the style sheet contains class styles, on the other hand, you won't see their formatting effects until you apply them to an element on the page, as described next . 6.3.2 Applying a Class Style You can apply class styles to any selection in the document window, whether it's a word, an image, or an entire paragraph. (You can apply any class style to any element, although doing so doesn't always make sense. If you format a graphic with a style that specifies bold, red Courier type, it won't look any different.) For example, suppose your company's name appears in a paragraph of text on a Web page that includes a class style named .company. To format that text using the class style, you select the name in the document window and apply the style, as described below. Similarly, to format larger selections, such as an entire paragraph, you'd select the paragraph and apply the class style. In fact, you can apply a class style to any HTML tag, such as the <p> (paragraph), <td> (table cell ), or <body> tags. When you apply a class style (.content, for example) to a tag, Dreamweaver adds a special class property to the page's code, like this: <p class="company">. On the other hand, if you apply a class to a selection that isn't a tag ”a single word that you've double-clicked, for example ”Dreamweaver wraps the selection within a <span> tag like this: <span class="company">The National Exasperater</span>. This tag, in other words, applies a style to a span of text that can't be identified by a single tag. As you can see, it doesn't take much code to add a style to a Web page. A single application of a CSS style might add only 15 characters to your document (<p class="company">). When you compare that compact instruction with the equivalent HTML code required to produce the same formatted text (such as <font size ="5" face="Georgia, Times New Roman, Times, serif " color ="#999933"> The National Exasperater</font>, class styles look downright petite. To apply a class style to text, select some words. Then, from the Style menu in the Property inspector, select the style name (Figure 6-4). To style an entire paragraph, you only need to place the cursor anywhere inside the paragraph (or heading) before using the Property inspector. To apply a class style to an object like an image, select the object (as always, the tag selector in the bottom of the document window is a great way to select a tag). Then use the Class pop-up menu on the Property inspector (Figure 6-4) to select the style name. The Property inspector provides the easiest method of applying a class style. Depending on what you've selected on the page (text, an image, or some other HTML tag) you'll encounter one of two different menus ”the Style menu (top) or the Class menu (bottom). Either way, it's the same menu with the same options, and you use it to select the name of a style to apply it to whatever you've selected in the document window. You can also remove a style by selecting None from the menu. 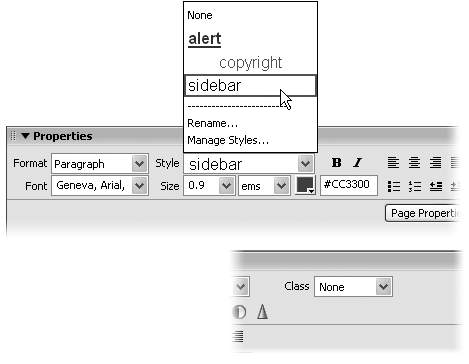 You can also apply a class style by selecting whatever element you wish to style, choosing Text > CSS Styles, selecting the style from the submenu. Finally, you can also apply a class from the document window's tag selector, as shown in Figure 6-5. 6.3.3 Un-Applying a Class Style To remove a style from an object on a Web page, simply select the element and select None from the Property inspector's Style menu (see Figure 6-4). You can also choose Text CSS Styles None to remove a style from any selection (even non-text elements like images or tables).
You can apply a class style directly to a tag using the document window's tag selector. Just right-click (Control-click) the tag you wish to format, and then select the class style from the Set Class submenu. In addition, the tag selector lets you know if a tag has a class style applied to it. If so, the style's name is added at the end of the tag. For example, in the bottom figure, a class style named .newsBox2 is applied to a table cell (the <td> tag) on the page. 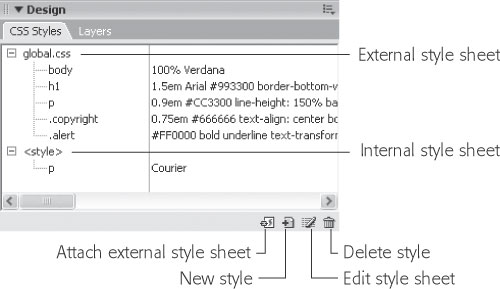 You can't, however, remove tag styles from HTML tags. For example, suppose you've redefined the <h1> tag using the steps outlined on Section 6.2. If your page has three Heading 1 (<h1>) paragraphs, and you want the third heading to have a different style than the other two, you're out of luck. The only way to remove the formatting is to delete the <h1> style altogether (see Section 6.4.3), which, of course, would remove the formatting from all three headings. In this case, you'd have been better off creating a class style and applying it to the first two headlines only. FREQUENTLY ASKED QUESTION
When Formatting Disappears Sometimes when I copy text from one Web page and paste it into another Web page, all of the formatting disappears. When you use Cascading Style Sheets, keep in mind that the actual style information is stored either in the <head> of the Web page (for internal style sheets) or in a separate CSS file (an external style sheet). When you copy and paste text, the styles themselves don't go along for the ride. For example, if you copy a paragraph that has a class style applied to it and paste it into another document, the code in the paragraph is pasted (<p class="company"> for instance), but the actual "company" style, with all its formatting properties, isn't. The best solution is to use a common external style sheet for all pages on your site. That way, when you copy and paste text, all the pages share the same styles and formatting. So in the example above, if you copy a paragraph that includes a class style ”class="company" ”into another page that shares the same style sheet, the paragraphs will look the same on both pages. If you use the Property inspector to format text as described in Chapter 3, Dreamweaver MX 2004 creates its own internal style sheet, which can make things confusing when you copy and paste. Fortunately, you can export the styles in an internal style sheet into an external one; see the Tip on Section 6.2.1. You can then use the method described on Section 6.3 to attach that external style sheet to any page on the site. |
|