Advanced Layer Techniques
This section takes you through some of Photoshop’s advanced layer techniques such as setting layer opacity, using blending modes, adding adjustment and fill layers, and creating special layer style effects such as drop shadows, glows, bevels, and overlays.
Setting layer opacity
When working with a layered image, you may want to create a special effect by making one or more layers semi-transparent. Creating transparent and semi-transparent layers lets the layers below show through. The lower the opacity setting in the Layers palette, the more transparent the layer is.
To set the opacity for a layer, select the layer in the Layers palette, and then use the Opacity or Fill slider bars to set a layer’s transparency (see Figure 8-11). The Opacity slider sets transparency for the entire layer, affecting blending modes and any layer styles, whereas the Fill slider affects only painted pixels or shapes drawn on the layer.
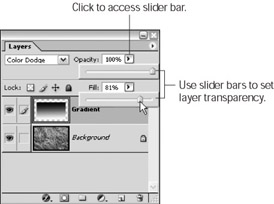
Figure 8-11: Use the Opacity or Fill slider bars to set layer transparency.
Using blending modes
Blending modes work with layer transparency. A blending mode is used to specify the way a layer’s pixels blend with the layer(s) below it. You also can use blending modes to modify the way the brush tools, the Bucket tool, Clone Stamp, Pattern Stamp, or Gradient tool apply color to a layer. Some of the blending modes are quite subtle, only changing a few colors or shifting hues, while others produce dramatic effects.
Most of the blending modes work by changing either the dark or light pixels in an image. For instance, setting the blending mode to Multiply only affects the darker pixels on the layer below, making the layer darker; the lighter pixels remain unchanged.
These blending modes are available using the Blending Mode drop-down list on the Layers palette or the Options bar with any of the brush tools, the Bucket tool, Clone Stamp, Pattern Stamp, or Gradient tool selected. If you take a look at the Blending Mode drop-down list on the Layers palette (see Figure 8-12), you’ll notice that the list is divided into groups. The blending modes are grouped by how they change a layer’s pixels — whether the darken, lighten, both darken and lighten, invert dark and light pixels, or enhance saturation and brightness.
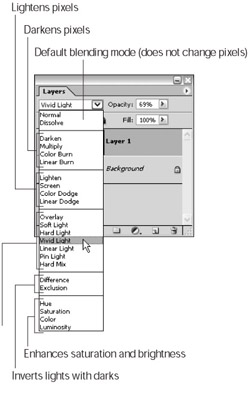
Figure 8-12: Blending modes are grouped on the drop-down list by how they affect a layer’s pixels.
Color Plates 8-4 and 8-5 give you a sampling of just a few of the effects you can produce with blending modes.
Adding adjustment layers
An adjustment layer is a special kind of layer that lets you try different effects on an image without permanently changing the image.
Adjustment layers use the same adjustment commands found on the Image→ Adjustments submenu. Although the commands from the Adjustments submenu affect only the selected layer, an adjustment command applied using an adjustment layer affects an entire image (not just one layer). This feature can come in handy, for instance, if you need to color correct an entire image with many layers. You can create the correction on an adjustment layer instead of having to correct each layer separately.
To see adjustment layers in action, take a look at Color Plate 8-2. There you’ll see how an adjustment layer can change the saturation, curves, or hue of a layer containing sock monkeys.
| Tip | If you like an adjustment layer you create and want to add it to another image, simply drag the adjustment layer from the Layers palette into the new image window. The adjustment layer is automatically added to that image’s layers. |
To add an adjustment layer:
-
In the Layers palette, select the layer that you want the adjustment layer to appear above.
-
 Click the Create new fill or adjustment layer button at the bottom of the Layers palette.
 Choose one of the adjustment commands from the menu that appears, as shown in Figure 8-13. (I discuss the adjustment commands and what they do in detail in Chapter 9.)
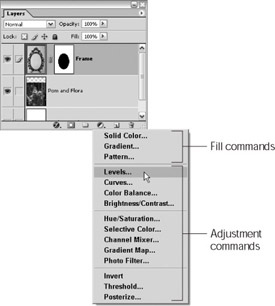
Figure 8-13: Choose one of the adjustment commands from the Create new fill or adjustment layer menu. -
In the dialog box that appears make the desired adjustments and then click OK.
For instance, if you chose the Levels command from the menu, the Levels dialog box appears. Adjust the levels as desired using the dialog box and click OK.
The new adjustment layer you created appears above the selected layer (Figure 8-14), and the image changes depending upon the type of adjustment you made.
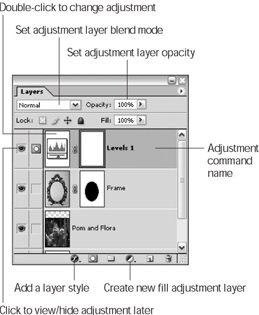
Figure 8-14: The adjustment layer appears in the Layers palette above the layer you originally selected.
If you don’t like the effect that the adjustment layer makes on the image, you can either modify the adjustment layer or just throw it away.
-
To modify an adjustment layer: Double-click the adjustment layer’s thumbnail to open the adjustment dialog box. Make the changes you want and click OK.
-
To delete an adjustment layer: In the Layers palette, click the adjustment layer to select it and then drag it to the trash can icon at the bottom of the palette.
Tip You also can select a blending mode and opacity for an adjustment layer. To choose a blending mode, select the adjustment layer in the Layers palette, then use the Blending Mode drop-down list to select the blending mode. To change the opacity, select the adjustment layer and then use the Opacity slider bar.
Tip You can add as many adjustment layers to an image as you want. If you want to compare different kinds of adjustments, create the adjustment layers, and then hide each adjustment layer in the Layers palette by clicking the eye icon. Make the adjustment layers visible one-by-one to check out their affects.
Creating Fill layers
A fill layer is similar to an adjustment layer in that it affects an entire image. Instead of using an adjustment command, though, a fill layer contains a solid color, pattern, or gradient. And, just like an adjustment layer, a fill layer can be changed or removed without affecting any other layers.
You’ll be surprised at the effects you can quickly create. Here’s how to add a fill layer:
-
In the Layers palette, select the layer that you want the adjustment layer to appear above.
-
Click the Create new fill or adjustment layer button at the bottom of the Layers palette.
Choose one of the fill commands from the menu that appears, as shown in Figure 8-13. (The fill commands and what they do are discussed in detail in Chapter 12.)
-
In the dialog box that appears, select the desired fill, gradient, or pattern (depending upon the fill command you chose), and then click OK.
For instance, if you chose the Pattern command from the menu, the Pattern fill dialog box appears. Select a pattern and then click OK.
The new adjustment layer you created appears above the selected layer.
If you don’t like the way the fill layer changes your image, you can adjust the fill layer by double-clicking the layer thumbnail in the Layers palette and making changes. Or, you can delete the fill layer entirely by dragging it to the trash can icon in the Layers palette.
| Tip | You can select a blending mode and opacity for a fill layer. To do so, choose a blending mode, select the fill layer in the Layers palette, and use the Blending Mode drop-down list to select the blending mode. To change the opacity, select the fill layer and then use the Opacity slider bar. |
EAN: 2147483647
Pages: 221