Creating Gradients
![]() The Gradient tool lets you fill a selection with a fountain of colors that starts with one color and ends with another. By default, the two colors are the Foreground color and Background color.
The Gradient tool lets you fill a selection with a fountain of colors that starts with one color and ends with another. By default, the two colors are the Foreground color and Background color.
But Photoshop can do more than create simple two-color blends. You can create custom gradients that blend a multitude of colors and vary from opaque to transparent throughout the blend. Photoshop has five gradient types: Linear, Radial, Angle, Reflected, and Diamond. And the Options bar offers settings that enable you to play with blend modes, opacity, and reversing colors.
| Tip | Right-click (Control+click on a Mac) anywhere in the image window to bring up the Gradient picker. |
Checking out the Gradient tool
Gradients can add interesting effects to an image. Open an image and try this out:
-
Select some portion of your image.
Remember If you don’t select a portion of your image before using the Gradient tool, Photoshop fills the entire image with the gradient. (Or, if you’re working on a layer, as discussed in Chapter 8, the gradient fills the entire layer.)
-
 Select the Gradient tool.
 To do it quickly, just type G.
-
From the Options bar, select your desired gradient type.
Figure 13-5 shows the Gradient picker open and the other settings available on the Options bar.
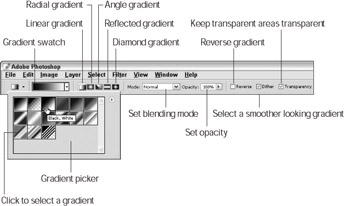
Figure 13-5: The Gradient picker offers 15 preset gradients. -
Select the Foreground to Background option, the first gradient, from the Gradient picker on the Options bar.
It creates a gradient that begins with the Foreground color and ends with the Background color.
-
Set the Foreground and Background colors the way you want them.
This step is up to you. You can stick with black and white or select new colors with the Eyedropper tool or Color palette.
-
Begin dragging at the point where you want to set the Foreground color.
-
Release where you want to position the Background color.
If you Shift+drag with the Gradient tool, Photoshop constrains the direction of your drag to a horizontal, vertical, or 45 degree angle.
Tip You also can apply a gradient to a layer using the Gradient Map command. This command applies the colors from a gradient to an image based on the light and dark pixels in an image. To find out how to apply the Gradient Map command to an image, turn to Chapter 9.
Changing gradient types
You can alter the performance of the Gradient tool by accessing the settings on the Options bar (refer to Figure 13-5).
Choosing between the five gradient types
Photoshop gives you five gradient tools, which are described below and illustrated in Figure 13-6.
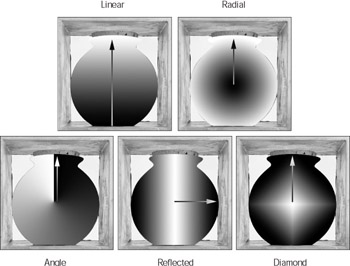
Figure 13-6: Jar filled with five different gradient types @@md Linear, Radial, Angle, Reflected, and Diamond.
-
Linear: Creates a gradient in which colors blend in a straight line.
-
Radial: The colors blend in concentric circles; by default, the blend begins from the center of the selection and moves outward, but you can move focal point.
Tip For consistency, every example in Figure 13-6 uses a black Foreground color and a white Background color. However, you almost always want to set the lighter color to the Foreground color when using the Radial option because doing so creates a glowing effect. If the Foreground color is darker than its Background color, then the gradation looks like a bottomless pit.
-
Angle: Creates a conical gradation with the colors appearing counterclockwise.
-
Reflected: If dragged from edge to edge of your selection, a reflected gradient acts like a standard linear gradient. However, if dragged from the interior to an edge of the selection, the gradient creates symmetrical linear gradients on both sides of the origin point.
-
Diamond: Like the radial gradient, this tool creates concentric shapes — in this case, diamonds or squares, depending on the angle you drag.
Choosing gradient options
You find three check boxes on the Options bar: Reverse, Dither, and Transparency. Here’s what they do:
-
Reverse check box: When selected, the gradient starts with the Background color and ends with the Foreground color. This option is useful for creating radial gradients while keeping the default colors intact.
-
Dither check box: When selected, this option helps eliminate banding. Banding occurs when you see distinct bands of color in a gradient.
-
Transparency check box: When selected, this option retains transparency information. Here’s how it works. Gradients can include areas that are partially or fully transparent. In other words, they fade from a solid color to a more transparent color. When the Transparency check box is deselected, Photoshop creates the gradient by using all opaque colors, ignoring the transparency information.
Tip The best way to get a grip on what the Transparency check box does is to try a little experiment. First, select the check box and press D to get the default Foreground and Background colors. Then, choose the Transparent Rainbow option (the next to last swatch) from the Gradient picker pop-up palette and draw a gradient. You get a fill pattern that consists of a multicolored rainbow with your background peeking out at the beginning and end of the gradient. Next, draw the gradient with the Transparency check box deselected. You now get a fill of a multicolored rainbow with no background peeking out because Photoshop ignores the transparency at either end of the gradient. In most cases, you don’t need to bother with the check box — just leave it selected.
Selecting your colors
The Gradient picker on the Options bar (refer to Figure 13-5) lets you change the way colors blend across the gradient. The preset gradients that come with Photoshop use different colors to create different effects. Here’s a brief description of the colors that some of the preset gradients blend:
-
Foreground to Background gradient: Shown in the upper-left corner of the Gradient picker, this is the default selection. This gradient does just what it sounds like it does: It blends between the Foreground and Background colors, as in the examples in Figure 13-6.
-
Foreground to Transparent, Transparent Rainbow, and Transparent Stripes: If you select one of these gradients, which include transparency, the gradient tool blends the Foreground color into the original colors in the selection. The examples in Figure 13-7 were created with the Foreground to Transparent option selected.
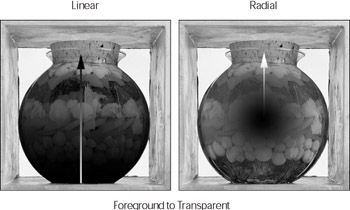
Figure 13-7: Here’s the jar filled with a linear and radial gradient and with the Foreground to Transparent option selected. -
Other preset gradients: The remaining options in the Gradient picker create a variety of preset gradients, some involving just a few colors and others blending a whole rainbow of colors.
-
Gradient libraries: Photoshop offers a vast array of gradient libraries that contain preset gradients that you can easily load for your painting pleasure. Open the Gradient picker menu by clicking the tiny arrow at the upper right of the picker, and scroll down to the bottom where you find the various gradient libraries. Select one and either replace or append your current gradient set.
Creating custom gradients
It’s pretty easy to design your own custom gradient if you just spend a few minutes looking at Gradient Editor dialog box.
To open the Gradient Editor dialog box, click the gradient swatch on the Gradient picker on the Options bar, as shown in Figure 13-8.
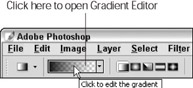
Figure 13-8: Click the gradient swatch.
The Gradient Editor dialog box, shown in Figure 13-9, contains everything you need to create nifty gradients.
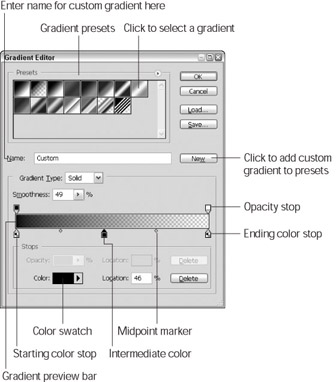
Figure 13-9: The Gradient Editor gives you complete control over your gradients.
The following list gives you a brief introduction to the dialog box and starts you on the path of creating your own gradient:
-
Presets: The palette at the top of the dialog box lists all the preset gradients — the same ones in the Gradient picker on the Options bar. Select the gradient you want to use as a starting point for your custom gradient from this palette.
-
Gradient Type: You can choose between gradients made with Solid colors or those created with Noise. Noise gradients add a grainy quality that randomizes the colors of selected pixels.
-
Smoothness: Drag the slider or enter a value to determine how smoothly you blend one color into another color. The Smoothness slider changes to a Roughness slider when a Noise gradient type is selected.
-
Roughness: This option is only available if you choose a Noise gradient. Roughness affects how smooth or sharp one color transitions into another.
The following options are available only when the Noise gradient type is selected:
-
Color Model and Color sliders: Change the color model and/or limit the color range by moving the sliders.
-
Restrict Colors: Limits the colors to printable CMYK colors. (See more about CMYK in Chapter 4.)
-
Add Transparency: Enables you to incorporate transparency in your noise gradient.
-
Randomize: Changes the colors in a Noise gradient. Remember, this option is random and every time you click you get a new set of colors.
-
Gradient Preview bar: Displays both the colors and transparent areas of your gradient. Transparent areas are represented by a gray-and-white checkerboard pattern.
-
Stops: The little house-shaped boxes beneath the Gradient Preview bar are called stops. Color stops are on the bottom, and opacity stops are on the top of the Gradient Preview bar. You use these stops to change the colors, opacity, and location of the gradient, as explained in the upcoming two sections.
Remember The Save button: Saves your gradient to a different location on disk. You don’t need to save the gradient using this button unless you want to store your gradient in some spot other than where the rest of the gradients are located. After you edit and name a gradient, click the New button, and then click OK; the gradient is automatically added to the Gradient picker palette on the Options bar for the gradient tools.
To remove a gradient from the list, press Alt+Shift (Option+Shift on a Mac) and click the gradient. Note that the scissors icon signifies the Delete option.
Choosing colors
To change one of the colors in the gradient, first check to see whether the roof on that color’s color stop is black. The black roof indicates the active color stop — the color that is affected by your changes. If the roof isn’t black, click the color stop to make it active.
After you activate the color stop, you have one of three choices for picking a color:
-
You can click the colored square next to Color. The Color picker appears.
-
You can select the Foreground or Background color by clicking the arrow to the right of Color. Then select either Foreground or Background from the drop-down list.
-
You can click a color in your image, a color in the color bar of the Color palette, or a color in the Swatches palette.
Adding, removing, and deleting colors
Here’s some more stuff you need to know about playing with the colors in your gradient:
-
To add a color to the gradient: Click just below the Gradient Preview bar at the point where you want the color to appear. You get a new color stop icon representing the color.
-
To remove a color from the gradient: Drag its color stop down and away from the Gradient Preview bar.
-
To change the position of a color in the gradient: Drag the color stop to the right or left. Suppose you have a gradient that fades from black to white. If you want more black and less white, drag the black color stop toward the white stop.
-
To change the midpoint between two colors in the gradient: Drag the little diamond below the Gradient Preview bar. Using the example of a black-to-white gradient again, the midpoint marks the spot at which the gradient contains equal amounts of black and white.
Changing the transparency
Photoshop lets you adjust the amount of opacity in a gradient. You can make a portion of the gradient fully opaque, completely transparent, or somewhere in between the two.
Suppose you want to create a gradient that starts out white, gradually fades to completely transparent, and then becomes completely white again. In other words, you want to create a variation of the effect shown back in Figure 13-7. Here’s how to create such a gradient:
-
Make the Foreground color white.
-
Click the gradient swatch on the Options bar to open the Gradient Editor dialog box (refer to Figure 13-8).
-
Inside the Gradient Editor dialog box, choose the Foreground to Transparent (the second swatch) gradient from the Gradient palette.
-
Take the opacity stop on the right and move it to the center of the Gradient Preview bar. Leave the Opacity setting at 0% (completely transparent).
-
Add another opacity stop at the far right. Change the Opacity setting to 100% (completely opaque).
The Gradient Preview bar now shows your gradient in terms of transparent and opaque areas (see Figure 13-10).
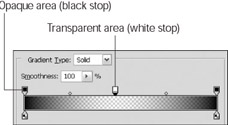
Figure 13-10: The Gradient Preview bar shows you where the opaque and transparent areas of a gradient are.Remember Black stops represent opaque areas; white stops represent transparent areas.
The Gradient Preview bar also shows you the opaque areas in their actual colors and transparent areas in a gray and white checkerboard pattern.
-
Type a name for your gradient in the Name text box.
-
Click the New button.
Your gradient, with its new name, is added to the gradient palette in both the Gradient Editor and the Gradient picker on the Options bar, as shown in Figure 13-11. You now have a gradient that fades from fully opaque white to transparent and then to fully opaque white again. Apply the gradient to an image to get a better idea of what you just created.
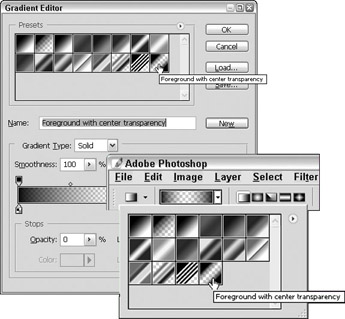
Figure 13-11: Your custom gradient is added to the gradient palette in the Gradient Editor and in the Gradient picker on the Options bar.
| Remember | You can add as many opacity stops as you want and set different Opacity values for each stop. To move an opacity stop, just drag it right or left; to delete a stop, drag it off the bar. To move a midpoint, drag it right or left. |
Don’t forget that the Transparency check box on the Options bar determines whether transparency settings are ignored when you apply a gradient. If the check box is deselected, your gradient is completely opaque. For example, if you deselect the check box when applying the gradient created by the preceding steps, you get a completely white gradient instead of one that fades from white to transparent and back again.
EAN: 2147483647
Pages: 221