Preparing and Saving GIF Images
The Graphics Interchange Format, or GIF, came into being in 1987, during a time when only robber barons and captains of industry owned 1.2Kbps modems and the rest of the world's data moved at the speed of one bit per annum. Developed by CompuServe, GIF supports a maximum of 8 bits per pixel, or a maximum of 256 colors per image, and relies on LZW compression, the same "lossless" compression(meaning that it does not rewrite pixels) employed by most TIFF images.
Frankly, GIF is a tired , old format. Its reputation with the developer community took an enormous hit when Unisys (the holder of the patent on LZW) began demanding royalty payments eight years after the format's introduction, a fracas that ultimately inspired the development of PNG (which stands for Portable Network Graphics, or PNG, Not GIF, depending on whom you talk to). In the past decade , GIF has remained virtually dormant and PNG has emerged as the much better format, supporting more colors, better compression, and a wider range of transparency options. GIF's only relative advantage is that it supports animation. But what really keeps GIF alive today is inertia. It's a known quantity and even crusty old browsers running on computers that haven't been upgraded since Julius Caesar was a baby have no problems displaying GIF. So although GIF may not be the most progressive or egalitarian format on the planet, it continues to serve a very specific function.
For example, despite its obvious limitations, GIF is a better format than JPEG for saving high-contrast imagery, line art, and text. Figure 14-11 shows a graphic with high- contrast line art, scads of text, and all varieties of shape layers and sharply rendered layer effects. Given that lossy compression is best suited to soft edges and gradual color transitions, this image may very well represent JPEG's worst nightmare.
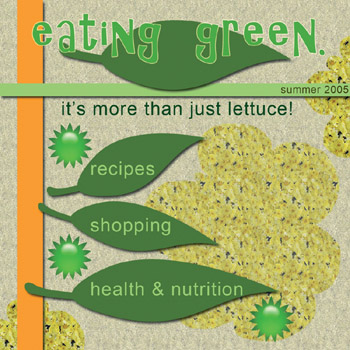
Figure 14-11: This image features high-contrast content, line art, and text, three elements that tend to work very well on the Web but react very badly to JPEG compression.
To prove that no one's making this stuff up, Figure 14-12 features magnified details from three variations on the graphic. The first example shows a detail from the full- color original, which consumes over 5MB of memory. The second example shows the same image saved in the JPEG format at an admittedly very low Quality setting, reducing the file size to a mere 132K, less than 4 percent of its uncompressed size . The resulting image suffers from an array of visible compression artifacts, especially prominent around type and other high-contrast edges. You can achieve a similar file size ” 147K, still under 4 percent of the uncompressed size ” by reducing the number of colors to a scant 32 and saving the image as a GIF file. Although this leads to more muted colors and noisy transitions, the GIF image is much more crisp, clear, and aesthetically pleasing, as seen in the last example in Figure 14-12.
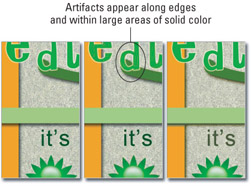
Figure 14-12: After applying the Unsharp Mask command to the full- color image (left), saving it in theJPEG format using a very low Quality setting resulted in the middle image. The saved image is a mess, riddled with compression artifacts.Fortunately, you can achieve a very similar file size by reducing the colors to 32 and saving the image as a GIF file (right).
The three routes to a GIF file
You can save a JPEG file in one of two ways. The first (and not necessarily the best) of these you've seen in the previous coverage of the Save As dialog box and the various JPEG options and related dialog boxes. When it comes to GIF images, however, the Save As dialog box falls short of providing you all the options you need access to when properly saving a GIF image for the Web. Of course, the Save As command lets you maintain a direct link between the open image window and the GIF file on disk, enabling you to make minor revisions and then update the disk file just by pressing Ctrl+S for the Save command ( z +S on the Mac) in the Save For Web dialog box ” but this is not some huge thing that should sway you from where the real one-stop shopping occurs.
As usual in Photoshop, there are multiple ways to save a GIF image ” and this has nothing to do with keyboard shortcuts. There are three distinct ways to create a GIF document. Here they are, with relative advantages and disadvantages, in no particular order:
-
Index the colors and then choose Save As. To reduce the number of colors in the image to 256 or fewer, choose Image Mode Indexed Color (described at length in the next section). This may seem an inconvenient first step, but it means that you have the option of modifying the pixels by hand after collapsing the color depth. Note that Photoshop greatly limits your options when editing a low-color image. Layers and filters are entirely out of the question, for example.
When you're ready to save the image, choose Save As and select CompuServe GIF from the Format pop-up menu. Photoshop next displays two options, Normal and Interlaced. If you want the Web browser to display the image in incremental passes ” similar to progressive JPEG ” select the latter. Otherwise , select Normal, which happens to be the safer option.
Advantages: Fine-tunes low-color images using limited range of tools; maintains link with file on disk. Disadvantages: Requires the most preparation; can't preview file size; have to use yet another dialog box (Color Table) to edit colors or make colors transparent, and even then your options are limited.
-
Choose Save As and then index the colors. You can, if you prefer, skip the Indexed Color command and go directly to File Save As. But when you select CompuServe GIF from the Format menu, Photoshop automatically activates the As A Copy check box, breaking any link between the open image and the file you're about to save. Then Photoshop goes ahead and brings up the Indexed Color dialog box anyway. So although this approach may sound the easiest of the three, it is in fact every bit as convoluted and less flexible.
Advantages: Lets you skip Indexed Color command. Disadvantages: Worst of both worlds ” no link to disk file, can't preview file size, no ability to edit low- color image, can't edit colors, and fewer optimization options.
-
Choose Save For Web. Choosing File Save For Web enables you to specify all GIF settings and color indexing preferences from one dialog box. You can also compare the effects of different settings, preview file sizes, balance GIF against JPEG, and access settings that are either unavailable otherwise or inconvenient.
Advantages: One-stop shopping, preview file sizes, compare settings, edit colors and make transparent, impose lossy compression, and modify dither and color reduction using masks. Disadvantages: You're creating a separate version of the file, with no link to disk file, and you can't edit low-color image by hand.
For those of you who liked the first option ” using the Indexed Color command and then Save As ” the following coverage is provided. Later on, the Save For Web dialog box is covered too, in all its comprehensive glory . If this sounds like opinion seeping through here, it is. But it's important that all the paths to a goal are considered so you achieve the most thorough understanding of the technology surrounding the creation of Web graphics and Photoshop's role in the process.
Using the Indexed Color command
To reduce the number of colors in an RGB image so that you can save it in GIF or some other low-color format, choose Image Mode Indexed Color. This command strips an image of all but its most essential colors by generating a color lookup table (LUT, or CLUT, as the word Color is sometimes included in the abbreviation). The LUT serves as a kind of index, describing how the few remaining colors map to the RGB space, which is why the process is called indexing .
| Caution | When you first choose the Indexed Color command, Photoshop asks you if you want to flatten the image. Your only options are to comply or cancel ” low-color images do not support layers ” so be sure to save the layered image before choosing the command. |
Pictured in Figure 14-13, the Indexed Color dialog box lets you specify the number of colors you want to keep, the method by which the indexed colors are recruited, and how colors are blended and made transparent. The following sections explain how these options work.
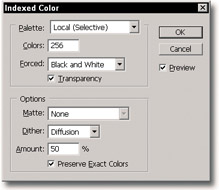
Figure 14-13: The Indexed Color options enable you to control the reduction of colors in an RGB image. The Palette settings determine which colors Photoshop keeps; the Options settings control transparency and color mixing.
Specifying the palette
The Palette menu, found inside the Indexed Color dialog box, lets you play team captain and pick your players ” the players being the colors used to make up your image. You have 16 million players to choose from, each one is as important as the next, and nobody's chosen last. You can pick how big your team will be, reducing the colors from 16 million all the way down to just a handful, whatever number you need to win the game.
With that hopefully helpful sports analogy out of the way, let's look at the Palette menu's options. You can safely ignore a handful of the options, including the two System settings (mostly archaic), Uniform (never was useful), and Custom (better handled by Save For Web) when saving for the Web, so this leaves the following options in need of further illumination :
-
Exact: Usually dimmed, Exact is only active if an image already contains fewer than 256 colors. This only occurs in extremely high-contrast situations ” as when editing a screen shot or line of type. The Colors value tells you how many colors there are.
-
Web: When displaying an image on an old 8-bit screen, the browser invariably changes all colors to those in the Web (or browser-safe ) palette, which is a low-color LUT common to Internet Explorer and Netscape. The LUT comprises colors whose R, G, and B values are divisible by 51. That means each primary color can be set to 0, 51, 102, 153, 204, or 255. Calculate all possible combinations, and you get 216 colors in all, or 217 if you include transparency.
The Web palette ensures that your GIF colors go unmodified, no matter what the capabilities of the viewer's monitor ( assuming the viewer is not one of the remaining users of an antique black and white monitor). It can also guarantee agreement between multiple images inside a table, especially when a GIF animation is involved. But generally , your images will look better and compress to smaller file sizes when you use Adaptive, Selective, or Perceptual. (To see for yourself, see Figure 14-14.)
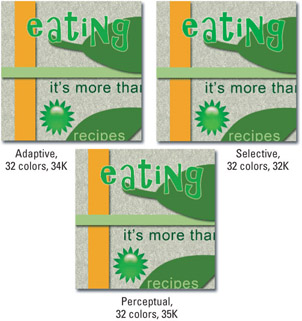
Figure 14-14: With all three versions coming in at virtually the same file size, the Adaptive palette keeps the most popular colors (left). Selective saves a wider range of color (right) and Perceptual sacrifices variety for smooth transitions (bottom). -
Adaptive, Selective, and Perceptual: Available in both Local and Master flavors (as described in a moment), these three settings are variations on a common theme, intelligently culling colors based on the contents of the image window. The oldest of the three, Adaptive, is the least sophisticated, retaining the most frequently used colors in your image. Selective tries to maintain key colors that represent different parts of the spectrum, with special attention to colors in the Web palette. Meanwhile, Perceptual samples colors that produce the best transitions, great for reproducing gradients and other color blends.
Tip Some advice: Use Perceptual for photographic images, where smooth transitions are more important than specific color values. Use Selective when an image contains bright colors or sharp graphic transitions, as shown in the image in Figure 14-15. If an image contains relatively few colors, and you want to maintain those colors as exactly as possible, go for Adaptive.
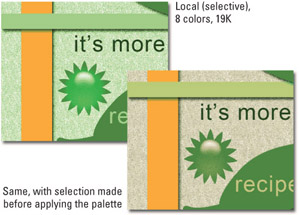
Figure 14-15: The Local (Selective) 8-color setting on the left, with no selection made, misses the gray background, washing it green instead. After making a selection in the gray textured area before applying this same form of Indexed Color, the gray is captured more accurately (right).As called out in Figure 14-14, Adaptive, Selective, and Perceptual may result in smaller file sizes than the Web palette, not because they compress better, but because they let you vary the number of colors. (The Web palette is locked into 216 colors, or 217 with transparency.) But colors being equal ” always 32 in the case of the figure ” file size remains fairly consistent. There is no inherent compression advantage of one Palette setting over another.
-
Local versus Master: Choose the Local option if you want Photoshop to consider the colors in the frontmost image only. However, if you have several images open and want to create a palette based on all of them, choose Master.
Tip When you select any of the Local options, you can influence how Photoshop calculates the palette by selecting an area of your image before choosing the Indexed Color command. Photoshop favors the selected area when creating the palette. For example, Figure 14-15 shows Local (Selective) applied with just eight colors. When nothing is selected, it misses the gray textured background entirely. But with a selection within the background area made using the Rectangular Marquee tool, Local (Selective) nails the gray quite nicely (see image on right), and eliminates the allover wash of green seen on the left.
-
Previous: This option replays the last look-up table created by the Indexed Color command. If you're trying to create a series of high-contrast graphics that you want to look as homogeneous as possible, use this option. The Previous option is dimmed unless you've used Indexed Color at least once during the current session.
Colors, transparency, and dithering
Although the Palette option may be the most complex of the Indexed Color options to understand (if not to use), it's just one of many ensemble players in the color reduction cast. Here's how the others work:
-
Colors: Enter the number of colors you want to use in the Colors option box. In the old days, you controlled the number of colors by choosing a particular bit depth (the number of bits of data devoted to each pixel). But a few versions back, Adobe's engineers decided that scaling colors by whole bit values ” 8-bit for 256 colors, 7-bit for 128, 6-bit for 64, and so on ” wasn't absolutely necessary to achieve smaller file sizes, so you might as well free your mind and enter the exact number of colors you deem fit. Still, it was a valuable option ” sacrificing an entire bit does sometimes make a difference, after all ” which is why it's a good thing that it lives on in the Save For Web dialog box (much-heralded coverage coming up soon).
-
Forced: As useful as Adaptive, Selective, and Perceptual are, they can easily upset important colors. For example, the white background of an image might turn a pale red or blue, even if white was a predominant color. This possibility calls for the Forced option, which lets you lock down key colors so they don't change under any circumstances. Black and White locks in black and white, nearly always a good thing. Primaries protects those and RGB plus CMY. Web protects the 216 colors in the Web-friendly palette. Choose Custom to specify your own colors, such as the background color of a Web page. Click a swatch to define a color; Ctrl+click (or z +click) a swatch to unlock that color.
-
Transparency: If an image is set on a layer against a transparent background, selecting this check box maintains that transparency. Bear in mind, however, that transparency in a GIF file is either on or off; there are no soft transitions as in a Photoshop layer. (For an alternative to this, see "GIF optimization settings" later in this chapter.)
For example, check out Figure 14-16. In the image on the left, the background is removed, leaving the familiar checkerboard pattern that indicates transparency. In the image on the right, the Transparency option is turned on, and the Matte set to White. Note that even though Photoshop flattened the file (as is required when converting to Indexed Color), you can still see the transparent background. An indexed image is the only kind of Photoshop document that accommodates transparency without layers.
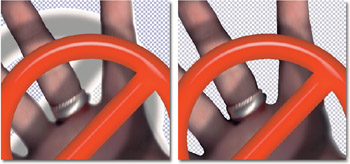
Figure 14-16: After deleting the background from the image (left), the 32-color Local (Selective) palette was applied and the Transparency check box turned on. Setting Matte to White adds a white backdrop to the soft and feathered edges (right), great if you set the image against a white Web page background. -
Matte: The Matte option works in collaboration with the Transparency check box. (If there is no transparency in an image ” that is, all layers cover one another to create a seamless opacity ” the Matte option is dimmed.) When you select Transparency, the specified Matte color fills the translucent pixels in the image, as demonstrated in the second example in Figure 14-16 ” the feathered edges are white in the image on the right. When Transparency is turned off, the Matte color fills both translucent and transparent areas. To ensure smooth transitions, select the Matte color that matches the background color of your Web page.
-
Dither: This option controls how Photoshop mimics the several million colors that you asked it to remove from an image. The None option makes no attempt to smooth out color transitions, but results in smaller file sizes, as in the first example in Figure 14-17. Diffusion mixes pixels to soften the transition between colors, as in the second example in the figure. Noise mixes pixels throughout the image, not merely in areas of transition. And Pattern is just plain awful . (Try it out and you'll see.) Some sage wisdom: Stick with Diffusion and use the following option.
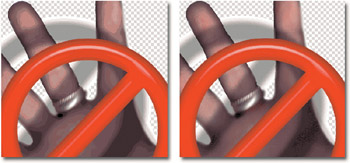
Figure 14-17: The results of combining the 32-color -
Amount: This wonderful option controls the amount of dithering applied. When and only when Diffusion is active, you can modify the amount of dithering by raising or lowering this value. Lower values produce harsher color transitions, but lower the file size. Because GIF's LZW protocol is better suited to compressing uninterrupted expanses of color, quick transitions mean speedier images. As the size values in Figure 14-17 illustrate , it's a trade-off. Keep an eye on the image window to see how low you can go.
-
Preserve Exact Colors: Again available only when Diffusion is active, this check box disables dithering inside areas of flat color that exactly match a color in the active palette. Say that you've created some text in a Web color. The text is anti-aliased, but the letters themselves are flat. By selecting Preserve Exact Colors, you tell Photoshop to dither around the edges of the letters but to leave the interiors undithered. When available, leave it on.
EAN: 2147483647
Pages: 95