Saving JPEG Images
The JPEG format is named after the people who designed it, the Joint Photographic Experts Group. JPEG is the most efficient and essential compression format currently available and is likely to be the compression standard for a long time to come. (New kid on the block JPEG 2000 sounds promising , but it'll be a while before the majority of in-use browsers reliably support it. If you want to check it out, you need to manually install it from your Photoshop CS2 CD.) JPEG is a "lossy" compression scheme, which means it sacrifices image quality to conserve space on disk. You are in charge of controlling how much data is lost and how much file size is cast to the four winds.
As with GIF and PNG, you can save an image to the JPEG format using either File Save As or the Save For Web command, which is explored later in this chapter. For the present, choose File Save As or press Ctrl+Shift+S ( z +Shift+S), and then choose JPEG from the Format pop-up menu. (Note that none of the Web formats, JPEG included, supports layers or alpha channels.) When you click the Save button, Photoshop greets you with the JPEG Options dialog box, shown in Figure 14-9. The most vital option in this dialog box is the Quality setting, which determines how much compression Photoshop applies to your image.
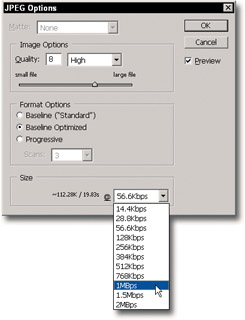
Figure 14-9: The JPEG Options dialog box provides a total of 13 compression settings, ranging from 0 (heaviest compression) to 12 (best quality). Turn on thePreview check box not only to preview the effects of your changes in the image window, but also to see the approximate file size and download time of the image at various settings.
Adjusting the quality
Select an option from the Quality pop-up menu or drag the slider triangle from 0 to 12 to specify the quality setting. Of the named options, Low takes the least space on disk but distorts the image rather severely; Maximum retains the highest amount of image quality, but consumes more disk space. Of the numbered options, 0 is the most severe compressor and 12 does the least damage.
| Note | In Photoshop, JPEG evaluates an image in 8- -8-pixel blocks, using a technique called Adaptive Discrete Cosine Transform (or ADCT). ADCT averages the 24-bit value of every pixel in the block, and then stores the average color in the upper-left pixel in the block and assigns the remaining 63 pixels smaller values relative to the average. Next, the lossy compression kicks in as JPEG divides the block by a formula called the quantization matrix, which simplifies the pixels' values by changing as many as possible to zero. |
Figure 14-10 shows an image saved at High, Medium, and Low Quality settings. The samples are arranged from highest image quality at top to lowest quality at bottom. The uncompressed image measures 699 658 pixels (admittedly large for the Web, but this being a book, the figure has to look good in print) and consumes 1.32MB in memory. This means that the Low Quality setting, which results in a 16K file, represents a remarkable savings. But it comes at a price ” the artifacts are quite obvious in the low-quality image, and it would probably be worth taking 9 seconds to load(medium quality) to get fewer artifacts.
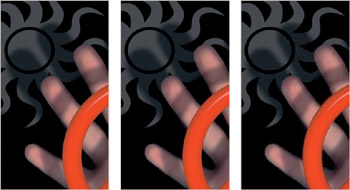
Figure 14-10: Three JPEG settings applied to a single image, with the highest Quality setting illustrated at the left and the lowest at the right. The image goes from1.32MB (the original) to just 16K (low quality), stopping at 46.18K in the middle image, and loses quality along the way. The middle image is your best choice, as it loads quickly ” 9 seconds, by Photoshop's estimate ” and looks pretty good.
To help you gauge the most desirable Quality setting for your specific image, Photoshop displays file size information at the bottom of the dialog box ( assuming that the Preview check box is turned on). The first value indicates the approximate file size you'll get if you apply the current JPEG settings. The second value estimates how long the file takes to download at a given connection speed, which you select from the neighboring pop-up menu. As shown back in Figure 14-9, your selection of connections varies from the ancient modem standard 14.4Kbps to 140 times that rate (2Mbps) with the help of a dedicated T1 connection or better. Naturally, it's always safest to assume that more visitors to your Web site suffer from the slow speeds than benefit from the fast ones, but the greater availability and increasingly reasonable costs for broadband (DSL and cable modems, anyway) are making this less of an issue. Still, it's always best to design for the worst-case scenario.
Other JPEG options
Quality may be the most important of the JPEG settings, but it's not the only one. The remaining dialog box options work as follows (in the order they appear):
-
Matte: Unlike GIF, Photoshop's implementation of JPEG does not support transparency. (The aforementioned JPEG 2000 does support alpha-channel transparency, but again, it's too early in the game to use JPEG 2000 and have any confidence that end users will even be able to see your image.) So if your image contains transparent areas, Photoshop needs to know what color to fill them with when it saves the image as a JPEG. Select the desired color from the Matte pop-up menu. Keep an eye on the preview in the image window to make sure that you like the effect. Be aware that JPEG compression may cause the actual matte color to differ somewhat from the color you choose from the menu.
-
Format Options: Most Web browsers support two variations of the JPEG format. The so-called baseline (or sequentially displayed ) format draws images in line-by-line passes on-screen. The second variation, progressive, renders an image in multiple passes, each increasing the resolution, thus permitting visitors to get an idea of how an image looks without waiting for the entire file to download.
Tip You may prefer the baseline format because it ensures compatibility with even the oldest, most ill-conceived browsers. Of the two Baseline options, select Baseline Optimized. This setting includes better Huffman encoding (an additional component of JPEG that applies lossless compression) and may reduce the file size by an extra 5 to 10 percent.
-
Scans : Progressive, although not an advisable setting to turn on for your JPEG image, and can be customized through the Scans option, which appears when you click to select Progressive in the JPEG options dialog box. When selecting the number of scans ” passes that the image will go through before appearing in its entirety ” a higher value results in a faster display of the initial image, but it also takes longer to render the image fully because of all the incremental refreshing.
EAN: 2147483647
Pages: 95