Creating an Independent Mask Channel
Masks generated via the Quick Mask Mode and Color Range command are temporary. After you let go of the selection, they're gone. Sometimes, this isn't a problem ”you're only using the selection once, so what do you care? Other times, however, a selection is as much a work of art as the image you create with it is. You may need to work on it in stages; take a break, and come back to it when your brain isn't fried. The simplest solution is to back up your selection, save your file, and move on. In fact, anytime that you spend 15 minutes or more on a selection, you should save it.
Saving a selection outline to a mask channel
The following steps describe how to back up a selection to an independent mask channel, which is any channel above and beyond those required to represent a grayscale or color image. Mask channels are saved along with the image itself, making them a safe and sturdy solution.
STEPS: Transferring a Selection to an Independent Channel
-
Convert the selection to a mask channel. One way to do this is to choose Select Save Selection, or right-click (Control-click on the Mac) in the image window and choose Save Selection from the shortcut menu, which saves the selection as a mask. The dialog box shown in Figure 4-15 appears, asking where you want to put the mask. In most cases, you'll want to save the mask to a separate channel inside the current image. To do so, make sure that the name of the current image appears in the Document pop-up menu. Then select New from the Channel pop-up menu, enter any name for the channel that you like, and press Enter or Return. You can then either replace an old channel, or save the mask to a new channel. Regardless of the method you choose, your selection outline remains intact.
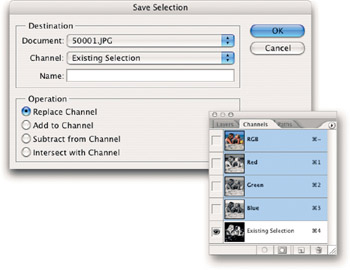
Figure 4-15: The Save Selection dialog box enables you to convert your selection outline to a mask and save it to a new or existing channel.-
Replace an old channel: If you have an old channel you want to replace, select the channel's name from the Channel pop-up menu. The radio buttons at the bottom of the dialog box become available, enabling you to add the mask to the channel, subtract it, or intersect it. These radio buttons work like the equivalent options that appear when you make a path into a selection outline, but they blend the masks together, instead. The result is the same as if you were adding, subtracting, or intersecting selection outlines, except it's expressed as a mask.
-
Save to a new channel: Alternatively, you can save the mask to a new multi- channel document all its own. To do this, choose New from the Document pop-up menu and press Enter or Return.
Tip If you only want to save the selection to a new channel and be done with it, just click the make new channel icon at the bottom of the Channels palette (labeled in Figure 4-15). Photoshop automatically creates a new channel, converts the selection to a mask, and places the mask in the channel.
-
-
View the mask in the Channels palette. To do so, click the appropriate channel name in the Channels palette ” automatically named Alpha 1 unless you assigned a name of your own. In Figure 4-15, the contents of a channel called Existing Selection were replaced , so this is where my mask now resides.
Note This step is not mandatory. It's been included because it lets you see the mask and familiarize yourself with how masks look. Remember, white represents a selection, black is deselected, and gray is partial selected.
Tip If you didn't name your mask in Step 1 and you want to name it now, double-click the Alpha 1 name in the Channels palette and type a new name.
-
Return to the standard image-editing mode by clicking the first channel name in the Channels palette. Better yet, press Ctrl+1 ( z -1 on the Mac) if you're editing a grayscale image, or Ctrl+tilde ( z -tilde on the Mac) if the image is in color.
-
Save the image to disk to store the selection permanently as part of the file. A handful of formats ” PICT, Pixar, PNG, TIFF, Targa, PDF, and native Photoshop ” accommodate RGB images with an extra mask channel. But only TIFF, PDF, and the native Photoshop format can handle more than four channels, each format saving up to 56 channels in all. You might find that you prefer the TIFF format with LZW compression when saving images with masks. Because TIFF supports layers , you aren't restricted to the Photoshop format for multilayered images with masks.
Both the native Photoshop format and TIFF can compress masks so that they take up substantially less room on disk. The Photoshop format does this automatically, and you can save a TIFF image using LZW compression without fear. In both cases, this run-line compression is entirely safe. It does not change a single pixel in the image; it merely writes the code in a more efficient manner.
| Tip | You can also save a quick mask to its own channel for later use. When you enter the Quick Mask Mode, the Channels palette displays an item called Quick Mask . The italic letters show the channel is temporary and will not be saved with the image. To clone it to a permanent channel, drag the Quick Mask item onto the new channel icon at the bottom of the Channels palette. Now save the image to the TIFF or Photoshop format, and you're backed up. |
Converting a mask to a selection
Choose Select Load Selection to retrieve your selection later. A nearly identical dialog box to that shown earlier in Figure 4-15 appears, except for the addition of an Invert check box. Select the document and channel that contain the mask you want to use. You can add it to, subtract it from, or intersect it with a currently active selection. Select the Invert option if you want to reverse the selected and deselected portions of the mask.
Want to avoid the Load Selection command? Ctrl-click (Win) or z -click (Mac) the channel name in the Channels palette that contains the mask you want to use. For example, if you Ctrl-click the Existing Selection item in Figure 4-15, Photoshop loads the equivalent selection outline into the image window.
But wait, there's more:
-
You can press Ctrl+Alt ( z -Option on the Mac) plus the channel number to convert the channel to a selection. For example, Ctrl+Alt+4 would convert the Existing Selection channel shown in Figure 4-15.
-
You can also select the channel and click the far-left mask selection icon at the bottom of the Channels palette.
-
To add a mask to the current selection outline, Ctrl+Shift-click ( z -Shift-click on the Mac) the channel name in the Channels palette.
-
Ctrl+Alt-click ( z -Option-click on the Mac) a channel name to subtract the mask from the selection.
-
And Ctrl+Shift+Alt-click ( z -Shift-Option-click on the Mac) to find the intersection.
You can also convert color channels or mask channels to selections. For example, if you want to select the black pixels in a piece of scanned line art in grayscale mode, Ctrl-click (Win) or z -click (Mac) the first item in the Channels palette. This selects the white pixels; press Ctrl+Shift+I ( z -Shift-I on the Mac) or choose Select Inverse to reverse the selection to the black pixels.
Viewing mask and image
Photoshop enables you to view any mask channel along with an image, just as you can view mask and image together in the Quick Mask Mode. To do this, click in the first column of the Channels palette to toggle the display of the eyeball icon. An eyeball in front of a channel name indicates you can see that channel. If you are currently viewing the full-color image, for example, click in front of the mask channel name to view the mask as a translucent color coating, again as in the Quick Mask Mode. Or if the contents of the mask channel appear by themselves on-screen, click in front of the composite name (RGB, CMYK, or LAB) to display the image as well.
| Tip | When the mask is active, you can toggle the display of the image by pressing the tilde (~) key. Few folks know about this shortcut, but it's a good one to assign to memory. It works whether the Channels palette is open or not, and it permits you to focus on the mask without moving your mouse all over the screen. |
Using a mask channel is different from using the Quick Mask Mode in that you can edit either the image or the mask channel when viewing the two together. You can even edit two or more masks at once. To specify which channel you want to edit, click the channel name in the palette. To edit two channels at once, click one and Shift-click another. All active channel names appear highlighted.
You can change the color and opacity of each mask independently of other mask channels and the Quick Mask Mode. Double-click the mask channel thumbnail or choose the Channel Options command from the Channels palette menu. (This command is dimmed when editing a standard color channel, such as Red, Green, Blue, Cyan, Magenta, Yellow, or Black.) A dialog box similar to the one shown back in Figure 4-6 appears, but this one contains a Name option box so you can change the name of the mask channel. You can then edit the color overlay as described in the"Changing the red coating" section earlier in this chapter.
| Tip | If you ever need to edit a selection outline inside the mask channel using paint and edit tools, click the Quick Mask Mode icon in the Toolbox. It may sound a little like a play within a play, but you can access the Quick Mask Mode even when working within a mask channel. Do yourself a favor and make sure the mask channel color is different from the quick mask color, so you can tell what's going on. |
EAN: 2147483647
Pages: 95