Building a Mask from an Image
This being the Professional Edition, the least we can do is discuss how professionals do things. Of course, a professional with deep pockets may go out and buy an expensive third-party masking add-on for Photoshop, but it's not like the program can't do some pretty amazing stuff right out of the box.
So, in this final section, we'll examine every step required to create a mask for a complex image. You'll see how to select the stuff you never thought you could select ” all the wispy little details from leaves , stray pieces of string, hair, you name it.
Figure 4-16 give you an idea of what is meant here. The major challenges presented by our subject are the stray bits of hair roaming about her head and shoulders. Imagine trying to select those using the Magnetic Lasso or Magic Wand. It ain't happening. As demonstrated in Figure 4-16, these tools lack sufficient accuracy to do any good. You'd be fit to be tied by the time you finished selecting the hairs with the pen tools, and the edges aren't definite enough for Select Color Range to latch onto.
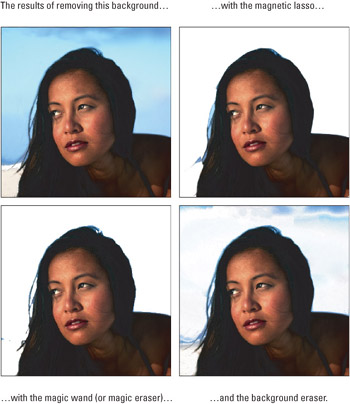
Figure 4-16: The details and indistinct transitions in this head of hair are too much for Photoshop's selection and extraction tools. This is a job for manual masking.
The solution is to mask your image manually. Granted, masking techniques vary as widely as the artists who employ them, but there are a few tried-and-true formulas that can work for just about everyone. First, you want to examine the image's channels to find one that lends itself best to a mask. You're looking for high degrees of contrast, specifically around the edges. After you've decided on a suitable channel, you copy it and boost the level of contrast using any of the weapons in Photoshop's arsenal that accomplish such things. For example, you can combine the High Pass filter (Filter Other High Pass) with adjustments to the channel's levels (Image Adjustments Levels). Some people prefer Image Adjustments Curves, but you may find that the Levels command is more straightforward. From this point, it's a matter of painting/editing the mask until you're satisfied with it. Like so many things, the only way to get a feel for masking is to try it out for yourself. The following steps explain exactly how this woman was masked and pasted against a different background. The final result is so realistic, you'd think she was born there.
STEPS: Masking a Monstrously Complicated Image
-
Browse the color channels. Press Ctrl+1 ( z -1 on the Mac) to see the red channel, Ctrl+2 ( z -2) for green, and Ctrl+3 ( z -3) for blue. Note that this assumes you're working inside an RGB image. You can also peruse CMYK and Lab images. If you're editing a grayscale image, you have only one channel, and that's Black, Jack.
Figure 4-17 shows the three channels in this RGB image. Of the three, the blue channel offers the most contrast between the hair and the background.
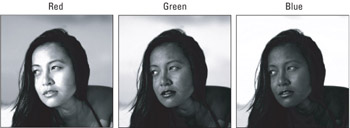
Figure 4-17: Of the three color channels, the blue channel offers the best contrast between hair and background. -
Clone the channel. Drag the channel onto the new channel icon at the bottom of the Channels palette to create a duplicate Now you can work on the channel without harming the image itself.
-
Choose Filter Other High Pass. The next thing you want to do is to force Photoshop to bring out the edges in the image so you don't have to hunt for them manually. And when you think edges, think filters. All of Photoshop's edge-detection prowess is packed into the Filter menu. Several edge-detection filters are available to you ” Unsharp Mask, Find Edges, and many others that are covered in Chapters 8 and 9. But the best filter for finding edges inside a mask is Filter Other High Pass.
High Pass selectively turns an image gray. High Pass may sound strange , but it's quite useful. The filter turns the non-edges completely gray while leaving the edges mostly intact, thus dividing edges and non-edges into different brightness camps, based on the Radius value in the High Pass dialog box. Unlike most of Photoshop's filters, a low Radius value produces a more pronounced effect than a high one, in effect locating more edges.
Figure 4-18 shows the cloned blue channel on the left with the result of the High Pass filter on the right. The example uses a Radius of 16, which is a nice, moderate value. The lower you go, the more edges you find and the more work you make for yourself. A Radius of 3 is accurate, but it'll take you an hour to fill in the mask. Granted, 16 is less accurate, but if you value your time, it's more sensible .
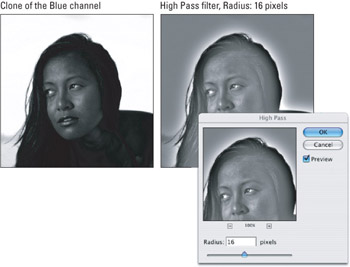
Figure 4-18: After cloning the blue channel (left), apply the High Pass filter with a Radius value of 16 to highlight the edges in the image (right). -
Choose Image Adjustments Levels or press Ctrl+L ( z -L on the Mac). After adding all that gray to the image, follow it up by increasing the contrast. The best command for enhancing contrast is Levels. Although this command is discussed in depth in Chapter 12, here's the short version: Inside the Levels dialog box, raise the first Input Levels value to make the dark colors darker , and lower the third Input Levels value to make the light colors lighter. (For now you can ignore the middle value.)
Figure 4-19 shows the result of raising the first Input Levels value to 110 and lowering the third value to 155. As you can see in the left-hand image, this gives you some excellent contrast between the black hairs and white background. To demonstrate the importance of the High Pass command in these steps, the example shows would happen if you had skipped Step 3 in the right- hand image in Figure 4-19. The example applies the same Levels values as in the left image, and yet the image is overly dark and quite lacking in edges.
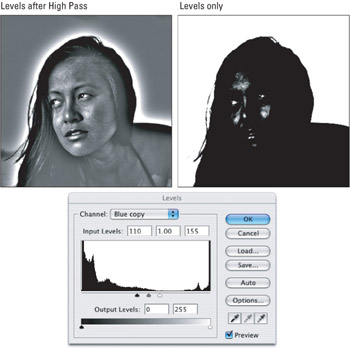
Figure 4-19: The results of applying the Levels command to the mask after the High Pass step (left) and without High Pass (right). High Pass has a very positive effect on the edge detail. -
Identify the edges. By way of High Pass and Levels, Photoshop typically presents you with a complex coloring book. Items that are dark in the original image have a white ethereal glow, and light items are just the reverse. Luckily, the woman is basically darker than her background. Sometimes, you may want to select areas and invert them by choosing Image Adjustments Invert (Ctrl+I for Windows; z -I for Mac) so all your outside edges are glowing uniformly. From here on, it's a matter of coloring inside the lines.
-
Remove the big stuff you don't need. To simplify things, get rid of the stuff you know you don't need. In the example, all you care about is the area where the woman meets her surroundings. Everything else goes to white or black.
In Figure 4-20, the area outside the woman is selected and filled with white by pressing Ctrl+Backspace ( z -Delete on the Mac). A lot was accomplished with the Lasso tool, but not everything is as it should be. The areas inside the hair require some careful attention with the Brush tool.
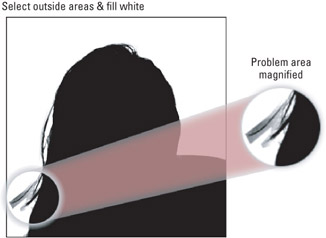
Figure 4-20: By selecting the area outside the object and filling it with white, you can clearly distinguish between foreground and background. The example still shows a few messy edges, identified by the circle. -
Paint inside the lines with the Brush tool. This tends to be the most time- consuming part. Now you have to paint inside the lines to make the edge pixels black or white. For this image, the Brush tool was used with a hard brush size of about 5 to 10 pixels (try using the X key to switch between painting with black and white). The first image in Figure 4-21 shows the fruits of our labors.
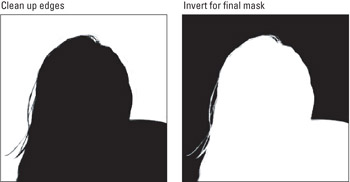
Figure 4-21: You can fix problem areas by hand using the Brush tool (left). You can then invert the entire mask so the area inside the object is white and the area outside is black (right). -
Invert the mask. You may or may not need to perform this step. Based on the condition of the edges after choosing the High Pass command, the woman ended up black against a white background. Of course, now you want to select the girl, so she needs to be white. Therefore, press Ctrl+I ( z -I on the Mac) to swap the blacks and whites. If your foreground image ends up white by this stage, then you can obviously skip this step.
-
Switch to the color composite view. Press Ctrl+tilde ( z -tilde on the Mac). Or if you're working in a grayscale image, press Ctrl+1 ( z -1). By the way, now is a good time to save the image if you haven't already done so. Remember, TIFF is a terrific format for this purpose.
-
Ctrl-click (Win) or z -click (Mac) the mask channel to convert it to a selection. This mask is ready to go prime time.
-
Ctrl-drag (Win) or z -drag (Mac) the selection and drop it into a different image. Figure 4-22 shows the result of dropping the woman into an evening background of orange sunset. Thanks to my mask, she looks as natural in her new environment as she did in her previous one. In fact, an uninitiated viewer may have difficulty believing this isn't how she was originally photographed. But if you take a peek at Figure 4-16, you can confirm that Figure 4-22 is indeed an artificial composite.
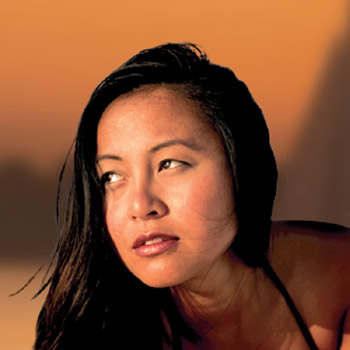
Figure 4-22: Thanks to the wonders of masking, our girl has found a new life in a more sultry location.
Figure 4-22 looks great, in part because a little extra finessing was done to match the highlights in the hair with that of the new background's sky and water. Any photographer is familiar with using lens filters to correct color temperature for the film they're using. Where her hair was originally casting blue now needed to go orange. Photoshop provides adjustment tools that perform a similar function. To push those bluish highlights orange, a photo filter (Image Adjustments Photo Filter) was applied, using the warming filter with a density of 75 percent. Pretty snazzy compositing, huh?
EAN: 2147483647
Pages: 95