Design and Operation of a Multiple Selection Screen
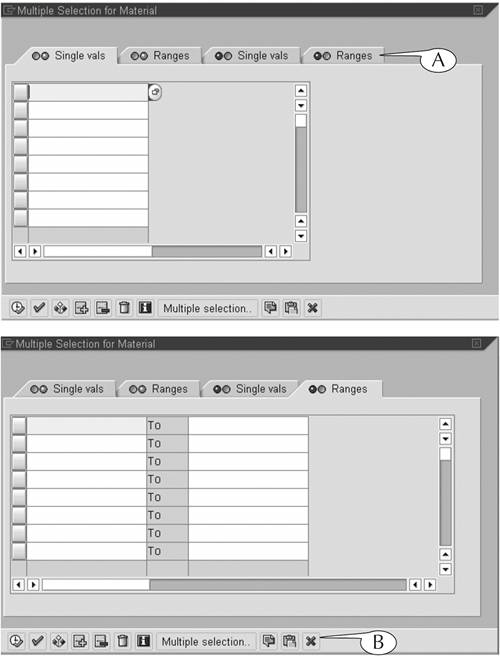
| The Multiple Selection for Material screen (Figure 11.2) displays four subscreens, which you call up by clicking their tabs (A). (We show two of these subscreens in the figure.) Each subscreen contains either one column of single data entry fields or two columns of paired fields, wherein you enter the codes for the object in question. The bottom of the screen contains a row of buttons (B), which you use to work with the contents of the screen. Figure 11.2. Two of the four subscreens of the Multiple Selection for Material screen for equipment codes. The tabs of a multiple selection screen are color-codedthe first two contain a green light, the last two contain a red lightand are named either Single vals (that is, values) or Ranges. This combination of color and name defines the different functions of the subscreens.
You enter codes in the data entry fields of the multiple selection screen in the same manner as you enter them on an initial screen.
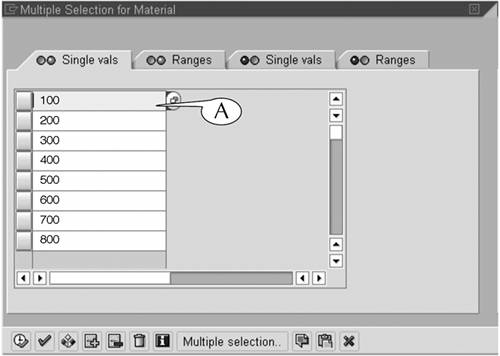
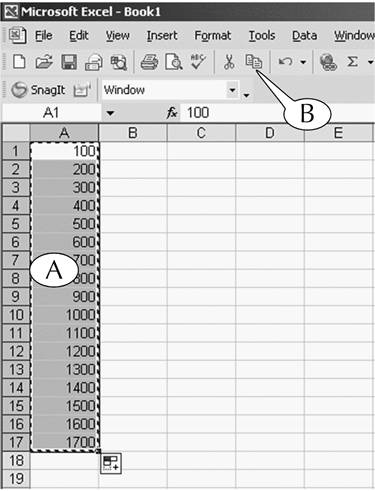
In addition to copying-and-pasting a single code into a field on the multiple selection screen, you can also copy-and-paste multiple codes into a column of fields. For example, you can copy-and-paste a column of codes from an Excel spreadsheet (Figure 11.3) onto the multiple selection screen by following this next procedure. Procedure: Copying Multiple Codes Onto the Multiple Selection Screen
Figure 11.3. Copying a column of data from an Excel spreadsheet into your computer's clipboard.
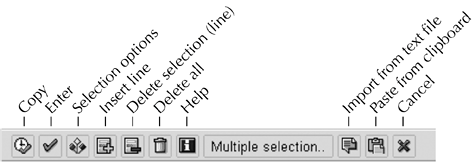
A multiple selection screen has a row of buttons at its bottom for working with its contents (Figure 11.5). The functions of some of these buttons, most notably the Enter, Selection options, Delete selection (that is, delete a line), and Paste from clipboard buttons, are executed more efficiently by the methods that were described above, so we do not describe them here. Figure 11.5. The tool buttons of the multiple selection screen.
The most important button on the multiple selection screen is Copy. Once you complete all your entries on the screen, you must click the Copy button to save your entries and return to the initial screen. The other useful buttons at the bottom of the multiple selection screen are
When you click the Copy button to save your entries on the multiple selection screen, the screen is erased and you can complete the setup of the initial screen of the transaction. However, you will notice a change to the fields in which you entered the multiple codes (Figure 11.6).
Figure 11.6. The first entries on the multiple selection screen appear in the datatype fields, and the Multiple selection button (B and D) is highlighted to indicate that codes have been entered on that screen.
At this point, you can always recall the multiple selection screen and edit its contents by clicking the Multiple selection button again. Once there, add, edit, or delete the codes, then click the Copy button to save your changes and return to the initial screen. |
EAN: 2147483647
Pages: 132
- Key #1: Delight Your Customers with Speed and Quality
- Key #3: Work Together for Maximum Gain
- When Companies Start Using Lean Six Sigma
- Making Improvements That Last: An Illustrated Guide to DMAIC and the Lean Six Sigma Toolkit
- The Experience of Making Improvements: What Its Like to Work on Lean Six Sigma Projects


