Creating Menus for Your Application
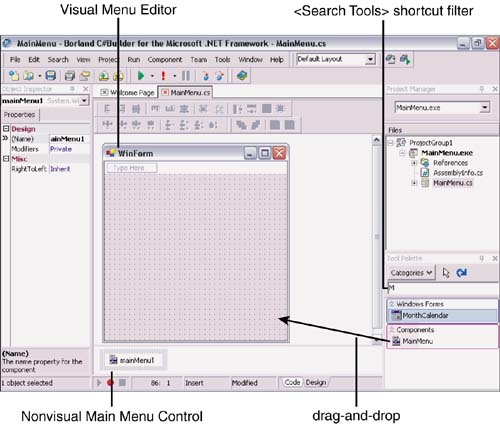
| C#Builder supports creating menus that can be implemented as traditional application menu bars or context-sensitive menus. Both types are created the same way, but implemented differently. Using the Menu DesignerThe menu designer enables you to build menus quickly. It exposes properties for each menu item and makes it possible to easily associate code, shortcuts, and other properties with each item. Creating a Main MenuYou'll find a MainMenu component in the Component section of the Tool Palette. You can scroll to it, select the Components category, or type the letter "M" into the <Search Tools> box and the component will appear. Drag it over to the form designer surface and drop it, which causes it to appear as a nonvisual component below the form (see Figure 8.1). While the MainMenu component is selected, as it is when initially dropped, a Visual Menu Editor will appear on the form designer surface, just below the title bar, as shown in Figure 8.1. Figure 8.1. Adding the MainMenu control to an application.
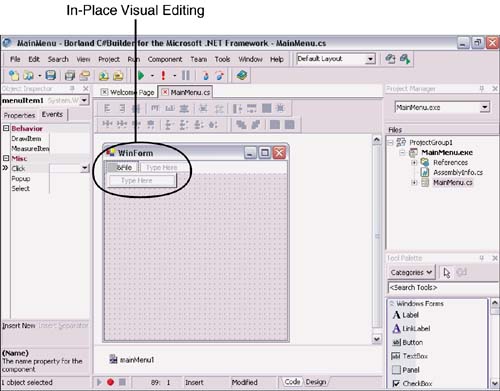
To begin creating the menu, click in the Visual Menu Editor where it says "Type Here" and type in &File. Notice the ampersand (&) symbol in front of the letter F. The & symbol creates a shortcut so that a user can press Alt+F to open the File menu. It also creates a visual cue by underlining the letter F. Shortcuts are always a good idea because they support a keyboard interface, which is a lifesaver if your mouse ever stops working. As soon as you start typing, the Visual Menu Editor creates two new editing boxes that say "Type Here" for additional menu items, as shown in Figure 8.2. This happens every time you begin a new menu item (this is only editor behavior and is not visible at runtime). Menu items are not created unless you type a name in the box. On submenus, below the main menu bar, adding menu items to the right of a selected submenu will create a cascading menu. Cascading menus have a right-pointing arrow. You build the menu by moving to each new menu item that appears in the Visual Menu Editor with the words "Type Here". Figure 8.2. Adding new menu items.
To remove a menu item that was created accidentally, select the item and press the Delete key. If a menu item is in the wrong order, select it and drag it to where it belongs. During the drag operation a red horizontal bar will appear to help identify the menu item location. Menu items can be moved within the same menu or to other menus this way. Right-clicking on the Visual Menu Editor will bring up a context menu that contains editing options similar to those discussed in this paragraph and the next.
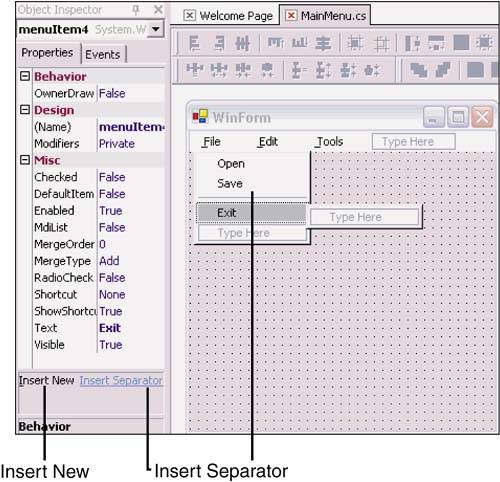
At the bottom of the Object Inspector are a couple of hyperlinks: Insert New and Insert Separator (see Figure 8.3). The Insert New link will insert a new menu item above the currently selected item in the Visual Menu Editor. The Insert Separator link will insert a separator bar above the currently selected item in the Visual Menu Editor. Figure 8.3. Object Inspector for the Menu Item Editor.
Adding Menu Event HandlersA naming convention I like to use on menus is "menu" + <main menu item> + <submenu item>. For example, I would name the File, Open menu as menuFileOpen. For consistency in the code, I name the File menu as menuFile. You set the name of a menu item by typing it in the Name property in the Object Inspector when the applicable menu item is selected in the Visual Menu Editor. Because this is the name C#Builder uses when automatically generating event handlers, making it meaningful will help you document your code better. Double-clicking any menu item in the Visual Menu Editor will automatically create an event handler and hook it up to the Click event with a delegate in the InitializeComponent method. Within that method, you can implement any behavior that the menu option was created for. Listing 8.1 shows what the automatically generated method looks like. Listing 8.1 A Menu Item Event Handler (MainMenu.cs) private void menuFileExit_Click(object sender, System.EventArgs e) { Close(); } The method in Listing 8.1 shows the event handler for the Exit submenu of the File menu. It simply calls the Close method to shut down the application. Each menu item has properties that can be set in the Object Inspector. Table 8.1 shows the MenuItem class properties.
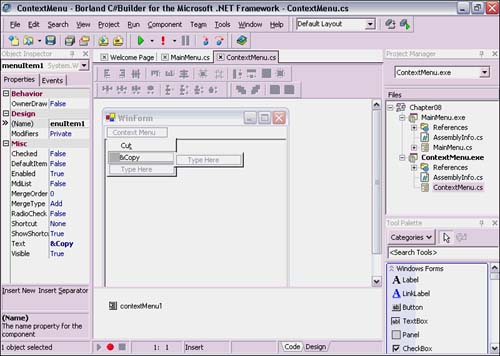
Implementing Context MenusContext menus are normal resource menus, except that they are set in the ContextMenu property of child controls in a Windows Forms application. They are essentially shortcuts that display functionality specific to the control they are applied to. Context menus are accessed by clicking the right mouse button. Context menus are added to individual controls, as opposed to the way a MainMenu control is added to a form and applies to the entire application. To add a context menu, make sure the control you want to apply it to is visible in the form designer. My example in Figure 8.4 uses a RichTextBox control that has its Dock property in the Object Inspector set to Fill. Locate the ContextMenu control in the Tool Palette by scrolling or typing the letter "C" in the <Search Tools> box. Select the ContextMenu control and drag it over the RichTextBox and drop it. This action creates a nonvisual component below the form designer surface. Figure 8.4. Adding a ContextMenu control.
When the ContextMenu is selected, its Visual Menu Editor appears at the top of the form on the form designer surface (see Figure 8.4). ContextMenu controls are edited in exactly the same way as MainMenu items. The exception is that the first item in the Visual Menu Editor is labeled as "Context Menu" and the first real menu item must be started in the box labeled "Type Here". Each control that can have a context menu will have a ContextMenu property in the Behavior section of its Object Inspector. In this example, the RichTextBox has a ContextMenu property that should be set to the ContextMenu control that was dropped on the designer surface. With C#Builder, this is the proper way of assigning a context menu to a control. |