HTML Editor Coding
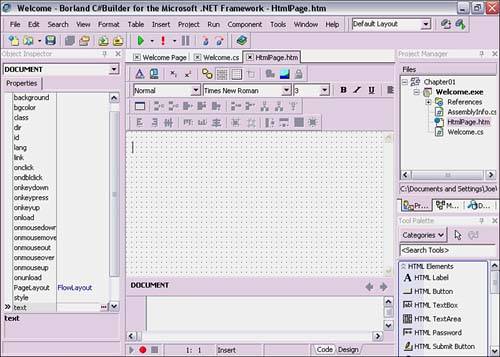
| The built-in C#Builder HTML editor includes color coding, tag completion, and WYSIWYG editing to help build Web pages more quickly. Navigation controls help you zero in on raw HTML and move around a document efficiently. You can create a new HTML project by selecting File, New, Other. In the New Items dialog that appears, select Markup Files from the Categories list. Then choose HTML Page in the list to the right and click the OK button. The process is the same as running any other wizard, as explained in the beginning of this chapter. This creates a new HTML file in design mode in the editor (see Figure 1.13). If there are existing projects open, the new HTML file will be added to the active project. The active project will be highlighted in a bold font in the Project Manager. To edit a standalone HTML file, make sure all projects are closed, by choosing File, Close All before creating the HTML file. With an HTML file open, the Tool Palette appears in the lower-right corner, as shown in Figure 1.13. Figure 1.13. The HTML editor.
The Tool Palette contains HTML controls that can be dropped onto the HTML designer surface. When you are editing HTML, you can switch between editor and designer surface by clicking either the Code or Design tabs, respectively, at the bottom of the editor. The designer surface is composed of three sections: toolbars, surface, and tag editor. HTML ToolbarsDefault toolbars for HTML design include Align, HTML Design, HTML Table, and HTML Format. These toolbars can be customized as described in the earlier section of this chapter, "Toolbar Customization." By default the designer surface displays a grid, which you can turn off by clicking the Show Grid toolbar button. Another important item on the toolbar is the Insert Table button. Be aware that the toolbars in the designer surface are sometimes cut off because of screen resolution or placement of other windows. To see everything available, it might be necessary to slide the Object Inspector or Project Manager/Tool Palette windows out of the way. Designer SurfaceAs soon as you click the mouse on the designer surface, the Object Inspector turns from a blank surface into a grid of properties (see Figure 1.13). The drop-down list at the top initially displays "DOCUMENT". As other elements are added to the designer surface, their declarations are available in this drop-down list for easy navigation. The purpose of the drop-down list on the Object Inspector is quick access to a specific HTML element. You can edit properties in the Object Inspector as appropriate for decorating the currently selected HTML element on the designer surface. When editing properties, press Enter to make changes appear in the designer surface. Code changes are automatically updated, and you can view them by selecting the Code tab at the bottom of the designer. In code view, the Object Inspector is blank, but selecting the Design tab will bring it back. Editing on the designer surface is simply a matter of typing the text needed in combination with HTML objects added to the page. Through a combination of toolbar and Tool Palette operations, any Web page can be designed visually. To add an item from the Tool Palette, select the item to use, drag it to the designer surface, and drop it in the proper location. Tool Palette items can also be double-clicked, causing them to be added to the designer surface. When the item is on the designer surface, select the item and its properties will appear in the Object Inspector. The HTML Tag EditorWhile you were adding objects to the designer surface and working with properties, you might have noticed changes in the area below the designer surface, the Tag editor. In addition to the designer surface and property editor, the Tag editor is another view into an HTML document. It has a title bar, zoom controls, and tag editing space. The title bar shows the current element selected in the designer surface. Each time a new design object is selected, the title bar will change and the tag edit space will display the corresponding HTML code element on the page. Applicable modifications in the tag editing space will reflect in both the designer surface and the property grid of the Object Inspector. Zoom controls, which are the arrows on the right side of the title bar, enable hierarchical movement throughout the HTML page. Clicking the left zoom arrow will move up the hierarchy to the HTML element at the top. Clicking the right zoom arrow moves control down the hierarchy to whatever object has been selected on the designer surface. The zoom arrows will only activate when there is a hierarchy of tags a couple of levels deep. For example, if you drop a Label control onto the designer surface, it will create an HTML <span> element where you can traverse between element text (Label by default) and the <span>Label</span> tags. |