Section 9.3. Sending Traps
9.3. Sending TrapsBy now you should have a mechanism in place for receiving traps. In this section, we'll look at some different utilities that send traps and allow you to develop traps that are appropriate for your environment. You'll notice that almost all trap utilities are command-line based. This allows you to execute the command from within a script, which is almost always what you want to do. For example, you can write a shell script that checks disk space every five minutes and sends a trap to the NMS if you're running low. You can also use these trap generators within existing programs and scripts. If you have a Perl script that accesses a database, you can use the Perl SNMP module to send a trap from within the script if a database insert fails. The possibilities are almost endless. Although there are many different snmptrap programs, they are all fundamentally similar. In particular, though their command-line syntax may vary, they all expect roughly the same arguments:
Before we start to tackle this section, let's take a moment to review what we learned in Chapter 2 about the various datatypes:
Be aware that not all programs support all datatypes. For example, the Perl SNMP module supports only the OctetString, INTEGER, and OID types, while the OpenView and Net-SNMP snmptrap commands support these three and many more. For each package we use, we will list, if applicable, the datatypes the program supports. In the next sections, we'll discuss snmptrap programs from HP, Network Computing Technologies, and Net-SNMP. We'll also include a script that uses a Perl module to send traps. If you are not using these particular programs in your environment, don't worry. You should still be able to relate these examples to your in-house programs. 9.3.1. Sending Traps with OpenViewOpenView has a commanad-line program for generating arbitrary traps, called snmptrap. snmptrap supports the counter, counter32, counter64,[*] gauge, gauge32, integer, integer32, ipaddress, null, objectidentifier, octetstring, octetstringascii, octetstringhex, octetstringoctal, opaque, opaqueascii, opaquehex, opaqueoctal, timeticks, and unsigned32 datatypes. Its command-line structure looks like this:
snmptrap -c community [-p port] node_addr enterprise_id agent-addr generic \ specific timestamp [OID type value] ... Here's a typical snmptrap command. It sends one trap, with three ASCII-string variable bindings for values: $ /opt/OV/bin/snmptrap -c public nms \ .1.3.6.1.4.1.2789.2500 "" 6 3003 "" \ .1.3.6.1.4.1.2789.2500.3003.1 octetstringascii "Oracle" \ .1.3.6.1.4.1.2789.2500.3003.2 octetstringascii "Backup Not Running" \ .1.3.6.1.4.1.2789.2500.3003.3 octetstringascii "Call the DBA Now for Help" It's a complicated command, and it's hard to imagine that you would ever type it on the command line. Let's break it up into pieces. The first line specifies the community string (public) and the address to which the trap should be sent (nms, though in practice it would be better to use an IP address rather than a node name). The next line is in many respects the most complicated. It specifies the enterprise ID for the trap we're going to send (.1.3.5.1.6.1.2789.2500, which is a subtree of the enterprise-specific tree we've devoted to traps); the address of the agent sending the trap (in this case, the null string "", which defaults to the agent's address; if you're using a proxy server, it is useful to specify the agent's address explicitly); the generic trap number (6, which is used for all enterprise-specific traps); the specific trap number (3003, which we've assigned); and a timestamp ("", which defaults to the current time). The remaining three lines specify three variable bindings to be included with the trap. For each binding, we have the variable's object ID, its datatype, and its value. The variables we're sending are defined in our private (enterprise-specific) MIB, so their OIDs all begin with .1.3.6.1.4.1.2789.2500. All the variables are strings, so their datatype is octetstringascii. The trap PDU will be packed with these three strings, among other things. The program that receives the trap will decode the trap PDU and realize that there are three variable bindings in the trap. These variable bindings, like the one that reads "Call the DBA Now for Help," can be used to alert the operator that something bad has happened. 9.3.2. Sending Traps with PerlIn Chapter 7, we learned how to use the get and set pieces of the SNMP Perl module. In this section, we'll see how to use the snmptrap() routine to generate traps. Currently, SNMP_util supports only three types for traps: string, int, and oid. This can seem limiting, but it covers most needs. Here's how snmptrap is called: snmptrap(communityname@host:port_number, enterpriseOID, host_name_from, \ generic_ID, specific_ID, OID, type, value, [OID, type, value ...]) One call to snmptrap can include any number of values; for each value, you must specify the object ID, the datatype, and the value you're reporting. The next script generates a trap with only one value: #!/usr/local/bin/perl # Filename: /opt/local/perl_scripts/snmptrap.pl use SNMP_util "0.54"; # This will load the BER and SNMP_Session for us snmptrap("public\@nms:162", ".1.3.6.1.4.1.2789", "sunserver1", 6, 1247, \ ".1.3.6.1.4.1.2789.1247.1", "int", "2448816"); The call to snmptrap() sends a trap to port 162 on host nms. The trap is sent from host sunserver1; it contains a single variable binding, for the object .1.3.6.1.4.1.2789.1247.1. The OID's type is int and its value is 2448816. Now let's try sending a trap with multiple values (multiple variable bindings). The first object we'll report is an integer, to which we give the arbitrary value 4278475. The second object has a string value and is a warning that our database has stopped. Because we're using OIDs that belong to our own enterprise, we can define these objects to be anything we want: snmptrap("public\@nms:162", ".1.3.6.1.4.1.2789", "sunserver2", 6, 3301, \ ".1.3.6.1.4.1.2789.3301.1", "int", "4278475", \ ".1.3.6.1.4.1.2789.3301.2", "string", "Sybase DB Stopped"); We can use the Net-SNMP snmptrapd program to monitor the traps coming in. We executed the preceding Perl code while running snmptrapd in stdout mode and received: $ ./snmptrapd -f -Lo 2005-05-05 08:00:24 NET-SNMP version 5.2.1 Started. 2005-05-05 08:03:05 sunserver2.ora.com [12.1.45.26] (via UDP: [12.1.45.26]:37223) TRAP, SNMP v1, community public SNMPv2-SMI::enterprises.2789.3301 Enterprise Specific Trap (3301) Uptime: 60 days, 14:41:38.72 SNMPv2-SMI::enterprises.2789.3301.1 = INTEGER: 4278475 SNMPv2-SMI::enterprises.2789.3301.2 = STRING: "Sybase DB Stopped" snmptrapd reported both of the values we sent in the trap: we see the integer value 4278475 and the notification that Sybase has stopped. Although this example is highly artificial, it's not all that different from what you would do when writing your own monitoring software. You would write whatever code is necessary to monitor vital systems such as your database and use the Perl SNMP module to send traps when significant events occur. You can then use any program capable of receiving traps to inform you when the traps arrive. If you want, you can add logic that analyzes the values sent in the trap or takes other actions, such as notifying an operator via a pager. 9.3.3. Sending Traps with Network Computing Technologies' Trap GeneratorThis command-line utility runs on Windows and, more recently, on Unix (to be specific, Solaris 2.6, Linux, Irix 6.2, and HP-UX). It understands the String, Counter, Gauge, Integer, Address, OID, TimeTicks, and Octet datatypes. You specify each of these types to the tool with S, C, G, I, A, O, T, and H, respectively. The command line for trapgen looks like this: trapgen -d DestinationIpAddress:port -c CommunityName -o senderOID -i senderIP -g GenericTrapType -s SpecificTrapType -t timestamp -v OID TYPE VALUE Here's how to use trapgen to send a trap notifying us that the UPS battery is running low. We use the String datatype to send an informative message, and we use trap 4025.1 from our private enterprise ID, 2789: C:\tools> trapgen -d nms:162 -c public -o ^ 1.3.6.1.4.1.2789.4025 -i 10.123.456.4 -g 6 -s 4025 -t 124501 ^ -v 1.3.6.1.4.1.2789.4025.1 S 5 Minutes Left On UPS Battery This trap will be sent to our network management station (which has the hostname nms) on port 162, which is the standard port for SNMP traps. Any management station should be able to receive the trap and act on it appropriately. You can use this command in Windows batch scripts and in Unix shell scripts. Therefore, you can use trapgen to generate traps as you need them: you can write scripts that monitor key processes and generate traps when any interesting events take place. As with the earlier Perl example, you can use this simple trap generator in your environment if you don't need a heavy-duty management system. 9.3.4. Sending Traps with Net-SNMPThis snmptrap program looks very similar to OpenView's snmptrap. This program uses a single letter to refer to datatypes, as shown in Table 9-2.
Here's how the Net-SNMP snmptrap program is invoked: snmptrap hostname community enterprise-oid agent \ generic-trap specific-trap uptime [OID type value]... If you use two single quotes ('') in place of the time, snmptrap inserts the current time into the trap. The following command generates a trap with a single value. The object ID is 2005.1, within our private enterprise; the value is a string that tells us that the web server has been restarted: $ snmptrap nms public .1.3.6.1.4.1.2789.2005 ntserver1 6 2476317 '' \ .1.3.6.1.4.1.2789.2005.1 s "WWW Server Has Been Restarted" Here's how to send a Version 2 notification with Net-SNMP: $ snmptrap -v2c nms public '' .1.3.6.1.6.3.1.1.5.3 \ ifIndex i 2 ifAdminStatus i 1 ifOperStatus i 1 The command is actually simpler than its Version 1 equivalent. It has no generic numbers, specific numbers, or vendor IDs. The '' argument defaults to the current system uptime. The OID specifies the linkDown notification, with three data bindings specifying the link's status. The definition of linkDown in the IF-MIB states that the linkDown notification must include the ifIndex, ifAdminStatus, and ifOperStatus objects, which report the index of the interface that went down, its administrative status, and its operational status, respectively. For ifAdminStatus and ifOperStatus, a value of 1 indicates that the link is up. So, this notification reports that interface 2 has changed its state from "down" to "up." Finally, here's how to send an SNMPv3 trap: $ snmptrap -e 0x012345 -v3 -l authPriv -u kschmidt -a MD5 \ -A mysecretpass -x DES -X mypassphrase localhost '' \ .1.3.6.1.4.1.2789.2005 .1.3.6.1.4.1.2789.2005.1 s \ "WWW Server Has Been Restarted" Notice the -e command-line flag; it specifies this application's engine ID. The corresponding trap receiver should be configured with this value. The snmptrap command-line tool is great for integrating SNMP monitoring into shell scripts and other programs. 9.3.5. Forcing Your Hardware to Generate TrapsWhen you install a new piece of equipment, you should verify that it generates traps correctly. Testing your equipment's ability to generate traps has the added benefit of testing the behavior of your NMS; you can ensure that it handles traps in the way you want. The best way to test new hardware is to read your vendor's MIB and look for all the trAP-TYPEs it has defined. This will give you a good feel for the sort of traps your vendor has implemented. For example, I read through the APC MIB and noticed that the unit sends a trap when it goes onto battery power if the AC power goes out. To test this feature, I secured the area in our datacenter and switched off the circuit breaker to simulate a power failure. The trap was generated, but it showed up in the Error event category because I did not have the correct MIB loaded in OpenView. I took the OID from the Error events and searched the APC MIBs for a match. When I found one, I loaded the MIB file into OpenView and repeated the test. This time, when the trap was received, OpenView put an informative message in the Event Categories. Most SNMP-compatible routers, switches, and network devices can generate linkDown traps. From RFC 1157, a linkDown trap is a "failure in one of the communication links represented in the agent's configuration." This means that if you start unplugging ports on your router, you should receive traps, right? Yes, but first make sure you don't start disconnecting production database servers. Furthermore, make sure you don't disconnect the port by which your device would send the trap back to the NMS. Remember, SNMP is designed with the assumption that the network is unreliableif something sends a trap but there's no way for the trap to reach its destination, no one will find out. By default, a linkDown trap won't appear in OpenView's Event Categories because the default setting for linkDown is "Log only"; watch the log file $OV_LOG/trapd.log to see these traps arrive. Once you have a mechanism for receiving traps, bringing the link up and down on your device should send some traps your way. 9.3.6. Receiving Traps with SNMPcSNMPc has support for a great many trap types out of the box. Let's first look at what SNMPc does when it gets a coldStart trap from an SNMP agent. Figure 9-8 shows a pop-up window from SNMPc when our agent is restarted. Figure 9-9 also shows the events in the active event window with the appropriate color statusin this case, the color is magenta. And of course, the icon for my LinuxServer changed to the color of the next most severe event, which is the coldStart event (see Figure 9-10). Figure 9-8. SNMPc trap pop-up window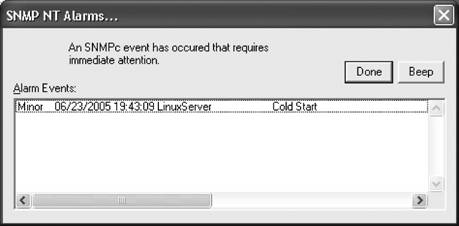 Figure 9-9. SNMPc event viewerFigure 9-10. SNMPc map object's color status If you right-click on the Cold Start event and select Edit Event Actions, you can change the properties for this trap. Figure 9-11 shows this window. The Message input box allows you to change the text of the event as seen in the event window. If you click on the Actions tab, you can change the actions for this event filter (Figure 9-12). The priority is currently magenta, but you can change it to whatever you see fit. The checkboxes on the right near the top control how SNMPc reacts to this event. Checking Log causes the event to show up in the event window. Alarm causes a pop-up window to appear like the one in Figure 9-8. You have other options at your disposal including running a program, playing a sound, or sending an email. The Clear Events checkbox allows you to dictate what, if any, other events will cause this event to be automatically cleared. If you select authenticationFailure, for example, and click Yes, if an authenticationFailure is received after the coldStart event, the coldStart event will be cleared. Figure 9-11. SNMPc event actions editor Figure 9-12. SNMPc event actions To see the actual trap details, right-click the event and select Event Properties to display the screen shown in Figure 9-13. Figure 9-13. SNMPc trap details Figure 9-13 shows the full text for the event and the variable bindings. Finally, go back to the event window, right-click on the event, and select Acknowledge so that the event can move from the Current event tab to the History event tab. Figure 9-9 shows these tabs. 9.3.6.1. Custom trap actionsLet's say you want to add a custom action to an SNMP trap. First see Chapter 5 for a discussion on how to add your MIBs to SNMPc. Once you have done this, you are ready to customize an action. We have already loaded the Cisco Ping MIB in our SNMPc system. This MIB allows you to configure Cisco routers to send out ICMP messages to one or more remote hosts. As an optional setting for this feature, the Cisco device can send you a trap when it is done sending these messages. The first thing to do is to find the entry in the Event Selection tab of the Selection tool. If you don't see this, go to View Since the events are in alphabetical order, it is easy to find the ciscoPingMIBTrapPrefix action. When you expand it, it has two actions: Default and ciscoPingCompletion. Right-click on the ciscoPingCompletion action and select Insert Event Filter. This will bring up a window like Figure 9-15. Figure 9-14. SNMPc event action selection Here you change the Event Name to suit your taste. You can also change the Message input as well, which is what will be displayed in the Event log window. The Figure 9-15. SNMPc event filter details Message input can be free-form text and/or contain special characters. These characters are summarized in Table 9-3.
Next you have to associate a device, or set of devices, with this trap. Select the Match tab at the top of the window. You have two choices. You can associate a group of nodes with this trap, which means all traps received from any device in this group will have this action applied to it. Figure 9-16 shows this option. The second option is to specify individual devices to apply this trap to. Click the Add button, which will bring up the Browse Map Tree in Figure 9-17. Here you can select as many individual devices as you want. In Figure 9-18, LinuxServer shows up under Sources. The next step would be to click on the Actions tab and configure the Priority and color and any other options you want. We discussed this in the previous section, so there is no need to reexamine it here. Click on the OK button to save your Event filter. It will be updated in the Event Selection tree, as shown in Figure 9-19. That's all there is to creating custom filters and actions. Figure 9-16. SNMPc: apply actions to devices Figure 9-17. Browsing the map in SNMPc 9.3.7. Using Hooks with Your ProgramsA hook is a convenient interface that lets you integrate your own code into some other product. The Emacs text editor is a good example of a program that uses hooks, almost entirely, to allow its users to extend how it operates. Let's look at the following simple program to explain this concept further: # Logical Sample Program NH1 # PROGRAM COMMENTS # PROGRAM BEGINS Figure 9-18. LinuxServer added to Sources Figure 9-19. Custom filter added PROGRAM ADDS $VAR1 + $VAR2 = $VAR3 PROGRAM SUBTRACTS $VAR5 - $VAR6 = $VAR7 PROGRAM PRINTS RESULTS $VAR3 $VAR7 # PROGRAM ENDS This program simply ADDS, SUBTRACTS, and PRINTS RESULTS; it does not have any hooks. To add a feature, you have to modify the code. For a small program like this, that is a trivial exercise, but it would be difficult in a longer program. The next program contains some hooks that let you add extensions: # Logical Sample Program H1 # PROGRAM COMMENTS # PROGRAM BEGINS PROGRAM RUNS $PATH/start.sh PROGRAM ADDS $VAR1 + $VAR2 = $VAR3 PROGRAM SUBTRACTS $VAR5 - $VAR6 = $VAR7 PROGRAM PRINTS RESULTS $VAR3 $VAR7 PROGRAM RUNS $PATH/end.sh # PROGRAM ENDS Notice the two additional RUNS statements. These hooks allow you to run anything you want at the start or end of the program. The first program, start.sh, might be as simple as the command echo "I am starting," which sends a simple message to the system or management console. This script could also call one of the trap-generation programs to send a trap to the NMS stating that some program is starting. It would be even more useful to send a message when the program terminates, possibly including information about the program's status. Here's a slightly more complicated program that runs a script, providing a number of arguments so that the script can send useful information back to the NMS when it generates a trap: # Logical Sample Program H2 # PROGRAM COMMENTS # PROGRAM BEGINS PROGRAM RUNS $PATH/start.sh $PROGRAM_NAME PROGRAM ADDS $VAR1 + $VAR2 = $VAR3 PROGRAM SUBTRACTS $VAR5 - $VAR6 = $VAR7 PROGRAM PRINTS RESULTS $VAR3 $VAR7 PROGRAM RUNS $PATH/end.sh $PROGRAM_NAME $VAR1 $VAR2 $VAR3 $VAR5 $VAR6 $VAR7 # PROGRAM ENDS With the additional arguments available to the hook programs, we can generate messages like "The Program Widget has ended with sales at $4 and YTD at $7." If your hook programs are shell scripts, you can simply add snmptrap commands using a text editor. Once you finish adding the snmptrap code, you can test your hook program by running it on the command line. Many scripts can benefit from snmptrap hooks. On Solaris or Linux machines, for example, some of your /etc/init.d scripts can be retrofitted to make use of snmptrap commands. It might be useful to have some kind of notification when important processes such as your web server or DNS server start and stop. Having such information on hand might make life much easier for your help desk. (The Concord SystemEDGE SNMP agent provides more rigorous process-monitoring capabilities. See Chapter 10 for more information on this product.) It's harder to add hooks to programs written in languages like C because you need access to the source code as well as the ability to figure out where to place the hooks. Once you have identified where your hooks go and you have added them, you must recompile the source code. Some programs have hooks built in, allowing you to run external programs or RPCs. Check your program's documentation for the locations of these hooks. This is much more convenient than trying to build your own hooks into another program. Once you have established what these external programs are called, you can start writing your own traps or adding to existing ones. |
 Select Tool. Then select the Event tab at the bottom of the tool. You should see a window similar to Figure 9-14.
EAN: 2147483647
Pages: 165