Extract Images from Backgrounds
Copy to a New Layer
-
Use any combination of selection tools to select the elements you want to extract from the background.
-
Press ctrl+j to copy the contents of the selection to a new, blank layer.
Since the copy will be positioned on a new layer, directly above the original, the results of this process will not be apparent at first. To see the copy by itself:
-
Open the Layers palette by choosing Window | Layers. The Layers palette appears.
-
In the Layers palette, click the Eyeball icon at the left of the background layer to hide the background layer. The new copy, without background, becomes apparent.

You’ll learn more about layers in Chapter 4.
Copy to a New Document
-
Use any combination of selection tools to select the elements you want to extract from the background.
-
Press ctrl+c to copy the contents of the selection to the clipboard.
-
Choose File | New to create a new document. By default, Photoshop sizes the new document to fit the contents of the clipboard.
-
Press ctrl+v to paste the clipboard into the new document.
Extract Background Elements
While not exactly a selection tool, Photoshop’s Extract filter automates the task of removing the background from around foreground elements in your image. To extract an element from its background with the Extract filter:
-
Choose Filter | Extract. The Extract dialog box opens, as seen in Figure 3-5.
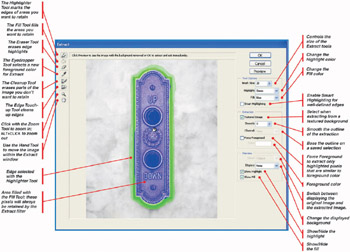
Figure 3-5: The Extract Filter workspace provides many options. -
Click the Highlight Tool at the top-left of the Extract dialog box to select it.
-
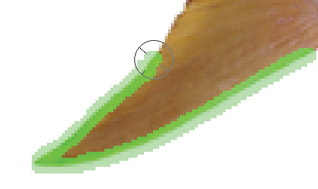
Drag with the Highlight Tool to highlight the edge of the element you want to extract. This highlight shows Photoshop where to look for the edges of your elements.
-
If necessary, adjust the Brush Size. The smaller the brush, the better job Photoshop will usually do of finding the edges in your picture.
-
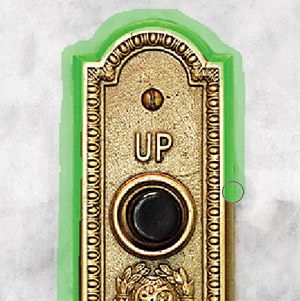
If your element has a clearly defined border, such as this one, make sure the highlight goes all the way around it.
-
If your element has no clearly defined border, cover it completely with the Highlighter.
-
If your element has a clearly defined border, select the Fill Tool at the top left of the Extract dialog box, and click inside the area outlined by the Highlight Tool to fill it. Pixels within the filled area will always be retained by the Extract filter.

-
Click Preview to preview the extraction.

Tip Pressing alt+backspace while in the Extract filter dialog box erases the highlights and fills.
If you don’t like the results, change the settings and try again. To reset the Extract filter:
-
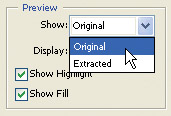
In the Preview section of the Extract dialog box, check Show Highlight and Show Fill, to redisplay your highlight and fill.
-
Open the Show drop-down list, and click Original.
Make changes in your settings:
-
Use a smaller Highlighter brush to make it easier for Photoshop to detect edges.
-
Increase the Smooth setting to even out jagged edges. Too much Smoothing will blur outlines.
-
If your element is against a textured background, check Textured Image to improve the extraction results.
-
Change the Highlight and Fill colors to make them easier to see against your image.
-
Preview and change the results as many times as you want. When you are happy, click OK to accept.
If no amount of tweaking produces good results in Extract filter, you can manually touch up areas.
| Tip | If your element has a well-defined edge, use Extract’s Smart Highlighting brush. Photoshop automatically detects the edge as you paint. |
Clean Up an Extraction with the Cleanup Tool
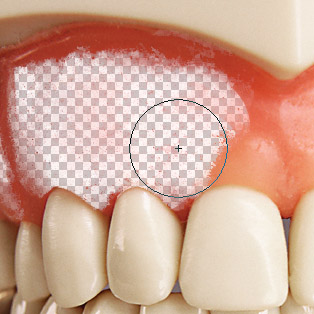
The Cleanup Tool paints with transparency. To clean up problem areas:
-
With your preview visible in the Extract filter, select the Cleanup Tool.
-
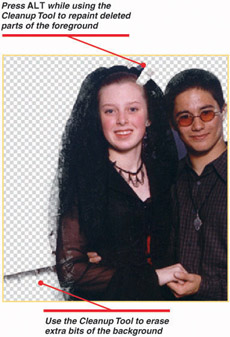
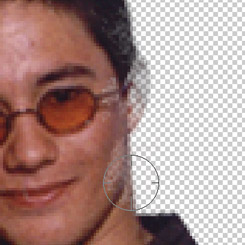
Paint with the Cleanup Tool to erase any remaining extra pixels from the background.
-
Hold down alt while painting with the Cleanup Tool to restore areas you want to extract.
Clean Up an Extraction with the Edge Touchup Tool
The Edge Touchup Tool cleans up ragged areas around the edges of extracted elements.
-
With your preview visible in the Extract filter, select the Edge Touchup Tool.
-
Drag the tool along the edges of your preview to clean them up.
-
When you are happy with the results displayed in Extract’s preview, click OK to perform the extraction and return to your document.
Use the Magic Eraser Tool
The Magic Eraser Tool works like a combination of the Magic Wand Tool and the delete key. It selects an area of similar color and deletes it.
-
To select the Magic Eraser Tool, click the current Eraser tool icon in the Toolbox palette, and hold the mouse button down. The Eraser Tool pop-up menu appears.
-
Click the Magic Eraser Tool to select it.
-
Set the Tolerance in the options bar. The higher the Tolerance, the wider the range of colors that will be deleted. A good starting Tolerance is 32.
-
Click a background area in your image to delete it.

Use the Background Eraser Tool
The Background Eraser Tool erases areas of similar color. Use the Background Eraser Tool to erase the background from around a foreground element.
When you first click with the Background Eraser Tool, it samples the background color.
-
To select the Background Eraser Tool, click the current Eraser tool icon in the Toolbox palette, and hold the mouse button down. The Eraser Tool pop-up menu appears.
-
Click the Background Eraser Tool to select it.
-
Open the Limits drop-down list, and click Contiguous.
-
Open the Sampling drop-down list, and click Once. This samples the background color each time you click with the tool.
-
Click in an area you want to erase, to sample the background color.
-
Without releasing the mouse button, drag the tool over the background to erase pixels of similar color.
-
To erase multiple areas or multiple colors, repeat Steps 5 and 6.
-
The Background Eraser Tool has a number of options which you can adjust for better results, as shown in Figure 3-6.
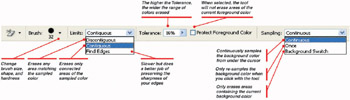
Figure 3-6: You find many options on the Background Eraser options bar.
EAN: 2147483647
Pages: 59
- Chapter I e-Search: A Conceptual Framework of Online Consumer Behavior
- Chapter V Consumer Complaint Behavior in the Online Environment
- Chapter VII Objective and Perceived Complexity and Their Impacts on Internet Communication
- Chapter X Converting Browsers to Buyers: Key Considerations in Designing Business-to-Consumer Web Sites
- Chapter XIV Product Catalog and Shopping Cart Effective Design