| You get oodles of software with most Linux distributions. In Fedora and Mandrake, you already have software to do most computer tasks that you can think of sitting right on your install disks. Why would you want more? Because more is more. Because we are human. Because we are greedy. Because we want it all. Because, "All your base are belong to us." The real reasons are, of course, that with computers, there are always new programs, new options, and new versions to download and install. Staying up-to-date and trying new programs make up the vibrant, plugged-in heart of most computer users. Installing New Software in Order of Sanity With so many sources and methods for installing new software on your Linux system, you might not know where to turn. You don't want to get stuck installing incorrect versions or configuring a version of some program that creates a lot more work than a more appropriate version might. To avoid frustration, check out these avenues for installing new software, in the order of sanity: Apt, Yum, or Mandrake Update Your installation disks RPM packages downloaded from the developers' or company's Web site Sourceforge.net RpmFind.net or rpm.pbone.net Downloaded compressed files of the source code to install from
If you look for your new software in this order, you will usually save the time and trouble of unnecessary dependency issues, errors, or configuration tweaks. |
Yeah, yeah, yeah, in Linux, there are always choices. If you're tired of hearing me say that, just get used to it. The abundance of choices is an intrinsic characteristic of all things Linux. In the case of installing new software, you have some common choices and some different choices, based on which distribution you are using. RPM Files Using packages is the most efficient way to install new software in Linux. Both Fedora and Mandrake use RPM packages for installing programs. RPM (Red Hat Package Manager) files are the closest Linux has to a standard program installer. An RPM package contains installation files and instructions for where to install the package files. Locations for system directories differ among distributions, and not all distributions can use RPM files. For distros that are RPM based (including Fedora, Mandrake, SUSE, and Yellow Dog), programs usually have different RPMs for different Linux distributions. RPM packages can also be specific to your computer's CPU architecture. You might see an architecture specified in a package's filename. You can use that part of the filename to choose the best package for your system. Look for the following text in package names to fit with these CPUs: i686: Pentium II CPU or above i586: Pentium-class CPU or above i386: 386-class CPU or above ppc: Apple Macintosh Power PC noarch: Can be used with any CPU
You can easily install an RPM file in Fedora and Mandrake by double-clicking the RPM file in your file manager. You can also install an RPM file in the terminal to have a little more control over the installation options. More Than One Way to Skin an RPM Did you think there were even more ways to install RPM files? Ding! You are correct. Besides the installation methods we talk about in the ToolKit, Fedora's Package Manager and Mandrake's RPMDrake can install RPM packages. Both tools are easy to use but are limited to the programs and version numbers on the install disks. To use the Fedora Package Manager or Mandrake's RPMDrake, go to your main menu: With Fedora Package Manager, choose System Settings > Add Remove Applications. For Mandrake RPMDrake, choose System > Configuration > Packaging > Install Software. I prefer Apt or Yum on Fedora, and Mandrake Update on Mandrake for installing new programs and for updating because those programs are all more robust. They can each pull newer software from their respective online sources. |
That's all good news. Want the bad news? The bad news is that each RPM file you install reduces your computer's life by one year. It's like chronic life-long smoking for your computer. RPMs will stunt your computer's growth. Of course none of that is true, but I had to see if you fell for it for at least a second. The bad news regarding RPM files can be said with one word: dependencies. Some RPMs install right away with no problems. Other RPMs require that you have additional RPM packages installed first; those required packages are called dependencies. These can be frustrating little exchanges between you and your computer. Here's an example of a dependency error message: # rpm -ivh koffice-1.3.3-1mdk.i586.rpm error: Failed dependencies: koffice-kword is needed by koffice-1.3.3-1mdk koffice-kspread is needed by koffice-1.3.3-1mdk koffice-karbon is needed by koffice-1.3.3-1mdk
You can see from that output that when I tried to install the RPM file using a terminal command, I got an error message. The error message tells me that three other packages are required for me to install before I can install the one I want. Reading through the error, I can see that the names of the required dependencies are koffice-kword, koffice-kspread, and koffice-karbon. Your best way, and only way, to deal with RPM dependencies is to calmly look at the packages needed and go find them online, either through one of the update utilities we will talk about in a bit or by finding individual RPMs online.  | TOOL KIT 3.6Install an RPM File Let's go grab a program that you probably don't already have. There is a small timer/alarm program on SourceForge.net called eLapse. Download the RPM file for Linux from http://sourceforge.net/projects/elapse/, and save it to your home directory. Your exact filename will probably be different because you might be able to download a newer version of the program. You're in the future. How is it there? Are there robots in the future with you? We will install eLapse both ways, through the file manager and through the terminal. You need to become the root user or enter your root password to install RPM files. Install from Your File Manager 1. | Open your file manager of choice, either Konqueror or Nautilus. Navigate to your home directory.
| 2. | Double-click the RPM file. You are prompted for your root password, so enter the password. You can see what the installation looks like in Fedora in Figure 3.10.
Figure 3.10. The Nautilus progress dialog box while installing an RPM file. 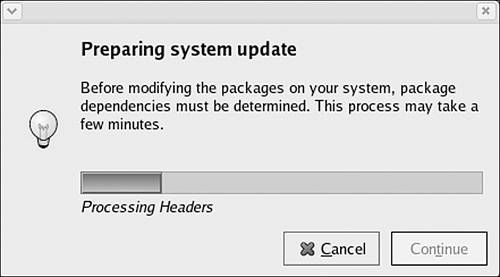
| 3. | That's it. You are pretty much done. Unless you had an error message, the package is installed. If you were successful, you are free to delete the RPM file.
|
Install from the Terminal 1. | Open your terminal of choice, such as the GNOME Terminal or Kshell. Go to your home directory:
$ cd ~
| 2. | Become the root user and enter your root password:
$ su
| 3. | The rpm command has many optional switches (a command switch is a letter or word option that you add after a command). Read the man file for the rpm command to find out more of the options. For installing a single package, we will use these:
# rpm -ivh eLapse-0.2-1.i386.rpm
The i means that we are installing. The v indicates that we want verbose output from the command so that we can watch what is going on. The h asks rpm to show a hash mark progress dialog box because that is just fun to watch. So, we see this output:
Preparing... ############################### [100%] 1:eLapse ############################### [100%]
The hash marks displayed the progress, and we were told when it was all done.
| 5. | If you were successful, you can log out of the root user (press Ctrl+D) and delete the RPM file.
|
|
|
How to Uninstall an RPM File Removing any package on your system is easy. You need to remove packages in the terminal. As the root user, use this command to uninstall an RPM: # rpm -e [package name]
If other packages need that package, you will see an error telling you what package uses the one that you are trying to remove. If you get that dependency error, you should think twice about uninstalling the package. Make sure that all related packages are not programs that you need. |
Apt and Synaptic Program InfoFedora/GNOME menu | Synaptic: System Settings > Synaptic Package Manager | Terminal Command | apt-get | Program URL | http://apt.freshrpms.net |
I can't be objective. I love Apt. Apt is the greatest thing since sliced chinchillas. I suppose that wouldn't actually be a great thing, but you know what I mean. Apt was originally developed as a program for another distribution, Debian. Then the smart people in the world figured that Apt was so cool that other Linux users should be able to use it as well. Now we have Apt for RPMs. Apt is great because it takes the already good RPM package system and solves the dependency problem. With Apt, you call out to online servers full of RPMs (repositories) and ask for the packages you want. If other packages are required, Apt goes ahead and installs those dependent packages as well. Currently, Apt is not available for Mandrake in a proven, stable version, but there are users out there working on it. The Magic Apt Commands You can keep your Fedora install up-to-date very simply with Apt, but you first need to make sure that you keep your Apt repository listing up-to-date. Before you use Apt to install anything, always resync the repository with this command: # apt-get update
Now you are ready to use this command to install a program: apt-get install [package name]
To update your whole system, use this command: # apt-get dist-upgrade
|
Apt is a program that you use on the command line, but you can also use Synaptic, a GUI front end for Apt. Synaptic provides you with a very easy interface for managing packages and repositories. You can see which available packages you have installed, which you might like to install, and which need updating. | TOOL KIT 3.7Use Apt for Fedora to Install Synaptic 1. | Download a copy of Apt from http://apt.freshrpms.net/, and install it. FreshRPMs should be your first stop for anything related to Apt; this site has the most reliable repositories and stays up-to-date. You can refer to the last section on RPM files (see ToolKit 3.6) for help on installing the Apt RPM package.
Remember that you need your root password to install an RPMfile.You also need your root password to use Apt.
| 2. | As always, you need to resync your Apt repository before you do anything:
# apt-get update
Wait while lots of information scrolls by about what Apt is doing. Apt is contacting the repositories you have listed and is getting the latest RPM header files.
| 3. | Next, download and install Synaptic. Watch how easy this is:
# apt-get install synaptic
Ba-boom. That's it. Apt searches its repository list and then gives you output that looks something like this:
Reading Package Lists... Done Building Dependency Tree... Done The following NEW packages will be installed: synaptic 0 upgraded, 1 newly installed, 0 removed and 108 not upgraded. Need to get 1114kB of archives. After unpacking 4554kB of additional disk space will be used. Get:1http://ayo.freshrpms.netfedora/linux/2/i386/freshrpms synaptic 0.52-1.1.fc2.fr [1114kB] Fetched 1114kB in 7s (154kB/s) Committing changes... Preparing... ###################################### [100%] 1:synaptic ###################################### [100%] Done.
You might be politely asked if it is okay to install the packages. You should politely answer in the affirmative.
| 4. | You can now open Synaptic by going to the main menu > System Settings > Synaptic Package Manager (see Figure 3.11).
Figure 3.11. Synaptic front end for Apt running on Fedora. 
|
|
|
 | UNDER THE HOODUP2DATE That blinky icon in your default Fedora system tray is asking for attention. The icon is for a program called Up2date. This program is a holdover from older Red Hat Linux releases. Up2date is another GUI way to update your system. The program works well and is very usable, but it is being gradually phased out in favor of Apt or Yum. Both Apt and Yum are more flexible and more powerful tools for updating. |
|
In Synaptic, you can browse the categorized list of available programs. The programs in each category show to the right with an icon indicating whether the program is installed, needs to be updated, or is not installed. You can double-click any programs you want to install, update, or uninstall. Click the Apply button on the toolbar to commit your changes. Yum Program InfoTerminal Command | yum | Program URL | http://apt.freshrpms.net |
Yum (Yellow Dog Updater Modified) is a lot like Apt. Just like Apt, Yum was developed for a different Linux distro, Yellow Dog. Just like Apt, Yum is a command-line updating tool. Just like Apt, the commands you need to install or update programs are intuitive and easy to remember. Yum is not only an automatic updater, but it is also a package-management tool for RPMs. If an RPM has required dependencies when you are installing it through Yum, it figures out and installs the dependencies for you. You can use Yum instead of or in addition to Apt or Up2date. Yum is installed by default on your Fedora system but is currently not available for Mandrake. Apt and Yum Repository Files You can add or remove repositories for Apt and Yum to access in their sources files: Apt: /etc/apt/sources.list Yum: /etc/yum.comf Synaptic: Main menu > System Settings > Synaptic Package Manager A number of individuals and groups maintain repositories for hard-to-find add-on packages. One of the best sources is the Dag Wieers repository (see http://dag.wieers.com/home-made/apt/). Just remember not to include the funky extra repository sources if you do an apt-get dist-upgrade or yum update. If you fail to remove those new sources during an overall update, you risk rendering some packages unusable. |
Because Yum comes with Fedora, it uses the Fedora repository initially. You can add other repositories, if you like. Use the terminal command su to become the root user before using Yum. When you first use Yum in each session, you need to update the database of RPM header files: # yum check-update
This can be a lengthy process the first time you do it, but it isn't so bad subsequent times. Updating your system or installing a program is easy. To update installed packages, use this command: # yum update
To install new packages, use this one: # yum install [package name]
Just like Apt, Yum is very easy to use. Unlike Apt, no commonly used GUI front end is as good as Synaptic to use instead of the command line. Mandrake Update Program InfoMandrake/KDE menu | System > Configuration > Packaging > Mandrake Update | Terminal Command | MandrakeUpdate |
You can update your Mandrake system easily as well. Mandrake Update (see Figure 3.12) is a utility that uses the Mandrake program RPMDrake and combines it with the capability to grab updated packages from online sources. Unfortunately, this tool installs only updates and does not give you an interface to install whole new programs. Figure 3.12. The Mandrake Update interface. 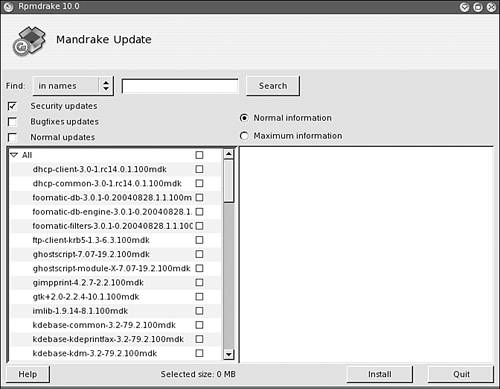
When you open Mandrake Update, you will be asked if Mandrake can go get you a list of servers to choose from and then show you the list. You can pick whichever one looks good to you. The main window then starts up. Updates are arranged in categories and displayed in an expandable list on the right side of the window. Information about each package is displayed to the right when you click on a package name to highlight it. Each available update has a check box next to it. Just check the updates that you want to install and click the Install button when you are ready. An Open Plea to Someone Somewhere Dear People Who Make Linux Things That I Want, Please make versions of Apt and Yum for Mandrake. Yes, there is URPMI (a slightly similar command-line program for Mandrake). Yes, there is Mandrake Update. It's not enough. Those utilities are okay, but having Apt and Yum versions for Mandrake would help us move toward even more of a standard for installing software in Linux. Apt and Yum for Mandrake would make everything less confusing. I know people are working on this now, but let's get the effort more active. Apt and Yum for Mandrake would cure cancer, grow flowers, and give us all free cookies. Make them for me. Make them for Mandrake for me now. Sincerely, Susan |
Installing Programs from Source Back in the old days, we had to walk uphill to install a programuphill both ways, in 4 feet of snow, with no shoes, and dragging a dead horse with us. And we liked it! We had to install all new programs from the source code. You might never have heard of this method before. Installing from the source code is a unique benefit of open source software. With the source available to anyone, you can download that sourceeven edit it, if you know how toand then compile the program yourself. When you install from source, you are installing the program for your particular architecture and your particular computer, and you are doing it manually. Although this method isn't as easy as clicking an RPM file, it can give you a more efficient program because it was built for your system. If this all sounds hard and complex, don't worry; it is. However, you can follow a few easy steps to make sure you usually have a smooth install of a program. The Magic 7 Steps to Installing Programs from Source 1. | Make sure you have development packages installed with your distribution. These were the software-development packages that were categories in your initial Linux installation. If you don't have the development packages, you can add them from your install disks.
| 2. | Download the source code, which is usually in a compressed .tar or .tar.gz archive file.
| 3. | Unpack the archive file using either your file manager or the command line.
| 4. | Open a terminal and use the su command to become the root user. Then go to the new directory created by the unpacked archive.
| 5. | Enter the command configure.
| 6. | Enter the command make.
| 7. | Enter the command make install.
|
Sure, those steps are harder than the one-step RPM install, but they're not too hard. Sometimes installing a program from source is the only avenue available to you if no one has created an RPM package of that program. For more details on those last three steps and an example, see ToolKit 3.8. One disadvantage to installing programs from source code is that programs are much more difficult to uninstall than ones that were installed using RPM packages. You have to hunt down each file installed by the program to delete it. | TOOL KIT 3.8Install a SourceForge.net Project from Source: eLapse Remember that open source timer program that we installed as an RPM? Let's download the source code and install it again. For fun, if you installed the RPM with me before, first uninstall the program with the command (as the root user) rpm -e eLapse before installing it again. Download the source code file, eLapse-0.2.tar.gz, from http://sourceforge.net/projects/elapse/. 1. | Open a terminal and go to the directory you downloaded the compressed file to.
| 2. | Unpack the tar file:
# tar -zxf eLapse-0.2.tar.gz
| 3. | Unpacking the archive created a new directory called "eLapse-0.2." Go into the directory:
# cd eLapse-0.2
List its contents to see what is there:
# ls
You will see a lot of files. When there is a README file and/or an INSTALL file, those are text files that you should read for instructions. This program is small and doesn't have much extra information in its instruction files, but other programs might put info in those files that can save you a lot of time.
| 4. | One file in the directory is named configure. That file is actually a program that checks your computer to see that all the software-development tools that the program needs are installed. Run configure:
# ./configure
Lots and lots of text will scroll by, some of it in an obscure language from a 1960s Star Trek episode. You don't have to catch it all; you can wait for the end result. If you are missing something that the program needs, you will see an error and can scroll back up to see what is missing. If you have a missing piece, try looking for it on your install disks. If you are successful, you will usually see your command prompt again.
| 5. | You are now ready to compile the program. You compile the source with a program called make:
# make
More gobbly-goop text scrolls past. If everything works, you will see the command prompt again.
| 6. | Right now you have a program. You can run it from the directory you are in. However, the program is not available in your system as a command. To make it a command, you need to do one more thing:
# make install
| 7. | Now you have installed the program from source. You can get out of this directory and clean up everything by deleting the compressed file and its resulting directory. You should be able to type eLapse at your command prompt to run the program.
|
|
|
|