Using IS-IS in ISP Networks
As discussed in the previous chapters, Integrated IS-IS has only two types of network models: point-to-point and broadcast. IS-IS does not support the point-to-multipoint model as in OSPF. You can, however, design and configure IS-IS routers with a workaround to support NBMA transport if necessary.
This section reviews the different connection models: point-to-point and multipoint. It also examines typical problem scenarios with running IS-IS over NBMA networks and looks at how you can overcome these issues. The last part of this section discusses scaling in NBMA environments, examines typical problems, and provides various ways to solve them.
Point-to-Point Connections: PoS
The simplest network model is point-to-point connectivity. Running IS-IS over point-to-point links, such as PoS, is straightforward.
PoS is most commonly used in ISP backbones as a high-speed interconnect. There are various types of PoS interfaces, currently reaching speeds of 10 gigabits per second (OC192/STM-16) and deployed in high-speed routers.
Only a single type of hello packet is used when running Integrated IS-IS over point-to-point links, regardless of whether the adjacency is Level 1, Level 2, or Level 1 and Level 2. This differs significantly from running Integrated IS-IS over LANs, where separate hello packets are sent for Level 1 and Level 2. A number of special purpose commands can be applied to point-to-point links, such as commands for adjusting the retransmission interval. In general, configuring point-to-point links for IS-IS is trivail and thoroughly covered in Chapter 9, "Configuring IS-IS for IP Routing on Cisco Routers."
Multipoint environments pose interesting challenges when enabled for IS-IS routing. Some of the issues are discussed in the following section.
Multipoint Connections: Frame Relay, ATM, and IS-IS Mesh Solutions
IS-IS does not directly support NBMA transport and certainly does make provisions for point-to-multipoint network model. This raises an intriguing question: How do you model nonbroadcast multiaccess (NBMA) networks, such as Frame Relay and ATM? The answer is that you can use a broadcast or point-to-point model.
In order to model an NBMA network as a multipoint broadcast LAN, you need full connectivity between all nodes and, therefore, full mesh of permanent virtual circuits between all routers connected to the medium. This is not always possible because most NBMA environments are designed as a hub and spoke architecture, or the NBMA cloud is simply not fully meshed for economic or feasibility reasons.
Even in a full mesh environment, if any of the virtual circuits is lost, you might have a situation in which flooding is broken and the Link-State database is no longer synchronized across all routers, leading to problems such as routing loops . The following sections discuss some possible problem scenarios that might be encountered when designing Integrated IS-IS for an NBMA environment.
Problem Scenarios with NBMA
As pointed out previously, when running IS-IS in a point-to-point environment over serial links, IS-IS generates and sends only a single hello packet, regardless of the type of adjacency, Level 1, Level 2 , or both. In a point-to-multipoint broadcast environment, such as a LAN, Integrated IS-IS generates and sends a different hello packet, Level 1 and Level 2 adjacencies. Cisco IOS considers a serial interface with Frame Relay encapsulation as a multipoint interface, and, therefore, LAN hellos are advertised over such interfaces. With this in mind, consider the scenario shown in Figure 8-2.
Figure 8-2. Problems forming neighbors over Frame Relay.
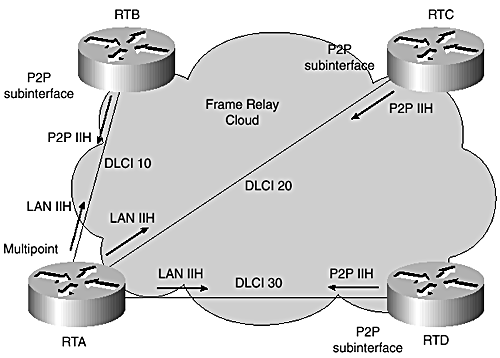
The Frame Relay cloud is shown as a mixed configuration of point-to-point and multipoint interfaces. This results in a connectivity problem. As you can see, RTA is configured as a multipoint broadcast interface and is, therefore, generating and sending LAN hellos. The other routers within the cloud (routers RTB, RTC, and RTD) have single point-to-point subinterface connection to RTA and, therefore, generate and send out point-to-point hello packets to RTA. Consequently, RTA never forms adjacencies with any of them.
The output of the show clns neighbor command from RTA shown in Example 8-1 confirms that the adjacencies with all the other routers are in "init" state, meaning the adjacency are stuck in "Initialization". They should be "Up" if completed.
Example 8-1 show clns neighbor command Output on RTA
RT1# show clns neighbors System Id Interface SNPA State Holdtime Type Protocol RTB Se0/0.1 DLCI 10 Init L1L2 IS-IS RTC Se0/0.2 DLCI 20 Init L1L2 IS-IS RTD Se0/0.3 DLCI 30 Init L1L2 IS-IS If all the routers within the Frame Relay cloud are not reconfigured to have the same interface type, point-to-point or multipoint, no adjacency will be completed. Therefore, LSPs are not exchanged over these interfaces. To fix this problem, RTA needs to be reconfigured as a point-to-point subinterface, with each PVC in a different IP subnet.
Figure 8-3 shows a second problem scenario that might occur when running Integrated IS-IS over an NBMA ATM cloud.
Figure 8-3. Nonfully meshed NBMA cloud with Multipoint configuration.
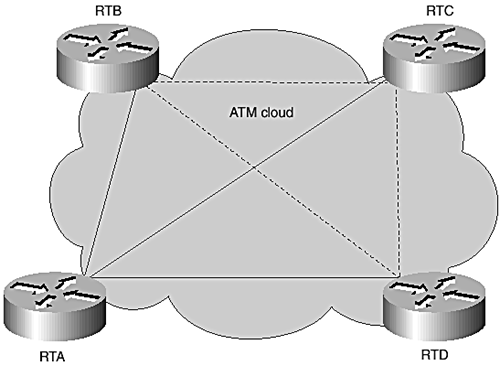
Figure 8-3 shows an ATM cloud in which all routers are fully meshed with virtual circuits and both the solid and dotted lines are active. The full mesh allows the cloud to be modeled as a broadcast link and configured as such to work with IS-IS. The problem with this model is that the full mesh ATM cloud does not have the complete broadcast capabilities of a multipoint broadcast technology, such as Ethernet. When any of the VCs fails (consider the dotted lines as failed circuits), the any-to-any connectivity is lost, breaking the flooding model. Individual VCs are not tracked in the IS-IS adjacency database for multipoint interfaces, so any failures are not dectected in the IS-IS environment.
Although modeling an NBMA cloud as a broadcast LAN is supported, it works only as long as all the VCs of the fully meshed topology are up. The operation of routing and forwarding might break when one or more virtual circuits go down.
The following section covers the preferred solution when running Integrated IS-IS over NBMA.
NBMA Solution: Point-to-Point Subinterfaces
The previous section considered problems associated with NBMA clouds when they are either modeled as broadcast multipoint links or when multipoint interfaces are connected to point-to-point interfaces. In both cases, the associated problems were obvious. Trying to simulate point-to-multipoint connectivity did not work, and modeling as broadcast required all VC to be up all the time or flooding stops working properly and the LS databases will be unsynchronized between routers. The third option is to model the VCs as point-to-point links by using point-to-point subinterfaces. The point-to-point model is more robust and provides a viable alternate. It allows tracking of the individual VCs, and each adjacency is monitored and considered in the LS database. A full mesh of PVCs is not required, making it economically feasible . As viable as this approach is, it presents scaling challenges in environments with highly meshed virtual circuits. These environments might experience redundant flooding problems, placing undue burden on network resources, such as bandwidth, memory, and processing capacity.
When using point-to-point subinterfaces in NBMA environments, IP addresses can be conserved using IP unnumbered interfaces which are tied to loopback addresses. If distinct addresses are required for the links, IP subnets with 30-bit masks (/30 subnets) can be used. This keeps the minimum number of required hosts to two per subnet. Also, recent releases of Cisco IOS Software support 31-bit masks that provide more address savings.
To address scaling issues resulting from redundant flooding in highly meshed environments, IS-IS mesh groups can be used. This is discussed in the next section.
NBMA Scaling
Most network operators configure their Frame Relay and ATM NBMA networks using point-to-point subinterfaces. Also, frequently, NBMA interfaces support a large number of PVCs. A full mesh, although, provides convenient redundancy and might result in a potentially high number of LSPs being flooded out of the subinterfaces ”across the mesh, resulting in scaling issues.
The higher the extent of the mesh, the larger the number of adjacencies. With a large number of adjacencies to support, a router's LSP might grow more than the maximum LSP size, requiring fragmentation. This can have adverse effects on the network because the number of LSPs is more of a concern than the actual size of the LSPs in such environments. In essence, larger number of LSPs requires more SPF computation time. In summary, a large NBMA full mesh can result in potential performance and scalability issues.
Excessive flooding in such environments can be limited by grouping subinterfaces into mesh groups. Mesh groups are designed for optimizing flooding over large NBMA clouds with many point-to-point connections.
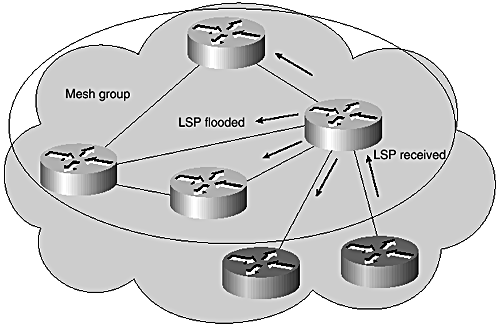
The basic idea behind mesh groups is that each member of the mesh group does not reflood LSPs received from another member of the group to other members of the same group because they would have already received copies. However, LSPs received from nonmember routers are flooded to all members of the mesh group, as well as other adjacent nonmembers.
Figures 8-4 and 8-5 show the flooding operation of members and nonmembers of a mesh group. Mesh-groups are enabled on Cisco routers as shown in Example 8-2.
Figure 8-4. Mesh group example: member flooding.
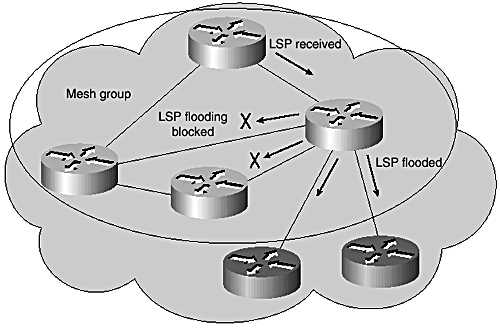
Figure 8-5. Mesh group example: nonmember flooding.
Example 8-2 Mesh-Group Configuration
interface ATM2/0.1 point-to-point ip address 182.168.200.9 255.255.255.252 ip router isis isis mesh-group 10
All interfaces that belong to the same mesh group are identified with the same mesh group number. For example, the interface shown Example 8-2 is identified with mesh-group number 10. Also, the mesh group syntax allows you to selectively configure full blocking on individual interfaces instead of placing them in a group. Mesh groups need to be used with care. To ensure flooding is not disrupted, select the most reliable PVCs to flood over. Failure to do so might compromise flooding and result in unsynchronized databases when critical VC connections fail.
Figure 8-4 illustrates mesh group operation. As shown, an LSP received from another member is not forwarded to other members of the same group, but forwarded to nonmembers. Figure 8-5 shows that an LSP received from a nonmember of the mesh group is forwarded to both members and nonmembers.
As mentioned previously, the alternative to grouping subinterfaces into a mesh group is to block flooding individually on each subinterface. If full LSP blocking on selected subinterfaces is enabled, no flooding occurs at all over those interfaces. Problems might arise if a large number of subinterfaces are put into blocking mode, and some of the few that are allowed to flood fail. The following configuration (Example 8-3) enables selective interface blocking on an individual subinterface.
Example 8-3 Blocking LSP Flooding on Individual Interfaces
int ATM2/0.1 point-to-point ip address 192.168.200.9 255.255.255.252 ip router isis isis mesh-group blocked
When using selective interface blocking, more robust flooding can be achieved by allowing advertisement of CSNPs on those subinterfaces that are otherwise blocked from flooding LSPs. This is configured as shown in Example 8-4.
Example 8-4 LSP Blocking with CSNP Flooding
int ATM2/0.1 point-to-point ip address 192.168.200.9 255.255.255.252 ip router isis isis mesh-group blocked isis csnp-interval <secs>
Of the two methods ”selective LSP blocking on individual interfaces and mesh-groups ”the preferred approach is selective blocking. This method is preferred mainly because it is more straightforward and easier to configure and monitor. Also, it can be used to generally flood fewer LSPs. Use of mesh groups is a more sophisticated approach and requires more planning to be effective and efficient. Also, troubleshooting problems might be more complicated.
LSP Timers in NBMA Networks
To alleviate some of the load on network resources caused by flooding many LSPs, you can modify a number of LSP timers to restrict the forwarding of LSPs over point-to-point interfaces. The following are relevant commands.
The isis lsp-interval command controls the interval between successive LSP transmissions. The value is specified in milliseconds. By default and in line with the standard, Cisco IOS Software maintains a delay of at least 33 milliseconds between consecutive LSP transmissions. On low-speed lines, this might still be too fast and might consume too much of the limited bandwidth available. Recent IOS releases restrict bandwidth used for LSP transmission on links with T1 capacity and less to no more than 50 percent of the configured bandwidth.
The isis retransmit-interval command specifies the time between retransmissions of a single LSP on a point-to-point link and has a 5-second default. The command is not applicable to broadcast media. To reduce the number of retransmissions on a link, the configured value needs to be conservatively higher.
Retransmissions occur only when LSPs are dropped; so configuring a higher value will have minimal effect on convergence. In a network with many redundant paths, a higher value is easily justified because the possibility of a router not receiving an LSP in timely fashion is less. The isis retransmit- throttle -interval command specifies the minimum delay in milliseconds between retransmissions of LSPs on an interface. In a large network with many nodes, it might be useful to control the rate at which LSPs are resent out of an interface. By default, a 33-millisecond gap exists between consecutive LSPs conformance with an ISO 10589 specification of 30 LSP transmissions per second. All the three commands discussed in this section control LSP flooding and can be used together with mesh-groups in the group mode for maximum effect.
Migrating from Other IGPs to Integrated IS-IS
With the increasing popularity of Integrated IS-IS, a number of ISPs have migrated IGPs from other protocols, whereas others are still weighing the benefits. The main rational behind the migrations is to deploy a scalable and robust protocol that converges fast. Ease of troubleshooting and maintenance are also key factors. Yet, others might have a need to deploy a link-state protocol that supports advanced applications, such as MPLS traffic engineering.
This section discusses basic migration techniques that have been used with a lot of success. There might be several other approaches to IGP migration, and the network operator is advised to chose the most convenient method based on the circumstances.
The migration procedure differs depending on the type of the existing IGP. If the existing IGP is a classful distance-vector protocol, such as the Routing Information Protocol (RIP), or Interior Gateway Routing Protocol (IGRP), for example, the procedure requires different considerations than if migrating from a classless protocol, such as Open Shortest Path First (OSPF).
Migrating from a Classless IGP to Integrated IS-IS
This section covers techniques and strategies for migrating from classless IGPs, such as the Enhanced Interior Gateway Protocol and OSPF, to Integrated IS-IS, which is itself another classless protocol.
The next section elaborates on the methodology for migrating from EIGRP. The entire migration process is presented in detail, and relevant IOS show and debugging commands for verifying and troubleshooting any potential problems are also provided.
Scenario: Migrating from EIGRP to Integrated IS-IS
The scenario considered is migration from a flat EIGRP network to a single (Level 2) Integrated IS-IS network.
EIGRP is actually an intelligent distance-vector protocol. It is classless and supports variable-length subnet masks (VLSMs). EIGRP uses hellos just as IS-IS and OSPF to discover and maintain neighbors. It builds a topology table, based on routing updates exchanged between neighbors. The migration from EIGRP to Integrated IS-IS is not too complex, although a migration from a pure link-state protocol might be simpler because of similar characteristics, such as flooding not being directly tied to the set of routes entered into the routing. A number of methods can be used to achieve a successful migration. Two specific approaches are outlined in the following text. The first approach is the Redistribution method, and the second is the Background method.
-
Redistribution method ” This approach involves configuring Integrated IS-IS at the edge of the network in addition to EIGRP and then redistributing the protocols into each other, while gradually extending the process into the core . This method is complex because configuring mutual redistribution at multiple points in a network can create routing loops if appropriate filters are not carefully applied to stop route feedback. However, if planned and executed carefully , this approach allows graceful migration that does not significantly impact availability of the network.
-
Background method ” The second approach, and possibly the better, involves running both protocols in parallel and making use of administrative distances to make EIGRP routes preferred initially and reversing that later so that IS-IS routes are preferred. This can be achieved by setting the administrative distance of all IS-IS routes to 255 with the distance command under the IS-IS routing process. This ensures that Integrated IS-IS routes are never used in preference of EIGRP routes for similar routes with the same prefix length. IS-IS routes have an administrative distance of 115, and EIGRP uses 90 by default. Configuring explicit administrative distance for IS-IS might not be required initially because for similar internal routes, EIGRP routes will be preferred over IS-IS routes. However, care needs to be taken if there are EIGRP summary and external routes in the network. These routes have administrative distances of 5 and 170, respectively. Using explicit distances is, therefore, better and safer.
After IS-IS has been enabled on the whole network and adjacencies and LS databases verified , EIGRP routers can then be made less preferable by moving the administrative distance of 255 from the IS-IS process to the EIGRP process in each router. It is recommended to keep the EIGRP process in the background to expedite restoration to the old setup if there are any issues. The final step involves removing EIGRP from the network altogether.
Both the Distribution and the Background methods require running the two protocols together to some extent and, therefore, can place resource demands on the routers. If running both protocols at the same time is not suitable for the specific environment, an intrusive approach that requires tearing down EIGRP before enabling IS-IS can be employed. This would, however, require network downtime.
Table 8-1 lists default administrative distances in Cisco IOS Software for various routing protocols.
Table 8-1. Default Administrative Distances
| Cisco IOS Routing Protocol | Default Administrative Distance |
|---|---|
| Connected interface | |
| Static route | 1 |
| EIGRP summary route | 5 |
| eBGP | 20 |
| EIGRP (internal) | 90 |
| IGRP | 100 |
| OSPF | 110 |
| IS-IS | 115 |
| RIP | 120 |
| EGP | 140 |
| EIGRP (external) | 170 |
| iBGP | 200 |
Software and Hardware Audit
Before enabling Integrated IS-IS to run in parallel with EIGRP, it is essential to understand the capabilites of each router, from both hardware and software standpoints, by carrying out a complete audit of the network.
With regard to hardware, this ensures that no major issues relating to CPU and memory requirements would arise in the middle of the migration. Also, it might be useful to make sure each router is running an IOS release that not only supports IS-IS but also all the capabilities and services required for normal operation of the network.
The network architects and operations staff involved in the migration should jointly plan the entire operation. Some guidance on the phases involved is provided later in this chapter. The migration activities need to also be prudently documented for post mortem evaluation of successful migration or any challenges encounted during the process. This might provide opportunities for enhancing certain aspects of the network.
Integrated IS-IS Configurations
Example 8-5 shows a typical Integrated IS-IS configuration that might be used for the migration. This configuration specifies each router as Level 2-only and includes an administrative distance of 255. This will configure the entire network to run a single flat Level 2 IS-IS area. IS-IS must be enabled on the appropriate interfaces of each router by applying the ip router isis command.
Both the lsp-refresh-interval and max-lsp-lifetime values are increased to their maximum to reduce periodic LSP flooding. Wide metrics are configured to allow greater interface and path metric values to be used. Wide metrics are required when configuring IS-IS to support MPLS traffic engineering.
Example 8-5 IS-IS Process Configuration
! router isis net 49.0001.1234.5678.9abc.00 passive-interface loopback0 lsp-refresh-interval 65000 max-lsp-lifetime 65535 is-type level-2-only distance 255 ip log-adjacency-changes ignore-lsp-errors metric-style wide level-2 !
Other Integrated IS-IS timers might be modified to support the specific network environment after the migration. Some of the timers of interest are listed here.
IS-IS routing-process level command:
-
spf-interval
-
prc-interval
-
lsp-gen-interval
Interface level commands:
-
csnp-interval
-
hello-interval
-
hello- multiplier
-
retransmit-interval
Chapter 9 covers steps for enabling IS-IS and explains in detail the timer for the preceding commands.
Configuring Integrated IS-IS in Parallel with EIGRP
When enabling IS-IS to run in parallel with EIGRP, attention must be paid to LSP flooding and the frequency of SPF/PRC calculations because they might place heavy demands on network resources, such as memory, CPU, and bandwidth. The following needs to be verified when the two protocols are running simultaneously :
-
IP addressing
-
Summarization
-
Default routing (if required)
-
Appropriate interface metrics to direct traffic flow
-
Consistent collection of LSP in the Link-State database across all routers
-
IS-IS adjacencies formed
-
Frequency of SPF and PRC calculations
After the preceding checks have been completed with satisfaction and it has been confirmed that there are no imminent problems, a maintenance period can be scheduled for the final cutover from EIGRP to IS-IS. It is always safe to have a minimal downtime for the cutover, even though it might not be required.
Downtime is a term used when the network is not available to users. This means that part of the network or its entirety will be unavailable. The actual time required might depend on the size and the complexity of the network and also the number and experience of support staff involved in the process. Migration of 500 nodes, for example, might call for several hours of downtime.
After completing all planned verifications, the distance can be reversed , by applying a value of 255 to EIGRP routes or lowering the distance of IS-IS routes so that they would be preferred over EIGRP routes. Usually, a clear ip route * command might be required to help flush out the old EIGRP routes and repopulate the IP routing table with the preferred IS-IS routes.
Migration Phases: Example EIGRP to IS-IS Migration
Figure 8-6 depicts a simple network running EIGRP as the IGP. IS-IS is configured to run alongside EIGRP and later to take preference over EIGRP.
Figure 8-6. Simple EIGRP network to migrate to IS-IS.
Migration Phases
This section identifies the different migration phases and discusses what occurs in each phase.
Phase 1: The network is running EIGRP in a flat network. Hardware and software audits performed and software and hardware upgraded are needed to support the migration.
Phase 2: Integrated IS-IS is configured to run in parallel and in the background with a higher administrative distance. This allows creation of the IS-IS Link-State database in all the routers but the routing and forwarding tables remain unaltered. This phase is probably the most critical because normal operation of IS-IS must be carefully verified. The good news here is that the operator can troubleshoot any Integrated IS-IS problems without disrupting network service; however, additional memory requirements and an increase in CPU utilization might pose some challenges. This phase can be considered complete only after the IS-IS database has been fully populated in each router with all expected LSPs and the potential for generating IS-IS routes that reflect the EIGRP routes in the current routing table has been confirmed.
Phase 3: Cut-over of the whole network to Integrated IS-IS as the primary IGP by transferring the high administrative distance command to the EIGRP process.
Phase 4: EIGRP is completely removed from the network after normal operation after forwarding under IS-IS is confirmed to be flawless.
Phase 1 ”Configurations and Other Status Information
Example 8-6 shows a typical EIGRP configuration that might be present on the routers prior to migration.
Example 8-6 Typical EIGRP Configuration
! router eigrp 10 network 192.168.10.0 network 192.168.20.0 no auto-summary !
Phase 2 ”Configurations and Other Status Information
At this point, Integrated IS-IS needs to be configured in the background for every router, as shown in Example 8-7.
Example 8-7 Enabling IS-IS in the Background
! hostname RTA ! clns routing ! interface Serial1/0:1 ip address 192.168.20.5 255.255.255.252 ip router isis isis metric 500 level-2 ! router eigrp 10 network 192.168.10.0 network 192.168.20.0 no auto-summary ! router isis passive-interface Loopback0 distance 255 ip net 49.0001.1921.6810.0001.00 is-type level-2-only metric-style wide level-2 max-lsp-lifetime 65535 lsp-refresh-interval 65000 log-adjacency-changes !
Because an administrative distance of 255 is configured for Integrated IS-IS, EIGRP external routes with an administrative distance of 170 will not be preempted in the IP routing table. Various show commands can be used to monitor and verify normal operation of IS-IS. As mentioned previously, this stage is critical because IS-IS must be tuned and verified to be fully operational. The subsequent stages of the migration should be smooth if this phase goes well.
The following examples show essential information needed to verify the correct configuration and operation of Integrated IS-IS. The show commands in Example 8-8 capture the status and operating parameters for IS-IS. Important lines are highlighted.
Example 8-8 Verifying IS-IS Configuration
RTD#show clns Global CLNS Information: 3 Interfaces Enabled for CLNS NET: 49.0001.1921.6810.0001.00 Configuration Timer: 60, Default Holding Timer: 300, Packet Lifetime 64 ERPDUs requested on locally generated packets Intermediate system operation enabled (forwarding allowed) IS-IS level-2-only Router: Routing for Area: 49.0001 RTD#show clns protocol IS-IS Router: <Null Tag> System Id: 1921.6810.0001.00 IS-Type: level-2-only Manual area address(es): 49.0001 Routing for area address(es): 49.0001 Interfaces supported by IS-IS: Serial1/0:1 - IP FastEthernet5/0 - IP FastEthernet2/0 - IP Redistributing: static Distance: 110 (Comment: This distance is for ISO routing) RRR level: none Generate narrow metrics: level-1 Accept narrow metrics: level-1 Generate wide metrics: level-2 Accept wide metrics: level-2
The command show clns protocol is particularly useful because it helps verify the the configuration by displaying a single output that shows the system ID, area address, IS type, IS-IS-enabled interfaces, and wide metric support.
Example 8-9 Verifying Adjacencies Formed
RTD# show clns neighbor System Id Interface SNPA State Holdtime Type Protocol RTH Se1/0:1 *HDLC* Up 24 L2 IS-IS RTB Fa5/0 0003.fec9.cc54 Up 24 L2 IS-IS
Use the show clns neighbor command to verify that the right adjacencies have been formed. An adjacency matrix, showing which neighbors are expected in the adjacency table, must be prepared ahead to facilitate this verification. Example 8-10 shows how to obtain more information about each neighbor.
Example 8-10 Obtaining More Information About Neighbors
RTD# show clns neighbor detail System Id Interface SNPA State Holdtime Type Protocol RTH SE1/0:1 *HDLC* Up 25 L2 IS-IS Area Address(es): 49.0001 IP Address(es): 192.168.20.38* Uptime: 00:37:01 RTB Fa5/0 0003.fec9.cc54 Up 25 L2 IS-IS Area Address(es): 49.0001 IP Address(es): 192.168.10.161* Uptime: 01:54:16
IS-IS needs to be monitored for stability after it is deployed across the network and prior to promoting it above EIGRP. Typical vital statistics to monitor include incrementing LSP sequence numbers, high numbers of SPF computations , checksum errors, and retransmissions. The output of the show clns traffic command provides statistics for IS-IS- related traffic. Excerpts of this command output are shown in Example 8-11. This information is also useful for troubleshooting potential problems. Some of the interesting lines in the output are highlighted.
Example 8-11 Monitoring IS-IS Traffic Statistics
RTD# show clns traffic [snip] IS-IS: Level-2 Hellos (sent/rcvd): 13465/2568 IS-IS: PTP Hellos (sent/rcvd): 2035/489 IS-IS: Level-2 LSPs sourced (new/refresh): 57/3 IS-IS: Level-2 LSPs flooded (sent/rcvd): 146/399. IS-IS: LSP Retransmissions: 1 IS-IS: Level-2 CSNPs (sent/rcvd): 2356/5 IS-IS: Level-2 PSNPs (sent/rcvd): 123/14 IS-IS: Level-2 DR Elections: 15 IS-IS: Level-2 SPF Calculations: 67 IS-IS: Level-2 Partial Route Calculations: 38 IS-IS: LSP checksum errors received: 0 IS-IS: Update process queue depth: 0/200 IS-IS: Update process packets dropped: 0
The following text provides guidelines for interpreting the information in Example 8-11.
-
LSPs sourced indicate stability of the IS.
-
LSP retransmissions need to stay low.
-
PRCs cannot be checked elsewhere. Partial route calculations are used when a change that does not affect the topology is reported through an LSP; typical examples are the addition or removal of an IP prefix or metric changes, changes related to externals routes or passive interfaces.
-
LSP checksum errors indicate problems and possible packet corruption. This information reflects corrupted LSPs were received on this router. LSPs might be corrupted during transit or when stored in memory. You can track down the cause by moving from one router to the other along the path to the originator and checking which intermediate routers also are seeing the same errors. The IS-IS process also periodically scans the LS database and generates an error log for any corrupted LSPs found.
-
LSP corruption storms (purging and reflooding) lead to frequent SPF runs and high CPU. The command ignore-lsp-error can be configured under the IS-IS routing process to stabilize the situation if necessary.
-
The update queue should not stay full.
-
The update queue should not drop much.
After the IS-IS operation is verified across the routers, the Link-State database needs to be scanned for the presence of LSPs from all the routers running IS-IS. Example 8-12 shows how to list LSP entries in the LS database.
Example 8-12 Listing LSPs in the Link-State Database
RTD# sh isis database IS-IS Level-2 Link State Database LSPID LSP Seq Num LSP Checksum LSP Holdtime ATT/P/OL RTA.00-00 0x00000006 0xB0CB 62058 0/0/0 RTH.00-00 0x00000016 0xE873 58673 0/0/0 RTC.00-00 0x00000017 0x6A3C 65031 0/0/0 RTB.00-00 0x000000E4 0x5568 62068 0/0/0 RTG.00-00 0x0000001B 0xFD58 63197 0/0/0 RTG.02-00 0x00000001 0x6C24 56073 0/0/0 RTG.03-00 0x00000006 0x9C28 61399 0/0/0 RTD.00-00 * 0x00000025 0x9BEE 63197 0/0/0 RTD.02-00 * 0x00000004 0xBEF8 61506 0/0/0 RTD.03-00 * 0x00000006 0x3A41 54372 0/0/0 Example 8-13 shows how to view the information carried in an LSP. The LSPs are flooded intact, and the same information needs to be present in each LSP when viewed on any of the area routers. During the migration, every LSP needs to be checked to make sure it carries accurate information about the originator's environment. The collection of information in all the LSPs needs to accurately reflect the network's topology.
Example 8-13 Viewing the Information Carried in a LSP
RTD# show isis database RTA.00-00 detail IS-IS Level-2 LSP RTA.00-00 LSPID LSP Seq Num LSP Checksum LSP Holdtime ATT/P/OL RTA.00-00 0x0000000D 0xA461 60837 0/0/0 Area Address: 49.0001 NLPID: 0xCC Hostname: RTA IP Address: 192.168.10.8 Metric: 10 IS-Extended RTA.02 Metric: 100 IS-Extended RTB.00 Metric: 100 IP 192.168.20.216/30 Metric: 0 IP 192.168.10.12/32 Metric: 10 IP 192.168.10.32/32 Metric: 100 IP 192.168.10.24/30 Broadcast segments, such as Ethernet, should have a consistent DIS for each level of routing. In this migration, IS-IS is being deployed as a single Level 2 domain; therefore, the Level 2 DIS on all broadcast links must be verified, as shown in Example 8-14, to be the same. Any inconsistency will hinder database synchronisation over the segment. If there are any anomalies, the root cause needs to be investigated and corrected before moving on to the next phase of the migration. Example 8-14 shows the output of the show clns interface command with the DIS information highlighted. The circuit ID of a broadcast link is associated with the system ID or the host name of the DIS. In this case, RTD is shown to be the DIS. The 02 suffix in RTD.02 indicates this is the second broadcast segment on which RTD is playing the role of DIS. The other interesting information in this output is the number of Level 2 adjacencies on the segment. This does not include the virtual Pseudonode, and the count should reflect other actual adjacent routers directly connected to the segment. You can read more about DIS and pseudonode functionality in Chapter 4 in the "Forming LAN Adjacencies"section.
Example 8-14 Confirming DIS Consistency on Broadcast Links
RTD# show clns int fasteth5/0 FastEthernet5/0 is up, line protocol is up Checksums enabled, MTU 1497, Encapsulation SAP ERPDUs enabled, min. interval 10 msec. RDPDUs enabled, min. interval 100 msec., Addr Mask enabled Congestion Experienced bit set at 4 packets CLNS fast switching enabled CLNS SSE switching disabled DEC compatibility mode OFF for this interface Next ESH/ISH in 33 seconds Routing Protocol: IS-IS Circuit Type: level-2-only Interface number 0x1, local circuit ID 0x2 Level-2 Metric: 6000, Priority: 127, Circuit ID: RTD.02 Number of active level-2 adjacencies: 2 Next IS-IS LAN Level-2 Hello in 2 seconds
By default, IS-IS sets the metric to 10 on all interfaces, regardless of bandwidth. Therefore, path selection would be essentially based on hop count if the metric is not adjusted to reflect bandwidth of the various links or to influence traffic flow along the preferred path. In contrast, EIGRP, by default, automatically takes into consideration the characteristics of links, including bandwidth to assign metrics, with the lower metric generally implying better bandwidth. The metric assigned to a route is the total of the metric on all outgoing interfaces on a specific path to that destination. Again, the lower value is better. Therefore, to ensure traffic flow under IS-IS is consistent with the existing traffic flow under EIGRP, the metric on all active IS-IS interfaces needs to be manually adjusted on every router to correspond to EIGRP values or similar, according to a layout that is planned in advance.
Enabling IS-IS on all routers with a distance of 255 should not change the existing traffic flow under EIGRP because EIGRP routes have a better administrative distance and are still preferred over similar IS-IS routes.
At this point, the network has two fully functional routing protocols, with one as the primary source of routes. Vigilant monitoring of the network needs to continue with prying into each router's configuration, checking IS-IS adjacencies, verifying consistency of the IS-IS LS database on all routers, verifying consistency of LSP information, checking the IP routing tables, and forwarding tables (FIB and Adjacency Databases ”See Chapter 1, "Overview of IP Routing" section). It would be useful also to take note of the number of routes in the routing table before going on to the next phase. The show ip routes summary and show ip cef summary commands should provide this information.
Phase 3 ”Configurations and Other Status Information
The third phase is to transfer the administrative distance of 255 from the IS-IS routing process, the EIGRP routing process, making the latter the less preferred source of routes. This ensures that Integrated IS-IS becomes the primary source of routing information that feeds routes into the routing table, and then makes it into the forwarding tables (CEF, and so on). Example 8-15 shows how the distance command is removed from the IS-IS process and a similar command is placed in the EIGRP process. This might require downtime to be scheduled for final clean up.
Example 8-15 Reversing Priorities with the Distance Command
RTD(config)# router isis RTD(config-router)#no distance 255 ip RTD(config-router)# RTD(config)# router eigrp 10 RTD(config-router)#distance 255 RTD(config-router)#
The routing table might need to be cleared to force routes sourced from IS-IS to take precedence. The clear ip route * command does just this. After the routing table is populated with IS-IS routes, a quick show ip route summary command entry should provide route statistics that can be compared with similar information gathered from the previous phase. The show ip route command should be used to scrutinize the routing table further to make sure all prefixes are available and, most importantly, that they are from the IS-IS process and not EIGRP. The show ip route isis and show ip route eigrp commands need to be used to check subsets routes for IS-IS and EIGRP, respectively. The show ip route eigrp command should not display any EIGRP entries in the routing table. The show ip cef and related commands should be used to confirm that all routes are available in the forwarding table. Example 8-16 shows a sample output of IS-IS Level 2 routes for the IP routing table. Also, the ping and traceroute commands can be used to test reachability and path selection to various destinations in the network to confirm normal routing is restored.
Example 8-16 Verifying the Routes in the IP Routing Table
RTD# show ip route isis i L2 196.172.60.0/24 [80/17846] via 192.168.10.161, FastEthernet5/0 192.28.235.0/28 is subnetted, 1 subnets i L2 192.28.235.0 [80/17846] via 192.168.10.161, FastEthernet5/0 192.168.20.0/24 is variably subnetted, 3 subnets, 2 masks i L2 192.168.20.138/32 [80/17846] via 192.168.10.161, FastEthernet5/0 i L2 192.168.20.216/30 [80/17846] via 192.168.10.161, FastEthernet5/0 i L2 192.168.20.192/30 [80/17846] via 192.168.10.161, FastEthernet5/ 192.168.10.0/24 is variably subnetted, 9 subnets, 3 masks i L2 192.168.10.8/32 [80/17846] via 192.168.10.161, FastEthernet5/0 i L2 192.168.10.9/32 [80/6000] via 192.168.10.161, FastEthernet5/0 i L2 192.168.10.12/32 [80/17846] via 192.168.10.161, FastEthernet5/0 i L2 192.168.10.22/32 [80/17846] via 192.168.10.161, FastEthernet5/0 i L2 192.168.10.23/32 [80/6000] via 192.168.10.161, FastEthernet5/0 i L2 192.168.10.20/32 [80/17846] via 192.168.10.161, FastEthernet5/0 i L2 192.168.10.128/30 [80/23458] via 192.168.10.161, FastEthernet5/0 i L2 192.168.10.104/30 [80/17846] via 192.168.10.161, FastEthernet5/0 i L2 192.168.10.112/28 [80/14462] via 192.168.10.161, FastEthernet5/0 Phase 4 ”Configuration and Other Status Information
By the end of Phase 4, it should be completely confirmed that all forwarding is restored and IS-IS routes are able to completely support routing in the network. EIGRP is no longer required for primary routing or even for fallback. Disabling of EIGRP routing from the network can, therefore, proceed. The EIGRP configuration is removed with the following line of configuration from each router:
RTD(config)# no router eigrp 10 This concludes the migration process. The network should continue being monitored for proper forwarding and optimization opportunities, such as summarization, metric adjustments of optimal path selection, and so on in the new routing environment.
The record of events during the migration needs to be consulted for post mortem evaluation. This information can provide the basis for any recommendations on future growth, changes, and management of the network.
Migrating from OSPF to Integrated IS-IS
Both OSPF and Integrated IS-IS are pure link-state protocols and, therefore, use similar mechanisms for flooding and route computation. Migrating from a single area OSPF domain to a single level IS-IS routing domain should be straightforward; there should be no change in the characteristics of routing in any significant manner, as compared to the migration from traditional distance-vector protocols. If OSPF is deployed with hierarchy, the hierarchy can be maintained with IS-IS route leaking. However, if a hierarchical OSPF domain is not large and the simplicity associated with troubleshooting and maintenance of a flat IS-IS domain is of interest, this is also possible, even though more careful planning will be required.
Migration Phases
The same migration principles and phases that were elaborated for EIGRP migration in the previous section can be applied. In particular, the background method can be effectively used. OSPF has a better administrative distance of 110 compared to 115 for IS-IS, so technically in phase 2, the administrative distance for IS-IS does not need to be changed to 255. However, a higher administrative distance must be applied to OSPF in phase 3.
Metrics
In the default mode of operation, OSPF transforms interface bandwidth into metric information. Unlike EIGRP, however, only bandwidth information is used and other link characteristics, such as delay, reliability, and MTU, are not used to compute composite metrics. OSPF metric or cost values are inversely proportional to bandwidth. The cost on an interface is assigned based on a default reference bandwidth of 100Mb/s and calcuated by dividing the reference bandwidth by the interface bandwidth. A value 1 is applied for all results greater than one. The reference bandwidth is configurable. Also, if necessary, the interface metric can also be manually assigned.
For the purpose of migrating to IS-IS, the OSPF costs can be noted for all interfaces and directly ported manually into the IS-IS configuration for corresponding interfaces. The output of the show ip ospf interface provides the cost associated with an interface. The OSPF costs should be obtained in advance for each router and entered into a migration planning spreadsheet or table for later use. Because OSPF allows cost values larger than 63 per interface, this approach might require IS-IS wide metrics to support any large values.
Using the same metric values on corresponding OSPF and IS-IS interfaces would guarantee the new IS-IS paths to be identical to the previous OSPF paths. It would make the migration practically loop free as IS-IS is made primary from router to router. Routes intalled from either OSPF or IS-IS would have practically identical characteristics. The network can actually remain fully functional as a higher distance is applied to OSPF in each router and different routers independently choose IS-IS or OSPF as the source of routes based on current configuration.
Monitoring Network Resources
Probably the single most important issue in migrating from OSPF to IS-IS is availability of enough network resources, such as bandwidth, router memory, and CPU capacity, to handle two resource demanding protocols running independently and concurrently on each router.
Checking available resources during the inventory stage and upgrading as needed before turning up IS-IS in parallel with OSPF should go a long way to forestall any surprises that might appear in the middle of the migration. With all these issues in mind, the migration from OSPF should be similar to the migration from EIGRP, and the migration phases discussed earlier should be applicable here also.
Migrating from a Classful IGP to Integrated IS-IS
Migrating from a classful protocol is not any more challenging than the previous scenarios discussed. Classful protocols require deployment of flat networks by their inherent nature. The redistribution method of migration will not work well here because IS-IS being a classless protocol might carry detailed routing information that the classful protocol might not be able to handle. As you might know, classful protocols do not support VLSMs and discontiguous subnets. Classless protocols do. Also, classful protocols, such as RIPv1 and the Interior Gateway Routing Protocol (IGRP), are based on distance vector concepts, and the contents of the routing tables are directly tied to routing updates. In contrast, IS-IS generates routing information based on a complete model of the topology built on information gathered from LSPs; there, routing dynamics might differ . Also, RIP uses hop count for metrics, and IGRP uses a composite metric similar to EIGRP.
The migration from a classful protocol to Integrated IS-IS might also require a change in the physical topology if IS-IS is to be deployed with hierarchy. In most cases, however, the classful migration involves deploying a flat Level 2 IS-IS domain, and so the background method can be successfully employed with minimal challenges.
If hierarchy is required, first consider which routers form the backbone of the network. As discussed in previous chapters, Integrated IS-IS requires a contiguous backbone, which within a hierarchical topology must be a collection of Level 2 routers.
The selection of the backbone routers depends on several criteria. The primary consideration involves identifying which regions of the network are best suited to be part of the backbone. These should be core strategic locations that border other geographic regions . The layered approach discussed in Chapter 7, "General Network Design Issues," can be leveraged here.
Other criteria that must be taken into consideration, include network resources, such as bandwidth of network links, router memory, and CPU capacity. Remember that link-state protocols have to create and maintain a Link-State database, as well as the routing table and might require more memory than a distance vector protocol when deployed in comparable networks. Also, the new backbone needs to be fully redundant.
This concludes the discussion of general issues that need to be considered when migrating from a flat classful protocol to Integrated IS-IS. The next sections cover specific consideration for migrating from RIP.
Migrating from RIP to Integrated IS-IS
This section looks at migrating from the Routing Information Protocol (RIP) to Integrated IS-IS. Consider Figure 8-7, which is a flat RIP network. First, you must decide which routers need to become the backbone. This is not such a difficult decision given the current topology. Take a look at the European region: Routers RTA1, RTB1, and RTC1 are obvious candidates for backbone routers. In the USA region, routers RTB2 and RTD2 are the best candidates to be backbone routers. Finally, in the Asian region, routers RTC3 and RTD3 are the obvious choices.
Figure 8-7. Transforming from flat to a hierarchical routing topology.
The backbone routers provide redundant connectivity to other regions. Each selected backbone router also has redundant connections into its own region. The backbone routers will certainly be excellent points for route summarization in the hierarchical topology.
The European region can be further segmented into a full three-layer hierarchy with routers RTD1, RTE1, RTF1, and RTG1 considered as the distribution routers, and RTH1 operating as an access router. Summarization can be applied at the distribution points, between the core and access layers . The distribution routers are configured as both Level 1 and Level 2, with the core being Level 2-only and the access being Level 1-only.
With all the routers assigned roles ”backbone, distribution, or access ”and their corresponding IS types defined, preparation for the actual migration can begin. The background migration method will be most suitable and the phases used in the migration from EIGRP can be followed. RIP has a worse default administrative distance of 120, and IS-IS has a value of 115, so the IS-IS value needs to be changed to a worse value in phase 2. Alternatively, the administrative distance for RIP can be lowered to, for example, 50 to ensure that the RIP routes remain primary.
RIP uses hop count so no special metric assignments need to be prepared ahead of time. However, if specific metric adjustments have been made by applying metric offsets to influence path selection in the RIP environment, appropriate metric adjustments need to be made this forward into IS-IS. A simple worksheet for metric conversion from the RIP environment to the IS-IS enviroment would be rightfully in place.
In phase 3, the cutover to IS-IS as primary is performed by making the IS-IS adminstrative distance better, either by removing the administrative distance of 255 from the IS-IS configuration or removing the distance of 50 from RIP if the alternate approach was used. The cutover can typically start from the edge toward the core with the clear ip route * command used in each router to refresh the IP routing table.
In phase 4, RIP can be disabled from the network after a reasonable level of certainty has been established that IS-IS is operating as expected and routing is fully functional.
Because RIP is a classful protocol, there might have been a potential waste of addresses in the RIP environment while assigning contiguous IP subnets to make routing work. IS-IS is more flexible with address assignment as a classless protocol and might present opportunities for more efficient address assignment in the new network. Any address changes should, however, be implemented after the migration is completed.
Migrating from IGRP to Integrated IS-IS
All the discussions for migrating from RIP are applicable to IGRP because both protocols have similar routing functionality and characteristics, such as classful addressing and distance vector routing. However, a key difference between them lies in metric definition. RIP uses hop count, and IGRP uses a composite metric based on bandwidth, delay, reliability, and MTU. Therefore, the preparations for the migration from IGRP needs to include planning of metric conversion to provide the desired path selection when IS-IS is made primary over IGRP.
In this scenario also, the background method is most suitable for the migration. The administrative distance of IGRP is 100 compared to 115 for IS-IS. This means that IGRP routes would be preferred over IS-IS routes, and no distance adjustment is required in phase 2. Making IS-IS primary will require applying a larger distance to IGRP in phase 3.
Coexisting with Other IP IGPs
Integrated IS-IS might be required to coexist with other IGPs in some networks. This can possibly happen during migration from one protocol to another, such as when using the redistribution method for migration to IS-IS. This also happens in the background approach during the cutover phase. However, there might be practical scenarios where coexistence might be needed for long-term normal operation. In this situation, IS-IS might be deployed in one region of the network and the other protocol in an adjacent region. In other situations, IS-IS might be in the core, and another less robust protocol might exist on the fringes running on routers that might not support IS-IS.
When Integrated IS-IS coexists with another IGP on a more permanent basis, mutual redistribution is required to exchange routes between the two protocol domains. Under these circumstances, the potential for routing loops because of route feedback is high. Therefore, care must be taken to ensure that redistribution occurs at only carefully selected points in the network, and route filters must also be used to reduce any potential for route feedback. Administrative distances might have to be adjusted on routers that run both protocols to ensure preference of certain routes from a specific protocol source.
As a link-state protocol, Integrated IS-IS obtains routing information through LSP exchange, and because each router must have a consistent view of the topology based on information contained in the LSPs, LSP filtering is not allowed. However, external routes can be filtered during redistribution into the IS-IS routing domain. Routes from IS-IS can also be filtered before inclusion in other protocol environments.
EAN: 2147483647
Pages: 144