Creating Blend Shapes
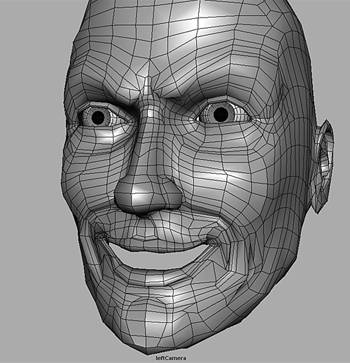
| This section shows you how to create and edit blend shapes to animate facial expressiveness. A blend shape is used to morph between a main shape and any number of target shapes. It is an easy and efficient way to have your character's face deform smoothly from one facial expression to another. Multiple blend shapes can be mixed while animating to produce a wide variety of facial poses. This section also shows you how to correctly combine bound influences and blend shapes on the face skin to produce the best results. Tips for Making Target ShapesThe most efficient way to create blend shapes is to create separate targets for each expressive area of the face. The two main expressive areas on a face are the area of the eyes and the area of the mouth. The reason you want to separate these facial areas when creating targets, as opposed to making separate targets for the whole face, is to enable you to mix areas of expression during animation. Instead of making an angry face target, and a happy face target, you make an angry eyes target, angry mouth target, happy eyes target, and happy mouth target. You can then mix the targets, combining angry eyes with a happy mouth for instance, to create a maniacal expression (see Figure 5.9). Just do the math to see how this is more efficient. If you create 6 eye shapes and 6 mouth shapes, you have 36 possible combinations of shapes. This is much more efficient than creating 36 target shapes for the whole face, because you only had to create 12 shapes to get the same number of expressions. 5.9. Separating the expressive areas of the face into distinct blend shape targets enables you to mix areas to create new expressions, such as mixing a happy mouth with angry eyes.
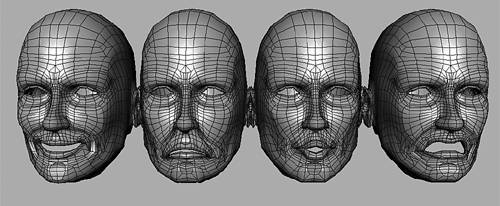
The best way to ensure your target shapes work correctly is to create them by duplicating the main head. If your main head is made from multiple surfaces, such as a NURBS patch head, group all the surfaces and duplicate the group to create the targets. Because you will be using only the component information to create the blend shapes, you can transform the target heads away from the main head to make it easier to modify them. You can also scale them if they are taking too much space. In addition, because creating blend shapes only involves animating the components of the main head, it is important to make sure you do not change the basic component structure of the targets. Points on the main head are numbered in a specific way, and the target shapes have to retain the same numbering scheme to create a smooth blend between the shapes. Therefore, you shouldn't add points, delete points, or cut the surface of target shapes. Also avoid making any adjustments to the center pivots, such as moving them in insert mode. Components are registered in relation to the center position, and modifying the center pivots may make your blend shapes shift the main head out of position. As long as you move points only on your target shapes, your blend shapes should morph smoothly and predictably. You can use any tools or techniques that move only points to do this, such as using the Sculpt Surfaces tool or Surface Editing tool. When modifying each target, avoid moving any points that are not in the expressive area of the face that you are working on for that particular shape. For instance, do not move any points in the eye area if you are working on a mouth shape. When you create the blend shape, Maya copies only the component information that has been modified on the target head to the main head. This enables you to mix the expressive areas of the face without any problems. Finally, when you have finished adjusting all the target shapes, give them short, descriptive names. Try to create enough target shapes to move each area of the face. The mouth and eye openings should all have shapes that close them. Some basic expressions that you want to create in the mouth and eye areas are: happy, sad, angry, and surprise (see Figure 5.10). In addition, if your character is going to be animated to talk, make a set of shapes for the mouth that will be used for lip-syncing. These should cover shapes for vowel sounds such as A, E, I, O, and U, as well as shapes for consonant sounds such as M, K, L, and V. 5.10. A full set of blend shapes should include basic expressions for each area of the face, such as happy, sad, angry, and surprise mouth shapes.
Assigning Blend Shapes to the SkinTo create blend shapes for your character, you hold down the Shift key to select all the target heads and Shift-select the main head last. If you have multiple surfaces, follow the same procedure with the group node parents. When everything is selected, on the top menu bar choose Deform, Create Blend Shape For head shapes, you also want to set the Origin option to Local, and make sure the In-Between option is checked off. This setup assigns only the component information from the target heads to the main head and creates a separate slider for each target shape so that they can be mixed. Choosing the World option assigns both the component and transform information from the target heads to the main head and causes the main head to shift to wherever each target head is positioned. Turning on the In-Between option creates a single slider that contains all the target shapes in a specific order. Use these options when you need to morph something from one place to another in your scene. For instance, you could position several target models of a bird in various stages of flight in a scene and turn on Global and In-Between to create a slider that makes the bird fly through the scene. Finally, make sure the Check Topology option is turned on and the Delete Targets option is turned off. You should use the Check Topology option whenever your target shapes are duplicated copies of your main head; this option ensures that Maya creates a predictable morph based on the point-numbering scheme of the target and main head models. Only turn this option off if you are trying to morph objects that were not created with the same structure, such as morphing a human into an animal. Maya then bases the morph on where points are positioned in 3D space, instead of basing it on their numbers. Deleting the targets should be done later, after you make sure all the blend shapes are working correctly. When all the options are set, click the Create button to assign the blend shapes to your main head (see Figure 5.11). 5.11. Set all the blend shape options and click the Create button to assign the blend shapes.
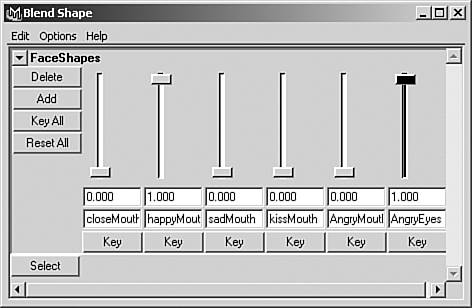
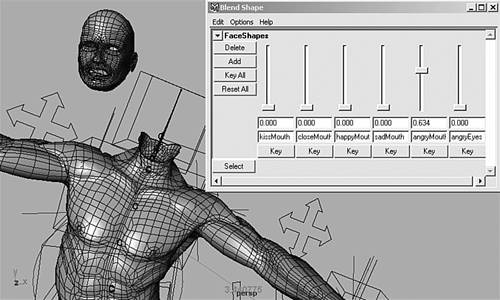
Mixing and Animating Blend Shape SlidersAfter you have assigned blend shapes to a character's head, you open the Blend Shape Editor to mix and animate them. Do this by choosing Window, Animation Editors, Blend Shape. Inside the editor, you will see multiple vertical sliders in a horizontal row (see Figure 5.12). The sliders represent target shapes, and the name of each target head displays below each slider. Each slider's limit goes from 0 to 1, with 0 representing no shape, and 1 representing a full shape. Moving several sliders enables you to additively mix shapes together on the main head. For instance, mixing a Close Mouth slider with a Happy Mouth slider creates a closed-mouth smile pose. Experiment with different combinations to see what looks good. If you want to animate specific sliders, move the sliders as needed, and click the Key buttons below the appropriate sliders. To set keys on all the sliders, just click the Key All button to the left of all the sliders. Clicking the Reset All button sets all the sliders back to their original value. 5.12. Open the Blend Shapes Editor to mix blend shapes by manipulating the vertical sliders.
Also keep in mind that each blend shape slider is associated with a channel that exists on the blend shape node. Click the Select button to select the blend shape node, and view the blend shape channels (see Figure 5.13). Because all the channels can be animated, you can later connect controls to your character's blend shapes using expressions, the Connection Editor, or by setting driven keys. 5.13. Click the Select button in the Blend Shape Editor to select the blend shapes node, which displays the blend shape channels in the channel bar.
Editing Blend ShapesYou can adjust the default limits set on the blend shape sliders in a couple of ways. One way is to select the blend shape node by clicking the Select button in the editor, and then setting the weight channel to a value above or below 1. Setting it below 1 causes all the sliders to produce less of a shape, whereas setting it above 1 causes all the sliders to go beyond their target shape. To have more control, however, leave the weight setting at 1, and type values in the fields below each slider to change their individual limits. For instance, with a slider set on 0, type in a value of 1 in the field to reset the minimum limit. Then move the slider to 1, and type in a value of 2 in the field to reset the maximum limit. Then, if you move the slider below 0 or above 1, the points on your character's face continue moving to create extreme face shapes. Sometimes these shapes do not look very good. Sometimes, however, you will get some surprisingly useful new expressions that you didn't even have to create. For instance, setting a slider that closes the mouth to above 1, and other sliders to below 0, can create an unusual mouth pose that was not expected (see Figure 5.14). 5.14. Setting the slider limits above 1 and below 0 can sometimes produce useful new shapes.
You also can edit existing blend shapes by modifying the target shapes. A history connection exists between the target heads and the main head, which updates the main head whenever a target is modified. This is one of the reasons you don't want to delete the target heads when you create your blend shapes. You can add new blend shapes to a blend shape node in a couple of ways. To add a new target head as a blend shape, select the target and Shift-select the main head, and then choose Deform, Edit Blend Shape, Add 5.15. Use the Add button to create in-between shapes for a particular expression. Then drive the half shape and full shape with one custom channel to produce a more natural blend.
Another way to edit your sliders is to reposition the order of the sliders. To swap the order of two sliders, Shift-select the two target heads, and choose Deform, Edit Blend Shape, Swap Reordering DeformersOne thing you have to be aware of when assigning both blend shapes and influences to your character's skin is that the order of the deformers makes a difference. In most cases, the skinCluster node should be evaluated after any blend shape nodes. If you bind your character's head first, and then add blend shapes afterward, the nodes are in the wrong order. This wrong order causes the head to shift when you animate the blend shapes on top of the skeleton controls. To avoid this problem, just right-click the skin to choose Inputs, All Inputs to reorder the deformers. This action opens a list that goes from bottom to top, called a stack, with the last thing in the list being at the top. To reorder the deformers, hold down the middle mouse button to drag the skinCluster node below the blend shapes node (see Figure 5.16). Keep in mind that you can only drag downward, not upward, in this list. You must do this on all skins that contain both a skinCluster and blend shape node in the wrong order. 5.16. If your character's head shifts when combining skeleton and blend shape deformations, right-click the skin to reorder the deformers so that the skinCluster node is above the blend shapes node.
COntrolling a Character's Face with a Dummy HeadOne technique that you may find useful is to create all your head controls on a separate copy of your character's main head. The main head is assigned only to a head skeleton, so it moves with the body. The copy is then assigned to a separate head skeleton, jaw skeleton, and all the other face deformers. These can include face skeletons, blend shapes, influence curves, and lattices, but the head copy will not move with the character's body. You may even want to create a special camera that only looks at the copy, or dummy head. Finally, to make all the deformations on the dummy head appear on your character's main head, create a single blend shape between the two. Assign the dummy head as the target, and leave the blend shape slider for the dummy head always set to 1. This ensures that all the deformations created on the dummy head are transferred to the main head through a blend shape connection. This technique separates the body animation from the face animation. You can then animate the body first, with the dummy head hidden on a layer, and animate the face afterward. Using a dummy head makes it easy to find and view the face. You can also hide the character's body to concentrate on only the face animation after you have established the timing of the body animation. Alternatively, you can animate the dummy head in a completely separate scene, and import it later to use as a blend shape target for the main head of your character. |

EAN: 2147483647
Pages: 75