Creating Basic Face Controls
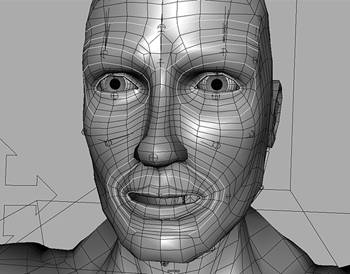
| When you tested your skeletal bind in Chapter 4, you probably noticed that rotating the jaw joint caused the entire face of your character to stretch (see Figure 5.1). This happens when you bind the basic rig, because only the head and jaw skeletons are being assigned to the skin of the face. All the features of the face are assigned a certain amount to each of these skeletons, and therefore they move when the jaw is rotated. To produce a better bind, and gain more control over each area of the face, you must create additional face influences. Keep in mind as you do this that all the new face influences must move with either the head or jaw skeletons, so they should be parented accordingly. Remember that you can insert two group nodes between skeletons to keep too many extraneous bones from being drawn. 5.1. When you only bind a head and jaw skeleton to your character's head, the weighting on the face is very generalized, which causes the entire face to stretch when the jaw joint is moved.
Adding Face Influences to the HeadTo make your bind more specific, you can create skeletons that lock down all the facial features that should not move with the jaw. These skeletons should contour the skull to some degree on the cheekbones and forehead. For instance, a skeleton can be drawn going from the top of the nose to the tip of the nose. Two small, two-joint skeletons can be created on either side of the nose to flare the nostrils by scaling them in X. Draw skeletons from the center of the head out to the center of each cheek to puff out or pull in your character's cheeks by also scaling in X. You also can draw three skeletons from the top of the forehead down to the left, right, and middle of the brow. You can scale these to raise each part of your character's brows (see Figure 5.2). Group all skeletons in the top part of the face under the HeadRoot joint so that they move with the head. 5.2. You can draw skeletons to make the weighting in your character's face more specific, such as creating several joints in the forehead area to flex the brows.
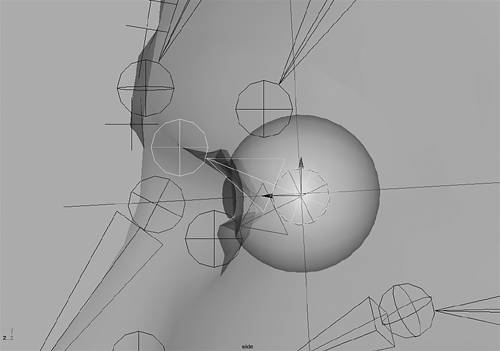
Skeletons can also be drawn from the center of the eyes out to both the upper and lower eyelids (see Figure 5.3). Because the eyeballs are round, the lids must close on an arc to prevent intersection problems. Assigning the lids to skeleton joints that rotate from the center of each eye ensures they deform around the eyeballs in the correct manner. 5.3. Drawing skeletons from the center of each eyeball to the edge of each eyelid creates controls that close the eyelids on an arc.
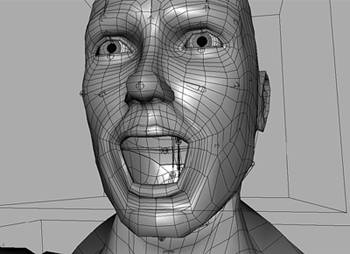
You can also draw two skeletons to better contour the jaw. Draw these starting below each ear, and end them in the center of the chin. In addition, to force a better lip bind assignment, you can draw one upper-lip and one lower-lip skeleton. You should draw the upper-lip skeleton from the bottom of the nose to the middle of the upper lip, and draw the lower-lip skeleton from the middle of the chin to the middle of the lower lip. Group together all the new skeletons in the jaw and lower-lip area to be parented under the original jaw joint (see Figure 5.4). 5.4. Skeletons in the lower part of the face, such as one for the lower lip, should be child to the jaw joint so that they move with the jaw.
If you have separated your character's head skin from the rest of your character's body, as recommended at the beginning of this chapter, you need to rebind all the head and face skeletons again. If you left your character's head attached to its body, however, because it has already been meticulously bound and weighted, add each new skeleton to the existing skinCluster node as an influence. You may want to set a weighting of 0 in the Add Influence options box and then manually set the weight for each new influence as needed with the Paint Skin Weights tool and the Component Editor. One technique you can use in conjunction with assigning skeleton influences is to use the geometry of the skull as a motion track for the influences to move on. This enables you to make it appear that your muscles and skin are moving according to the bone structure of the face. Do this by creating some underlying geometry for the bones of the face or just use your existing polygon reference bones. Then use a geometry constraint to force the influences to stick to the surface of the underlying geometry. The best kind of influences to use with this technique are either single-joint skeletons or locators assigned as influence objects. To try this, create a single-joint skeleton by activating the Joint tool, clicking once, and pressing Enter. Then select the polygon reference skull bone, Shift-select the single-joint skeleton, and choose Constrain, Geometry. When you translate the joint, it should stick to the surface of the polygon skull (see Figure 5.5). Make sure you still parent the joint under the HeadRoot joint to ensure it moves correctly with the head. You can also use a similar technique with sculpt deformers to make it appear that bones are sliding under the skin. 5.5. You can geometry-constrain influences to the polygon reference skull bone to make the skin deform according to the structure of the underlying bones.
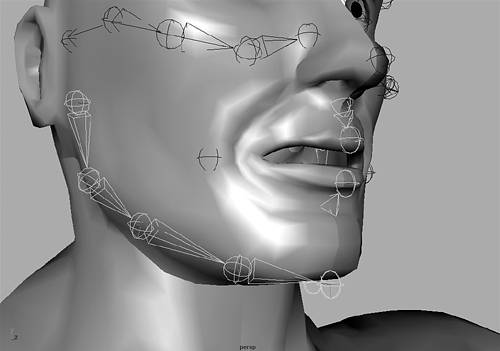
Another way to animate facial features is to add more influence curves than skeletons to the head skin. In this case, you hold down the V key to snap to the points on the face as you draw each curve. Try to draw the curves so that they contour the main features and wrinkles of the face. For instance, curves can be created around the mouth and around each eye. Curves can also be drawn to follow the brow lines and the smile lines (see Figure 5.6). When drawing your curves, try to simplify the curve by snapping only to the main areas you want to control. Then assign these curves as additional influences, along with your head and jaw skeletons. Adjust the weighting of the skin to the curves as needed using the Paint Skin Weights tool and the Component Editor. Also make sure you turn on the useComponents channel on the skinCluster node to force the skin to deform with the curves. 5.6. You can assign curves as influences that contour the eyes, mouth, and wrinkle lines to use as face controls.
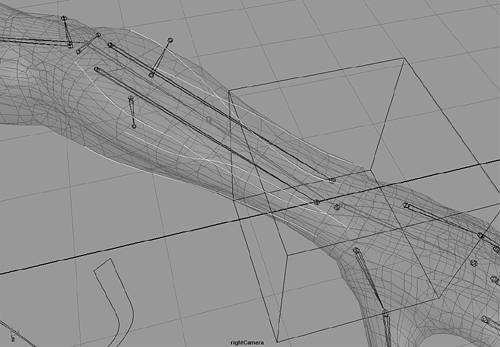
After you have assigned the influence curves, you can create single-point clusters on each point of the curves. Do not turn on local mode, which turns off the capability of the clusters to deform the skin when their parents get transformed. Parent the clusters under the main skeleton joints with which they should move. Clusters on the eye curves should be child to the HeadRoot joint, for instance, whereas clusters on the lower-lip curves should be child to the JawRoot joint. Grouping together all the clusters for each joint makes setting driven keys more predictable. Finally, create custom channels on the Head box that drive the clusters and joints together. Using channels as multiple drivers for the same cluster handles, you can set driven keys to create a variety of controls for each area of the face. One variation you could use with this technique is to assign the curves to the skeletons with a rigid bind instead of parenting the cluster handles to the joints directly. The advantage of doing this is that you can adjust the rigid bind weighting of the curves to follow the skeletons more smoothly than they would through just parenting. In this variation, you group the cluster handles under a node that is made child to the HeadRoot joint. You can also use similar techniques on other parts of your character's body. For instance, you could create influence curves to improve the forearm skin deformation instead of using a lattice as detailed in Chapter 4. Add influence curves that are drawn from the upper forearm to the wrist, and create single-point cluster handles that are parented to the lower-arm and arm turn joints (see Figure 5.7). Then you can set driven keys on the cluster handles to smooth out the skin when the armTurn joint rotates. 5.7. You can use influence curves in other areas of the body, such as for smoothing out the twisting of a forearm.
|
EAN: 2147483647
Pages: 75