Deforming the Skin with Skeletons
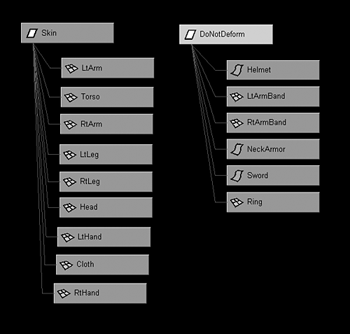
| This section shows you how to assign a basic bind to your models, which enables the skeletons you created in Chapter 3 to deform your character's skin. This is the first step toward being able to animate your character with your rig controls. Like all deformers, binding only affects the components of your models. This occurs through assigning the points on the models to the closest skeleton joints. After you bind your skin, the transforms of your models are locked, as signified by a gray color on the channels. It is important to remember that after you bind your models, they should not have their transform channels animated. To prepare your models for binding, make sure they are all parented under a single group node named Skin. Because you will not be animating their transforms, it doesn't matter whether the skin models are in any specific order in the hierarchy. Also make sure that all models in the skin hierarchy are meant to deform. Some models that shouldn't be deformed are eyeballs, armor, hats, and hard props such as eyeglasses. The eyeballs should already be parented under the HeadRoot joint so that they move with the head, but the other objects may not be parented to anything. Make these models child to a separate group node named DoNotDeform (see Figure 4.2). Later, parent each of these models under the appropriate skeleton joints in your rig so that they move with your character's skin. For instance, a wrist watch would be child of the ArmTurn joint, so it moves with the forearm. 4.2. Parent all the character models that should be a part of the deforming skin in a separate hierarchy than the models that should not deform, such as armor, eyeballs, and hard props.
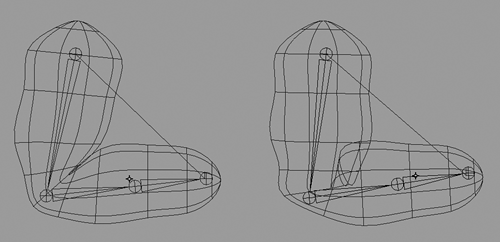
Because any inputs into your character's skin could adversely affect your bind, it is important to delete history on your models before binding them. For instance, history connections to creation curves cause the bind to not work properly. Also keep in mind that any stitching or fillets connected to your NURBS surfaces are also removed when you delete history. This should not present a problem, however, because it is preferable to keep the tangency between surfaces through the bind assignment. Using stitching and fillets in conjunction with the bind causes your system to slow down dramatically. Instead, this section shows you how to keep the tangency between surfaces by adjusting how points on the skin are assigned to the skeletons, called skin weighting. This does not slow down your system any more than a normal bind does. Of course, to reduce the need to keep surfaces together, you can convert your NURBS patch models to polygon models that you then merge into a single surface. See Chapter 2, "Modeling the Skin of a Biped Character," for a detailed explanation of the conversion process. Binding MethodsThe two binding methods in Maya are rigid skin binding and smooth skin binding. Rigid has traditionally been used for low-resolution gaming characters, whereas smooth binding is normally used for high-resolution cinematic characters. This book focuses primarily on the smooth skin binding method, which gives you more control and flexibility over animating your character's skin. The basics of rigid binding are covered in this section, however, with the rest of the chapter describing in detail how to smooth skin bind your character. Open the scene file named BasicBind.mb, and scrub the timeline to see how the bound skins deform. Each skin is assigned to a similar skeleton, but deforms very differently from each other when animated. The skin on the left is assigned with a basic smooth skin bind, whereas the one on the right is assigned with a basic rigid skin bind. Specifically, notice the area around the rotating joints. The skin on the left bends much more smoothly than the one on the right, which tends to intersect itself when the skeletons rotate upward (see Figure 4.3). 4.3. Notice that the smooth skin bind on the left deforms very differently from the rigid skin bind on the right.
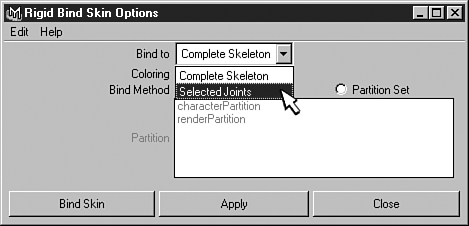
The reason the skins bend differently from each other is because the points on the skins are assigned to the skeletons in very different manners. You can assign a point in a smooth skin bind to multiple joints, whereas you can assign a point in a rigid skin bind to only one joint. This creates a smoother bend on the smooth bound skin because the points around the deforming joint are moving partially with the rotating joint, and partially with the joint that remains still. How much each point moves with a particular joint is determined by the skin weighting assignment. The higher a joint is weighted, the more it affects the skin. On the rigid skin, however, the points are always initially assigned to only one joint with a full weighting. This causes the points above the animated joint to stay still, while the ones below the animated joint move completely with the rotating joint. Because of this, the skin assigned with a rigid bind intersects itself when the arm bends. You assign a rigid skin bind by selecting the skin model's hierarchy, then Shift-select all the skeletons, and choose Skin, Bind Skin, Rigid Bind 4.4. In the Rigid Bind options box, you must choose between binding the complete skeleton or selected joints.
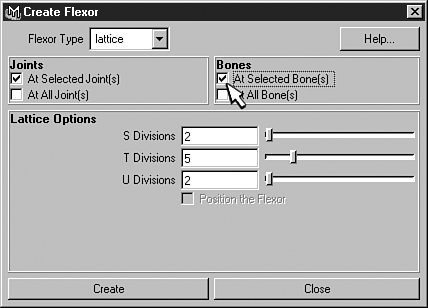
One property that rigid skin binding has that is not available in a smooth skin bind is colored joints. By turning on the Color Joints option, the joints in your skeletons become color coded. Because each point on a rigid bound skin can be assigned to only one joint, turning on the Colored Joints option also colors the points on the skin to reflect the joint colors. Select the bound skin and switch to component mode to see the colored points. The last option for a rigid skin bind is the Bind Method option. In most cases, you should use closest point, which places the skin points in cluster sets based on how close they are to particular joints. If you want to bind only specific points in your models to the skeleton joints, you can create your own cluster sets ahead of time by creating a partition under the Create menu. Also under the Create menu, in component mode, select the points on your skin that you want to bind, and create a named set that you add to your custom partition. After you place the set in the partition, the name of your partition appears in the Rigid Bind options box under Partition Set. Select it to bind only the points in the set you created. You may wonder why anyone would use rigid binding if it causes the skin to intersect itself so badly. However, there are ways of reducing intersection problems on a rigid bound skin. To make it deform more smoothly, and even produce some simple muscle flexing, you add flexors to the skin. Flexors are unique to rigid skin binding, and are easy to assign to the skin. You create a flexor by choosing Skin, Edit Rigid Skin, Create Flexor 4.5. You can place lattice flexors around a joint, or around the bones between joints for simple muscle effects.
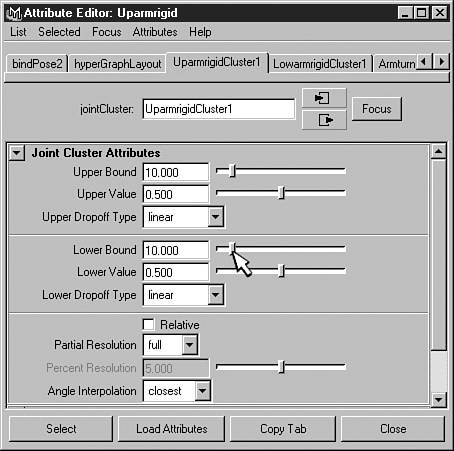
Creating a lattice flexor assigns the lattice to the skin, and parents it to the skeleton. Select the lattice, and notice that several channels are available under the Shapes section in the channel bar. Adjust these channels to move parts of the lattice to improve the deformation of the skin. You can manually key these channels when animating, or set driven keys so that the skeletal joints drive them. You can use a lattice on the upper-arm bone to animate a biceps muscle, for instance, or you can use a sculpt flexor. The sculpt flexor creates a spherical sculpt deformer at the bone that can be scaled to push out a biceps. Adjust the pivot point of the sculpt flexor to affect only the biceps side of the arm skin. The other flexor you can create is called a joint cluster. This flexor has upper and lower bound channels that you can adjust to remove skin intersections at the deforming joints. Select the main joints in your skeleton and add the joint cluster flexor to the selected joints. A small letter J will appear on each joint signifying it has a joint cluster. Then adjust the attributes in the channel bar or the Attribute Editor (see Figure 4.6). As with the other flexors, the channels can be driven to automatically correct intersection problems when the arm bends. 4.6. Adjusting the upper and lower bound attributes of a joint cluster flexor can remove intersection problems on a rigid bound skin.
In component mode, select some points on the skin after assigning flexors. Then open the Component Editor by choosing Window, General Editors, Component Editor, and select the Rigid Skins tab. The values displayed are called skin weights, and they show how much each selected point is assigned to a particular joint. Even though a point on a rigid bound skin can be assigned to only one joint, reducing the weighting to less than a value of 1 can make the skin deform more smoothly. This occurs automatically when you assign flexors to the skin. You can also manually type in values less than 1, or use the interactive slider to adjust the values. You also can adjust the skin weights in other ways, such as by selecting the skin and choosing Deform, Paint Cluster Weights Tool In addition to adjusting the value of skin weights, you can use the Edit Membership tool to change the joints to which a point is assigned. Do this by choosing Deform, Edit Membership Tool, and select a rigid bound joint. The points assigned to that joint become highlighted (see Figure 4.7). To add to this set, hold the Shift key down while clicking additional points. The new points in the set should also become highlighted, and will also deform with the selected joint. Select additional joints to continue editing the joint cluster membership. You can also hold down the Ctrl key when selecting points to remove them from all memberships. This should only be done, however, if you don't want those points to move with any skeletons. Another way you can edit cluster membership is by selecting the skin and choosing Deform, Paint Set Membership Tool 4.7. Use the Edit Membership tool to see which points on a rigid bound skin are assigned to a selected joint, and use the Shift key to add points.
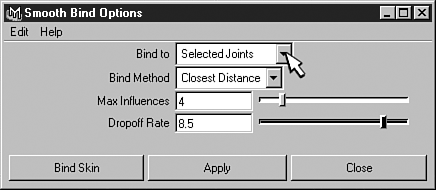
Creating a Smooth Skin BindThe rest of this chapter concentrates on smooth skin binding, which gives you more control over how your skin deforms. To create a smooth skin bind, select your skin models, and Shift-select the skeleton joints you want to assign to them. Then open the Smooth Skin Bind options box by choosing Skin, Bind Skin, Smooth Bind 4.8. The Smooth Skin Bind options box has some options that are similar to rigid binding, such as whether to bind to the complete skeleton or selected joints.
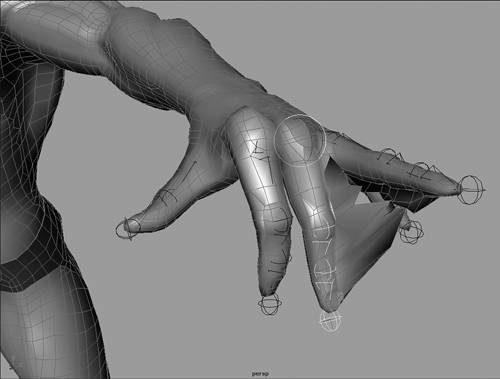
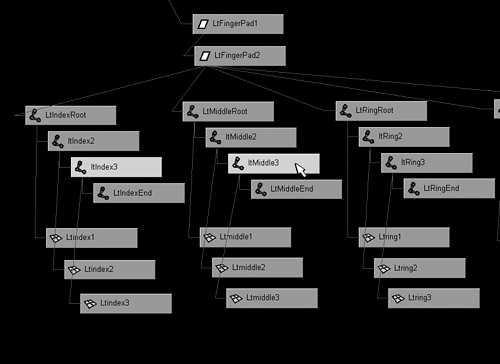
The advantage of using the Complete Skeleton option is that you don't have to take the time to select every joint you want to bind. By selecting only the root joints, all the joints in the skeleton are added to the bind. This can be a disadvantage, however, on a complicated character with a lot of skeletons in its rig. If your skeletons are in a rig similar to the one detailed in Chapter 3, reducing the amount of joints in your bind is desirable, because this reduces the size of the list of deformers assigned to the skin. Leaving some joints out of your bind, such as the end joints on each skeleton, does not change how the skin deforms. Usually the end joints are never actually animated, and are just there to serve as a goal for the previous joint's X-axis to point at. By using the Selected Joints option, you can remove the end joints from your bind by just not selecting them. The next option you need to set is the binding method. You have a choice between the Closest Distance option and the Closest Joint option. The Closest Distance option assigns each point in the skin to the joint closest in distance. Then it assigns additional joints also based on how far they are from the point. Remember from the preceding section that a single point on a smooth bound skin can be assigned to multiple joints, which produces a smoother deformation on the skin than rigid binding. This ability to assign multiple joints to control a single point on the skin can be a problem, however, in areas where limbs branch off the body. For instance, fingers placed very close together can have points in one finger assigned to joints in the adjoining finger, because they are close in distance. If this occurs on the hand, you see the skin stretching on the inner side of one finger when the adjoining finger moves (see Figure 4.9). The same problem can happen on the upper arms and legs. This is one of the reasons you created your character models with the arms and legs stretched out away from the torso. This keeps the joints in the limbs from being close in distance to joints in other parts of your character's body when binding. 4.9. Using the Complete Skeleton option on your skin bind can cause fingers close to each other to have their points assigned to joints in the adjoining finger.
The Closest Joint option reduces the problem of points being assigned to joints in the wrong skeleton. Like the closest distance method, this method assigns the points to the first joint that is closest in distance. Then, this method assigns additional joints based both on distance and where they exist in the rig hierarchy (see Figure 4.10). In your character's hand, for instance, a point on the end of one finger will be assigned to the appropriate finger joint, and then the second joint may be on the same finger, or the next finger. When Maya considers binding the next finger joint because it is close in distance, it also checks the joint's position in the hierarchy. A joint in the next finger is all the way at the end of a separate branch in the hierarchy from the first assigned joint, so Maya does not assign it to the point. 4.10. The Closest Joint option assigns points based on both distance and position in the rig hierarchy. If a finger joint is close in distance to the first finger joint assigned, but far in the hierarchy because it is on adjacent fingers, the second joint is not assigned.
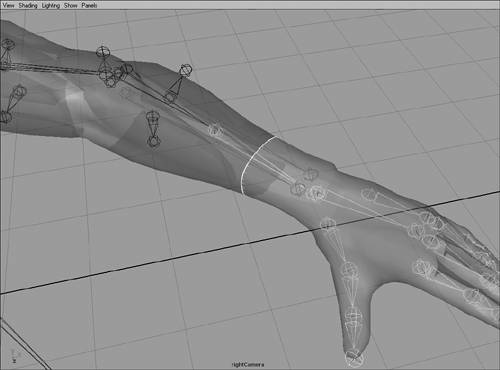
It is not always easy to decide which binding method to use. Using the closest joint method on the entire character reduces the problem of the wrong joints being assigned, but it can cause other problems. In a complex character such as the one built in Chapter 3, there are many group nodes and control objects in between skeletons. Using the closest joint method can make Maya not assign joints that should be assigned, because the nodes appear to be separated in the hierarchy. One way to get the best of both methods is to use different options on different parts of your character. For instance, you could use the closest distance method on the torso and arms, to make sure all the joints are assigned, and use the closest joint method on the hands, to make sure the finger assignment is correct. Because you cannot smooth bind the same skin more than once, to use multiple options you must first detach your character's skin into separate surfaces. Then bind each surface with the appropriate method. The key to doing this correctly is to make sure there is an overlapping of the assigned joints on each skin surface. When binding the arm separately from the hands, for instance, make sure that the lower-arm joints are assigned to both the arm skin and the hand skin (see Figure 4.11). This ensures that they have the same joint assignment in the area where the skins meet. Otherwise, the skins may come apart at the seams. 4.11. When binding separate but adjoining surfaces, make sure you assign an overlapping joint to prevent the seam from coming apart.
The last two smooth binding options work together to determine how many joints are assigned to each point on a skin. Set the Max Influences option to limit the total number of joints that can be assigned to a single point. In most normal cases, a point never needs to move with more than five joints. You may set the maximum number of influences to five in complex areas such as the face. On the other hand, it is normally not necessary to assign any less than three joints to points in most areas of your character's body. With this in mind, try setting the maximum number of influences for most of your skins to between three and five joints. When assigning the bind, Maya keeps looking for joints until it reaches the value set for the maximum number of influences, or it reaches the limit set for the drop-off rate. The Drop-off Rate option tells Maya how far away from the point it can look for joints to assign. Set the value high to get a faster drop off, which only assign joints that are close to the point, or set it low to make Maya assign joints that are farther away from the point. (Generally, I recommend setting the drop-off rate pretty high, such as around 7.5. This setting makes your bind more specific.)
Creating Extra Skeletons for a Better BindThe goal of binding is to do as little manual tweaking of skin weights as possible. One way to achieve this is by binding additional joints. Adding more joints into your character's skeletal rig before you do your final bind makes your skin weighting more specific. Adding more influences into the areas of the rig that do not currently have any keeps the points on the skin from being assigned to joints in distant skeletons. The best way to begin making your bind more specific is to draw new skeletons that contour the polygon reference bones. You can add skeletons for some of the ribs, for instance, or add skeletons in the nose and cheekbone areas of the skull (see Figure 4.17). As described later in this chapter, you also can draw many joints to represent the muscles and fat pads in the body. 4.17. Adding skeletons that contour the polygon reference bones, such as the ribs, can improve your initial bind.
Whenever you add skeletons to make your bind more specific, keep in mind that each new skeleton must be parented under the main skeletal joints in your rig. Otherwise, they will not move correctly with your character controls. If you add skeletons to represent ribs in your character's torso, for instance, make sure you parent the new skeletons under the appropriate backbone root joints. To keep a lot of extra bones from being drawn when you parent, create two group nodes between the skeletons. In addition to parenting, you can adjust movement on the new skeletons by setting driven keys on them. Rib skeletons should move with your character's backbone and breath controls, for instance, so set driven keys to make these objects drive the new joints as needed. Manually Improving Smooth Skin WeightsAs mentioned earlier in this chapter, the weighting on each skin point determines how the skin deforms when the skeleton joints rotate. Smooth skin binding allows each point on a skin to be assigned to multiple joints, based primarily on how close the joints are to a particular point. Joints closest to a given point are given the highest weighting, and affect the point more than joints that are farther away. To make the effects of weighting logical and predictable on a smooth skin bind, the weights are normalized. Normalized weighting sets a limit on the maximum amount that a single point can be weighted. It assigns the largest amount of weighting to the closest joint, and assigns smaller amounts to additional joints based on the bind options settings, until it reaches a maximum combined weighting of 1. In an arm skin, for example, a point in the biceps area may be assigned to a biceps joint, upper-arm joint, and lower-arm joint. The biceps joint is assigned the largest amount of weighting, such as .6, because it is the closest joint. The upper-arm joint is the next-closest joint, so it gets a smaller amount of weighting, perhaps a .25 weight. The last joint, therefore, must have a .15 weighting, because the total weight must equal 1 (see Table 4.1).
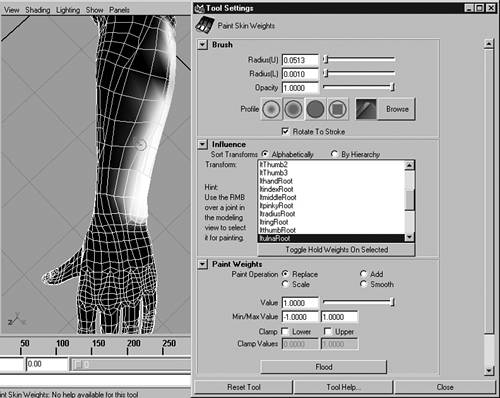
The most intuitive way to manually adjust the skin weighting on your character is to use the Paint Skin Weights tool. Before you paint skin weights, however, enlarge the perspective view to full screen, and make sure it is in shaded mode. In addition, on the perspective view's top menu bar choose Shading, Shade Options, Wireframe on Shaded to show the wireframe structure of your character's skin in shaded mode. Because weighting occurs only on the points and not on the surface between points, it is easier to paint if you can see your model's surface topology. Then select the skin you want to paint, and choose Skin, Edit Smooth Skin, Paint Skin Weights Tool Under the Influence section in the Paint Skin Weights tool, choose in the list which joint you want to adjust skin weighting for. This is where it is important that all your bound joints are named correctly. When you click a joint name, Maya displays, in grayscale, values of how the skin is weighted to that joint (see Figure 4.18). Then set the radius of your brush and decide what kind of paint operation you want to use when painting. Use the Replace option to set the weighting to a specific value. Use the Add option if you want to gradually increase or decrease the weighting value. If you know you want some points to be fully weighted to a joint, for instance, set the option to Replace and the Value to 1. Then paint on the appropriate points, which should turn them white. On the other hand, if you just want to increase the weighting gradually, set the operation to Add, and use a decimal value. To reduce the weighting, also use the Add operation, but set the value to a negative decimal number. Make sure your Min setting is 1, and not 0, to enable you to type in negative values. 4.18. Select the name of a joint in the Paint Skin Weights tool to see a grayscale representation of the weighting.
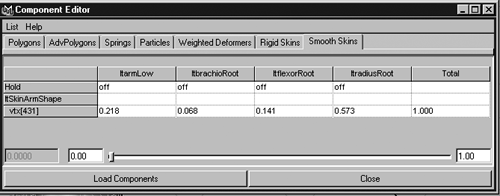
Other useful settings in the Paint Weights options box include the Smooth operation, Flood button, and Toggle Hold Weights on Selected button. Use the Smooth option to average values, which creates a gradual falloff in weighting. Click the Flood button if you want to set all the points on a surface to a particular value. If you know you want a joint to have no influence on a skin, for instance, set the operation to Replace and the value to 0, and flood the surface. The Hold button is useful if you don't want weights assigned on specific joints to change while painting. Normalized weights are always updating to have a total weighting of 1. If you reduce the weight value assigned to one joint, for instance, all the weight values to other joints automatically increase. If a joint has a hold on it, however, its weight does not change when other weights are adjusted up or down. Although setting a hold on a joint can be useful, make sure the hold is turned off after you have finished painting weights. For many people, painting weights is both easy and intuitive. However, it is not the most accurate way to adjust your character's skin weighting. The problem with painting weights is that it is sometimes difficult to distinguish extreme gray values from white or black values. A very light value may appear white while not having a weight of 1, or a very dark value may appear black while not having a weight of 0. This can cause small movements on the skin that are not meant to be there. To make sure the weights are set accurately, you must use the Component Editor. To use the Component Editor, select some points on your skin in component mode, and on the top menu bar choose Window, General Editors, Component Editor. Click the Smooth Skins tab to see an exact summary of how the selected points are weighted (see Figure 4.19). The points are listed on the left, and the joints or influences assigned to the skin are listed across the top. In a complex character, this list can be quite long, forcing you to scroll to the right. To make the list more manageable, click List in the editor's menu, and turn off Show All Columns. This removes from the Influence list any joints not assigned to the particular points you have selected. 4.19. Click the Smooth Skins tab in the Component Editor to see the exact weighting values of selected skin points.
Notice that the exact values for the weighting to each joint are given, and that they all total to 1. You can type in values for an individual point or use the Shift key to select the weights for many points. If you Shift-select many points, you can set them all to a particular weight by typing in the value, or use the slider at the bottom of the editor to interactively adjust all the weights. Notice that as you move the slider all the weights change, not just the ones you have selected. This shows you how normalized weights work. When you increase the values to one influence, all the other values go down, and vice versa. Also notice that when you move the slider, you can see the points moving interactively in the other views. To use the slider to adjust an entire column of weights, click the name of an influence at the top of the editor. One tip for weighting points in the Component Editor is to set some keys on your controls so that the skin you are weighting deforms into some extreme poses (see Figure 4.20). Do this on a few frames so that it is easy for you to access all the poses by just scrubbing the timeline. This enables you to adjust the weights on your character without having to switch from component mode to object mode to see the effects of your weight changes on the deforming skin. 4.20. Keyframe your rig controls to create some extreme poses that reveal any weighting problems.
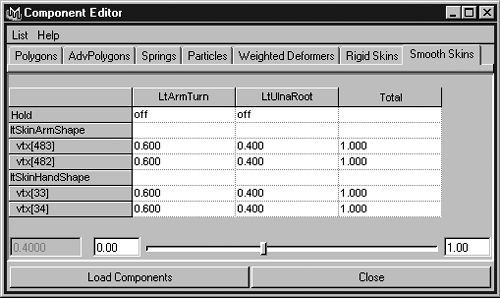
Just as in the Paint Skin Weights tool, you can put a hold on weights so that the weights to a particular influence are not affected by normalizing. If you set a column of weights to have a setting of .5, and then adjust another column of weights, the first column's values change when the weights normalize. To keep this from happening to the first column of weights, turn on a hold by typing a 1 into the Hold field at the top of the column. Then when you adjust the settings on the second column of weights, all the other columns normalize except the column being constrained by the hold. When you have finished adjusting the weights, make sure you turn the hold off by typing in a 0 in the Hold field. If you bind separate surfaces because you are using NURBS patches, or because you are using different binding methods for different parts of your character, you have to keep the seams between surfaces from separating. Doing this on NURBS patches using fillets or stitches is not very efficient, and considerably slows down your computer system. Keeping the seams together through weighting is much more efficient, and does not slow down your system any more than any other kind of bind. The thing to keep in mind is that all you need to do to make points on separate surfaces move in the same way is make sure they are weighted in the same manner to the same joints. The easiest way to make sure points stay together on separate surfaces is to place the seams in the middle of a bone, and not directly on a rotating joint. If the seam is in the middle of a bone, the edge points on both surfaces can be weighted fully to the bone. If you want to bind the hands separately from the arms so that you can use different binding methods, for example, it is best to separate the surfaces at the lower forearm. This places the seam in the middle of the arm turn bone. The weighting may get assigned automatically to the correct joint. If you have to adjust it manually, however, you can just set a weighting of 1 to the arm turn joint. On the other hand, if your seam is placed directly on the wrist, points on the edges of each surface may be assigned weights to different joints. One may be weighted more to the hand joint, whereas the other may be weighted more to the arm turn joint. Such an occurrence normally happens when the edge points were not properly snapped together on the separate surfaces during the modeling process. This causes the seam to come apart during animation. You can correct this error manually, however. Keep in mind that it is not necessary that the points on both surfaces are weighted to only one joint, just that they are weighted with the same values to the same joints (see Figure 4.21). Points on a wrist seam may be weighted .6 to the arm turn joint, and .4 to the hand joint, and the surfaces still stays together. 4.21. Points on the edge of two separate adjacent surfaces must be weighted the same amount to the same joints to keep the surfaces together when animating.
Also keep in mind that to keep tangency between two surfaces, you must keep a straight line between the four points across a seam. This means that you not only have to match the weights on the points directly on the seam but also on the points directly on either side of the seam. If all the points across the seam do not maintain tangency, even though the seam may not come apart, a crease may become visible during animation. It is also easier to maintain tangency on seams that are not directly on a rotating joint. You can use several other useful weighting commands under the Skin, Edit Smooth Skin menu. You can export and import weight maps. Exporting a weight map, by choosing Skin, Edit Smooth Skin, Export Skin Weight Maps 4.22. Exporting a weight map creates one text-based weight map file, and a folder that contains a gray scale image file for each influence.
If you are weighting a single surface skin that is symmetrical, such as a head or torso, you can mirror weights from one side of an axis plane to another. This does not work on separate skins, such as NURBS arm patches lofted off of a separate torso surface. To mirror weights from one side of a single surface torso to the other side, with the torso selected choose the Edit Smooth Skin menu, and then select Mirror Skin Weights Other useful commands under the Edit Smooth Skin menu are Copy Skin Weights, Prune Small Weights, and Remove Unused Influences. Copying the skin weights enables you to copy weights from one skin to another skin. It assigns the weights based on the similarity of the two skins, and where points are located in 3D space. The Prune Small Weights command sets to 0 all weights that are below a specified value. Then you can use the Removed Unused Influences to remove all the joints that have a 0 weighting. Under the Edit Smooth Skin menu, you can also disable and enable the normalizing of weights on a skin. Use this only under special circumstances, however, because it can lead to unpredictable deformation results.
|

EAN: 2147483647
Pages: 75