Chapter 7: Linking Assembly Modules with C .NET Programs
This chapter looks at issues of building and running C++ .NET programs, including assembly modules. There are many ways to link C++ and assembly programs; here, I will try to emphasize the key aspects of this process.
A C++ application can include one or more assembly modules. Modules are either files with the OBJ extension or standard libraries (with the LIB extension). These modules can contain calls to functions in other modules. Moreover, assembly functions can in turn call C++ .NET library functions. In fact, programs normally use separately compiled object files or libraries, so building a finished application requires some effort from a developer. What are the advantages of using object files generated with separate compilers? Ready-made object files usually require a minimum of memory and other system resources, which is very useful when creating fast applications.
I will describe how to link assembly modules with a C++ .NET program, assuming the use of a stand-alone assembly compiler when creating such modules. Compilers you can use include either ![]() ML.EXE of the MASM 6.14 software package, or the ML compiler of the C++ .NET development environment, located in the \bin subdirectory of the C++ .NET working directory. Files with the ASM extension can be compiled either from a command line or at one of the stages of building an application s executable file. There are no significant differences between these compiling techniques, but you should set the assembly compiler to use the chosen technique in the development environment for the sake of debugging and tracing convenience. In either case, you ll obtain an object file that can be used.
ML.EXE of the MASM 6.14 software package, or the ML compiler of the C++ .NET development environment, located in the \bin subdirectory of the C++ .NET working directory. Files with the ASM extension can be compiled either from a command line or at one of the stages of building an application s executable file. There are no significant differences between these compiling techniques, but you should set the assembly compiler to use the chosen technique in the development environment for the sake of debugging and tracing convenience. In either case, you ll obtain an object file that can be used.
First, a few words about the formats of the obtained object modules. The linker (LINK) operates with OBJ files of either COFF or OMF format. The Microsoft Visual C++ .NET compiler generates a COFF object file.
The linker converts OMF to COFF automatically. There are certain restrictions that sometimes hamper OMF-to-COFF conversion. More precisely, there are a few differences between the structures of files of these types. To avoid running into problems, you should set COFF-format object files as input files for the LINK linker. To obtain a COFF file, use the following command line:
ML /c /coff <an ASM file>
To use a file with useful functions in a C++ .NET application, use the following procedure:
-
Compile the source ASM file to obtain an object module in an OBJ file (the COFF format should be preferred).
-
Add the obtained OBJ files to the project and generate an application with the linker.
Step 2 can consist of several stages and can be implemented in various ways, because object files can be added to an application using various methods . Here are a few variants of integration:
-
You can add object files to your project by specifying the appropriate functions in the declarations section.
-
You can combine object files into static libraries of object modules. To do this, use the LIB.EXE utility of the Visual Studio C++ .NET package. The resulting LIB file can be added to your project.
-
You can use dynamic link libraries (DLLs) that contain object files.
Of course, you can use a combination of these methods.
Now we will turn our attention to the ![]() ML.EXE compiler s options used for generating object files. For example, to obtain an object module from the myproc.asm file, execute the following command:
ML.EXE compiler s options used for generating object files. For example, to obtain an object module from the myproc.asm file, execute the following command:
ML /c /coff myproc.asm
It is assumed that the source file is located in the same directory as ![]() ML.EXE .
ML.EXE .
The /c option tells the compiler to create only an object file. By default, if the compiler does not detect any errors, it will create the myproc.obj file in the COFF format. The obtained object module should be added to the C++ .NET main program and used for calling the functions it contains.
The object module file can contain several functions that can share data and call other functions of this module. With relatively small numbers of functions, variables , and their interconnections, the variant with one or more object modules is the most acceptable.
Frequently, the most convenient method of arranging and using functions of external modules involves creating a library (standard or import). In this case, the C++ .NET compiler offers many more options for application optimization. It is also very convenient to store the code of several object modules as one library. Library module files have the LIB extension. To create a library from an object file such as myproc.obj , use the LIB.EXE utility of the C++ .NET package:
LIB /OUTrmyproc.lib myproc.obj
If there are no errors, the myproc.lib file will be created. You should add it to the application project.
The variant of using assembly functions from dynamic link libraries is very popular. This variant is very flexible, and it allows you to create multiple copies of a DLL easily and to use various methods of linking DLLs to your application.
We will discuss linking an application and assembly modules in more detail beginning with object modules. An assembly module is compiled with the MASM 6.14 macro assembler or the assembler of the Visual C++ .NET environment. Every assembly program in our examples begins with the following directives:
.686 .model flat, C
The .686 directive allows the assembler to compile all commands of Pentium Pro or higher.
The .model flat, c directive defines the memory model used by the application, and the call convention (in this case, _cdec1 ).
For example, suppose you want to find the difference of two floating-point numbers and display the result. The difference will be computed with an assembly function (we will name it subf2 ). Put the source code of this function in the ![]() sub2.asm file.
sub2.asm file.
Assume the subf2 function is called using the _cdecl convention. The source code of the function is simple (Listing 7.1).
| |
;-------------------- subf2.asm -------------------- .686 .model flat, C .code subf2 proc push EBP mov EBP, ESP ; finit fld DWORD PTR [EBP+8] ; load f1 to ST(0) fsub DWORD PTR [EBP+12] ; subtract f2 from f1 fwait pop EBP ret subf2 endp end
| |
Now, we will focus on the source code briefly . The first two directives are described earlier. The function prolog is implemented with the following assembly commands:
push EBP mov EBP, ESP
They initialize the EBP register to the stack address to gain access to the variables. Computation is done with the mathematical coprocessor s commands, and the result is returned at the top of the coprocessor stack ST (0) :
fld DWORD PTR [EBP+8] fsub DWORD PTR [EBP+12]
The last two commands reset the stack and exit the function. Note that the ret command has no parameters according to the _cdecl convention.
Now you should obtain an object module of the main C++ .NET program and add it to the project. The object module can be generated with either of two methods: with the stand-alone compiler of the MASM 6.14 package or with the assembler of the Visual C++ .NET environment.
Here is a description of each of these two variants.
As noted earlier, when you use the MASM 6.14 stand-alone compiler, you can obtain an object module with the following command line:
ML.EXE /c /coff sub2.asm
Develop a C++ .NET console application that calls the subf2 function from the ![]() sub2.obj file. The source code of this application is shown in Listing 7.2.
sub2.obj file. The source code of this application is shown in Listing 7.2.
| |
// USING_STAND-ALONE_ASM_COMPILER.cpp : Defines the entry point for the // console application #include "stdafx.h" extern "C" float subf2(float f1, float f2); int _tmain(int argc, _TCHAR* argv[]) { float f1, f2; printf("CUSTOM BUILD WITH ASM-FILE IN PROJECT DEMO\n\n"); printf("Enter float f1: "); scanf("%f", &f1); printf("Enter float f2: "); scanf("%f", &f2); float fsub = subf2(f1, f2); printf("f1 f2 = %.2f\n", fsub); getchar(); return 0; } | |
Here is a brief analysis of the listing. Two floating-point numbers, f1 and f2 , are entered in the window of the console application. Their difference is found with the subf2 function. The function is external for the executable module, so it is declared with the extern directive:
extern "C" float subf2(float f1, float f2)
By default, the _cdecl call convention is used. The subf2 function takes two floating-point variables f1 and f2 and returns their difference. The C specifier prohibits decorating the function name.
The statement
float fsub = subf2(f1, f2)
computes the difference between the variables f1 and f2 and writes it to the fsub variable.
The object file that contains the subf2 function should be added to the project. To do this, select the Add Existing Item option in the Project menu and then select the name of the module in the dialog box that will open (Fig. 7.1).
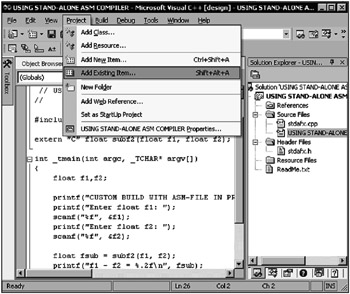
Fig. 7.1: Adding an object module to the project
After the object module is added to the project, the ![]() sub2.obj file name will appear in the file list in the Solution Explorer . Note that adding a separate module to a project does not necessarily mean that all functions of this module become visible to the application related to this project. It is important to specify the functions of the added modules with the extern directive.
sub2.obj file name will appear in the file list in the Solution Explorer . Note that adding a separate module to a project does not necessarily mean that all functions of this module become visible to the application related to this project. It is important to specify the functions of the added modules with the extern directive.
As usual, adding a module to a project is done with the Project menu item. Select the Add Existing Item option. In the dialog box that will open, select the object module file.
After the object module file is added to the project, the file name will appear in the project file list (Fig. 7.2).
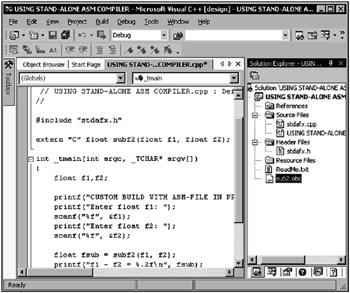
Fig. 7.2: Project window after the object file is added
Note that the ![]() sub2.obj object file is added to the project as a resource file.
sub2.obj object file is added to the project as a resource file.
Save the project and rebuild it with the Rebuild option of the Build menu item.
After you start the application and enter two floating-point numbers, the window of the program will look similar to that shown in Fig. 7.3.
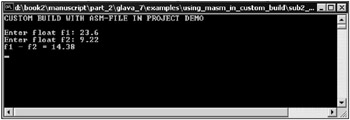
Fig. 7.3: Window of an application that computes the difference between two numbers with a separately compiled object module
Linking an assembly function and a calling program can be done with the MASM compiler of the Visual C++ .NET development environment. Note that the C++ .NET macro assembler has features similar to those of the MASM 6.14 stand-alone compiler and supports the same directives and commands.
You will not need any other tools besides those available in C++ .NET 2003. One advantage of this method is that it is very easy to edit and debug an assembly module with the Visual C++ .NET 2003 environment interface.
At first, you might think the process is too complicated because the examples discussed here are non-trivial. Therefore, I will explain each step in detail.
As an example, we will develop a console application. Take the source code in Listing 7.2 as a sample for the source code of this application. Then add the file with the source code of the assembly function to your application. For this purpose, you must complete a few additional actions.
First, add a new text file to your project. This file will contain the source code of the assembly function. Create this file with the Add New Item option of the Project menu item as shown in Fig. 7.4.
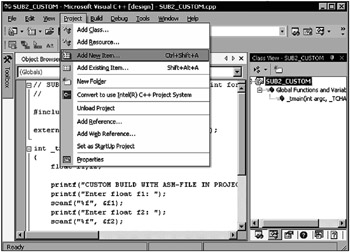
Fig. 7.4: Adding a new file to a project
Select the type of the file added to the project. There is no template for an ASM file in the Visual C++ .NET development environment. Therefore, use one of the text templates. This should be a text file. Of the available templates, select Text File (.txt) and specify the file name in the text box. Let it be ![]() sub2.asm .
sub2.asm .
Note that the text file does not have to have the ASM extension. Nothing prevents us from saving it as, say, ![]() sub2.txt . The C++ .NET inline assembler will process any text file you pass it.
sub2.txt . The C++ .NET inline assembler will process any text file you pass it.
Now we will go back to the ![]() sub2.asm file (Fig. 7.5).
sub2.asm file (Fig. 7.5).

Fig. 7.5: Selecting the file type and extension
Put the assembly code of the subf2 function into the empty file ![]() sub2.asm . Save the project. Next you should tell the compiler how it must process the ASM file. To do this, select the
sub2.asm . Save the project. Next you should tell the compiler how it must process the ASM file. To do this, select the ![]() sub2.asm file in Solution Explorer and go to the Properties tab (Fig. 7.6).
sub2.asm file in Solution Explorer and go to the Properties tab (Fig. 7.6).
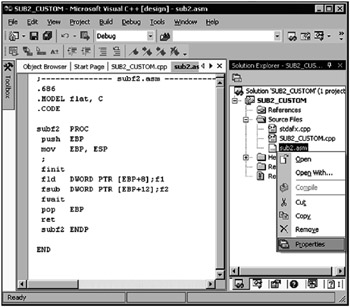
Fig. 7.6: Setting options for processing the sub2.asm file
In the Property page that will open, specify parameters for processing the ![]() sub2.asm file. The command line for the MASM inline compiler can be as follows :
sub2.asm file. The command line for the MASM inline compiler can be as follows :
ML /c /coff sub2.asm
If you saved the file as a TXT file, the only thing you should change in this command line is the file name:
ML /c /coff sub2.txt
Setting the MASM compiler options of the C++ .NET environment is shown in Fig. 7.7.
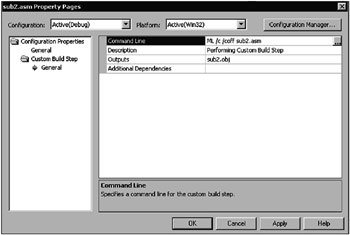
Fig. 7.7: Setting parameters for compiling the sub2.asm file
The Command Line parameter should be the following:
ML.EXE /c /coff sub2.asm
The Outputs parameter should contain the object module name, ![]() sub2.obj in our case. Save the project again and compile it. After you start the application, its window will look like shown in Fig. 7.8.
sub2.obj in our case. Save the project again and compile it. After you start the application, its window will look like shown in Fig. 7.8.
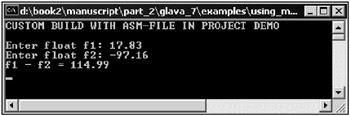
Fig. 7.8: Window of an application that demonstrates the use of an ASM file in the C++ .NET environment
We can draw a few conclusions concerning the use of object modules in a C++ .NET application. Although the examples above are quite simple, you can judge the advantages of a particular method of compiling and adding a module to a project from these examples.
Using the Visual C++ .NET 2003 environment for compiling ASM files and add-ing them to your project is very convenient. This is particularly true for the application debugging stage where you have to rebuild the application or recompile its individual modules repeatedly. Using the inline compiler saves you a lot of time in this case.
Note that object files generated with the macro assembler are external for the C++ .NET compiler regardless of the method of generating them. This means that all functions in these modules should be declared with the extern directive.
ASM files can contain several functions, and some of the object module s functions can be called by other functions of the same module and use their results. Change the source code of the assembly module by adding the code of a function that adds 100 to an integer parameter it takes (name the function add100 ). The modified source code is shown in Listing 7.3.
| |
; ----------- subf 2.asm--------- .686 .model flat, C .code subf2 proc ; cdecl push EBP mov EBP, ESP ; finit fld DWORD PTR [EBP+8] ; load f1 to ST(0) fsub DWORD PTR [EBP+12] ; subtract f2 from f1 fwait pop EBP ret subf2 endp add100 proc push EBP mov EBP, ESP mov EAX, DWORD PTR [EBP+8] add EAX, 100 pop EBP ret add100 endp end
| |
Save the source code in the ![]() subf2.asm file. Develop a console application that uses the functions subf2 and add100 and add the
subf2.asm file. Develop a console application that uses the functions subf2 and add100 and add the ![]() subf2.asm file to your project. The source code of the console application is shown in Listing 7.4.
subf2.asm file to your project. The source code of the console application is shown in Listing 7.4.
| |
#include <stdio.h> extern "C" float subf2(float f1, float f2); extern "C" int add100(int i1); void main(void) { float f1, f2; printf("CUSTOM BUILD WITH ASM-FILE BUILT-IN\n\n"); printf("Enter float f1: "); scanf("%f", &f1); printf("Enter float f2: "); scanf("%f", &f2); float fsub = subf2(f1, f2); printf("f1 - f2 = %.2f\n", fsub); printf("Rounded +100 = %d\n", addl00((int)(fsub/10))); getchar(); } | |
The window of this application is shown in Fig. 7.9.
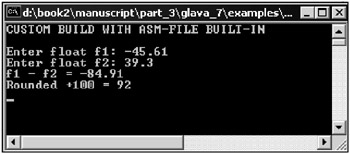
Fig. 7.9: Window of an application that demonstrates the use of two functions from the added assembly module
So far, we assumed that the calls to the functions from the assembly module are done according to the _cdecl convention. To use another convention, such as _stdcall , you need to make some changes to the file with the source code of these functions. Suppose you want the add100 function to be called in accordance with the _stdcall convention. In this case, the source code of the ![]() subf2.asm assembly module should appear as shown in Listing 7.5 (the changes are in bold).
subf2.asm assembly module should appear as shown in Listing 7.5 (the changes are in bold).
| |
;----------- subf2.asm (variant 3)-------- .686 .model flat .code _subf2 proc ; cdecl push EBP mov EBP, ESP ; finit fld DWORD PTR [EBP+8] ; Load f1 to ST(0) fsub DWORD PTR [EBP+12] ; Subtract f2 from f1 fwait pop EBP ret _subf2 endp _add100@4 proc push EBP mov EBP, ESP mov EAX, DWORD PTR [EBP+8] add EAX, 100 pop EBP ret 4 _add100@4 endp end
| |
Note that if the default convention _cdecl is used for all functions of an assembly module, it will suffice to use the "C" qualifier in the model directive, and you will not need to use special notation for the function names with an underscore character at the beginning. If another convention for function calls or a mixed variant as in Listing 7.5 is used, this should be explicity specified with the function name notation.
The main program should contain the following lines corresponding to the subf2 and add100 functions:
extern "C" float subf2(float f1, float f2) extern "C" int _stdcall add100(int i1)
The use of assembly modules is not confined to calls to functions in a C++ .NET main program. For data exchange, you can use common variables. This term is borrowed from earlier versions of Microsoft C++ compilers. It is not very precise, but it is appropriate for describing the essence of the method.
We will illustrate this with an example, taking the previous console application and the assembly module from Listing 7.5 as a model. Change the source code in the assembly file so that a common variable can be used for the result of computing. Remember that the difference of two floating-point numbers was returned by the subf2 function in the coprocessor s stack ST(0) and used in other pieces of the program code.
Now, the result of the function will be put into a double-word variable fres and then used in the main program. The modified source code of the assembly module is shown in Listing 7.6 (the changes are in bold).
| |
;----------- subf 2std.asm ------- .686 .model flat public _fres .data _fres DD 0 .code _subf2 proc ; cdecl push EBP mov EBP, ESP ; finit fld DWORD PTR [EBP+8] ; load f1 to ST(0) fsub DWORD PTR [EBP+12] ; subtract f2 from f1 lea ESI, _fres fst DWORD PTR [ESI] fwait pop EBP ret _subf2 endp _add100@4 proc push EBP mov EBP, ESP mov EAX, DWORD PTR [EBP+8] add EAX, 100 pop EBP ret 4 _add100@4 endp end
| |
Now, we will explain this source code. A new section, .data , has appeared. It declares the fres variable as public . This means that the variable is accessible from other modules. Since there is no explicit call convention, you can assume the fres variable is processed in accordance with the _cdecl convention. This is why the name of the variable begins with an underscore character.
The commands
lea ESI, _fres fst DWORD PTR [ESI]
write the result stored in the coprocessor s stack to the fres variable. Remember that the assembly module is compiled with the Visual C++ .NET macro assembler as a part of the project.
The source code of the C++ console application is shown in Listing 7.7.
| |
#include <stdio.h> extern "C" void subf2(float f1, float f2); extern "C" int _stdcall add100(int i1); extern "C" float fres; void main(void) { float f1, f2; printf("CUSTOM BUILD WITH COMMON VAR IN ASM MODULE\n\n"); printf("Enter float f1: "); scanf("%f", &f1); printf("Enter float f2: "); scanf("%f", &f2); subf2(f1, f2); printf("f1 f2 = %.2f\n", fres); printf("Rounded +100 = %d\n", add100((int) (fres/10))); getchar(); } | |
Here, the subf2 function is declared as void . When subf2 terminates, the difference between f1 and f2 is written to the fres common variable. In the console application, it is necessary to declare the fres variable as extern and prohibit decorating its name: extern "C" float fres .
The Visual C++ .NET development environment allows you to use external compilers to generate object modules when developing an application. For example, to obtain an object module file from an ASM file, you can use an external assembly compiler. Note that nothing prevents you from using the macro assembler of the development environment. You can edit and compile the source assembly module in the C++ .NET development environment and add the object module to the project manually. We will illustrate this method with an example.
We will develop a console application that calls an assembly function from an object module for processing a character string. Processing the string involves the substitution of spaces with '+' characters . The original and processed strings are displayed in the application window. Name the assembly function conv and save its source code in the ![]() convstr.asm file on, say, disk D. The file location is chosen at will to keep the discussion general.
convstr.asm file on, say, disk D. The file location is chosen at will to keep the discussion general.
The source code of the conv function is shown in Listing 7.8.
| |
; -------convstr.asm------- .686 .model flat, C .code conv proc push EBP mov EBP, ESP mov ESI, DWORD PTR [EBP+8] ;pointer to string mov ECX, DWORD PTR [EBP+i2] ;length of string mov AL, ' ' next: cmp AL, BYTE PTR [ESI] jne next_addr mov BYTE PTR [ESI], '+' next_addr: inc ESI dec ECX jnz next pop EBP ret conv endp end
| |
The conv function takes the string address as the first (from left) argument and the string length as the second argument. When the function is called, both parameters are extracted with the following commands:
mov ESI, DWORD PTR [EBP+8] mov ECX, DWORD PTR [EBP+i2]
Here, the string address is at the address [EBP+8] , and the string length is at [EBP+i2] . Searching for and replacing the spaces are done in the following piece of code:
. . . next: cmp AL, BYTE PTR [ESI] jne next_addr mov BYTE PTR [ESI], '+' next_addr: . . .
Passing the parameters and resetting the stack are done in accordance with the _cdecl convention, so the ret command has no parameters.
The C++ .NET console application has the following source code (Listing 7.9).
| |
// VIRTUAL_ALLOC_AS_SHARE_MEM.cpp : Defines the entry point for the // console application #include "stdafx.h" #include <windows.h> extern "C" void conv(char* p1, int cnt); int _tmain(int argc, _TCHAR* argv[]) { char* p1 = NULL; char* p2 = "This is a test string!!! "; printf(" USING EXTERNAL ASM TOOL IN C++ PROJECT\n\n"); p1 = (char*)VirtualAlloc(NULL, 256, MEM_COMMIT, PAGE_READWRITE); strcpy(p1, p2); printf("Before conversion: %s\n\n", p1); conv(p1, strlen(p1)); printf("After conversion: %s\n", p1); VirtualFree(p1, 0, MEM_RELEASE); getchar(); return 0; } | |
The strcpy function puts a copy of the string being processed to the memory area that is allocated with the virtuaiAlloc WIN API function and addressed with the p1 pointer. After the conv (p1, strlen (p1)) statement is executed, all the found spaces are substituted with '+' characters.
Set the development environment so that the MASM compiler can be used in the project window to obtain an object module. As a compiler, you can select either a stand-alone tool such as ![]() ML.EXE of the MASM 6.14 package or the tool built into the development environment.
ML.EXE of the MASM 6.14 package or the tool built into the development environment.
First, select the External Tools option in the Tools menu item (Fig. 7.10).
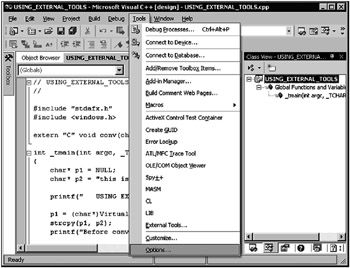
Fig. 7.10: Step 1: Selecting an external tool
Second, make settings in the External Tools window as shown in Fig. 7.11.
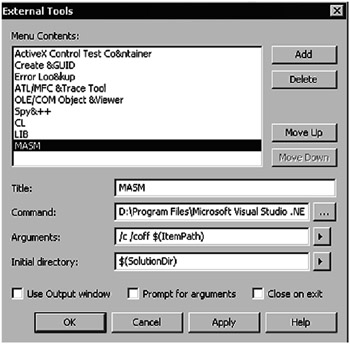
Fig. 7.11: Step 2: Selecting and setting parameters of external tools
Type the compiler name in the Title text box. This is not important, so you can choose the name at will.
In the Command text box, type (or select) the name of the executable file, including the full path . In the Arguments text box, enter the compiler options (in this case, /c /coff ) and the full path to the target file $(itemPath) . Finally, in the Initial directory text box, specify that the target file (an object module) should be put to the $(SolutionDir) project directory.
After you set the MASM compiler as an external tool, you can open the assembly file in the project window. To compile it, it is necessary that the ASM file editing window is active.
Start the compiler with the newly-created MASM option of the Tools menu (Fig. 7.12).
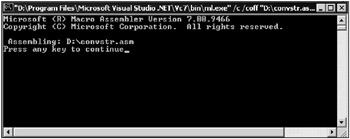
Fig. 7.12: Starting the assembly compiler from the command line
If compiling is successful, a new OBJ file will appear in the project directory. Add it to your project with the Add Existing Item option of th e Projec t menu. Save the project and compile it.
After you run the application, its window will appear as shown in Fig. 7.13.
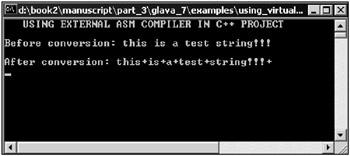
Fig. 7.13: The window of an application that demonstrates string conversion
Selecting and setting an external compiler as a development tool with the External Tools option allows you to use unified compilation parameters for all assembly modules being components of various applications. In this case, you do not have to set compiler options individually for each assembly module.
However, this method has one disadvantage . It is pointless to add an assembly file to a project; it should be first compiled to an object module and only then added to the project.
If a C++ .NET project contains several object files, which contain several assembly functions, debugging the application becomes much more complicated. In addition, in most cases you might want to use the same modules in other applications. It would be convenient if you could combine such object modules in a library file and use it in your applications. For this purpose, use the LIB.EXE utility of the Visual C++ .NET package. In general, its syntax is
LIB.EXE [options] file1 file2 where file1 , file2 , etc. are object files.
With the LIB.EXE utility, you can fulfil the following tasks :
-
Add object files to a library. In this case you should specify the name of an existing library and the names of the modules being added.
-
Replace an object file in a library.
-
Delete an object file from a library.
The LIB.EXE utility creates a library module file with the LIB extension. A LIB file can be added to any project. We will illustrate the use of the LIB.EXE utility with an example. Modify the previous project so that all lowercase letters 't' are substituted with uppercase letters 'T' with the convt function, and all lowercase letters 's' are substituted with uppercase letters 'S' with the convs function. Both functions are written in the assembler, and saved in the files ![]() convt.asm and
convt.asm and ![]() convs.asm .
convs.asm .
The source code of the ![]() convs.asm function is shown in Listing 7.10.
convs.asm function is shown in Listing 7.10.
| |
;------------- convs.asm-------- .686 .model flat, C .code convs proc push EBP mov EBP, ESP mov ESI, DWORD PTR [EBP+8] ; pointer to string mov ECX, DWORD PTR [EBP+i2] ; length of string mov AL, 's' next: cmp AL, BYTE PTR [ESI] jne next_addr mov BYTE PTR [ESI], 'S' next_addr: inc ESI dec ECX jnz next pop EBP ret convs endp end
| |
The convt function is almost identical to the convs function except the characters being substituted. Modify the C++ console application for these functions as shown in Listing 7.11.
| |
// VIRTUAL_ALLOC_AS_SHARE_MEM.cpp : Defines the entry point for the // console application #include "stdafx.h" #include <windows.h> extern "C" void convs(char* p1, int cnt); extern "C" void convt(char* p1, int cnt); int _tmain(int argc, _TCHAR* argv[]) { char* p1 = NULL; char* p2 = "This is a test string!!! "; printf(" USING ASM LIB IN C++ PROJECT\n\n"); p1 = (char*)VirtualAlloc(NULL, 256, MEM_COMMIT, PAGE_READWRITE); strcpy(p1, p2); printf("Before conversion: %s\n\n", p1); convt(p1, strlen(p1)); printf("After conversion t->T: %s\n", p1); convs(p1, strlen(p1)); printf("After conversion s->S: %s\n", p1); VirtualFree(p1, 0, MEM_RELEASE); getchar(); return 0; } | |
When finally building the application, one library file, ![]() conv.lib , will be used rather than module files
conv.lib , will be used rather than module files ![]() convs.obj and
convs.obj and ![]() convt.obj . To generate
convt.obj . To generate ![]() conv.lib , adhere to the following procedure:
conv.lib , adhere to the following procedure:
-
Obtain object module files with the ML compiler of the MASM 6.14 macro assembler. For this purpose, execute the following commands from the command line:
ML /c /coff convs.asm ML /c /coff convt.asm
-
Combine the obtained object files into one library file
 conv.lib with the LIB.EXE utility:
 LIB /OUT:conv.lib convs.obj convt.obj
-
Add the library file to the project, compile the project, and run it.
The window of the application is shown in Fig. 7.14.
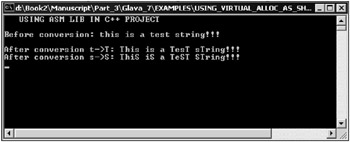
Fig. 7.14: Window of an application that demonstrates the use of a library module
The main advantage of library modules is that they can contain object modules compiled both from ASM and CPP files. This allows you to create very powerful libraries. The next example demonstrates how two arithmetic functions can be combined in one library module and used in an application.
The first function, add2 , is written in C++. It adds two integers, and its source code is saved in the ![]() add2.cpp file. The other (we will name it sub2 ) is written in the assembler. It subtracts an integer from another, and its source code is saved in the
add2.cpp file. The other (we will name it sub2 ) is written in the assembler. It subtracts an integer from another, and its source code is saved in the ![]() sub2.asm file. Both functions return the results in integer variables.
sub2.asm file. Both functions return the results in integer variables.
The source code of the add2 function is shown in Listing 7.12.
| |
extern "C" int add2(int i1, int i2) { return (i1+i2); } | |
Note the declaration of the add2 function. In order for other modules to be able to access it, the extern directive must be used.
The source code of the sub2 function is shown in Listing 7.13.
| |
; --------- sub2.asm ------- .686 .model flat, C .code sub2 proc push EBP mov EBP, ESP mov EAX, DWORD PTR [EBP+8] ; i1 sub EAX, DWORD PTR [EBP+12] ; i1-i2 pop EBP ret sub2 endp end
| |
To create a library file, it is necessary to obtain object modules from the files ![]() add2.cpp and
add2.cpp and ![]() sub2.asm first. To compile the assembly file, use the ML compiler of the MASM macro assembler from the C++ .NET 2003 environment:
sub2.asm first. To compile the assembly file, use the ML compiler of the MASM macro assembler from the C++ .NET 2003 environment:
ML /c /coff sub2.asm
If the compilation completes without errors, you will obtain the ![]() sub2.obj file.
sub2.obj file.
To compile the ![]() add2.cpp file, use the standard C++ .NET compiler:
add2.cpp file, use the standard C++ .NET compiler:
CL /c add2.cpp
Both object modules, ![]() add2.obj and
add2.obj and ![]() sub2.obj , can be combined in one static library file
sub2.obj , can be combined in one static library file ![]() addsub.lib with the following command:
addsub.lib with the following command:
LIB /OUT:addsub.lib add2.obj sub2.obj
You can use the obtained library in a console application whose source code is shown in Listing 7.14.
| |
// C_n_ASM_LIB.cpp : Defines the entry point for the console application #include "stdafx.h" extern "C" int add2(int i1, int i2); extern "C" int sub2(int i1, int i2); int _tmain(int argc, _TCHAR* argv[]) { int i1, i2; printf(" USING ASM & C OBJ MODULES IN LIB-FILE\n\n"); printf("Enter integer i1: "); scanf("%d", &i1); printf("Enter integer i2: "); scanf("%d", &i2); printf("\nResult of ADD2 call: %d\n", add2(i1, i2)); printf("\nResult of SUB2 call: %d\n", sub2(11, i2)); getchar(); return 0; } | |
Since the functions add2 and sub2 are in a separate module, they must be declared as external:
extern "C" int add2(int i1, int i2); extern "C" int sub2(int i1, int i2);
The window of the application is shown in Fig. 7.15.
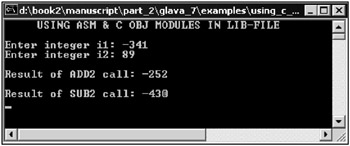
Fig. 7.15: Window of an application that demonstrates the work of the library functions add2 and sub2
It is possible to use several standard libraries in your application. The next example is a C++.NET console application with two added libraries, liblasm.lib and ![]() lib2asm.lib . The liblasm library contains two interrelated functions signmul and sub20 , and the lib2asm library contains the signdiv function.
lib2asm.lib . The liblasm library contains two interrelated functions signmul and sub20 , and the lib2asm library contains the signdiv function.
The source code of the functions in the liblasm library is shown in Listing 7.15.
| |
.686 .model flat, C .code signmul proc push EBP mov EBP, ESP mov EAX, DWORD PTR [EBP+8] mov ECX, DWORD PTR [EBP+i2] imul ECX call sub20 pop EBP ret signmul endp sub20 proc sub EAX, 20 ret sub20 endp end
| |
The signmul function multiplies two signed integers. The result is decreased by 20 with the sub20 function. A distinct feature of this library is that an auxiliary function sub20 need not be declared in the main application.
The ![]() lib2asm.lib library contains one function signdiv that returns the address of the quotient of two signed integers. The source code of the signdiv assembly function is shown in Listing 7.16.
lib2asm.lib library contains one function signdiv that returns the address of the quotient of two signed integers. The source code of the signdiv assembly function is shown in Listing 7.16.
| |
.686 .model flat, C .data fres DD 0 .code signdiv proc push EBP mov EBP, ESP finit fild DWORD PTR [EBP+8] fidiv DWORD PTR [EBP+i2] fistp DWORD PTR fres fwait mov EAX, offset fres pop EBP ret signdiv endp end
| |
For the division operation, mathematical coprocessor commands are used. The result of division is stored in the fres variable with the command:
fistp DWORD PTR fres
The address of the variable is returned to the main command in the EAX register with the command:
mov EAX, offset fres
The source code of the functions is saved in the liblasm.asm and ![]() lib2asm.asm files. The object modules liblasm.obj and
lib2asm.asm files. The object modules liblasm.obj and ![]() lib2asm.obj are generated with the following commands:
lib2asm.obj are generated with the following commands:
ML /c /coff liblasm.asm ML /c /coff lib2asm.asm
The static library files can be obtained easily with the LIB.EXE utility:
LIB /OUTrliblasm.lib liblasm.obj LIB /OUT:lib2asm.lib lib2asm.obj
Develop an application that uses these library files. The source code of such an application is shown in Listing 7.17.
| |
// LIB1_PLUS_LIB2.cpp : Defines the entry point for the console // application #include "stdafx.h" extern "C" int signmul(int i1, int i2); extern "C" int* signdiv(int i1, int i2); int _tmain(int argc, _TCHAR* argv[]) { int i1, i2; printf("USING SOME STANDARD LIBRARIES EXAMPLE\n\n"); printf("Enter integer i1:"); scanf("%d", &i1); printf("Enter integer i2:"); scanf("%d", &i2); printf("MUL(i1, i2) 20 = %d\n", signmul(i1,i2)); printf("DIV(i1, i2)= %d\n", *signdiv(il,i2)); getchar(); return 0; } | |
Add both files to this application s project, save, and recompile the project. The window of the application is shown in Fig. 7.16.
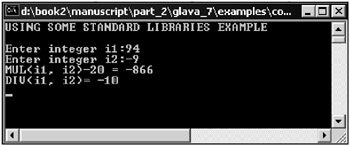
Fig. 7.16: Window of an application that uses two library files
Now, we will focus on the use of assembly functions in the dynamic link libraries (DLLs). Since theoretical issues of building DLLs are described in special literature, we will not concentrate on them here. Using assembly functions in these libraries makes it possible to improve the quality of the code, but linking an assembly module and a DLL needs a detailed explanation. We will illustrate the main points of this process with a practical example.
Suppose a console application uses the same functions as in the previous example: sub2 and add2 . In addition, both functions are called from a dynamic link library (named ![]() DLL_n_ASM.dll ). Develop a variant of a solution consisting of two projects. One of the projects should be a DLL, and the other should be a console application that uses functions of this library.
DLL_n_ASM.dll ). Develop a variant of a solution consisting of two projects. One of the projects should be a DLL, and the other should be a console application that uses functions of this library.
Develop the DLL with the C++ .NET Application Wizard. Choose a Windows console application as a template and select DLL in the Application Settings properties. Modify the source code of the CPP library file as shown in Listing 7.18 (the changes are in bold).
| |
// DLL_n_ASM.cpp : Defines the entry point for the DLL application #include "stdafx.h" extern "C" int sub2(int i1, int i2); BOOL APIENTRY DllMain(HANDLE hModule, DWORD ul_reason_for_call, LPVOID lpReserved)) { return TRUE; } extern "C" __declspec(dllexport) int add2(int i1, int i2) { return (i1+i2); } extern "C" __declspec(dllexport) int subdll2(int i1, int i2) { return (sub2(i1, i2)); } | |
This DLL contains two functions. One of them, subdll2 , uses the sub2 assembly function as auxiliary. The source code of the sub2 function is shown in Listing 7.19.
| |
;----------------sub2.asm-------------- .686 .model flat, C public sub2 .code sub2 proc push EBP mov EBP, ESP mov EAX, DWORD PTR [EBP+8] ; i1 sub EAX, DWORD PTR [EBP+12] ; i2 pop EBP ret sub2 endp end
| |
Add the ![]() sub2.asm assembly file with the sub2 function to the DLL project and set the compiler options for this file with the Properties option. Save the project and compile it. If no errors are detected , you will obtain the
sub2.asm assembly file with the sub2 function to the DLL project and set the compiler options for this file with the Properties option. Save the project and compile it. If no errors are detected , you will obtain the ![]() DLL_n_ASM.dll dynamic link library with two export functions add2 and subdll2 and the
DLL_n_ASM.dll dynamic link library with two export functions add2 and subdll2 and the ![]() DLL_n_ASM.lib import library.
DLL_n_ASM.lib import library.
To demonstrate the use of the DLL, develop a console application project related to this library. The source code of this application is shown in Listing 7.20.
| |
// USE_DLL.cpp : Defines the entry point for the console application #include "stdafx.h" extern "C" __declspec(dllimport) int add2(int i1, int i2); extern "C" __declspec(dllimport) int subdll2(int i1, int i2); int _tmain(int argc, _TCHAR* argv[]) { int i1, i2; printf("USING ASM FUNC IN DLL\n\n"); printf("Enter i1:"); scanf("%d", &i1); printf("Enter i2:"); scanf("%d", &i2); printf("\nResult of ADD2call: %d\n", add2(i1, i2)); printf("\nResult of ASM func SUB2call: %d\n", subdll2(i1, i2)); getchar(); return 0; } | |
Use static linking of the DLL to the main application. For this purpose, add the ![]() DLL_n_ASM.lib import library to the console application project and copy the
DLL_n_ASM.lib import library to the console application project and copy the ![]() DLL_n_ASM.dll file to the Windows system directory.
DLL_n_ASM.dll file to the Windows system directory.
The window with both projects will appear as shown in Fig. 7.17.
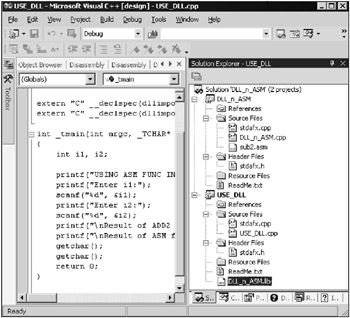
Fig. 7.17: Project window
One more note: Functions called from a DLL should be declared as imported:
extern "C" __declspec(dllimport) int add2(int i1, int i2) extern "C" __declspec(dllimport) int subdll2(int i1, int i2)
You can compile the projects USE_DLL and DLL_n_ASM either individually or together if you select the Rebuild Solution option in the Build menu item. The window of the application is shown in Fig. 7.18.
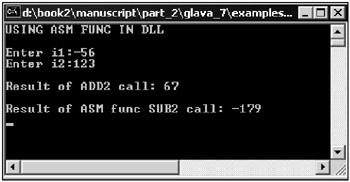
Fig. 7.18: Window of an application that demonstrates a call to an assembly function
Using assembly functions in dynamic link libraries will be more convenient if the object modules are combined in a standard library file. Suppose you want to find the maximum of two floating-point numbers with the max function and the minimum of them with the min function. The source code of these functions is in the minmax.asm file, and it is shown in Listing 7.21.
| |
.686 .model flat, C .code fmax proc push EBP mov EBP, ESP finit fld DWORD PTR [EBP+8] fcomp DWORD PTR [EBP+12] fstsw AX sahf jb set_op fld DWORD PTR [EBP+8] jmp com set_op: fld DWORD PTR [EBP+12] com: fwait pop EBP ret fmax endp fmin proc push EBP mov EBP, ESP finit fld DWORD PTR [EBP+8] fcomp DWORD PTR [EBP+12] fstsw AX sahf jb set_op fld DWORD PTR [EBP+12] jmp com set_op: fld DWORD PTR [EBP+8] com: fwait pop EBP ret fmin endp end
| |
We will not dissect the source code of these functions because you encountered similar examples earlier. Put the object code of these functions to the ![]() minimax.lib library. To do this, execute the following commands:
minimax.lib library. To do this, execute the following commands:
ML /c /coff minimax.asm LIB /OUT:minimax.lib minimax.obj
Create a solution consisting of two projects. The first project should be a dynamic link library (name it ![]() USING_IMPDLL_STANDARD.dll ). Modify the source code of the library template generated by the Application Wizard as shown in Listing 7.22.
USING_IMPDLL_STANDARD.dll ). Modify the source code of the library template generated by the Application Wizard as shown in Listing 7.22.
| |
// USING_IMPDLL_STANDARD.cpp : Defines the entry point for the DLL // application #include "stdafx.h" extern "C" float fmax(float f1, float f2); extern "C" float fmin(float f1, float f2); BOOL APIENTRY DllMain(HANDLE hModule, DWORD ul_reason_for_call, LPVOID lpReserved } { return TRUE; } extern "C" float __declspec(dllexport) sub2f(float f1, float f2) { return(fmax(f1,f2) min(f1, f2)); } | |
For everything to work well, the ![]() minimax.lib standard library should be among the project files. The references to this library s functions are defined as follows:
minimax.lib standard library should be among the project files. The references to this library s functions are defined as follows:
extern "C" float fmax(float f1, float f2) extern "C" float fmin(float f1, float f2)
In addition, the sub2f function should be declared as external with the dllexport attribute. After you compile the project, you will obtain a DLL and an import library. Link the DLL project to another project that will demonstrate the use of the ![]() minimax.lib standard library and the DLL. The source code of this application is shown in Listing 7.23.
minimax.lib standard library and the DLL. The source code of this application is shown in Listing 7.23.
| |
// USE_MINIMAX_LIB_IN_DLL.cpp : Defines the entry point for the console // application #include "stdafx.h" extern "C" __declspec(dllimport) float sub2f(float f1, float f2); extern "C" float fmax(float f1, float f2); extern "C" float fmin(float f1, float f2); int _tmain(int argc, _TCHAR* argv[]) { float f1, f2; printf(" USING DLL WITH STANDARD LIB DEMO\n\n"); printf("Enter float f1:"); scanf("%f", &f1); printf("Enter float f2:"); scanf("%f", &f2); printf("\nMAX = %.2f\n", fmax(f1, f2)); printf("\nMIN %.2f\n", fmin(f1, f2)); printf("\nMAX-MIN= %.2f\n", sub2f(f1, f2)); getchar(); return 0; } | |
Since this application uses the fmin and fmax functions defined in another module, you should add the ![]() minimax.lib library to the application.
minimax.lib library to the application.
The window of the application is shown in Fig. 7.19.
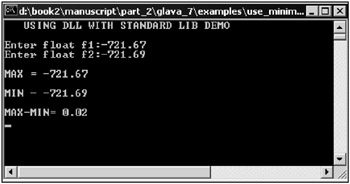
Fig. 7.19: Window of an application that demonstrates the use of a standard library and DLL
Now, we will consider another example, in which a separately compiled assembly module is used as a component of a DLL. Suppose a DLL (named ![]() COMMON_DLL.dll ) contains the absfdll function that computes the absolute value of a floating-point number. In turn, absfdll uses the absf assembly function.
COMMON_DLL.dll ) contains the absfdll function that computes the absolute value of a floating-point number. In turn, absfdll uses the absf assembly function.
The computed absolute value is displayed with a C++ console application. To call the absf function from the DLL, the main application uses dynamic loading and a call to the LoadLibrary and GetProcAddress WIN API functions.
Now, we will examine the example more closely, beginning with the ![]() COMMON_DLL.dll dynamic link library. Its source code is shown in Listing 7.24.
COMMON_DLL.dll dynamic link library. Its source code is shown in Listing 7.24.
| |
// COMMON_DLL.cpp : Defines the entry point for the DLL application #include "stdafx.h" extern "C" float absf(float f1); BOOL APIENTRY DllMain(HANDLE hModule, DWORD ul_reason_for_call, LPVOID lpReserved) { return TRUE; } extern "C" __declspec(dllexport) float absfdll(float f1) { return (absf(f1)); } | |
Since the absf assembly function is located in another module, it should be declared with the extern directive. The absfdll function exported from the DLL uses absf in the return statement. Note that such a variant of calling an assembly function (with the return statement) allows you to use the assembler for work with C++ .NET manageable code, which generally is very difficult to do.
The source code of the absf assembly function is simple. It is shown in Listing 7.25.
| |
;---------------absf.asm------------ .686 .model flat, C .code absf proc push EBP mov EBP, ESP finit fld DWORD PTR [EBP+8] fabs fwait pop EBP ret absf endp end
| |
As mentioned earlier, the main application uses dynamic loading to load the absf function from the library, and it does not require declaration of the imported DLL functions with the extern directive. Also, unlike the previous example, you do not have to add the import library file to the main application project. The source code of the C++ .NET console application is shown in Listing 7.26.
| |
// This is the main project file for VC++ application project // generated using an Application Wizard. #include "stdafx.h" #include <windows.h> int _tmain() { // TODO: Please replace the sample code below with your own. typedef FLOAT (*myfunc) (FLOAT); myfunc absfdll; printf(" USE EXTERNAL OBJ IN DLL (DYNAMIC LOADING)\n\n"); HINSTANCE hLib = LoadLibrary("COMMON_DLL"); if (hLib == NULL) { printf ("Unable to load library\n"); getchar(); exit (1); } absfdll = (myfunc)GetProcAddress(hLib, "absfdll"); if (!absfdll) { printf("Unable to load functions!\n"); FreeLibrary(hLib); getchar(); exit (1); } float f1 = 731.19; printf("ABS of float f1 (%.3f) = %.3f", f1, absfdll(f1)); FreeLibrary(hLib); getchar(); return 0; } | |
The first thing you should do is to define a pointer to the function and to create an instance of this pointer to the function you are using:
typedef FLOAT (*myfunc) (FLOAT); myfunc absfdll;
The absfdll function takes a FLOAT value as a parameter and returns also a FLOAT value, which is reflected in the definition of the pointer to the myfunc function.
If the LoadLibrary function completes successfully, the obtained descriptor of the loaded library module is used to get the address of the absfdll function:
absfdll = (myfunc)GetProcAddress(hLib, "absfdll")
After you finish the work with the DLL, you should tell the Windows operating system that the application does not need the DLL any longer. In this case, Windows will decrement the value of the DLL use counter.
The window of the application is shown in Fig. 7.20.
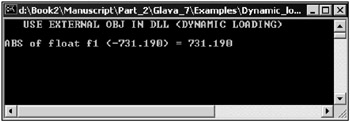
Fig. 7.20: Window of an application that demonstrates the use of an assembly function when dynamically loading a library
Now, we will summarize the use of separately compiled assembly modules in C++ .NET 2003 applications. They can be compiled with either the stand-alone MASM compiler or the macro assembler built in the Visual C++ .NET development environment. During compilation, a standard object module file with the COFF or OMF format is generated. Further linking the application and object modules is defined by the developer and the features of the application.
Here, we described the MASM macro assembler and its features. However, any other compiler that generates an object file with the COFF format can be used for generating object files. Hopefully, the material and examples in this chapter will be helpful when implementing your tasks.
EAN: 2147483647
Pages: 50
- ERP Systems Impact on Organizations
- ERP System Acquisition: A Process Model and Results From an Austrian Survey
- The Effects of an Enterprise Resource Planning System (ERP) Implementation on Job Characteristics – A Study using the Hackman and Oldham Job Characteristics Model
- Healthcare Information: From Administrative to Practice Databases
- Relevance and Micro-Relevance for the Professional as Determinants of IT-Diffusion and IT-Use in Healthcare