Hack34.Connect to the Internet
Hack 34. Connect to the Internet
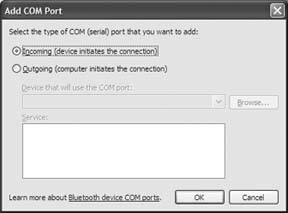
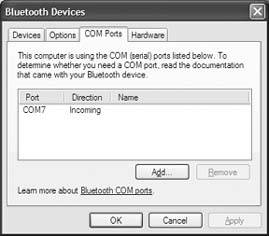
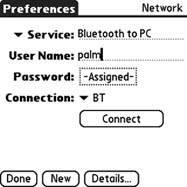
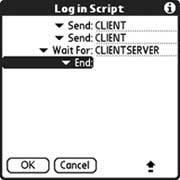
Just because you aren't at your desktop machine, it doesn't mean you have to be disconnected. Depending on your PDA, you have several different choices for getting on the Internet. All Palm devices can connect to the Internet via modem or serial cable and most can connect via infrared (IR). Bluetooth-equipped Palm devices can connect via Bluetooth. Other options for connecting to the Internet include Wi-Fi (802.11b) and using your cellular data service on a smartphone. 6.2.1. ModemYou can purchase a regular modem for most Palm devices that connects to a standard phone line. For older devices, you might need to lookon eBay (http://www.ebay.com) or at a computer swap meet to find a modem. Configuring your Palm device to use a modem is easy. Go to the Preferences application and select the Networkcategory. Select your service and enter your username and password. Select Standard Modem in the Connection list. Enter the phone number for your ISP. The Details button brings up a dialog box that lets you select additional optionsconnection type (defaults to PPP, but you can choose SLIP or CSLIP if necessary), an idle timeout that will hang up after a specified period of inactivity, whether or not to do DNS queries automatically, and whether to use a static IP address or a dynamic address. The dialog box also provides the ability to write a simple script. You can use this to automate certain tasks. Set additional parameters for a modem by selecting Edit Connections from the connection list. Select a connection from the dialog box, and then press the Edit button. Then you will be able to modify settings such as what you are connecting to (PC, modem, or LAN) and whether you are connecting via cable or IR. Also, you can choose between TouchTone and rotary dialing, and set the volume for dialing and connecting. If you select Details, you can set the speed of the connection, the type of flow control, and any initialization string. 6.2.2. Serial Cable or CradleSetting up a connection via a serial cable or cradle is similar to setting up a modem, except that you don't have to enter a phone number, username, or password. Choose Cradle / Cable from the Connection list. Note that you need to be running a PPP stackon your desktop machine to connect via cable. For Windows machines, you can get a PPP stackcalled SoftickPPP (http://www.softick.com/ppp/). This stacksupports USB, Serial, Infrared, and Bluetooth connections. Configuring SoftickPPP is fairly simple, as you can see in Figure 6-1. The one tricky setting depends on what kind of device you have. For Sony Cliés (and some other devicescheckthe Softickweb site for more details), you will need to set the PPP stackto operate in exclusive mode. This means that you can't HotSync while connecting to the Internet. Most devices can do this, but for the ones that can't, you need to select Use USB in exclusive mode from the USB tab in PPP, as you can see in Figure 6-2. You will need to enable SoftickPPP explicitly when you want to connect to the Internet and disable it when you want to HotSync. Figure 6-1. Setting up Softick PPP on Windows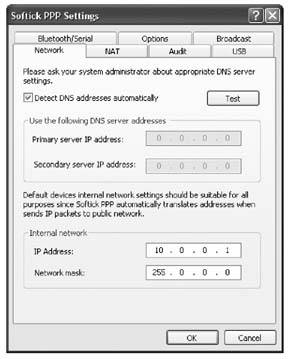 Figure 6-2. Setting Softick PPP to use exclusive mode on the USB port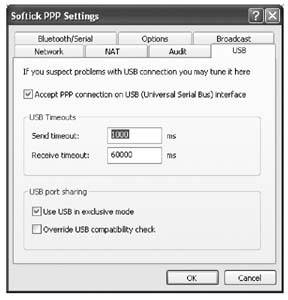 Another choice for connecting with a cable is to buy a cable to connect your Palm device to a cell phone. You can find cables online at various sites such as http://www.thesupplynet.com. Your cell phone must be set up with data access through your wireless service provider. A cell phone can act as a modem (follow the modem instructions) or as a direct networkaccess point. You will need to check your wireless service plan for details. You can also edit the connection (as with a modem) to select what you are connecting to. 6.2.3. Infrared (IR)You can use an infrared connection to a desktop computer or to a cell phone. For a desktop computer, the setup is similar to setting up a connection through a serial cable, except that you will choose IR or IR to a PC/ Handheld from the Connection list. Connecting to a phone depends on whether the phone acts as a modem or as a direct networkaccess point. Checkyour service plan for details. Select the appropriate connection type IR to a GSM Phone, if that is applicable, otherwise choose IR or IR to a PC/ Handheld. If you are using the phone as a modem, then follow the modem instructions. 6.2.4. BluetoothYou can connect to the Internet via Bluetooth, if your Palm device has it installed. If your Palm device doesn't have Bluetooth built-in, you may be able to buy an adapter [Hack #53], depending on which device you have. You need a Bluetooth-enabled access point to get on the Internet. That can be an access point, a cell phone, or your desktop computer. Bluetooth LAN access point. If you are connecting through a LAN Access Point (either your office or some other business like a coffee shop), then you will need to get the networkinformation from them. If you are in a public place that has Bluetooth access, this information is usually posted somewhere convenient. If you are connecting to an access point, select Trusted Devices and Add Device. Your Palm device will then search for Bluetooth access points. You may have to search more than once to find the network you are looking for. When the networkis found, tap on it and hit OK. You need to enter in a passkeythis is something that you set up when you were configuring your desktop, or it should be available from the provider of the access point. Cell phone. You will need to find out from your cell phone service provider whether or not you have data service set up on your cell phone, and if so, how should you access it. Some cell phones can be used as modems [Hack #31]. Your wireless plan also needs to support this. Other plans will let you use your cell phone as a direct networkaccess point. You need to make sure that your wireless plan allows you to connect other devices to your phone. This is usually called tethering. If your phone and plan support it, then you can connect your Palm device to your phone. From the Bluetooth Preferences, select Setup Device. You will also probably want to set your Palm device to not be discoverable, unless you want people trying to connect to your Palm device. From the Setup Devices form, select Phone Setup and then Phone Connection. Make sure your cell phone is set to be discoverable, select your phone model, and type in a passkey to pair the devices (as with a desktop connection). You will have to type the same passkey into your cell phone when prompted. After you have paired the phone and your Palm device, your Palm device will askyou if you want to set up your device to connect to the Internet. Answer yes, and then follow the remaining prompts. When you are finished, go to Bluetooth Preferences and tap the Connect button to finally make the connection. At this point, you should be able to access the Internet. Use a Windows XP computer as an access point. If you are connecting through your desktop machine, you will also need a Bluetooth adapter on your desktop. Make sure that your drivers are up-to-date. Start by making sure that Bluetooth is set up and working on both the PC and Palm. Then, create a COM port for the Bluetooth connection.
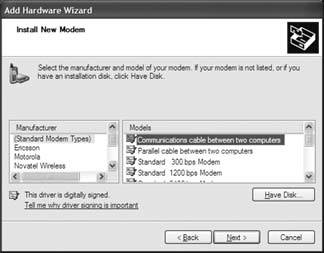
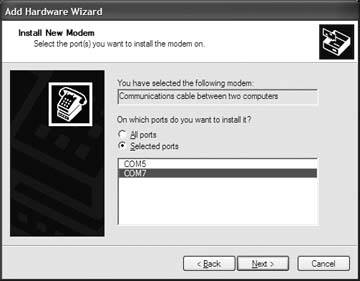
Now you need to create a modem that lives on this COM port.
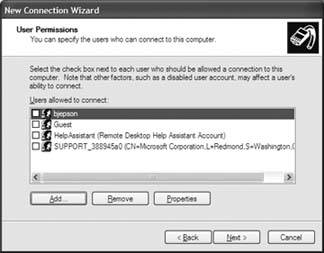
Now you need to create the incoming PPP connection.
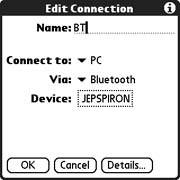
Once the other side is set up and you have the connection information, you need to enable Bluetooth on your Palm device:
Next, you need to create the Network connection.
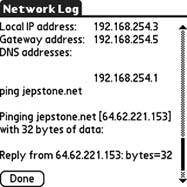
Troubleshooting. I hate to say it, but when I had problems connecting to my Windows XP box, the only solution that worked was to reboot the Windows machine. Also, while you are connecting, you can press down on your Palm's five-way navigation pad. This will show you what the Palm is sending over the network, so you can get an idea of whether the Palm is even talking to anything. 6.2.5. Wi-Fi (802.11b)Getting set up for Wi-Fi depends on whether 802.11b is built in (e.g., the Tungsten C) or whether 802.11b access is coming from an add-on card. Setting up internal Wi-Fi. To get started with built-in Wi-Fi, select Wi-Fi Setup from the Palm Launcher. Tap Next and your Palm device will search for all available networks. If the application finds the network you want to connect to, then you are setjust tap the network name to continue. If the networkyou were looking for was not found, then you need to tap the Other button. You will need to enter the networkname (SSID) in the corresponding field. Finally, tap OK and Done, unless you want to set up a VPN first. You can also configure WEP encryption. This will help make your connection more secure, but it is not guaranteed to be completely secure. When you enter the networkname under Other, you have an option to turn on WEP encryption. You can also select this option by editing the networkconnection. If you checkthe WEP Encryption box, then you can set an encryption key. Tapping on the encryption key control brings up a dialog box with options for choosing a key type, specifying up to four keys, and also a key index that specifies which of the four keys to use. Set these as appropriate to match the network. The dialog box also has a text field for entering in your WEP keys. Tap OK when finished. After the basic networkhas been set up, you can configure the standard Internet settings. Launch the Preferences application and select Wi-Fi. Select Edit Networks from the Network list and then choose the network you want to edit. Tap Details, then Advancedit seems like all the interesting stuff is always hidden behind an Advanced button. The Advanced button brings up a dialog box that lets you choose between a static and dynamic IP address (and lets you configure the subnet maskand router for a dynamic address). You can also choose to use the default DNS server or to use a DNS server at a specific IP address. Setting up a Wi-Fi card. Launch the Preferences application and select the Wi-Fi category. Select On in the list. The Wi-Fi card will automatically search for available networks. The Wi-Fi card will try to connect to the first networkit finds. If you want to connect to a different network, then you need to tap on the Networklist. If the networkyou want to connect to appears in the list, then go ahead and select it. If the networkdoes not appear in the list, you will need to set it up manually. Launch the Wi-Fi Setup application. Tap Next, and then tap Other to bring up a dialog box for creating a new Wi-Fi network. Enter the network name (SSID), and select WEP encryption if desired. If you select WEP encryption, then you will need to tap on WEP Key to set up the encryption keys. To change the IP or DNS settings, bring up the Wi-Fi Setup application and select the networkto edit. Press the Details button, then press Advanced in the next dialog box, and you will be able to choose between a static or dynamic IP address. You can also select whether to automatically choose a DNS server or to use specified primary and secondary DNS servers. 6.2.6. SmartphoneTo start with, you may need to activate a Subscriber Identity Module (SIM) card in your smartphone (the provider who sold you your phone should have done this, but in some cases you will need to call the carrier to activate it). If you have a CDMA device (Verizon and Sprint), then you won't have a SIM card. Your phone (or SIM card) should have been activated when you signed up for wireless service. If not, you will need to contact your service provider to activate it. To support an Internet session, your wireless plan must be set up for data services. A few sample plans are listed in Table 6-1. That's all you need to do to get set up. You should be able to access the Web [Hack #37] and check email [Hack #35].
|

EAN: 2147483647
Pages: 115