20.4. Adding Objects to a SQL Server Database The nicest thing about the SQL Server support in Access is that it lets you work inside the familiar Access window, even though you're dealing with a very different database engine. However, you pay a price for this convenience. As you'll see in the following sections, creating database objects for SQL Server isn't quite as intuitive as creating them for Access. 20.4.1. Creating a Table You can create a table in any Access project (.adp file), whether it's a new database you created from scratch or an existing one that you're working with. Either way, the process is the same. First, choose Create  Tables Table Design. You cant create a SQL Server table in Datasheet view. Instead, you always need to start in Design view. You can also edit an existing table in Design view in the normal way. Just right-click it, and then choose Design View. Tables Table Design. You cant create a SQL Server table in Datasheet view. Instead, you always need to start in Design view. You can also edit an existing table in Design view in the normal way. Just right-click it, and then choose Design View. When the Design view appears, you'll notice that it looks a bit different than the Design view for ordinary Access tables. Fortunately, it still works essentially the same way. You add a list of fields from top to bottom, and configure the name , data type, and size of each one. (SQL Server calls them columns instead of fields, but there's really no difference.) Each field has five columns of information (Figure 20-10) for you to fill out: -
Column Name . This column identifies the field (just as it does in a normal Access table). To avoid headaches , don't use spaces or special characters . -
Data Type . This column indicates what type of information the field can store (just as it does in a normal Access table). However, the set of field types that SQL Server provides is different from the set that Access usesmore on that issue in Section 20.4.1.1. -
Length . This column corresponds roughly to the Field Size property in Access (Section 2.3.1.1). For a text-based data type, the length is the number of allowed characters. But for most data types, the field size is for information only; it shows the number of bytes of space that the field uses, but it can't be modified. -
Allow Nulls . This column corresponds to the Required field property in Access (Section 4.1.1). If a checkmark is in this column, you're telling SQL Server that blank values are acceptable, which means the database user can leave this field empty. -
Description . This column gets a plain-English description of your field. Fill it in, or notit's up to you. When designing a SQL Server table, you also need to specify the primary key (Section 2.4). Usually, you'll use a field that stores an automatically generated ID number. To designate a field as a primary key, click to select the field, and then choose Table Tools Design Tools Primary Key. Youll see a key icon appear at the far left of the row. When you're done working with your table, close it. Access prompts you to save the table and pick a name. Then you can start entering data in the familiar Access datasheet, which hasn't changed a bit. 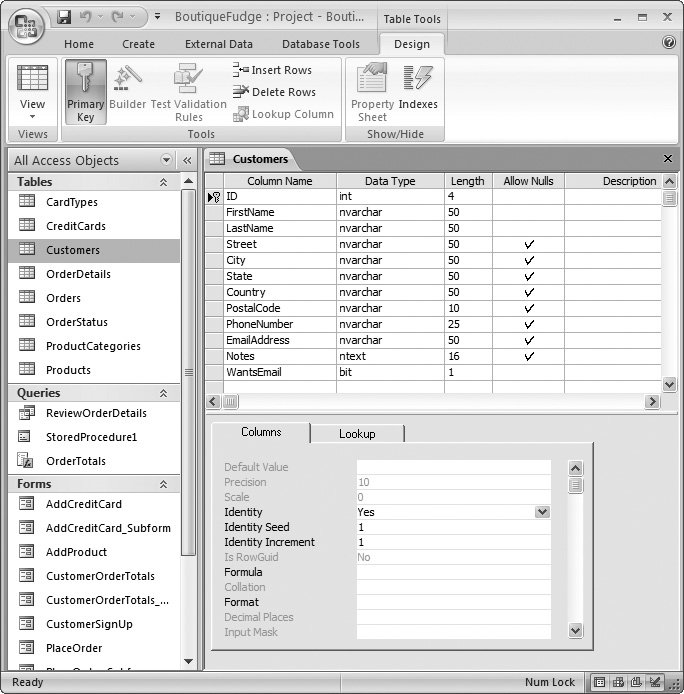 | Figure 20-10. This example shows the Design view for the familiar Customers table from the BoutiqueFudge database, SQL Server style. | |
Note: You'll probably notice that Access projects are slower than ordinary Access database files. That's because Access needs to communicate with SQL Server behind the scenes, asking it to create tables, perform data operations, and so on.
20.4.1.1. SQL Server data types It would be nice if SQL Server and Access used exactly the same set of data types. However, these applications come from different backgrounds and sometimes their differences show. Fortunately, there's a close mapping between most data types. That means most Access data types have a corresponding SQL Server data type that matches pretty closely. (And when you upsize a database, Access is usually able to pick a good match.) Table 20-1 shows the SQL Server data types that you get for various Access data types.
Note: SQL Server has still more data types that aren't shown in this table and don't map directly to Access data types. However, the data types shown here are by far the most common.
Table 20-1. SQL Server and Access Data Types Compared | Access Data Type | SQL Server Equivalent | | Text | nvarchar (which can hold up to 4,000 characters, unlike the Access Text data type, which tops out at 255 characters) | | Memo | ntext | | Number (with a Field Size of Integer) | smallint | | Number (with a Field Size of Long Integer) | int | | Number (with a Field Size of Single) | real | | Number (with a Field Size of Double) | float | | Number (with a Field Size of Decimal) | decimal | | Number (with a Field Size of Byte) | tinyint | | Number (with a Field Size of ReplicationID) | uniqueidentifier | | Date/Time | datetime | | Currency | money | | AutoNumber | int (with Identity set to Yes) | | Yes/No | bit | | Hyperlink | nvarchar | | Attachment | nvarchar (but only the file name is kept) |
20.4.1.2. AutoNumber fields You may have noticed that SQL Server doesn't have an AutoNumber data type. But don't let that fool you into thinking that there's no way to get this insanely useful feature (Section 2.3.9) in SQL Server. You just need to set it up a bit differently: -
When creating an ID field, give it the int data type . -
In the Columns tab underneath the field list, set Identity to Yes . An identity value is the SQL Server name for an AutoNumber field. It's a value that SQL Server assigns for you automatically, and is guaranteed to always be unique. -
You can also set the Identity Seed and Identity Increment properties : -
Identity Seed is the starting value. This property is a sorely missed feature in Access, which always starts its AutoNumber values at 1. (You may remember the complex workaround in Section 8.3.2.) -
Identity Increment is the amount SQL Server increases in between values. For example, if the Identity Increment is 5, you may see numbers like 1, 6, 11, 16, and so on. Of course, SQL Server is free to skip over a number for a variety of reasons, just like Access does. 20.4.1.3. Lookups The SQL Server Design view lacks the convenient lookup wizard that Access uses. Instead, you need to select the field where you want to place the lookup, click the Lookup tab at the bottom of the design window (Figure 20-11), and then fill in all the lookup information. Here are the key settings you need to create a lookup: -
Display Control should be set to Combo Boxthat's the drop-down list that lets you pick the value you want. -
Row Source Type should be set to Tables/Views/Functions if you want to create a lookup that uses the data from a related table. (If you just want to supply a list of values, you would use the Value List option instead.) -
Row Source provides the data for the lookup. If you're drawing your data from another table, you'll use a SQL SELECT command (Section 6.2.3) that pulls out two fieldsthe field with descriptive information, and the field with the ID value. For example, you could use the command SELECT ID,ProductName FROM Products ORDER BY ProductName to create a lookup list that gets the ID and the name of each product in the Products table, sorted by product name. 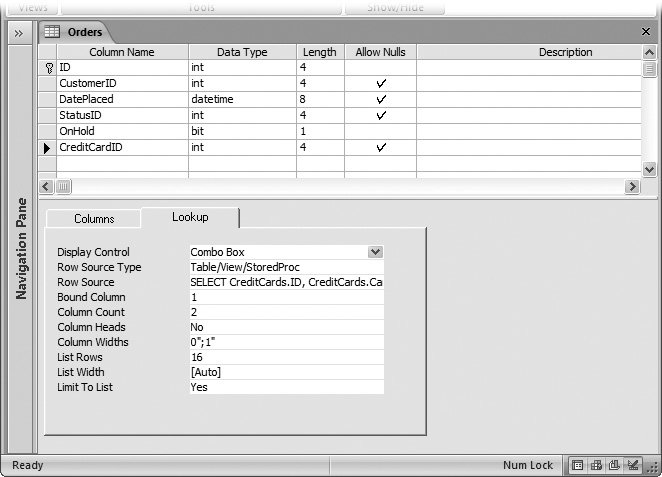 | Figure 20-11. Here's a completed lookup for the CreditCardID field in the Orders table. | |
Tip: If you don't want to write the SELECT statement on your own, click in this box, and then click the ellipsis button to open a query window where you can pick your table and fields. This query window is a bit different from the Access query designer you've used so farsee Section 20.4.2 for a quick tour.
-
Bound Column identifies which column (from the Row Source) should be inserted in the field when you pick a value from the lookup. For example, if the first field in your SELECT statement is the ID value (as in the previous example), you would set this value to 1. -
Column Count sets the number of columns that show up in the lookup list. Usually, this option is set to 2 (which shows both columns), but the width of the first column with the ID number is given an infinitesimally small size so you don't actually see it. -
Column Heads determines whether titles are at the top of the columns in the lookup. Usually, this value is set to No. However, if you create a lookup that shows several pieces of related information, you can use column heads to make it easier to tell what's what when you're reading values in the lookup list. -
Column Widths sets how big each column is in the lookup list. You separate each value (in inches) with a semicolon. For example, a setting of 0";1" shrinks the first column out of sight and makes the second column one inch wide. Unfortunately, creating a lookup doesn't create a relationship between the two tables. If you want a relationship, you need to create it yourself, as described in the next section.
Note: When you upsize a database, Access is nice enough to keep all your lookups.
20.4.1.4. Relationships As you learned in Chapter 5, every respectable database has lots of table relationships. In Access, you have two speedy ways to build a relationship: using the database diagram tool, and creating a lookup on a field. But in an Access project, neither one of those features are available. Instead, you need to define the relationship by hand in the design window for your table. Here's how to do it: -
Open the child table in Design view . This table has the field that links to the parent table. (For example, Products is in the child table of ProductCategories. The tip-off is the ProductCategoryID field that appears in the Products table.) -
Choose Table Tools Design Show/Hide Property Sheet . This action pops open the Properties dialog box (Figure 20-12), which looks nothing like the Property Sheet you've used before with Access databases. 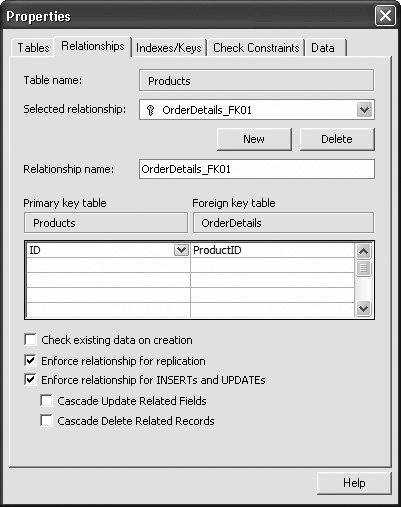 | Figure 20-12. Here's a completed relationship that links the OrderDetails table (as the child) to the Products table (as the parent). In each record in the OrderDetails table, the ProductID field points to the product that was ordered. | | -
Click the Relationships tab . -
Click New to define a new relationship . -
In the list box under the heading "Primary key table," pick the parent table . -
In the first row underneath, pick the unique field in the parent table . (You have several rows here because it's possible to create relationships based on several fields, although it's rarely done.) -
In the list box under the heading "Foreign key table," pick the child table . In the first row underneath, pick the field in the child table that points to the linked parent record. -
If you want to verify that existing data lives up to this relationship, turn on the checkbox for "Check existing data on creation ." If you don't want to check your existing records to make sure they live up to the rules of this relationship, (Section 5.2.3) leave this checkbox turned off. If you don't have any data in the table yet, it doesn't matter what you choose. -
Turn on the checkbox next to "Enforce relationships for INSERTs and UPDATEs" if you want to enforce relational integrity when adding and changing records . Doing so prevents you from breaking the relationship rules (Section 5.2.3) when adding or updating records. For example, you won't be allowed to insert a child record that points to a non-existent parent record. If you choose not to use relational integrity, you can use one of the options below to switch on cascading updates or deletes (Section 5.2.3.1). -
Close the window when you're done . 20.4.2. Understanding Queries Tables of data aren't the only database object that's stored in a SQL Server database. Your SQL Server database can also hold queries, those endlessly useful routines for finding (and changing) the records you want. The objects that Access fans call queries have a whole different existence in SQL Server. Where you see queries, SQL Server sees three different types of objects: -
View . A view is roughly equivalent to a select queryit grabs records (possibly from related tables) and displays them in a datasheet. -
User-defined function . A user-defined function is similar to a select query that takes parameters . (As you learned in Section 7.4, parameters let you ask the user for a piece of information just before running the query. You can then use that information to filter records or perform a calculation.) -
Stored procedure . A stored procedure is the heavyweight of SQL Server database objects. It can perform a whole batch of tasks , like selecting records, committing updates, and running transactions. You won't use most of that power when you create a stored procedure in Access. Instead, you use stored procedures to create the SQL Server equivalent of an action query (Chapter 8) that commits a single update, insert, or delete operation. In the following section, you'll try your hand at creating a basic view. 20.4.3. Creating a View Creating a view is a lot like creating a classic Access query that selects a bunch of records. The following steps show you how to create a view and equip it with all the essentials, including sorting, filtering, and expressions: -
Choose Create Other Query Wizard . The New Query dialog box appears, which offers to help you create a variety of SQL Server query types. In this case, you simply want to create an ordinary query that extracts some useful data. -
Choose Design View, and then click OK . The Add Table dialog box appears. -
Choose the table (or tables you want to use), and then click Add to include it in your query. When you're finished, click Close . The query designer appears. Conceptually, it works more or less like the Access query designer, with the same features. However, it looks a bit different (Figure 20-13). 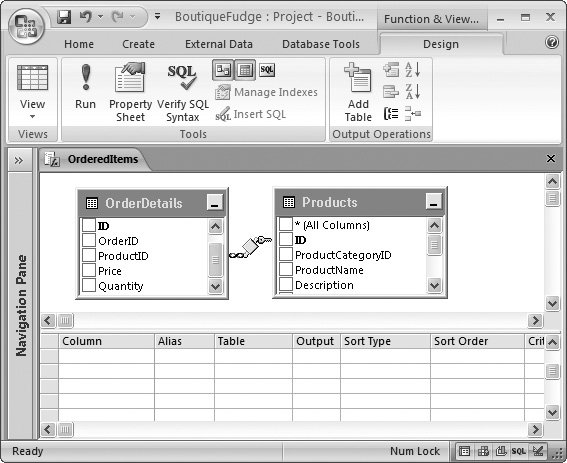 | Figure 20-13. When you add more than one table to a query, and these tables have a relationship defined in the database, the query designer includes the join lines (Section 6.3.1). In this example, the query is showing a list of ordered items, with extra product information from the Products table. | | -
Choose the fields you want to include in your query results . To include a field in your results, place a checkmark next to the field. Each field is added to the list at the bottom of the window in a separate row (Figure 20-14). This is similar to the Access query designer but flipped around. (Access creates one column for each field in a query.) At this point, you have a fully functional query. But you may also want to add sorting, filtering, and calculated expressions, as described in the following steps. -
If you want to sort on a field, choose Ascending or Descending in the Sort Type box . If you want to sort by more than one field, set the Sort Type of every field you want to use. However, you also need to fill in a number in the Sort Order column to tell the query designer which sort to perform first. For example, if you want to sort a batch of names by last name and then first name, you would use the number 1 for the Sort Order of the LastName field and the number 2 for the FirstName field.
Tip: If you want to use a field for sorting or filtering but you don't want it to appear in the results, just clear the checkmark in the Output box.
 | Figure 20-14. This example shows four fields, all with a checkmark in the Output column, which means they'll be shown in the results table. | | -
If you want to use filtering, set a filter expression in the Criteria box next to the appropriate field . Performing this task is easy enough for numeric values, because the filter expressions are exactly the same as in Access. You can use the same operators (like the +, -, /, * signs to perform calculations, and the =, <, and > signs to compare numbers). However, if you want to work with text or dates, make sure you review the syntax differences between SQL Server and Access in the "Syntax Differences box in Section 20.4.3. You can apply filtering to as many fields as you want. If you want to define several different criteria, and show records that match any of these criteria, you can define additional filter expressions in the Or column, as shown in Figure 20-15. 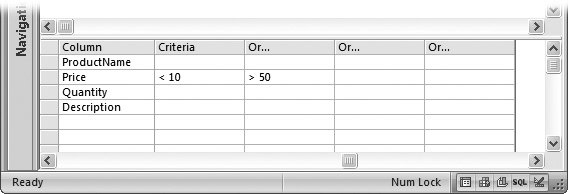 | Figure 20-15. This field matches any prices that are under $10 or over $50. | | -
If you want to use a calculated field, add it to the bottom of the list by filling in the Column and Alias boxes (Figure 20-16) . The syntax for creating a calculated field is a bit different in the SQL Server query designer. Rather than using the ColumnName: Expression syntax, you put the column name in the Alias box, and you put the expression in the Column box. Although you can type in your expression using simple field names, the query designer converts them to three-part names automatically. Figure 20-16 shows what you'll see if you type in the simple calculated expression Price*Quantity , which calculates the cost of one line in an order. If you want to create a calculated expression that uses text or dates, make sure you review the syntax differences between SQL Server and Access in the "Syntax Differences" box below. 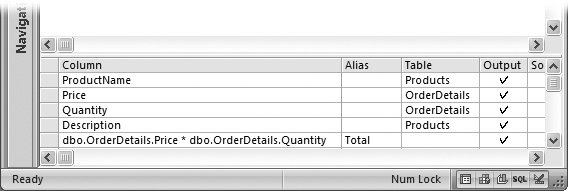 | Figure 20-16. You'll notice that the field names use strange three-part names (so Price becomes dbo.OrderDetails. Price). This name indicates that the Price field is in a table named OrderDetails, which was created by the database owner (dbo). SQL Server uses these names in expressions to prevent possible ambiguity. But don't worrythe query designer changes ordinary names into three-part names automatically. | | WORD TO THE WISE
Syntax Differences | | When you create a query using an Access project, your query is actually a SQL Server database object. It's SQL Server that stores it, and it's SQL Server that runs it. This point is important because the variation of SQL (the structured query language; see Section 6.2.3) that Access uses is slightly different from the flavor you find in SQL Server. This minor differences can trip up the most well meaning query writers. Fortunately, you can avoid many headaches just by being aware of a few key differences: -
Text values use single quotes, not double quotes. So to search for a product record by name, use ' Maple Magic ' not " Maple Magic ". -
Dates also use single quotes, not number signs. So search for orders placed before ' 1/30/2008 ' not # 1/30/2008 #. -
When joining two pieces of text together, use the + symbol, not the & symbol. So to get a full name in a calculated expression, use FirstName + ' ' + LastName , not FirstName &+ " " &LastName . You can't use Access functions. SQL Server has its own library of functions, and while many of them are the same or similar to the Access functions you know and love, differences abound. The safest approach is to search for the function you want to use in the SQL Server Books Online reference (Figure 20-2 shows how to download it). That way you can check the function and see if it works the same as its Access counterpart . | -
When you're finished designing your query, right-click the tab title, and then choose Datasheet View (or choose Function & View Tools Design Tools Run) . Access will ask you to save your query. Once you do, you see your results in the familiar datasheet, just as you do when you run a query in an Access database. You can then print or edit the results. |