Section 20.3. Creating a SQL Server Database
20.3. Creating a SQL Server DatabaseYou've suffered through the long and grueling installation process. Now it's time to reap the rewards of your labor and create your first SQL Server database. Access gives you two ways to create a SQL Server database:
Generally , upsizing a database is easiest because it lets you design your tables using the tools you're most familiar with, and then transfer your data. (As you'll see, creating a SQL Server table in Access is a similar, but subtly different process from creating an ordinary Access table. It's a bit like you'd feel if you got up in the morning and found someone had swapped your sock drawer with your CD collection. Everything's therejust not where you expect.) The direct-creation approach also has its advantages. Most importantly, it gives you more control because you don't have a conversion step. Access databases don't line up exactly with SQL Server databases (for example, the field data types that you use are similar, but slightly different). If you create your database in SQL Server from the start, you'll dodge any potential conversion issues. It the following sections, you'll learn about both approaches. 20.3.1. Upsizing a DatabaseAccess has a handy Upsizing wizard that can convert any Access database into a SQL Server database. The Upsizing wizard is similar to the database splitter (Section 18.2.2)when you're finished, you'll have a front end and a back end. Your front end is an Access file that contains your forms, reports , macros, and code. Your back end is the data (and usually the queries), which are in SQL Server's capable hands. Here's how to take the Upsizing wizard for a whirl:
| ||
|
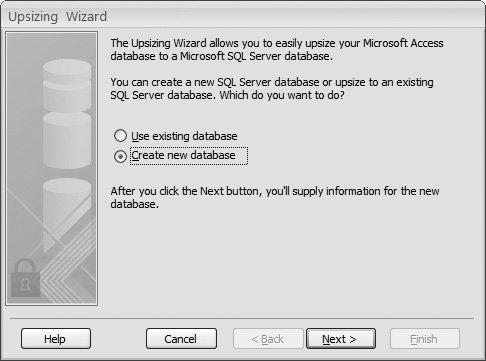
Choose "Create new database," and then click Next .
If you've already created a SQL Server database in your SQL Server computer (for example, using another database management tool), you could choose "Use existing database" to transfer your Access tables into that database. However, it almost always makes sense to create a new database. After all, a database engine like SQL Server can store a virtually unlimited number of databases.
In the next step (Figure 20-6), you need to tell Access where to find your database server. First, supply the server name in the box at the top of the window .
The server name consists of the name of the computer that's running SQL Server, followed by a backslash, followed by the word SQLEXPRESS. So, if the computer that's running SQL Server is named FudgeServer, you'd find your database at FudgeServer\SQLEXPRESS. If you're connecting to the full version of SQL Server (not the Express edition), you usually don't need the second part, so just FudgeServer would do. Consult with your database administrator for help.
Note: To find out the name of your computer, find the My Computer icon (on your desktop or in Windows Explorer), right-click it, and then choose Properties. Then choose the Computer Name tab. You'll see the name of your computer and a handy Change button you can use to modify it.
|
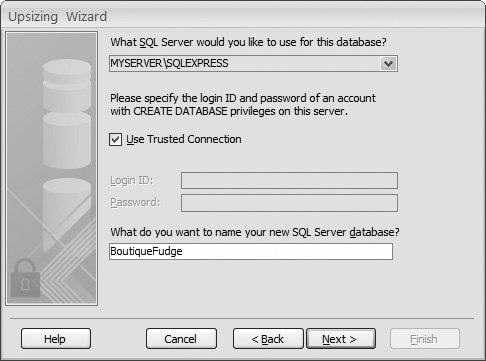
Keep the Use Trusted Connection checkbox turned on .
This action tells Access to connect using your Windows account. However, if you need to supply a different user name and password connection, clear the checkbox, and then enter this information in the text boxes below.
Enter the name for your database, and then click Next .
Use the same rules you follow for naming database objectsbe short and leave out spaces and other punctuation.
Note: When you create a database, SQL Server doesn't tell you the name of the actual database file (and actually, it's usually more than one file). That's because the file names are just not that important. Instead, all you need to know is the name you've anointed your database with (BoutiqueFudge, for example). Behind the scenes, SQL Server stores your data in the appropriate files, so you don't need to worry about it.
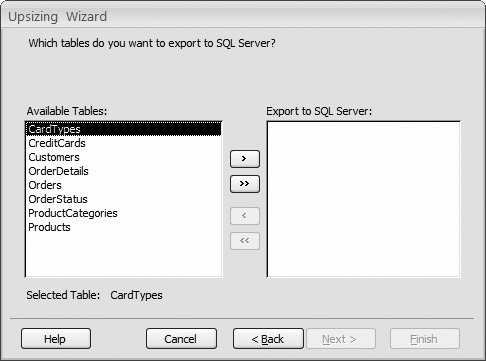
Choose the tables you want to transfer to your database (Figure 20-7), and then click Next .
Access doesn't let you pick the queries you want to transfer. Instead, it transfers all the queries that are related to the tables you pick. Other objects, like forms and reports, are never transferred.
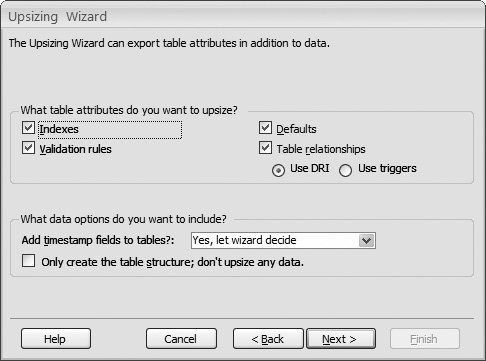
The next steps lets you control how SQL Server creates your tables (Figure 20-8). Change any options you want, and then click Next .
In Chapter 2 you learned about indexes, and in Chapter 4 you learned about default values and validation rules. Usually, if you've taken the time to define these ingredients in Access, you also want them in the exported SQL Server tables, so leave the checkboxes turned on. Here are the other options you can use:
|
|
-
Table relationships . Keep this checkbox turned on, because it ensures that the relationships you've defined between your tables are enforced by SQL Server. You have two options here. "Use DRI" is short for "use data relational integrityin other words, the standard practice of making sure you can't create child records that link to a nonexistent parent (Section 5.2.3). "Use triggers" tells SQL Server to use the less common cascading deletes and cascading updates features (Section 5.2.3.1).
-
Add timestamp fields to tables . This setting lets you create a timestamp fieldan extra field whose only purpose is to record each time a change is made. The timestamp field is sometimes used to prevent clashing edits, because it lets you check if someone else has made changes to a record since the last time you looked at it. Usually, you won't add any timestamp fields. Instead, you'll add them to specific tables later on if you decide you want this feature.
-
Only create the table structure . With this option you can create all the tables in SQL Server, but leave out the data. This option is useful if you've been using the Access database file for testing and it's full of fake data.
The last step asks you what to do with the original Access file. Usually, you'll choose "Create a new Access client/server application ."
Here's what the three options mean:
-
Create a new Access client/server application . This option creates a special type of Access file called an Access project . You'll recognize the difference because every Access project file has the file extension .adp. This file is a front end that has all your reports, forms, and code, and has a special set of links that lets you interact with your tables that are on the server. (The original Access database file remains, but you'll probably just delete that now that all your data is in SQL Server.)
-
Link SQL Server tables to existing application . This option is similar to creating an Access project, except it modifies the current database to become the front end. All the tables that have just been transferred are renamed by adding the word "local" at the end (so the Products table becomes Products_ local). In addition, you'll have a new set of linked tables that use the original table names. Each linked table lets you access the corresponding table in SQL Server. Once you've verified that these links work, you'll probably decide to delete the "local" tables so you don't get confused . (For more about linked tables, see the box "Access Projects vs. Linked Tables" in Section 20.3.2).
-
No application changes . With this option, the data is transferred, but your Access database isn't modified. That means you'll be left with two sets of dataone in your Access database file, and one in SQL Server (which you can't see or modify in Access). This result usually isn't what you want.
Click Next .
If you're creating an Access project (as described in the previous step), Access asks if you want to open the new project front end right away or keep the old database open. Usually, you'll want to open the new file so you can get to work.
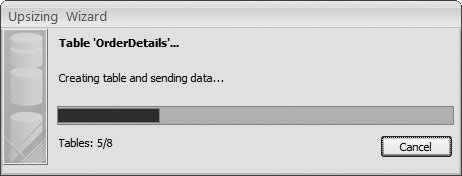
Click Finish to start the upsizing process .
Access connects to SQL Server and starts transferring all the data. As it works, you see a progress indicator (Figure 20-9).
When Access is finished, it shows a report that summarizes how the whole process went. You can print it, or choose Print Preview  Close Preview Close Print Preview to return to your database.
|
The conversion process usually runs without a problem. However, not everything can survive the switch. Here are some ingredients that will be lost:
-
Hyperlink fields . They become ordinary text fields.
-
Attachment fields . They become ordinary text fields, but the only thing the text field stores are the names of the files that you originally put in the attachment.
-
Multivalue fields . You're left with a semicolon-separated list of values. This result gives you the right information, but not in a way that SQL Server can use. Any relations and queries that use this information are out of luck.
If you're creating an Access project (rather than just linked tables), your queries are also converted. As a result, you'll lose the following ingredients, because SQL server doesn't support them:
-
Action queries (Chapter 8) that use parameters (Section 7.4).
-
Crosstab queries.
-
Queries that reference values on a form. (The form is in your front end, so once you transfer the query, it has no way to access that information.)
-
Nonstandard queries that were created in SQL view rather than in Design viewfor example, union queries (Section 6.2.3.2).
Tip: Want to go back the other way, and transfer some data from SQL Server into Access? If so, the trick is the import and export features in Access, which you learned about in Chapter 19.
Once you've finished the upsizing process, you can continue to work with your tables as you did before. For example, you can open your tables in the datasheet, edit records, and use your forms and reports. The difference is that now your copy of Access is communicating with SQL Server to get the information it needs and make changes.
When editing data and using forms and reports, you won't notice any difference between the new upsized database and your original database (except for the fact that it may perform more slowly). However, you will notice a difference when you create a new table or query, or when you modify the design of an existing table or query. That's because tables and queries are actually stored in the SQL Server database, and SQL Server databases are designed differently than their Access counterparts.
| UP TO SPEED Access Projects vs. Linked Tables |
| Access projects and linked tables sound like two similar options. They both let you create Access front ends that work with data in a SQL Server database. However, here are some important differences:
You learned about linked tables in Chapter 19. The rest of this chapter assumes you're creating an Access project. |
You'll start looking at the differences in Section 20.3.3. But first, it's worth considering how you can manage the SQL Server database you've just created.
20.3.2. Managing Your Database
In Access Land, it's easy to delete, move, or back up a database. All you need to do is find the corresponding .accdb file and use a file management tool like Windows Explorer.
SQL Server doesn't work this way. As you learned earlier, it handles files behind the scenes, without revealing their file names. And even if you know where to find the database files, you can't accomplish much with them. For example, if you want to move a SQL Server database from one server computer to another, a simple cut-and-paste operation in Windows Explorer won't work. The original server will keep looking for the database you moved, and the destination server will keep ignoring it.
If you want to perform management tasks like thesedeleting, moving, and copying a databaseyou need to work with SQL Server so it can move the files and update its database catalog. One option is to download the free SQL Server Management Studio tool (see Figure 20-2), which helps you out with a wide range of administrative tasks. (For example, it's the tool you'll need to use if you get really ambitious and start configuring SQL Server's security settings so it allows some people and rejects others.) However, you can also perform the most common management tasks right inside Access. The secret is using the Office button Server menu (which appears only when you have an Access project open).
Your options there include:
-
Connection . Pops open a Data Link Properties dialog box where you can change the connection settings for your Access project file. Usually, you head here if you have a problem connecting to your SQL Server database. For example, if someone's moved or renamed the SQL Server database, or they've changed the user name and password you need to log in, this window is where you can update your settings. Just supply the new server, database name, or password information, and then click OK to reconnect .
Tip: If you open an Access project file but you don't see any tables, and the word "disconnected" appears in the title bar, Access wasn't able to connect to your database. If the name of the database or server has changed recently, choose Office button Server Connection to fix the problem.
Server Back Up SQL Database command and recreates the corresponding SQL Server database. -
Transfer Database . Lets you move a database from one computer to another. (Both computers need to have the SQL Server software.) Access stores the new server location in your project file so you can keep using the database in its new location. This feature is handy if you've been testing a SQL Server database on your computer and now you want to move it to a network server where everyone can access it.
-
Copy Database File . If you're running SQL Server on your computer, this option lets you create a copy of the database file that you can take to another computer. (If you're connected to a copy of SQL Server on another server, this command won't work.) Generally, the Office button
Server Transfer Database command is easier to use because it gets everything done in one step. -
Drop SQL Database . Removes the database from SQL Server and deletes it.
-
Set Logon Password . If you're using Mixed mode authentication (Section 20.2.1), this option lets you change the SQL Server password.
20.3.3. Creating a SQL Server Database from Scratch
Access also lets you create a new SQL Server database with nothing in it, and then add the tables you want. Here's how to do it:
-
Choose Office button
New (or just launch Access without opening a database file and click Blank Database) . The Getting Started page appears.
-
On the right side of the window, click the folder icon next to the database file name .
The New Database dialog box appears.
-
In the "Save as type" list, choose "Microsoft Office Access Projects (*.adp) ."
-
Pick the folder where you want to place the front end (the .adp file), type a name into the "File name" box (like ZooAnimals.adp), and then click OK .
Access returns you to the Getting Started page, with your information in the New Project pane on the right side of the window.
-
Click Create to seal the deal .
Access asks if you want to use an existing SQL Server database.
-
Click No to create a new one of your own .
A window appears that asks you where your server is and what database you want to create. You've seen this step before in the Upsizing wizard (Figure 20-6).
-
Enter the location of your database server and the name of the database you want to create, and then click Finish .
Access creates the blank SQL Server database (and your .adp project file). After a short delay, the Access window appears with an empty navigation panel.
-
When you're ready to create your first table, jump ahead to the next section .