Section 10.3. Building Better Frames Pages
So far, you've learned enough about frames to create a basic Web site that sports a never-changing navigation bar (just like the one shown in Figure 10-7). In this section, you'll learn about a few refinements that help make sure your frames look respectable, as well as a way to create more complex site structures using nested frames.
10.3.1. Frame Borders and Resizing
When you create a basic frameset, the browser adds a thick gray bar between each frame. The Web surfer can drag this bar to resize your frames at will, potentially scrambling your content (see Figure 10-8).
|
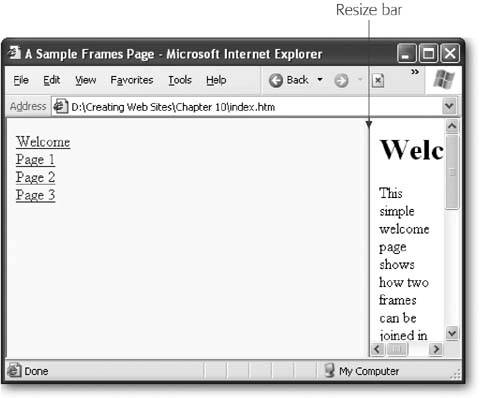
Although resizable frames are occasionally useful, very few Web sites use them. Instead, most Web sites add the noresize attribute to lock frames into place. That way, you decide what the page looks likeand stays like. You need to apply the noresize attribute to each <frame> tag, like so:
<frame noresize >
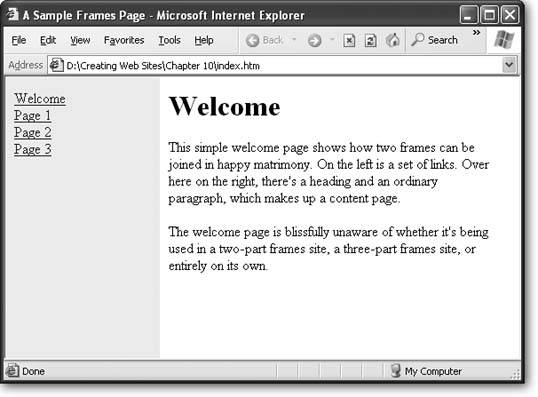
Many Web pages go even further, and hide the ugly gray bar altogether, by using the border attribute of the <frameset> tag. You also need to add a number to the border attribute that represents the width of the bar (in pixels). Set this number to 0 and the border disappears, so the page blends into one seamless whole:
<frameset border="0" >
Here's a cleaned-up version of the frameset demonstrated earlier:
<html> <head> <title>A Sample Frames Page</title> </head> <frameset cols="30%,*" border="0" > <frame name="Menu" src="menu.htm" noresize > <frame name="Main" src="welcome.htm" noresize > </frameset> </html>
Figure 10-9 shows the result.
|
10.3.2. Scrolling
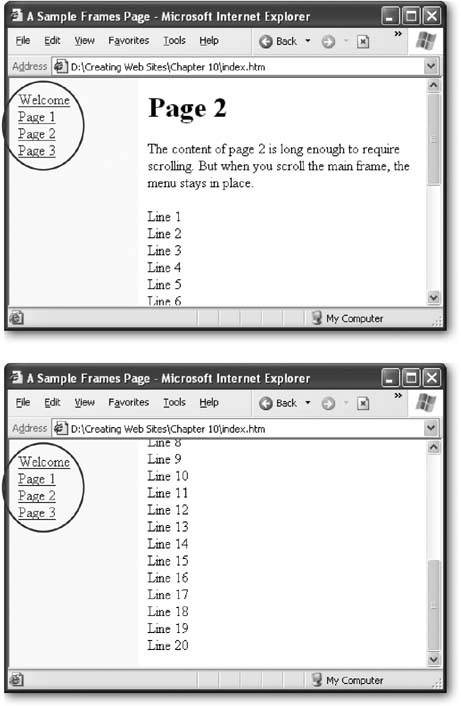
Frames have one unmistakable featurethe scroll bar. When the content of one page grows larger than the size of its frame, scrollbars appear. But what makes this scrolling feature different than in an ordinary Web page is the fact that you can scroll each frame independently , as shown in Figure 10-10.
Note: The fact that you don't see independently scrolling page sections is one way you can tell that a Web site like Amazon isn't designed using frames. When you scroll a page on the Amazon Web site, everythingcontent, menu, and header sectionsscrolls as part of the same page.
In order to prevent confusion, it's a good idea to keep as little content as possible in the non-content frames (like the menu panel) to prevent having more than one set of scrollbars, which can confuse the hardiest Web fan.
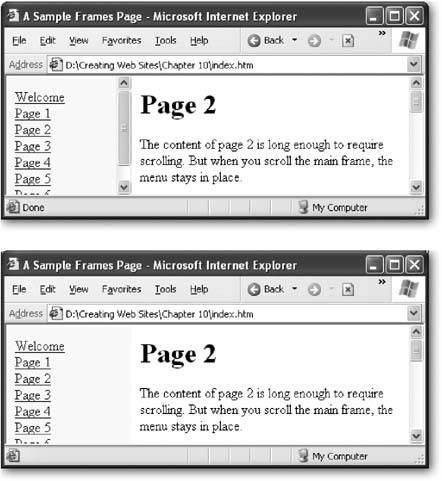
Alternatively, you can change the scrolling behavior of a frame using the scrolling attribute. The standard setting, auto (which you get if you don't list any attribute) shows scrollbars only when they're needed. Your other options are no (to never show scrollbars) or yes (to always show them).
|
Here's an example that disables scrolling for the menu frame:
<frame name="Menu" src="menu.htm" noresize scrolling="no" >
Figure 10-11 shows the difference.
Note: Resist the temptation to turn off scrolling, because it might be needed if the browser window is very small. Ideally, you should test your Web site at the minimum expected browser window size (see Section 5.1.2 in Chapter 5 for a discussion about screen resolutions ), and ensure that at this size, the only scrollbars that appear are in the main content page. The only time you may want to turn off scrolling is when you show a small frame for a navigation bar or a page banner.
|
10.3.3. Handling Browsers That Don't Support Frames
Earlier in this chapter (Section 10.2) you learned about the <noframes> tag, which allows you to define content that appears in a browser that doesn't support frames. Although it's rare that you'll run into any trouble, it's still a good idea to plan an alternative option for surfers who can't view your frames. Fortunately, HTML gives you an option that doesn't require a lot of work.
For example, consider the two-frame example you've been reading about throughout this chapter. It uses frames to show a menu alongside a content page. At a bare minimum, browsers that don't support frames should still be able to read the content pages one at a time, in an ordinary browser window. The easiest way to accomplish serve up these individual pages is to copy the HTML from the menu.htm file into the <noframes> section, as shown here:
<html> <head> <title>A Sample Frames Page</title> </head> <frameset></frameset> <noframes> <body> <h1>Choose a Topic</h1> <a href="welcome.htm">Welcome</a><br> <a href="page1.htm">Page 1</a><br> <a href="page2.htm">Page 2</a><br> <a href="page3.htm">Page 3</a> <body> </noframes> </html>
Notice that the <noframes> section picks up where the rest of the HTML document leaves offwith the <body> tag that defines the start of the HTML content.
Now, when the page is viewed on a browser that doesn't support frames, the visitor will see a heading and the list of pages from the menu. The visitor can click through to see each content page. The solution isn't perfect (for example, in order to move from the content page back to the menu, the visitor needs to click the browser's Back button), but it does provide a rudimentary view of your site's pages. You also need to remember to copy the menu HTML back into the <noframes> section of the index.htm document every time you change it.
Tip: It's also a good idea to add content to the <noframes> section so any search engine that stumbles across your page can find out more about it, increasing the likelihood your Web site will be cataloged and searchable. Chapter 11 discusses search engines and how they find your Web site in more detail.
10.3.4. Better URLs for Framesets
There's no law against requesting a frameset page. You can type its URL into your browser window or link to it in the same way you link to any page. However, frameset pages are a lot less flexible, because they combine several pages into one URL. To understand the problem that can create, it helps to consider an example.
When you head to a frameset page (say, index.htm ), the browser requests the initial page for each frame. For example, the browser might request navbar.htm to get a menu and start.htm to show a start page. When you start clicking links in the navigation bar, the browser performs the nifty little trick you saw earlierit keeps the same frame layout, but it loads in new Web pages. For example, if you click Contact Us, the link might swap the start.htm page with contact.htm .
But here's the problem: The URL in the browser window never changes. No matter what page you're looking at, the URL still reflects the name of the initial frameset page ( index.htm ). That means that there's no way to surf back to the arrangement of frames that has contact.htm loaded up. Instead, when you type index.htm into your browser you'll see the initial set of frames (which includes start.htm ), and you'll need to click your way through to contact.htm .
Note: The limitation discussed in this section actually doesn't apply to the Favorites feature in Internet Explorer. That's because IE is crafty enough to store information about what page should be loaded into each frame, so it can restore the exact arrangement of frames. However, this limitation does apply to other browsers like Firefox. More significantly, it applies if you need to type the URL in by hand, send it in an email message, or provide a link from another Web site.
You might think you could solve this problem by requesting contact.htm directly. But that would get you just the contact.htm page, not the frameset. As a result, you wouldn't see the content in other frames, like the ever-so-important navigation bar.
One way around this problem is to create extra frames pages. For example, if you want a way to get back to the contact.htm page, you could create a frames page named contact_frames.htm . This frames page would use the exact same frameset as index.htm , with one minor difference. Instead of loading the start.htm page initially, it would load the contact.htm page. If you want to point someone to the Contact Us page, just use contact_frames.htm . Think of it as an open front door that gives surfers another way into your Web site.
The only problem with this approach is that you need to create a lot of extra frameset pagesas much as one for each ordinary content page. If you decide to change your layout later on, you're stuck with a lot of updating.
Note: A more advanced approach is to add JavaScript code to each page. The idea is that each content page should check if it's a frameset when it's shown in a browser. If it isn't, the content page should send the surfer back to the frames page, with specific instructions about what frames to show. If you want to experiment with this more complex approach, work through the JavaScript section in Chapter 14, and then read the solution at http://javascript.about.com/library/blframe.htm.
10.3.5. Nested Framesets
As you get more comfortable with frames, you may begin to plan more ambitious layouts. Sooner or later, you'll want to divide and subdivide the browser window with wild abandon. The good news is that this isn't that difficult to accomplishyou simply need to nest one set of frames inside another.
For example, imagine you want to divide a page into two rows, and place the header information into the top row. Then, you want to subdivide the remaining content into two columns , featuring the menu controls and content page. Figure 10-12 shows the result of this kind of slicing and dicing.
|
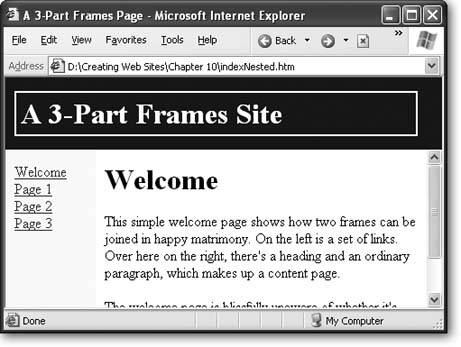
In this case, you need two framesets. The outer frameset defines the two rows, and the inner frameset splits one of these rows into columns. Here's the complete code for the frames page:
<html> <head> <title>A 3-Part Frames Page</title> </head> <frameset rows="80,*" border="0"> <frame name="Header" src="header.htm"> <frameset cols="100,*" border="0"> <frame name="Menu" src="menu.htm" noresize> <frame name="Main" src="welcome.htm" noresize> </frameset> </frameset> </html>
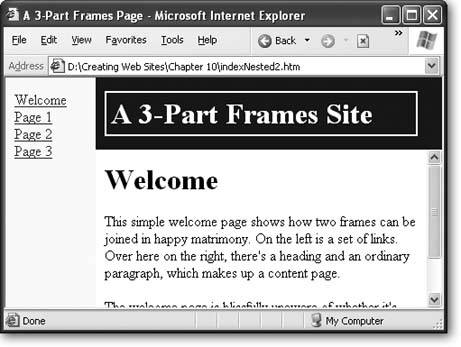
The only challenge in writing a nested frameset is determining the correct order to use for dividing your page. If you reverse the nesting in this example (so you split the window into columns first and then into rows), you'll end up with a different result.
<html> <head> <title>A 3-Part Frames Page</title> </head> <frameset cols="100,*" border="0"> <frame name="Menu" src="menu.htm" noresize> <frameset rows="80,*" border="0"> <frame name="Header" src="header.htm"> <frame name="Main" src="welcome.htm" noresize> </frameset> </frameset> </html>
Figure 10-13 shows this reorganized version.
|
10.3.6. Another Way to Nest Frames
There is one limitation with defining all your frames in a single frames page. To understand the problem, it helps to consider a new example.
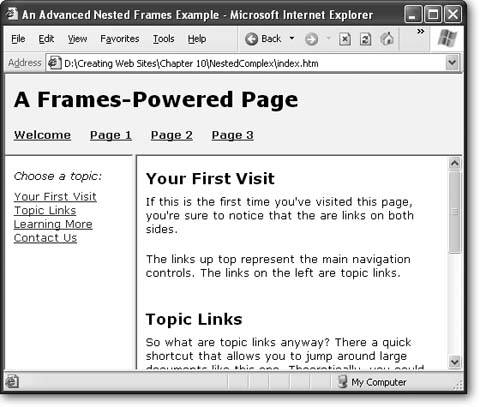
Figure 10-14 shows a page that's divided into a typical layout of three frames: a header at the top, a topic panel at the left, and a content region at the right. However, the way these frames are used is different from the previous examples. If you click one of the topic links on the left, you'll jump to a different portion of the current page. If you click one of the header links at the top, you'll surf to a whole new page with a different set of topics.
|
Tip: Topic links are a great way to break down large pages and make them easier to navigate on the Web. Add these links to your pages by using bookmarks (as described on Section 8.3).
The problem that this example presents is that every time the reader clicks a new link in the header, you need to replace both of the frames underneath. That's because you need to load a new content page and a new list of topic links. Unfortunately, if you implement this design using a single frames page, that isn't possible. Every time you click a link in the header, you can change only a single frame.
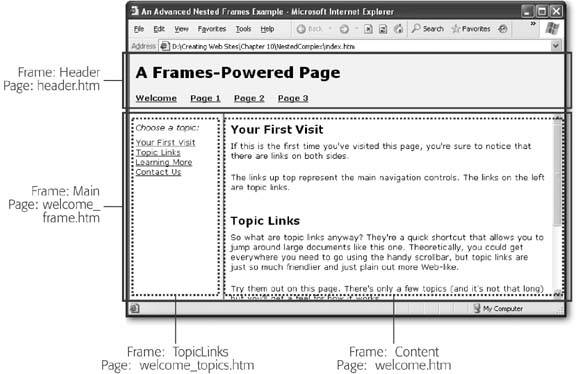
The workaround to this problem is to create more than one frames page. The first frames page is index.htm , which defines the overall structure of the site. It simply splits the page into a header frame and another frame underneath, as shown here:
<html> <head> <title>An Advanced Nested Frames Example</title> </head> <frameset border="0" rows="94,*"> <frame name="Header" scrolling="no" noresize src="header.htm"> <frame name="Main" src="welcome_frame.htm"> </frameset> </html>
The trick here is that the frame underneath points to another frame document, which is named welcome_frame.htm . The welcome_frame.htm file then splits the page again , this time into two columns:
<html> <head><title></title></head> <frameset cols="150,*"> <frame name="TopicLinks" src="welcome_topics.htm" scrolling="no"> <frame name="Content" src="welcome.htm" > </frameset> </html>
The frame on the left, TopicLinks, holds the topic links. The frame on the right, Content, holds the actual text (see Figure 10-15).
|
In order for this model to work, you need to create a frame document for every content page. That's the messy bit. For example, when the Page 1 link is clicked, you would replace the bottom frame with the page1_frame.htm page. Here's the link you'd put in the header.htm document:
<a href="page1_frame.htm" target="Main">Page 1</a>
The page1_frame.htm document looks exactly the same as welcome_frame.htm , because it defines the same two column frames, in exactly the same positions . The only difference is that the source changes to point to a new topic page and a new content page, as shown here:
<html> <head><title></title></head> <frameset cols="150,*"> <frame name="TopicLinks" src="page1_topics.htm" scrolling="no"> <frame name="Content" src="page1.htm" > </frameset> </html>
That's all you need to make this example work. As you can see, by creating more than one frames page, you buy yourself oodles more flexibility. However, this approach requires some extra effort. In order to complete this solution, you need a frames page, topic page, and content page for each link in the header. Sadly, there's no way to dodge this work.
Tip: Of course, high- powered HTML editors like FrontPage and Dreamweaver do provide tools that make it easier to work with frames. For example, you can edit all the pages that belong to a frameset in one window. The same support isn't available in Nvu.
EAN: N/A
Pages: 135