Lesson 2: Configuring Inbound Connections
In Windows 2000 Professional, all of the processes for creating network connections are consolidated in the Network Connection wizard. An inbound connection is one type of network connection that you can create using the Network Connection wizard.
After this lesson, you will be able to
- Configure inbound connections in Windows 2000
- Configure remote access to allow incoming virtual private network (VPN) connections
Estimated lesson time: 20 minutes
Allowing Inbound Dial-up Connections
To configure and administer inbound connections on a computer running Windows 2000 Professional, you use the Network Connection wizard.
- To access the Network Connection wizard, click Start.
- Point to Settings, click Network Connections.
- Double-click Make New Connection.
The Welcome to the Network Connection wizard appears.
- Click Next to continue, and the Network Connection Type page appears.
- Select Accept Incoming Connections (see Figure 5.7).
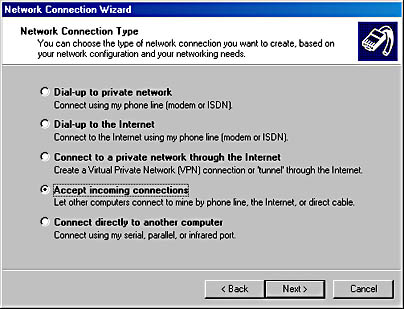
Figure 5.7 The Network Connection Type page
Configuring Devices for Incoming Connections
Once you have selected Accept Incoming Connections, click Next. The Devices For Incoming Connections page appears, so you can choose one of the available devices on your computer to accept incoming calls. If the device you select is configurable, click the Properties button to configure it. For example, if you have selected a modem, possible options to configure include port speed, compression, and the type of flow control (see Figure 5.8). The Advanced tab contains additional configurable options that might include the number of data bits, parity, and number of stop bits.

Figure 5.8 Configuring a device for inbound connections
Allowing Virtual Private Connections
When you have finished configuring the device, click OK to close the Properties dialog box and then click Next on the Devices For Incoming Connection page. The Incoming Virtual Private Connection page appears. Select the appropriate check box either to allow or not allow virtual private connections, and then click Next.
Specifying Users and Callback Options
You must specify which users can access this inbound connection on the Allowed Users page, as shown in Figure 5.9.
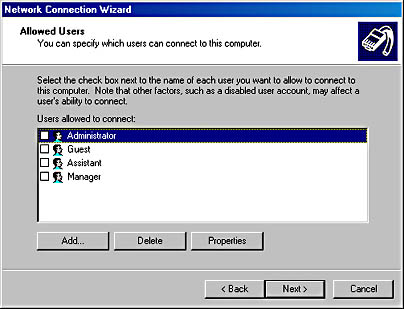
Figure 5.9 Specifying the users who can access this inbound connection
After you select a user, click Properties and click the Callback tab to set the callback options. You can select Do Not Allow Callback, Allow The Caller To Set The Callback Number, or Always Use The Following Callback Number. Enabling callback causes the remote server, in this case your computer, to disconnect from the client calling in, and then to call the client computer back.
By using callback, you can have the bill for the telephone call charged to your telephone number rather than to the telephone number of the user who called in. You can also use callback to increase security. If you specify the callback number, you don't have to worry about someone trying to break in. Even if an unauthorized user calls in, the system calls back at the number you specified, not the number of the unauthorized user.
Selecting Networking Components
After you specify the callback options you can select the appropriate network components.
Click Next, and the Networking Components page appears. You can choose the networking components you want to enable for incoming connections. You can also install additional networking components by clicking Install.
For example, follow these steps to install NWLink IPX/SPX/NetBIOS Compatible Transport Protocol:
- Click Install.
- Select Protocol.
- Click Add.
- On the Select Network Protocol page, select NWLink IPX/SPX/NetBIOS Compatible Transport Protocol.
- Insert the Windows 2000 Professional CD-ROM in the CD-ROM drive,
- Click OK.
Windows 2000 installs the protocol.
After the protocol is installed, you are returned to the Networking Components page. When you click Next, you are prompted to type a name for the connection. You should then click Finish. If you would like a shortcut to appear on your desktop, select the Add A Shortcut To My Desktop check box. Click Finish to create the connection.

Practice: Configuring an Inbound Connection
In this practice, you configure an inbound connection.
Exercise 1: Configuring an Inbound Connection
- Log on as Administrator with a password of password.
- On the Start menu, point to Settings, and click Network And Dial-Up Connections.
The Network And Dial-Up Connections window appears.
- Double-click Make New Connection.
- The Network Connection wizard appears. Click Next.
The Network Connection Type page appears.
- Select Accept Incoming Connections, and then click Next.
The Devices For Incoming Connections page appears.
- Select the modem device option for your computer in the Connection Devices list, and then click Next.
The Incoming Virtual Private Connection page appears.
- Select Allow Virtual Private Connections, and then click Next.
The Allowed Users page appears.
- Select Administrator, and then click Properties.
The Administrator Properties dialog box appears.
- Click the Callback tab.
- Review the Callback tab's options, leave the default Do Not Allow Callback option selected, and then click OK.
- Click Next.
The Networking Components page appears.
- Review the available networking components, click Internet Protocol TCP/IP, and then click Properties.
The Incoming TCP/IP Properties dialog box appears.
- Select Specify TCP/IP addresses.
- In the From box, type 192.168.1.201, and in the To box, type 192.168.1.205. Click OK.
NOTE
If your computer is on a network and there is a valid address that you can use to test your inbound connection, use a range of IP addresses that includes that address. - Click Next.
- Click Finish to accept the default Incoming Connections in The Connection Will Be Named box.
Lesson Summary
In this lesson, you learned that you configure inbound connections in Windows 2000 Professional by using the Network Connection wizard. You can choose which of the available devices on your computer to have accept incoming calls. If these devices are configurable, you can click the Properties button to configure them. You must also specify which user accounts can use inbound connections. For each user account, you can specify whether to allow callback and, if allowed, whether you or the caller should specify the callback number.
EAN: N/A
Pages: 244