Lesson 1: TCPIP
TCP/IP allows you to communicate across networks of computers using various hardware architectures and operating systems. Microsoft's implementation of TCP/IP enables enterprise networking and connectivity between computers running Windows 2000.
After this lesson, you will be able to
- Describe the TCP/IP protocol suite and the TCP/IP utilities included with Windows 2000
- Configure TCP/IP
Estimated lesson time: 65 minutes
Understanding the TCP/IP Protocol Suite
Adding TCP/IP to a Windows 2000 configuration offers the following advantages:
- A routable networking protocol supported by most operating systems. Most large networks rely on TCP/IP.
- A technology for connecting dissimilar systems. You can use many standard connectivity utilities to access and transfer data between dissimilar systems. Windows 2000 includes several of these standard utilities.
- A robust, scalable, cross-platform client/server framework. TCP/IP supports the Microsoft Windows Sockets (winsock) interface, which is ideal for developing client/server applications for WinSock-compliant stacks.
- A method of gaining access to Internet resources.
The TCP/IP suite of protocols provides a set of standards for how computers communicate and how networks are interconnected. The TCP/IP suite of protocols maps to a four-layer conceptual model that helps to understand the tasks for which each protocol in the suite is responsible: network interface, Internet, transport, and application. These layers are illustrated in Figure 5.1.
The Network Interface Layer
At the base of the model is the network interface layer. This layer puts frames on the wire and pulls frames off the wire. There are no protocols in the TCP/IP suite that correspond to this layer of the model.
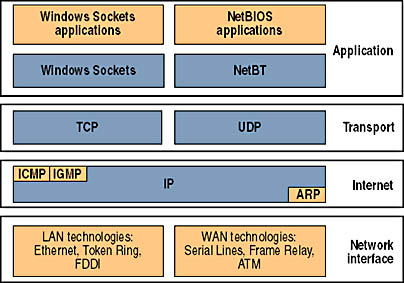
Figure 5.1 The TCP/IP suite of protocols within four layers
The Internet Layer
Internet layer protocols encapsulate packets into Internet datagrams and run all the necessary routing algorithms. The four Internet layer protocols are Internet Protocol (IP), Address Resolution Protocol (ARP), Internet Control Message Protocol (ICMP), and Internet Group Management Protocol (IGMP). Table 5.1 describes these four Internet layer protocols.
Table 5.1 Protocols Included in the Internet Layer
| Protocol | Description |
|---|---|
| IP | Provides connectionless packet delivery for all other protocols in the suite. Doesn't guarantee packet arrival or correct packet sequence. |
| ARP | Provides IP address mapping to the media access control (MAC) sublayer address to acquire the physical MAC control address of the destination. IP broadcasts a special ARP inquiry packet containing the IP address of the destination system. The system that owns the IP address replies by sending its physical address to the requester. The MAC sublayer communicates directly with the network adapter card and is responsible for delivering error-free data between two computers on a network. |
| ICMP | Provides special communication between hosts, allowing them to share status and error information. Higher-level protocols use this information to recover from transmission problems. Network administrators use this information to detect network trouble. The ping utility uses ICMP packets to determine whether a particular IP device on a network is functional. |
| IGMP | Provides multicasting, which is a limited form of broadcasting, to communicate and manage information between all member devices in a multicast group. IGMP informs neighboring multicast routers of the host group memberships present on a particular network. Windows 2000 supports multicast capabilities that allow developers to create multicast programs, such as Windows 2000 Server NetShow Services. |
The Transport Layer
Transport layer protocols provide communication sessions between computers. The desired method of data delivery determines what transport protocol will be used. The two transport layer protocols are Transmission Control Protocol (TCP) and User Datagram Protocol (UDP). Table 5.2 describes the two protocols included in the transport layer.
Table 5.2 Protocols Included in the Transport Layer
| Protocol | Description |
|---|---|
| TCP | Provides connection-oriented, reliable communications for applications that typically transfer large amounts of data at one time or that require an acknowledgment for data received. TCP guarantees the delivery of packets, ensures proper sequencing of the data, and provides a checksum feature that validates both the packet header and its data for accuracy. |
| UDP | Provides connectionless communications and doesn't guarantee that packets will be delivered. Applications that use UDP typically transfer small amounts of data at one time. Reliable delivery is the responsibility of the application. |
The Application Layer
At the top of the model is the application layer, in which applications gain access to the network. Many standard TCP/IP utilities and services reside in the application layer. These include File Transport Protocol (FTP), Telnet, Simple Network Management Protocol (SNMP), Domain Name System (DNS), and so on.
TCP/IP provides two interfaces for network applications to use the services of the TCP/IP protocol stack: Winsock and the NetBIOS over TCP/IP (NetBT) interface. Table 5.3 describes these two interfaces.
Table 5.3 Interfaces That Applications Use for TCP/IP Services
| Interface | Description |
|---|---|
| Winsock | Serves as the standard interface between socket-based applications and TCP/IP protocols. |
| NetBT | Serves as the standard interface for NetBIOS services, including name, datagram, and session services. NetBT also provides a standard interface between NetBIOS-based applications and TCP/IP protocols. |
Configuring TCP/IP to Use a Static IP Address
By default, client computers running Windows 2000, Windows 95, or Windows 98 obtain TCP/IP configuration information automatically from the Dynamic Host Configuration Protocol (DHCP) Service. However, even in a DHCP-enabled environment, you should assign a static IP address to selected network computers. For example, the computer running the DHCP Service can't be a DHCP client, so it must have a static IP address. If the DHCP Service isn't available, you must also configure TCP/IP to use a static IP address. For each network adapter card that uses TCP/IP in a computer, you can configure an IP address, subnet mask, and default gateway, as shown in Figure 5.2.
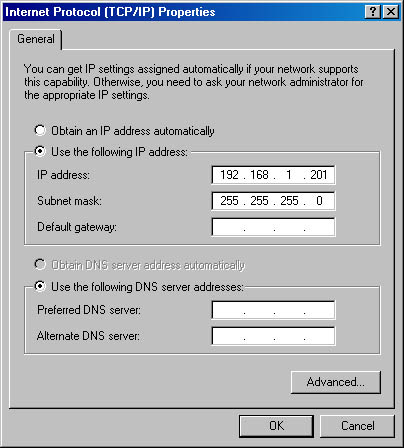
Figure 5.2 Configuring a static TCP/IP address
Table 5.4 describes options that can be used when configuring a static TCP/IP address.
Table 5.4 Options for Configuring a Static TCP/IP Address
| Option | Description |
|---|---|
| IP address | A logical 32-bit address that identifies a TCP/IP host. Each network adapter card in a computer running TCP/IP requires a unique IP address. Each address has two parts: a network ID, which identifies all hosts on the same physical network, and a host ID, which identifies a host on the network. For the unique IP address 192.168.1.108, for example, the net- work ID is 192.168.1, and the host ID is 108. |
| Subnet mask | A network in a multiple-network environment that uses IP addresses derived from a single network ID. Subnets divide a large network into multiple physical networks connected with routers. A subnet mask blocks out part of the IP address so that TCP/IP can distinguish the network ID from the host ID. When TCP/IP hosts try to communicate, the subnet mask determines whether the destination host is on a local or remote network. To communicate on a network, computers must have the same subnet mask. |
| Default gateway | The intermediate device on a local network that stores network IDs of other networks in the enterprise or Internet. To communicate with a host on another network, configure an IP address for the default gateway. TCP/IP sends packets for remote networks to the default gateway (if no other route is configured), which forwards the packets to other gateways until the packet is delivered to a gateway connected to the specified destination. |
Follow these steps to configure TCP/IP to use a static IP address:
- Right-click My Network Places, and then click Properties.
- In the Network And Dial-Up Connections window, right-click Local Area Connection, and then click Properties.
- In the Local Area Connection Properties dialog box, click Internet Protocol (TCP/IP), verify that the check box to its left is selected, and then click Properties.
- In the Internet Protocol (TCP/IP) Properties dialog box, on the General tab, click Use The Following IP Address, type the TCP/IP configuration parameters, and then click OK.
- Click OK to close the Local Area Connection Properties dialog box, and then close the Network And Dial-Up Connections window.
CAUTION
IP communications can fail if duplicate IP addresses exist on a network. Therefore, you should always check with the network administrator to obtain a valid static IP address.
Configuring TCP/IP to Obtain an IP Address Automatically
If a server running the DHCP Service is available on the network, it can automatically assign TCP/IP configuration information to the DHCP client, as shown in Figure 5.3. You can then configure any clients running Windows 2000, Windows 95, and Windows 98 to obtain TCP/IP configuration information automatically from the DHCP Service. Using DHCP to configure TCP/IP automatically on client computers simplifies administration and ensures correct configuration information.
NOTE
Windows 2000 Professional doesn't include the DHCP Service. Only the Windows 2000 Server products provide the DHCP Service.
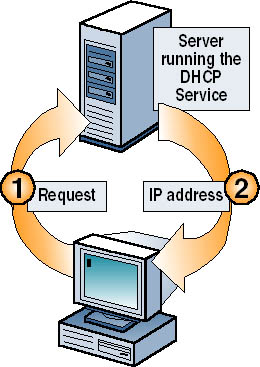
Figure 5.3 A server running the DHCP Service assigns TCP/IP addresses
NOTE
Windows 2000 Professional also includes an Automatic Private IP Addressing feature that provides DHCP clients with limited network functionality if a DHCP server is unavailable during startup.
You can use the DHCP Service to provide clients with TCP/IP configuration information automatically. However, you must configure a computer as a DHCP client before it can interact with the DHCP Service.
Follow these steps to configure a DHCP client:
- Right-click My Network Places, and then click Properties.
- In the Network And Dial-Up Connections window, right-click Local Area Connection, and then click Properties.
- In the Local Area Connection Properties dialog box, click Internet Protocol (TCP/IP), verify that the check box to its left is selected, and then click Properties.
- In the Internet Protocol (TCP/IP) Properties dialog box, on the General tab, click Obtain An IP Address Automatically.
- Click OK to close the Local Area Connection Properties dialog box, and then close the Network And Dial-Up Connections window.
Using Automatic Private IP Addressing
The Windows 2000 implementation of TCP/IP supports a new mechanism for automatic address assignment of IP addresses for simple LAN-based network configurations. This addressing mechanism is an extension of dynamic IP address assignment for LAN adapters. It enables configuration of IP addresses without using static IP address assignment or installing the DHCP Service.
For the Automatic Private IP Addressing feature to function properly on a computer running Windows 2000, you must configure a network LAN adapter for TCP/IP and click Obtain An IP Address Automatically in the Internet Protocol (TCP/IP) Properties dialog box.
The process that causes Windows 2000 to utilize the Automatic Private IP Addressing feature, as shown in Figure 5.4, is explained in the following steps:
- Windows 2000 TCP/IP attempts to find a DHCP server on the attached network to obtain a dynamically assigned IP address.
- In the absence of a DHCP server during startup—for example, the server is down for maintenance or repairs—the client cannot obtain an IP address.
- Automatic Private IP Addressing generates an IP address in the form of 169.254.x.y (where x.y is the client's unique identifier) and a subnet mask of 255.255.0.0.
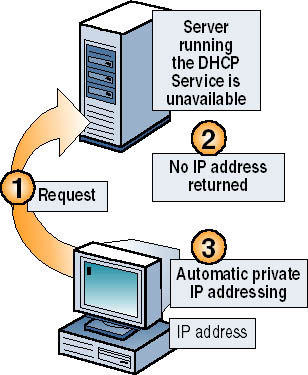
Figure 5.4 The Automatic Private IP Addressing feature
NOTE
The Internet Assigned Numbers Authority (IANA) has reserved 169.254.0.0 to 169.254.255.255 for Automatic Private IP Addressing. As a result, Automatic Private IP Addressing provides addresses that are guaranteed not to conflict with routable addresses.
After the computer generates the address, it broadcasts to this address and then assigns the address to itself, if no other computer responds. The computer continues to use this address until it detects and receives configuration information from a DHCP server. This allows two computers that are plugged into a LAN hub to restart without any IP address configuration and to use TCP/IP for local network access.
NOTE
Windows 98 also supports Automatic Private IP Addressing.
Automatic Private IP Addressing can assign a TCP/IP address to DHCP clients automatically. However, Automatic Private IP Addressing doesn't generate all the information that typically is provided by the DHCP service, such as the address of a default gateway.
Consequently, computers enabled with Automatic Private IP Addressing can communicate only with computers on the same subnet that also have addresses of the form 169.254.x.y.
Disabling Automatic Private IP Addressing
By default, the Automatic Private IP Addressing feature is enabled. However, you can disable this feature by adding the IPAutoconfigurationEnabled value to the HKEY_LOCAL_MACHINE\SYSTEM\CurrentControlSet\Services\Tcpip\Parameters\Interfaces\Adapter subkey of the registry and setting its value to 0.
NOTE
This subkey includes the globally unique identifier (GUID) for the computer's LAN adapter.
The IPAutoconfigurationEnabled entry uses a REG_DWORD data type. A value of 0 disables Automatic Private IP Addressing, and the default value of 1 enables Automatic Private IP Addressing.
Using TCP/IP Utilities
Windows 2000 includes several utilities that you can use to troubleshoot TCP/IP and test connectivity, which are illustrated in Figure 5.5.
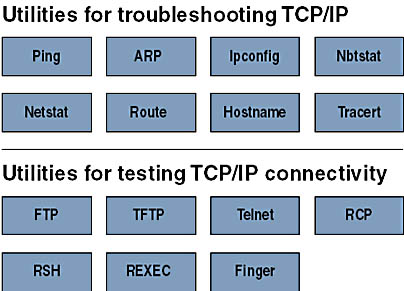
Figure 5.5 TCP/IP utilities included with Windows 2000
Troubleshooting TCP/IP
Table 5.5 describes the Windows 2000 utilities that you can use to troubleshoot TCP/IP.
Table 5.5 Utilities Used to Troubleshoot TCP/IP
| Option | Description |
|---|---|
| Ping | Verifies configurations and tests connections |
| ARP | Displays locally resolved IP addresses as physical addresses |
| Ipconfig | Displays the current TCP/IP configuration |
| Nbtstat | Displays statistics and connections using NetBIOS over TCP/IP |
| Netstat | Displays TCP/IP protocol statistics and connections |
| Route | Displays or modifies the local routing table |
| Hostname | Returns the local computer's host name for authentication by the Remote Copy Protocol (RCP), remote shell (RSH), and remote execution (REXEC) utilities |
| Tracert | Checks the route to a remote system |
These troubleshooting utilities are all executed from the Command Prompt window. For information on how to use all of these commands, except Hostname and Tracert, open the Command Prompt window, type the command followed by /? and then press Enter. For example, for information on the Ping command, open the Command Prompt window, type Ping /? and then press Enter.
To use the Hostname utility, open the Command Prompt window, type Hostname and then press Enter. Hostname will return the name of the local computer.
For information on how to use the Tracert command, open a Command Prompt window, type Tracert and then press Enter.
Testing TCP/IP Connectivity
Windows 2000 also provides utilities for testing TCP/IP connectivity. Table 5.6 describes these utilities.
Table 5.6 Utilities Used to Test TCP/IP Connectivity
| Option | Description |
|---|---|
| FTP | Provides bidirectional file transfer between a computer running Windows 2000 and any TCP/IP host running FTP. Windows 2000 Server can serve as an FTP client or server. |
| Trivial File Transfer Protocol (TFTP) | Provides bidirectional file transfer between a computer running Windows 2000 and a TCP/IP host running TFTP. |
| Telnet | Provides terminal emulation to a TCP/IP host running Telnet. Windows 2000 Server can serve as a Telnet client. |
| Remote Copy Protocol (RCP) | Copies files between a client and a host that support RCP, such as a computer running Windows 2000 and a UNIX host. |
| Remote shell (RSH) | Runs commands on a UNIX host. |
| Remote execution (REXEC) | Runs a process on a remote computer. |
| Finger | Retrieves system information from a remote computer that supports TCP/IP and the finger utility. |
Testing a TCP/IP Configuration
After configuring TCP/IP and restarting the computer, you should use the ipconfig and ping command-prompt utilities to test the configuration and connections to other TCP/IP hosts and networks. Such testing helps to ensure that TCP/IP is functioning properly.
Using Ipconfig
You use the ipconfig utility to verify the TCP/IP configuration parameters on a host. This helps to determine whether the configuration is initialized, or whether a duplicate IP address exists. Use the ipconfig command with the /all switch to verify configuration information.
TIP
Type ipconfig /all | more to prevent the ipconfig output from scrolling off the screen; to scroll down and view additional output, press the Spacebar.
The result of using the ipconfig /all command is as follows:
- If a configuration has initialized, the ipconfig utility displays the IP address and subnet mask. If it is assigned, the ipconfig utility displays the default gateway.
- If a duplicate IP address exists, the ipconfig utility indicates that the IP address is configured; however, the subnet mask is 0.0.0.0.
- If the computer is unable to obtain an IP address from a server running the DHCP Service on the network, the ipconfig utility displays the IP address as the address provided by Automatic Private IP Addressing.
Using Ping
After you have verified the TCP/IP configuration, use the ping utility to test connectivity. The ping utility is a diagnostic tool that you can use to test TCP/IP configurations and diagnose connection failures. Use the ping utility to determine whether a particular TCP/IP host is available and functional. To test connectivity, use the Ping command with the following syntax:
ping IP_address
Using Ipconfig and Ping
Figure 5.6 illustrates the steps for verifying a computer's configuration and for testing router connections.
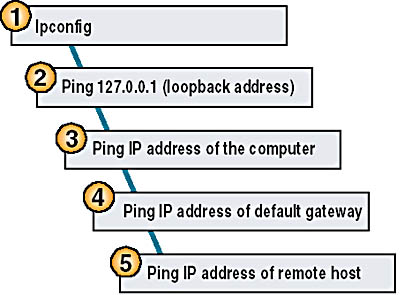
Figure 5.6 Using ipconfig and ping
The following are the steps illustrated in Figure 5.6:
- Use the ipconfig command to verify that the TCP/IP configuration has been initialized.
- Use the ping command with the loopback address (ping 127.0.0.1) to verify that TCP/IP is correctly installed and bound to your network adapter card.
- Use the ping command with the IP address of the computer to verify that your computer is not a duplicate of another IP address on the network.
- Use the ping command with the IP address of the default gateway to verify that the default gateway is operational and that your computer can communicate with the local network.
- Use the ping command with the IP address of a remote host to verify that the computer can communicate through a router.
NOTE
Typically, if you ping the remote host (step 5) and the ping command is successfully executed, steps 1 through 4, if ran, would also be successful by default. If the ping command isn't successfully executed, ping the IP address of another remote host before completing the entire diagnostic process because the current host might be turned off.
By default, the following message appears four times in response to a successfully executed ping command:
Reply from IP_address

Practice: Installing and Configuring TCP/IP
In this practice, you use two TCP/IP utilities to verify your computer's configuration. You then configure your computer to use a static IP address and verify your computer's new configuration. Next you configure your computer to use a DHCP server to automatically assign an IP address to your computer, whether or not a DHCP server is available on your network. Finally you test the Automatic Private IP Addressing feature in Windows 2000 by disabling the DHCP server, if one exists on your network.
To complete this practice, you will need
- TCP/IP as the only installed protocol
- A server running the DHCP Service to provide IP addresses (optional)
If you are working on a computer that isn't part of a network and a server isn't running the DHCP service, you won't be able to do certain procedures in this practice.
In the following table, record the IP address, subnet mask, and default gateway that your network administrator provides for you to use during this practice. Also, ask your network administrator whether you can use another computer to test your computer's connectivity, and record the IP address of that computer as well. If you are not on a network, you can use the suggested values.
| Variable value | Suggested value | Your value |
|---|---|---|
| Static IP address | 192.168.1.201 | |
| Subnet mask | 255.255.255.0 | |
| Default gateway (if required) | None | |
| Computer to test connectivity | N/A |
Exercise 1: Verifying a Computer's TCP/IP Configuration
In this exercise, you use two TCP/IP utilities, ipconfig and ping, to verify your computer's configuration.
NOTE
To do the exercises in this practice, you use the Command Prompt and Network Connections windows frequently. For the sake of efficiency, open the windows once and then minimize and restore them as necessary.
- Open the Command Prompt window.
- At the command prompt, type ipconfig /all | more and then press Enter.
The Windows 2000 IP Configuration utility displays the TCP/IP configuration of the physical and logical adapters configured on your computer.
- Press Spacebar as necessary to display the heading Local Area Connection. Use the information displayed in this section to complete as much of the following table as possible. Press Spacebar to display additional information, as necessary, and to return to the command prompt.
Setting Value Host name Description Physical address DHCP enabled Autoconfiguration enabled IP address Subnet mask Default gateway DNS servers - Press Spacebar as necessary to scroll through the configuration information and return to the command prompt.
- To verify that the IP address is working and configured for your adapter, type ping 127.0.0.1 and then press Enter.
A response similar to the following indicates a successful ping:
Pinging 127.0.0.1 with 32 bytes of data: Reply from 127.0.0.1: bytes=32 time<10ms TTL=128 Reply from 127.0.0.1: bytes=32 time<10ms TTL=128 Reply from 127.0.0.1: bytes=32 time<10ms TTL=128 Reply from 127.0.0.1: bytes=32 time<10ms TTL=128 Ping statistics for 127.0.0.1: Packets: Sent = 4, Received = 4, Lost = 0 <0% loss>, Approximate round trip times in milliseconds: Minimum = 0ms, Maximum = 0ms, Average = 0ms
- Minimize the Command Prompt window.
Exercise 2: Configuring TCP/IP to Use a Static IP Address
In this exercise, you configure TCP/IP to use a static IP address.
To configure TCP/IP to use a static IP address
- Right-click My Network Places, and then click Properties.
The Network And Dial-Up Connections window appears.
- Right-click Local Area Connection, and then click Properties.
The Local Area Connection Properties dialog box appears, displaying the network adapter in use and the network components used in this connection.
- Click Internet Protocol (TCP/IP), and then verify that the check box to the left of the entry is selected.
- Click Properties.
The Internet Protocol (TCP/IP) Properties dialog box appears.
- Click Use The Following IP Address.
- In the IP Address box, the Subnet Mask box, and the Default Gateway box (if required), type the values that you typed in the table before you started Exercise 1, or the suggested values listed in that table.
IMPORTANT
Be careful when manually entering IP configuration settings, especially numeric addresses. The most frequent cause of TCP/IP connection problems is incorrectly entered IP address information. - Click OK.
You are returned to the Local Area Connection Properties dialog box.
- Click OK to close the Local Area Connection Properties dialog box.
- Minimize the Network And Dial-Up Connections window.
To test the static TCP/IP configuration
- Restore the Command Prompt.
- At the command prompt, type ipconfig /all | more and then press Enter.
The Windows 2000 IP Configuration utility displays the physical and logical adapters configured on your computer.
- Press Spacebar as needed to scroll through the configuration information and locate the local area connection information.
- Record the current TCP/IP configuration settings for your local area connection in the following table.
Setting Value IP address Subnet mask Default gateway - Press Spacebar as necessary to scroll through the configuration information and return to the command prompt.
- To verify that the IP address is working and configured for your adapter, type ping 127.0.0.1 and then press Enter.
What happens?
Answer
- If you have a computer that you are using to test connectivity, type ping ip_address (where ip_address is the IP address of the computer you are using to test connectivity), and then press Enter. If you don't have a computer to test connectivity, skip this step and proceed to step 8.
What happens?
Answer
- Minimize the command prompt.
Exercise 3: Configuring TCP/IP to Automatically Obtain an IP Address
In this exercise, you configure TCP/IP to automatically obtain an IP address. Then you test the configuration to verify that the DHCP Service has provided the appropriate IP addressing information. Be sure to perform the first part of this exercise even if you have no DHCP Service server because you will also use these settings in Exercise 4.
To configure TCP/IP to automatically obtain an IP address
- Restore the Network And Dial-Up Connections window, right-click Local Area Connection, and then click Properties.
The Local Area Connection dialog box appears.
- Click Internet Protocol (TCP/IP), and then verify that the check box to the left of the entry is selected.
- Click Properties.
The Internet Protocol (TCP/IP) Properties dialog box appears.
- Click Obtain An IP Address Automatically.
Which IP address settings will the DHCP Service configure for your computer?
Answer
- Click OK to close the Internet Protocol (TCP/IP) Properties dialog box.
- Click OK to close the Local Area Connection Properties dialog box.
- Minimize the Network And Dial-Up Connections window.
To test the TCP/IP configuration
NOTE
If a server running the DHCP Service isn't available to provide an IP address, skip this procedure and proceed to Exercise 4.
- Restore the command prompt, type ipconfig /release and then press Enter.
- At the command prompt, type ipconfig /renew and then press Enter.
- At the command prompt, type ipconfig | more and then press Enter.
- Pressing Spacebar as necessary, record the current TCP/IP configuration settings for your local area connection in the following table.
Setting Value IP address Subnet mask Default gateway - To test that TCP/IP is working and bound to your adapter, type ping 127.0.0.1 and then press Enter.
The internal loopback test displays four replies if TCP/IP is bound to the adapter.
Exercise 4: Obtaining an IP Address by using Automatic Private IP Addressing
For this exercise, if you have a server running the DHCP Service, you must disable it on that server so that a DHCP server will not be available to provide an IP address for your computer. Without a DHCP server available to provide an IP address, the Windows 2000 Automatic Private IP Addressing feature provides unique IP addresses for your computer. If the DHCP Service can't be disabled, simply disconnect your network adapter cable.
To obtain an IP address by using Automatic Private IP Addressing
- At the command prompt, type ipconfig /release and then press Enter.
- At the command prompt, type ipconfig /renew and then press Enter.
There will be a pause while Windows 2000 attempts to locate a DHCP server on the network.
What message appears, and what does it indicate?
Answer
To test the TCP/IP configuration
- At the command prompt, type ipconfig | more and then press Enter.
- Pressing Spacebar as necessary, record the current TCP/IP settings for your local area connection in the following table.
Setting Value IP address Subnet mask Default gateway Is this the same IP address that was assigned to your computer in Exercise 3? Why or why not?
Answer
- Press Spacebar to finish scrolling through the configuration information, as necessary.
- To verify that TCP/IP is working and bound to your adapter, type ping 127.0.0.1 and then press Enter.
The internal loopback test displays four replies if TCP/IP is bound to the adapter.
- If you have a computer to test TCP/IP connectivity with your computer, type ping ip_address (where ip_address is the IP address of the computer that you are using to test connectivity), and then press Enter. If you don't have a computer to test connectivity, skip this step and proceed to Exercise 5.
Were you successful? Why or why not?
Answer
Exercise 5: Obtaining an IP Address by using DHCP
In this exercise, you enable the DHCP Service running on the computer that is acting as a DHCP server (or you reconnect your network cable if you disconnected it in Exercise 4). Your computer will obtain IP addressing information from the DHCP server.
NOTE
If a server running the DHCP Service isn't available to provide an IP address, skip this exercise.
- At the command prompt, type ipconfig /release and then press Enter.
- At the command prompt, type ipconfig /renew and then press Enter.
After a short wait, a message indicates the adapter's local area connection.
- At the command prompt, type ipconfig /all | more and then press Enter.
- Verify that the DHCP server has assigned an IP address to your computer.
- Close the Command Prompt window.
Lesson Summary
In this lesson, you learned that TCP/IP enables enterprise networking and connectivity on computers running Windows 2000. It provides a robust, scalable, cross-platform client/server framework that is supported by most large networks, including the Internet. You learned that the TCP/IP suite of protocols maps to a four-layer conceptual model: network interface, Internet, transport, and application.
By default, client computers running Windows 2000 obtain TCP/IP configuration information automatically from the DHCP Service. However, even in a DHCP-enabled environment, some computers, such as the computer running the DHCP Service, require a static IP address. For each network adapter card that uses TCP/IP in a computer, you can configure an IP address, a subnet mask, and a default gateway.
You also learned that Windows 2000 includes utilities that you can use to troubleshoot TCP/IP and test connectivity. Ping and ipconfig are two common troubleshooting utilities, and FTP and telnet are two connectivity utilities.
Finally, in this lesson you learned that the Windows 2000 implementation of TCP/IP supports automatic private IP addressing. Automatic private IP addressing is a new mechanism for automatic address assignment of IP addresses for simple LAN-based network configurations. It is an extension of dynamic IP address assignment for LAN adapters and enables configuration of IP addresses without using static IP address assignments or installing the DHCP Service. By default, the Automatic Private IP Addressing feature is enabled. However, you can disable this feature by adding IPAutoconfigurationEnabled to the registry.
EAN: N/A
Pages: 244