Lesson 2: Managing Software Using Group Policy
The Software Installation extension, a software management feature of Windows 2000, is the administrator's primary tool for managing software within an organization. Managing software using Software Installation provides your users with immediate access to the software they need to perform their jobs and ensures that users have an easy and consistent experience when working with software throughout its life cycle. Users no longer need to look for a network share, use a CD-ROM, or install, fix, and upgrade software themselves. This lesson walks you through the steps for implementing Software Installation.
After this lesson, you will be able to
- Deploy software using Group Policy
- Configure deployment options
- Maintain software using Group Policy
Estimated lesson time: 75 minutes
Software Management Tools
Three tools are provided with Windows 2000 Server for software installation and maintenance. Table 20.3 describes these tools.
Table 20.3 Windows 2000 Software Installation and Maintenance Tools
| Tool | Role |
|---|---|
| The Software Installation extension of the Group Policy snap-in | Used by administrators to manage software |
| Windows Installer | Installs software packaged in Windows Installer files |
| Add/Remove Programs in Control Panel | Used by users to manage software on their own computers |
The Software Installation Extension
The Software Installation extension is the administrator's primary tool for managing software within an organization. Software Installation works in conjunction with Group Policy and Active Directory, establishing a Group PolicyGroup Policy-based software management system that allows you to centrally manage the following tasks:
- Initial deployment of software.
- Mandatory and nonmandatory upgrades, patches, and quick fixes for software. You can update a version of the software or replace it. You can even upgrade the OS using service packs.
- Removal of software.
Using Software Installation, you can centrally manage the installation of software on a client computer by assigning applications to users or computers or by publishing applications for users. Assign required or mandatory software to users or to computers. Publish software that users might find useful to perform their jobs.
Assigning Applications
When you assign an application to a user, the application is advertised to the user the next time he or she logs on to a workstation. The application advertisement follows the user regardless of which physical computer he or she actually uses. This application is installed the first time the user activates the application on the computer, either by selecting the application on the Start menu or by activating a document associated with the application.
When you assign an application to the computer, the application is advertised and the installation is performed when it is safe to do so. Typically this happens when the computer starts up so that there are no competing processes on the computer.
Publishing Applications
When you publish the application to users, the application does not appear installed on the users' computers. No shortcuts are visible on the desktop or Start menu, and no changes are made to the local registry on the users' computers. Instead, published applications store their advertisement attributes in Active Directory. Then, information such as the application's name and file associations is exposed to the users in the Active Directory container. The application is then available for the user to install using Add/Remove Programs in Control Panel or by clicking a file associated with the application (such as an .xls file for Microsoft Excel).
How Software Installation Works
The Software Installation extension uses Windows Installer technology to systematically maintain software. Windows Installer is a service that allows the OS to manage the installation process. Windows Installer is composed of three key parts:
- An OS service that performs the installation, modification, and removal of the software in accordance with the information in the Windows Installer package
- The Windows Installer package, a database containing information that describes the installed state of the application
- An application programming interface (API) that allows applications to interact with Windows Installer to install or remove additional features of the application after the initial installation is complete
Because Software Installation takes advantage of Windows Installer, users can take advantage of self-repairing applications. Windows Installer notes when a program file is missing and immediately reinstalls the damaged or missing files, thereby fixing the application.
The Windows Installer package is a file that contains explicit instructions on the installation and removal of specific applications. The developer who produces the application provides the Windows Installer package .msi file and ships it with the application. If a Windows Installer package does not come with an application, you might need to create a Windows Installer package, or repackage the application, using a third-party tool.
You can only deploy software using the Software Installation extension if the file type fits one of the following categories:
- Native Windows Installer package (.msi) files are developed as a part of the application and take full advantage of the Windows Installer.
- Repackaged application (.msi) files allow you to repackage applications that do not have a native Windows Installer package in much the same way that you repackage software today to customize installations.
- An existing setup program—an application (.zap) file—installs an application by using its original SETUP.EXE program.
In addition, you can make modifications to customize the installation of a Windows Installer package at the time of assignment or publication. Modifications are saved with the .mst file extension.
Other files you may encounter during Software Installation are
- Patch (.msp) files, which are used for bug fixes, service packs, and similar files
- Application assignment scripts (.aas files), which contain instructions associated with the assignment or publication of a package
Customizing Windows Installer Packages
You can customize Windows Installer applications by using modifications, also called transforms. The Windows Installer package format provides for customization by allowing you to "transform" the original package using authoring and repackaging tools. Some applications also provide wizards or templates that permit a user to create modifications.
For example, Microsoft Office 2000 supplies a Customization wizard that builds modifications. Using the Microsoft Office 2000 Customization wizard, you can create a modification that allows you to manage the configuration of Microsoft Office 2000 that is deployed to users. A modification might be designed to accommodate Microsoft Word as a key feature, installing it during the first installation. Less popular features, such as revision support or document translators, could be installed on first usage, and other features, such as clip art, might not be installed at all. You might have another modification that provides all of the features of Word and does not install Microsoft PowerPoint. The exact mix of which features to install and when to install them varies based on the audience for the application and how they use the software.
Implementing Software Installation
The following is the sequences of tasks use to implemente software installation:
- Planning and preparing the software installation
- Setting up a software distribution point
- Specifying software installation defaults
- Deploying software applications
- Setting automatic installation options
- Setting up application categories
- Setting software application properties
- Maintaining software applications
Planning and Preparing a Software Installation
When planning a software installation, you should do the following:
- Review your organization's software requirements on the basis of your over-all organizational structure within Active Directory and your available GPOs
- Determine how you want to deploy your applications
- Create a pilot to test how you want to assign or publish software to users or computers
- Prepare your software using a format that allows you to manage it based on what your organization requires, and test all of the Windows Installer packages or repackaged software
Table 20.4 describes strategies and considerations for implementing a software installation. Some of these strategies might seem contradictory, but select the strategies that meet your business goals.
Table 20.4 Strategies and Considerations for Implementing Software Installation
| Strategy | Considerations |
|---|---|
| Create OUs based on software management needs. | Allows you to target applications to the appropriate set of users. Group Policy security settings are not required to target the appropriate set of users. |
| Deploy software close to the root in the Active Directory tree. | Makes it easy to provide all users in an organization with access to an application. This reduces administration because you can deploy a single GPO rather than having to re-create that object in multiple containers deep in the Active Directory tree. |
| Deploy multiple applications with a single GPO. | Reduces administration overhead by allowing you to create and manage a single GPO rather than multiple GPOs. The logon process is faster because a single GPO deploying 10 applications processes faster than 10 GPOs each deploying one application. This is appropriate in organizations where users share the same core set of applications. |
| Publish or assign one application only once in the same GPO or in a series of GPOs that might apply to a single user or computer. | Makes it easier to determine which instance of the application applies to the user or computer. |
Software licenses are required for software written by independent software vendors and distributed using software distribution points (SDPs). It is your responsibility to match the number of users who can access software to the number of licenses you have on hand. It is also your responsibility to verify that you are working within the guidelines provided by each independent software vendor with the software.
Gather the package formats for the software and perform any necessary modifications to the packages.
Setting Up an SDP
After you have planned and prepared for software management, the next step is to copy the software to one or more SDPs, network locations from which people are able to get the software that they need.
Follow these steps to set up an SDP:
- Create the folders for the software on the file server that will be the SDP and make the folders network shares.
- Replicate the software to the SDPs by placing or copying the software, packages, modifications, all necessary files, and components to a distribution share(s). Place all software (the package and all related installation files) in a separate folder on the SDP.
- Set the appropriate permissions on the folders so that only administrators can change the files (Read and Write) and users can only read the files from the SDP folders and shares. Use Group Policy to manage the software within the appropriate GPO.
NOTE
Some software supports special commands to facilitate the creation of an SDP. For example, Microsoft Office 2000 should be prepared by running setup /a from a command prompt. This allows you to enter the software key once for all users, and the network share (SDP) location to copy the files to. Other software might have other ways to expand any compressed files from the distribution media and transfer the files to the appropriate location.
Specifying Software Installation Defaults
A GPO can contain several settings that affect how an application is installed, managed, and removed. You can globally define the default settings for the new packages within the GPO in the General tab of the Software Installation Properties dialog box. Some of these settings can be changed later by editing the package properties in the Software Installation extension.
Follow these steps to specify software installation defaults:
- Open the Group Policy snap-in, and then in Computer or User Configuration, open Software Settings.
- Right-click the Software Installation node, and then click Properties.
- In the General tab of the Software Installation Properties dialog box (see Figure 20.9), type the path to the default SDP for packages (.msi files) in the Default Package Location box.
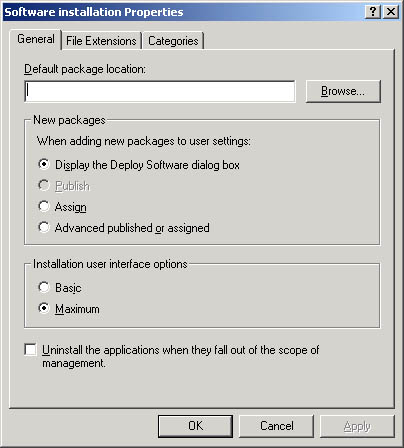
Figure 20.9 General tab of the Software Installation Properties dialog box
- In the New Packages section, select one of the following:
- Display The Deploy Software Dialog Box. Choose this to specify that when you add a new package, the Deploy Software dialog box will display, allowing you to assign, publish, or configure package properties.
- Publish. Choose this to specify that when you add a new package, by default you want it published with standard package properties. Packages can only be published to users, not computers. If this is an installation under the Computer Configuration node of the Group Policy snap-in, the Publish choice appears dimmed.
- Assign. Choose this to specify that when you add a new package by default, you want it assigned with standard package properties. Packages can be assigned to users and computers.
- Advanced Published Or Assigned. Choose this to specify that when you add a new package, the Configure Package Properties form should appear.
- In the Installation User Interface Options section, select one of the following:
- Basic. Choose this to provide only a basic display of the install process.
- Maximum. Choose this to provide all installation messages and screens during the package installation.
- Check the Uninstall The Applications When They Fall Out Of The Scope Of Management check box to specify that the package should be removed when the GPO no longer applies to users or computers.
- Click OK.
Deploying Software Applications
Given that software can be either assigned or published and may be targeted to users or computers, you can establish a workable combination to meet your software management goals. Table 20.5 details the different approaches to software deployment.
Table 20.5 Software Deployment Approaches
| Publish (User Only) | Assign (User) | Assign (Computer) | |
|---|---|---|---|
| After deployment the software is available for installation after | The next logon | The next logon | The next time the computer starts |
| Typically the user installs the software from | Add/Remove Programs in Control Panel | Start menu or Desktop shortcut | The software is already installed (the software automatically installs when the computer reboots) |
| If the software is not installed, and the user opens a file associated with the software, does the software install? | Yes (if auto-install is turned on) | Yes | Does not apply; the software is already installed |
| Can the user remove the software using Add/Remove Programs in Control Panel? | Yes, and the user can choose to install it again from Add/ Remove Programs in Control Panel | Yes, and the soft ware is available for installation again from the typical install points | No. Only the local administrator can remove the software; a user can run a repair on the software |
| Supported installation files are | Windows Installer packages, .zap files | Windows Installer packages | Windows Installer packages |
Modifications, or .mst files, are customizations applied to Windows Installer packages. A modification must be applied at the time of assignment or publication, not at the time of installation.
Assigning Applications
Assign an application when you want everyone to have the application on his or her computer. An application can be published to both computers and users.
Follow these steps to assign applications:
- Open the Group Policy snap-in, and then, in Computer or User Configuration, open Software Settings.
- Right-click the Software Installation node, click New, and click Package.
The File Name list in the Open dialog box shows those Windows Installer packages located at the SDP you specified as the default. If the Windows Installer package is located on a different network share, you can browse to find the SDP for the package.
- In the File Name list in the Open dialog box, select the Windows Installer package to be assigned, and then click Open.
- In the Deploy Software dialog box (see Figure 20.10), click Assigned, and then click OK. If this is an application under the Computer Configuration node of the Group Policy snap-in, the Published choice appears dimmed, because packages can only be assigned to computers, not published.
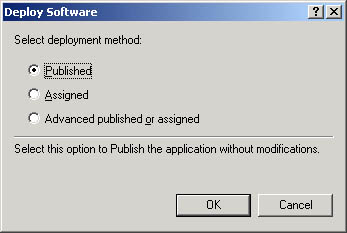
Figure 20.10 Deploy Software dialog box
Publishing Applications
Publish an application when you want the application to be available to people managed by the GPO, should they want the application. With published applications it is up to each person to decide whether or not to install the published application. An application can only be published to users.
Follow these steps to publish applications:
- Open the Group Policy snap-in. In User Configuration, open Software Settings.
- Right-click the Software Installation node, click New, and then click Package.
The File Name list in the Open dialog box shows those packages located at the SDP you specified as the default. If the Windows Installer package is located on a different network share, you can browse to find the SDP for the package.
- In the File Name list in the Open dialog box, select the Windows Installer package to be published, and then click Open.
- In the Deploy Software dialog box (see Figure 20.10), click Published, and then click OK.
The application is available for users to install either by using Add/Remove Programs in Control Panel or by opening a file with a file name extension that you have associated with the application.
Deploying Applications with Modifications
Modifications are associated with the Windows Installer package at deployment time rather than when the Windows Installer is actually using the package to install or modify the application. Modifications (.mst files) are applied to Windows Installer packages (which have the .msi extension) in an order specified by the administrator. This order must be determined before the application is assigned or published.
Follow these steps to add or remove modifications for applications:
- Open the Group Policy snap-in. In Computer or User Configuration, open Software Settings.
- Right-click the Software Installation node, click New, and then click Package.
- In the File Name list in the Open dialog box, select the Windows Installer package to be published, and then click Open.
- In the Deploy Software dialog box, click Advanced Published Or Assigned, and then click OK.
- In the Properties dialog box for the package, click the Modifications tab (see Figure 20.11).
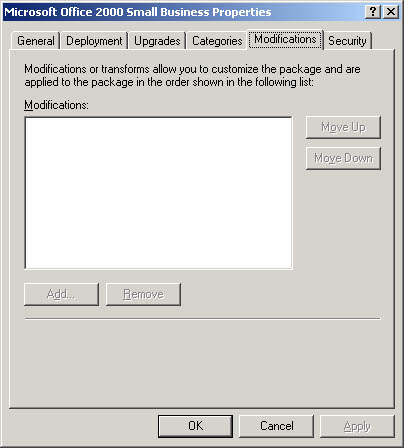
Figure 20.11 Modifications tab of the Properties dialog box
- To add modifications, click Add. In the Open dialog box, browse to find the modification file (.mst), and then click Open. You can add multiple modifications.
- To remove modifications, click the modification you want to remove, and then click Remove. Repeat until each unwanted modification has been removed.
- To set the order of modifications, select a modification and then click Move Up or Move Down. Modifications are applied according to the order specified in the list.
- Make sure that the modifications are configured exactly the way you want them, and then click OK.
IMPORTANT
Do not click OK until you have finished configuring the modifications. When you click OK, the package is assigned or published immediately. If the modifications are not properly configured you will have to uninstall the package or upgrade the package with a correctly configured version.
Setting Automatic Installation Options
To determine which application users install when they select a file, you can select a file extension and configure a priority for installing applications associated with the file extension using the File Extensions tab in the Software Installation Properties dialog box. The first application listed is the application installed in association with the file extension.
For example, if you use a GPO to deploy both Microsoft Word 2000 and Microsoft FrontPage 2000, both of these applications can edit HyperText Markup Language (HTML) documents, files with the .htm extension. To configure the file extension priority so that users who are managed by this GPO always install Microsoft FrontPage, set FrontPage as the application with the highest priority for the .htm extension. When users managed by this GPO who have installed neither Microsoft Word 2000 nor Microsoft FrontPage 2000 receive an .htm file (by e-mail or other means) and they double-click on the .htm file, Software Installation installs FrontPage 2000 and opens the .htm file for editing. Without Software Installation, the user would see the Open With dialog box and be asked to select the best alternative from the software already present on his or her computer.
File extension associations are managed on a per-GPO basis. Changing the priority order in a GPO affects only those users who have that GPO applied to them.
Follow these steps to set automatic installation options based on file name extension:
- Open the Group Policy snap-in. In Computer or User Configuration, open Software Settings.
- Right-click the Software Installation node, and then click Properties.
- In the File Extensions tab of the Software Installation Properties dialog box (see Figure 20.12), select the file extension for which you want to specify an automatic software installation from the Select File Extension list.
- In the Application Precedence list box, move the application with the highest precedence by default to the top of the list using the Up or Down buttons. The application at the top of the list is automatically installed if a document with the selected file name extension is invoked before the application has been installed.
- Click OK.
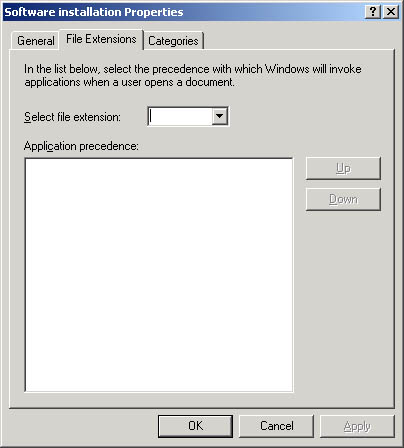
Figure 20.12 File Extensions tab of the Software Installation Properties dialog box
Setting Up Application Categories
You can organize assigned and published applications into logical categories to make it easier for users to locate the appropriate application from within Add/Remove Programs in Control Panel. Windows 2000 does not ship with any predefined categories.
The categories that you establish are per domain, not per GPO. You only need to define them once for the whole domain.
Follow these steps to set up categories for applications to be managed:
- Open the Group Policy snap-in. In Computer or User Configuration, open Software Settings.
- Right-click the Software Installation node, and then click Properties.
- In the Categories tab of the Software Installation Properties dialog box (see Figure 20.13), click Add.
- In the Enter New Category dialog box, type the name of the application category in the Category box and click OK.
- On the Software Installation Properties dialog box, click OK.
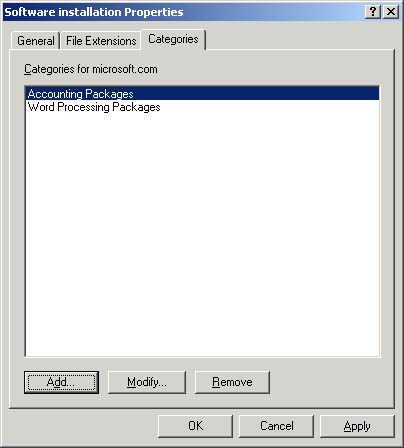
Figure 20.13 Categories tab of the Software Installation Properties dialog box
Setting Software Application Properties
You can fine-tune each application by editing installation options, specifying application categories to be used, and setting permissions for the software installation.
Editing Installation Options for Applications
Although you may have globally defined the default settings for new packages within the GPO in the General tab of the Software Installation Properties dialog box, some of these same settings can be changed later by editing the package properties. Installation options affect how an application is installed, managed, and removed.
Follow these steps to edit installation options for applications:
- Open the Group Policy snap-in. In Computer or User Configuration, open Software Settings.
- Click the Software Installation node.
- In the details pane, right-click the application for which you want to edit installation options, and then click Properties.
- In the Deployment tab of the Properties dialog box for the application (see Figure 20.14), select one of the following in the Deployment Type area:
- Published to allow users in the selected site, domain, or OU to install the application using either Add/Remove Programs in Control Panel or the application installation by file activation.
- Assigned to allow users in the selected site, domain, or OU to receive this application the next time they log on (for assignment to users) or when the computer restarts (for assignment to computers).
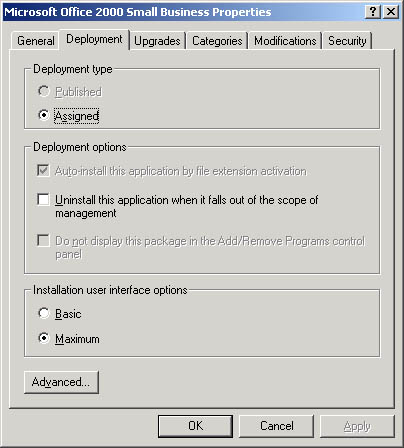
Figure 20.14 Deployment tab of the Properties dialog box
- In the Deployment Options area, select one of the following:
- Auto-Install This Application By File Extension Activation. Choose this to use the application precedence for the file name extension as determined in the File Extensions tab of the Software Installation Properties dialog box. If this is an application under the Computer Configuration node of the Group Policy snap-in, the check box appears dimmed and selected, because by default the application is installed automatically.
- Uninstall This Application When It Falls Out Of The Scope Of Management. Choose this to remove the application at logon (for users) or startup (for computers) if they move to a site, domain, or OU for which the application is not deployed.
- Do Not Display This Package In The Add/Remove Programs Control Panel. Choose this to specify that this package should not be displayed in Add/Remove Programs in Control Panel.
- In the Installation User Interface Options area, select one of the following:
- Basic. Choose this to provide only a basic display to users during the install process.
- Maximum. Choose this to provide all installation messages and screens to users during the package installation.
- Click Advanced to display the Advanced Deployment Options dialog box. In the Advanced Deployment Options area, select either of the following check boxes:
- Ignore Language When Deploying This Package. Choose this to specify whether to deploy the package even if it is in a different language.
- Remove Previous Installs Of This Product From (Users/Computers) If Product Was Not Installed By Group Policy-based Software Installation. Choose this to specify whether to remove previous installs of this product from users or computers if product was not installed by Group Policy-based Software Installation.
- Click OK.
- On the Properties dialog box, click OK.
Specifying Application Categories
You must associate applications with existing categories. Categories you set generally pertain to published applications only, as assigned applications do not appear in Add/Remove Programs in Control Panel. The application appears in the selected categories in Add/Remove Programs, which the user can use to install the application.
Follow these steps to specify application categories for Add/Remove Programs in Control Panel:
- Open the Group Policy snap-in. In Computer or User Configuration, open Software Settings.
- Click the Software Installation node.
- In the details pane, right-click the application for which you want to specify application categories, and then click Properties.
- In the Categories tab of the Properties dialog box for the application (see Figure 20.15), click the category you want to specify from the Available Categories list, and then click Select.
- Repeat Step 4 to specify additional categories. Click OK when you finish selecting categories.
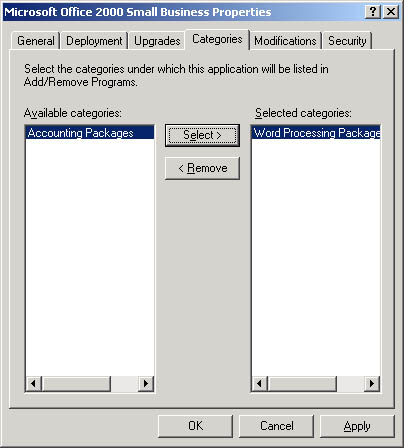
Figure 20.15 Categories tab of the Properties dialog box
Setting Permissions for Software Installation
Permissions set for software installation pertain only to the application installation.
Follow these steps to set permissions for software installation:
- Open the Group Policy snap-in. In Computer or User Configuration, open Software Settings.
- Click the Software Installation node.
- In the details pane, right-click the application for which you want to specify software installation permissions, and then click Properties.
- In the Security tab of the application's Properties dialog box, click the security group on which to set permissions.
Administrators who manage the application installation should have the Full Control permission set to Allow. Users who use the software assigned or published by the application should have the Read permission set to Allow.
- Click OK.
Maintaining Software Applications
After the deployment of software applications it may be necessary to upgrade or remove them at some point in the software life cycle.
Upgrading Applications
Several events in the life cycle of the software can trigger an upgrade, including the following:
- The original developer of the software releases a new version with new and improved features.
- The organization chooses to use a different vendor's application.
Upgrades typically involve major changes to the software and normally have new version numbers. Usually a substantial number of files change for an upgrade. You can use the Software Installation extension to establish the procedure to upgrade an existing application to the current release.
Follow these steps to upgrade applications:
- Open the Group Policy snap-in. In Computer or User Configuration, open Software Settings.
- Click the Software Installation node.
- In the details pane, right-click the Windows Installer package that will function as the upgrade (not the package to be upgraded), and then click Properties. You will have previously assigned or published this package.
- In the Upgrades tab of the application's Properties dialog box, click Add to create or add to the list of packages that are to be upgraded by the current package.
- In the Add Upgrade Package dialog box (see Figure 20.16), specify either Current Group Policy Object or A Specific GPO as the source of the package to be upgraded. In the latter case, click Browse, click the GPO you want, and then in the Browse For A Group Policy Object dialog box, click OK.
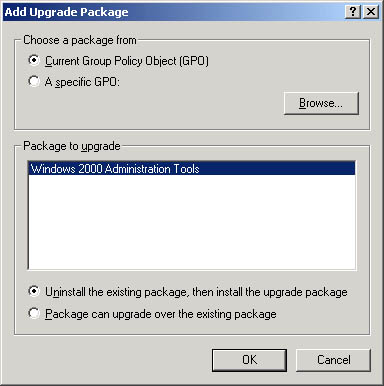
Figure 20.16 Add Upgrade Package dialog box
A list of all the other packages assigned to be published within the selected GPO appears under the heading Package To Upgrade. Depending on the GPO, this list may have zero or more entries.
- Click the package to upgrade.
- Click either Uninstall The Existing Package, Then Install The Upgrade Package, or Package Can Upgrade Over The Existing Package. Click OK. Typically, the uninstall option is used to replace an application with a completely different one (perhaps from a different vendor). The upgrade option is used to install a newer version of the same product while retaining the user's application preferences, document type associations, and so on.
- On the Upgrades tab in the Properties dialog box, enable the Required Upgrade For Existing Packages check box if you want the upgrade to be mandatory, and then click OK.
If this is an upgrade under the Computer Configuration node of the Group Policy snap-in, the check box appears dimmed and selected, because packages can only be assigned to computers, not published.
Removing Applications
At some point, users may no longer require an application, so you may need to remove it. For example, the following two issues can be resolved by using the removal choices set within the Software Installation extension:
- A version of a software application is no longer supported. Administrators can remove the software version from Software Installation without forcing the (physical) removal of the software from the computers of users who are still using the software. Users can continue to use the software until they remove it themselves. No user is able to install the software version (from the Start menu, from Add/Remove Programs in Control Panel, or by document invocation).
- A software application is no longer used. Administrators can force the removal of the software. The software is automatically deleted from a computer, either the next time the computer is turned on (when the software is assigned to the computer) or the next time the user logs on (when the software is assigned to the user). Users cannot install or run the software.
NOTE
When you originally deploy the software, if you want the application to be removed when a GPO no longer applies, select the Uninstall This Application When It Falls Out Of The Scope of Management option.
Follow these steps to remove applications:
- Open the Group Policy snap-in. In Computer or User Configuration, open Software Settings.
- Click the Software Installation node.
- In the details pane, right-click the application you want to remove, click All Tasks, and then click Remove.
- In the Remove Software Dialog box, select one of the following removal options:
- Immediately Uninstall The Software From Users And Computers. Select this option to specify that the application be removed the next time a user logs on or restarts the computer.
- Allow Users To Continue To Use The Software, But Prevent New Installations. Select this option to specify that users can continue to use the application if they have already installed it. If they remove the application or have never installed it, they will not be able to install it.
- Click OK.
Lesson Summary
In this lesson you learned how the Software Installation extension helps you specify how applications are installed and maintained in your organization. You can centrally manage the installation of software on a client computer by assigning applications to users or computers or by publishing applications for users. Assign required or mandatory software to users or to computers. Publish software that users might find useful to perform their jobs.
The Software Installation extension uses Windows Installer technology to systematically maintain software. The Windows Installer package is a file that contains explicit instructions for installing and removing specific applications.
You also learned the tasks ued for implementing software installation: planning and preparing; setting up an SDP; specifying software installation defaults; deploying software applications; setting automatic installation options; setting up application categories; setting software application properties; and maintaining software applications.
EAN: N/A
Pages: 244