Lesson 1: Implementing Group Policy
You can use Group Policy to establish configuration settings for your organization. This lesson guides you through the steps of implementing a Group Policy using the Group Policy tab and the Group Policy snap-in. You also learn how to modify a Group Policy policy.
After this lesson, you will be able to
- Implement a Group Policy
- Modify a Group Policy
Estimated lesson time: 60 minutes
Implementing Group Policy
The tasks for implementing Group Policy are
- Creating a Group Policy object (GPO)
- Creating a console for the GPO
- Delegating administrative control of the GPO
- Specifying Group Policy settings for the GPO
- Disabling unused Group Policy settings
- Indicating any GPO processing exceptions
- Filtering the scope of the GPO
- Linking the GPO to a site, domain, or organizational unit (OU)
Creating a GPO
The first step in implementing a Group Policy is to create a GPO. Recall that a GPO is a collection of Group Policy settings.
Follow these steps to create a GPO:
- Determine the type of GPO you want to create
- To create a GPO linked to a domain or an OU, open Active Directory Users and Computers.
- To create a GPO linked to a site, open Active Directory Sites and Services.
- Right-click the site, domain, or OU for which you want to create a GPO, click Properties, and select the Group Policy tab (see Figure 20.1).
- Click New, and then type the name you would like to use for this GPO.
By default, the new GPO is linked to the site, domain, or OU that was selected in the MMC when it was created and its settings apply to that site, domain, or OU.
- Click Close.
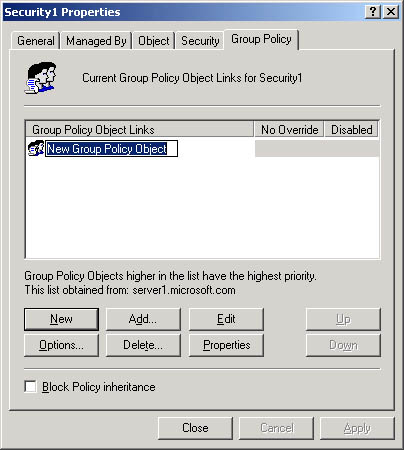
Figure 20.1 Group Policy tab
Creating a GPO Console
After you create a GPO, you should add the Group Policy snap-in to an MMC and create a standalone GPO console. After saving the console, you can open it whenever necessary from the Administrative Tools menu.
Delegating Administrative Control of a GPO
After you create a GPO, it is important to determine which groups of administrators have access permissions to the GPO. The default permissions on GPOs are shown in Table 20.1.
Table 20.1 Default GPO Permissions
| Security Group | Default Settings |
|---|---|
| Authenticated Users | Read, Apply Group Policy, Special Permissions |
| CREATOR OWNER | Special Permissions |
| Domain Administrators | Read, Write, Create All Child Objects, Delete All Child Objects, Special Permissions |
| Enterprise Administrators | Read, Write, Create All Child Objects, Delete All Child Objects, Special Permissions |
| SYSTEM | Read, Write, Create All Child Objects, Delete All Child Objects, Special Permissions |
By default, the Default Domain Policy GPO cannot be deleted by any administrator. This prevents the accidental deletion of this GPO, which contains important required settings for the domain.
If you are working with a GPO from a pre-built console, such as the Active Directory Users and Computers, the Delegation Of Control wizard is not available for use in delegating administrative control of a GPO; it only controls security of an object.
Follow these steps to delegate administrative control of a GPO:
- Access the Group Policy snap-in for the GPO.
- Right-click the Root node of the console and click Properties
- Click the Security tab (see Figure 20.2), and then click the security group for which you want to allow or deny administrative access to the GPO.
If you need to change the list of security groups for which you want to allow or deny administrative access to the GPO, you can add or remove security groups using Add and Remove.
- To provide administrative control of all aspects of the GPO, set the Read permission to Allow and set the Write permission to Allow.
A user or administrator who has Read access but does not have Write access to a GPO cannot use the Group Policy snap-in to see the settings that it contains. All extensions to the Group Policy snap-in require Write access to open a GPO.
- Click OK.
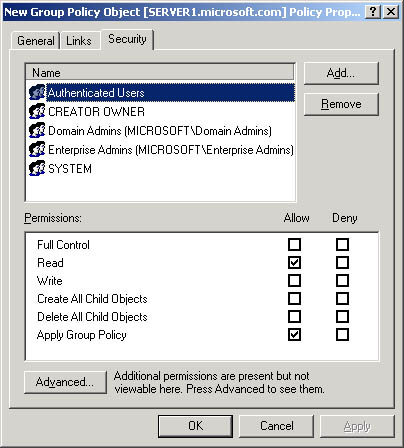
Figure 20.2 GPO Properties Security tab
Specifying Group Policy Settings
After you create a GPO and determine the administrators who have access permissions to the GPO, you can specify the Group Policy settings.
Follow these steps to specify Group Policy settings for a GPO:
- Access the Group Policy snap-in for the GPO (see Figure 20.3).
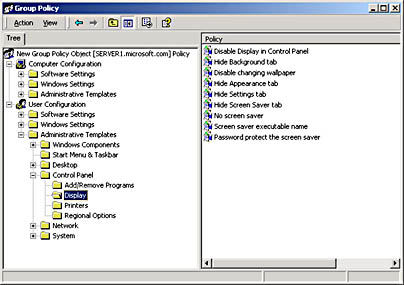
Figure 20.3 Group Policy snap-in
- In the console tree, expand the item that represents the particular policy you want to set.
For example, in Figure 20.3, User Configuration, Administrative Templates, and Control Panel were expanded, and then Display was expanded.
- In the details pane, right-click the policy that you want to set, and then click Properties. In Figure 20.4, the Hide Screen Saver Tab policy was selected in the details pane.
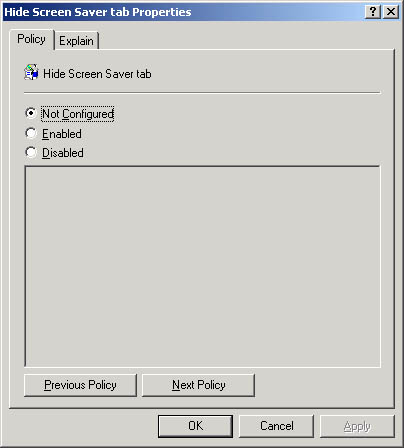
Figure 20.4 Hide Screen Saver Tab Properties dialog box
- Click Enabled to apply the policy to users or computers that are subject to this GPO, and then click OK.
Not Configured indicates that no change will be made to the registry regarding this setting. Disabled indicates that the registry will indicate that the policy does not apply to users or computers that are subject to this GPO.
Disabling Unused Group Policy Settings
If, under the Computer Configuration or User Configuration node of the console, a GPO has only settings that are Not Configured, you can avoid processing those settings by disabling the node. This expedites startup and logon for those users and computers subject to the GPO.
Follow these steps to disable the Computer Configuration or User Configuration settings for a GPO:
- Access the Group Policy snap-in for the GPO.
- Right-click the Root node of the console and click Properties.
- In the General tab in the Properties dialog box:
- To disable the Computer Configuration settings, click the Disable Computer Configuration Settings check box.
- To disable the User Configuration settings, click the Disable User Configuration Settings check box.
- Click OK.
Indicating GPO Processing Exceptions
GPOs are processed according to the Active Directory hierarchy: first the local GPO, then the site GPOs, domain GPOs, and finally the OU GPOs. However, you can change the default order of processing Group Policy settings. You do so by modifying the order of GPOs for an object, specifying the Block Policy Inheritance option, specifying the No Override option, or enabling the Loopback setting.
Follow these steps to modify the order of GPOs for an object:
- Open Active Directory Users and Computers to set the order of GPOs for a domain or OU, or open Active Directory Sites and Services to modify the order of GPOs for a site.
- In the console tree, right-click the site, domain, or OU for which you want to modify the GPO order, click Properties, and then click the Group Policy tab.
- In the Group Policy Object Links list, select the GPO and click the Up button (as shown in Figure 20.5) or the Down button to change the priority for a GPO for this site, domain, or OU. Windows 2000 processes GPOs from the top of the list to the bottom of the list.
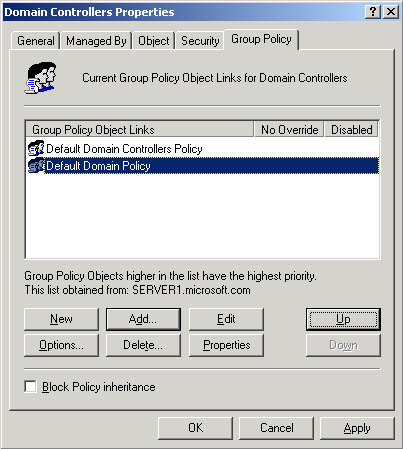
Figure 20.5 Modifying the order of GPOs
Follow these steps to specify the Block Policy Inheritance option:
- Open Active Directory Users and Computers to specify the Block Policy Inheritance option for a domain or OU, or open Active Directory Sites and Services to specify the Block Policy Inheritance option for a site.
- In the console tree, right-click the site, domain, or OU for which you want to specify the Block Policy Inheritance option, click Properties, and then click the Group Policy tab.
- Select the Block Policy Inheritance check box to specify that all GPOs linked to higher level sites, domains, or OUs should be blocked from linking to this site, domain, or OU. You cannot block GPOs that use the No Override option.
Follow these steps to specify the No Override option:
- Open Active Directory Users and Computers to specify the No Override option for a domain or OU, or open Active Directory Sites and Services to specify the No Override option for a site.
- In the console, right-click the site, domain, or OU to which the GPO is linked, click Properties, and then click the Group Policy tab.
- Select the GPO, click Options, select the No Override check box in the Options dialog box (see Figure 20.6) to specify that other GPOs should be prevented from overriding settings in this GPO, and then click OK.

Figure 20.6 Options dialog box
Follow these steps to enable the Loopback setting:
- Access the Group Policy snap-in for the GPO.
- In the console tree, expand Computer Configuration, Administrative Templates, System, and Group Policy.
- In the details pane, double-click User Group Policy Loopback Processing Mode.
- In the User Group Policy Loopback Processing Mode Properties dialog box, click Enabled.
- Select one of the following modes in the Mode list:
- Replace Use this to replace the GPO list for the user with the GPO list already obtained for the computer at computer startup.
- Merge Use this to append the GPO list obtained for the user at logon with the GPO list already obtained for the computer at computer startup.
- Click OK.
Filtering GPO Scope
The policies in a GPO apply only to users who have Read and Apply Group Policy permissions for that GPO. You can filter the scope of a GPO by creating security groups and then assigning Read and Apply Group Policy permissions to the selected groups. Thus, you can prevent a policy from applying to a specific group by denying that group Read and Apply Group Policy permissions to the GPO.
Follow these steps to filter the scope of a GPO:
- Access the Group Policy snap-in for the GPO.
- Right-click the Root node of the console, and then click Properties.
- Click the Security tab (see Figure 20.7), and then click the security group through which to filter this GPO.

Figure 20.7 Security tab of the GPO properties dialog box
If you need to change the list of security groups through which to filter this GPO, you can add or remove security groups using Add and Remove.
Set the permissions as shown in Table 20.2, and then click OK.
Table 20.2 Permissions for GPO Scopes
| GPO scope | Set These Permissions | Result |
|---|---|---|
| Members of this security group should have this GPO applied to them. | Set Apply Group-Policy (AGP) to Allow. Set Read to Allow. | This GPO applies to members of this security group unless they are members of at least one other security group that has AGP set to Deny, or Read set to Deny, or both. |
| Members of this security group are exempt from this GPO. | Set AGP to Deny. Set Read to Deny. | This GPO never applies to members of this security group regardless of the permissions those members have in other security groups. |
| Membership in this security group is irrelevant to whether the GPO should be applied | Set AGP to neither Allow nor Deny. Set Read to neither Allow nor Deny. | This GPO applies to members of this security group only if they have both AGP and Read set to Allow as members of at least one other . security group. They also must not have AGP or Read set to Deny as members of any other security group. |
Linking a GPO
By default, a new GPO is linked to the site, domain, or OU that was selected in the MMC when it was created. Therefore, its settings apply to that site, domain, or OU. Use the Group Policy tab for the site, domain, or OU properties to link a GPO to additional sites, domains, or OUs.
Follow these steps to link a GPO to a site, domain, or OU:
- Open Active Directory Users and Computers to link a GPO to a domain or OU, or open Active Directory Sites and Services to link a GPO to a site.
- In the console, right-click the site, domain, or OU to which the GPO should be linked.
- Click Properties, and then click the Group Policy tab.
- If the GPO already appears in the Group Policy Object Links list, and then click Cancel. If the GPO does not appear in the Group Policy Object Links list, and then click Add.
- In the Add A Group Policy Object Link dialog box (see Figure 20.8), click the All tab, click the desired GPO, and then click OK.
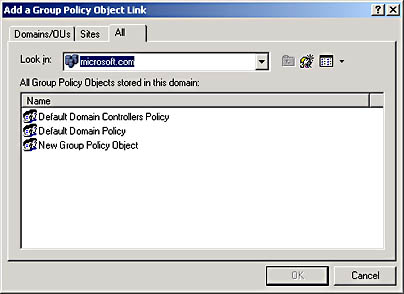
Figure 20.8 Add A Group Policy Object Link dialog box
- In the Properties dialog box for the site, domain, or OU, click OK.
Modifying Group Policy
The following is the sequence of tasks used to modify Group Policy :
- Removing a GPO link
- Deleting a GPO
- Editing a GPO and GPO settings
Removing a GPO Link
Removing a GPO link simply unlinks the GPO from the specified site, domain, or OU. The GPO remains in Active Directory until it is deleted.
Follow these steps to remove a GPO link:
- Open Active Directory Users and Computers to unlink a GPO from a domain or OU, or open Active Directory Sites and Services to unlink a GPO from a site.
- In the console, right-click the site, domain, or OU from which the GPO should be unlinked.
- Click Properties, and then click the Group Policy tab.
- In the Group Policy tab, select the GPO that you want to unlink, and then click Delete.
- In the Delete dialog box, click Remove The Link From The List.
The GPO remains in Active Directory but is no longer linked.
Deleting a GPO
If you delete a GPO, it is removed from Active Directory, and any sites, domains, or OUs to which it is linked will no longer be affected by it. You may wish to take the less drastic step of removing the GPO link, which disassociates the GPO from its OU but leaves the GPO intact in Active Directory.
Follow these steps to delete a GPO:
- Open Active Directory Users and Computers to delete a GPO from a domain or OU, or open Active Directory Sites and Services to delete a GPO from a site.
- In the console, right-click the site, domain, or OU from which the GPO should be deleted.
- Click Properties, and then click the Group Policy tab.
- In the Group Policy tab, select the GPO that you want to delete, and then click Delete.
- In the Delete dialog box, click Remove The Link And Delete The Group Policy Object Permanently, and then click OK.
The GPO is removed from Active Directory.
Editing a GPO and GPO Settings
To edit a GPO or its settings, follow the procedures outlined earlier in this lesson for creating a GPO and for specifying Group Policy settings.

Practice: Implementing a Group Policy
In this practice you implement a Group Policy for your domain. In Exercises 1 through 8 you create a GPO, create a GPO console, delegate administrative control of the GPO, specify Group Policy settings for the GPO, disable unused Group Policy settings, indicate a GPO processing exception, filter the scope of the GPO, and link the GPO to an additional OU. In Exercise 9 you test the Group Policy.
Exercise 1: Creating a GPO
In this exercise you create a GPO at the OU level.
To create a GPO for your OU
- Log on to the domain as Administrator.
- Click Start, point to Programs, point to Administrative Tools, and then click Active Directory Users And Computers.
- Double-click microsoft.com (or the name of the domain you have created).
- Create a new OU called Dispatch.
- Right-click the Dispatch OU, click Properties, and then select the Group Policy tab.
- Click New, and then type DispatchPolicy to name this GPO.
- Click Close.
Exercise 2: Creating a GPO Console
In this exercise you create a console for the DispatchPolicy GPO. After saving it, you can open it whenever necessary from the Administrative Tools menu.
To create a DispatchPolicy GPO console
- Click Start, and then point to Run.
The Run dialog box appears.
- Type mmc in the Open box, and then click OK.
A new MMC appears.
- From the Console menu, click Add/Remove Snap-In.
The Add/Remove Snap-In dialog box appears.
- Click Add.
The Add Standalone Snap-In dialog box appears.
- Select Group Policy, and then click Add.
The Select Group Policy Object page appears.
- Click Browse to find the DispatchPolicy GPO.
The Browse For A Group Policy Object dialog box appears.
- Click the All tab, click the DispatchPolicy GPO, and then click OK.
The Select Group Policy Object page appears with DispatchPolicy in the Group Policy Object box.
- Click Finish, and then click Close on the Add Standalone Snap-In dialog box.
- Click OK on the Add/Remove Snap-In dialog box.
- On the Console menu, click Save As.
The Save As dialog box appears.
- Type DispatchPolicy GPO in the File Name box, and then click Save.
The DispatchPolicy GPO is now available on the Administrative Tools menu.
Exercise 3: Delegating Administrative Control of a GPO
In this exercise you delegate administrative control for the DispatchPolicy GPO to the Administrators group.
To delegate administrative control for your GPO
- Access the DispatchPolicy GPO console.
- Right-click the Root node of the console, DispatchPolicy [server1.microsoft.com] Policy, click Properties, and then click the Security tab.
The DispatchPolicy [server1.microsoft.com] Policy Properties dialog box appears.
What security groups already have administrative control of the DispatchPolicy GPO?
- Add the Administrators group using the Add button.
- To provide administrative control of all aspects of the GPO to the Administrators group, set Read, Write, Create All Child Objects, and Delete All Child Objects to Allow for the group.
- Click OK.
Exercise 4: Specifying Group Policy Settings
In this exercise you specify some Group Policy settings for the DispatchPolicy GPO.
To specify Group Policy settings for your GPO
- In the DispatchPolicy GPO console, in the console tree, expand the Root node of the console.
- Click User Configuration, and then click Administrative Templates.
- In the console tree, click Start Menu & Task Bar.
What appears in the details pane?
Answer
- In the details pane, double-click Remove Search Menu From Start Menu.
The Remove Search Menu From Start Menu Properties dialog box appears.
- Click Enabled, and then click OK.
How can you tell at a glance that this setting is enabled?
Answer
- Repeat Steps 4 and 5 to enable the Remove Run Menu From Start Menu policy (still under User Configuration).
- In the console tree, double-click System, and then click Logon/Logoff.
The policies available for this category appear in the details pane.
- In the details pane, enable the Disable Lock Computer policy and click OK.
Exercise 5: Disabling Unused Group Policy Settings
In this exercise you disable the Computer Configuration node of the console, as this node contains only settings that are not configured. This expedites startup for those users and computers subject to the GPO.
To disable the Computer Configuration settings for your GPO
- On the DispatchPolicy GPO console, right-click the Root node of the console, and then click Properties.
The DispatchPolicy [server1.microsoft.com] Policy Properties dialog box appears.
- In the General tab, click Disable Computer Configuration Settings.
The Confirm Disable message box appears, asking you to confirm that you want to disable the Computer Configuration settings.
- Click Yes, and then click OK.
Exercise 6: Indicating GPO Processing Exceptions
In this exercise you set the No Override option to prevent other GPOs from overriding the policies set in the DispatchPolicy GPO.
To set the No Override option for your GPO
- Click Start, point to Programs, point to Administrative Tools, and then click Active Directory Users And Computers.
- Right-click the Dispatch OU, and then click Properties.
The Dispatch Properties dialog box appears.
- Click the Group Policy tab, click the DispatchPolicy GPO, and then click Options.
The DispatchPolicy Options dialog box appears.
- Select the No Override check box, and then click OK.
- In the Dispatch Properties dialog box, click OK.
Exercise 7: Filtering GPO Scope
In this exercise you prevent a policy from applying to the Sales security group by denying that group Read permission to the GPO. You created the Sales group and its members in Chapter 7, "Managing Security ".
To filter the scope of your GPO
- In the DispatchPolicy GPO console, right-click the Root node of the console, and then click Properties.
The DispatchPolicy [server1.microsoft.com] Policy Properties dialog box appears.
- Click the Security tab, and then click the Sales security group. Add the Sales group using the Add button.
- For the Sales group, set Apply Group Policy to Deny and set Read to Deny, and then click OK.
The Security message box appears, asking you to confirm that you want to prevent the DispatchPolicy from applying to the Sales group.
- Click Yes.
Exercise 8: Linking a GPO
By default, the DispatchPolicy GPO is linked and its settings apply to the Dispatch OU. In this exercise you link the DispatchPolicy GPO to the Security1 OU you created in Chapter 19, "Managing Active Directory Components."
To link your GPO to an additional OU
- Click Start, point to Programs, point to Administrative Tools, and then click Active Directory Users And Computers.
- Right-click the Security1 OU, and then click Properties.
The Security1 Properties dialog box appears.
- Click the Group Policy tab, and then click Add.
The Add A Group Policy Object Link dialog box appears.
- Click the All tab, click the DispatchPolicy GPO, and then click OK.
- In the Security1 Properties dialog box, click OK.
Exercise 9: Testing a GPO
In this exercise you view the effects of the Group Policy implemented in the previous exercises.
To test the DispatchPolicy GPO
- Log on as Assistant1, a member of the Security1 OU.
- Press Ctrl+Alt+Delete.
The Windows Security dialog box appears.
Are you able to lock the workstation? Why?
Answer
- Click Cancel, and then click Start.
Does the Search command appear on the Start menu?
Does the Run command appear on the Start menu?
Answer
- Log off as Assistant1, and then log on as Administrator.
- Make Assistant1 a member of the Sales security group.
- Log off as Administrator, and then log on as Assistant1.
- Press Ctrl+Alt+Delete.
Are you able to lock the workstation? Why?
Answer
- Log off the computer.
Lesson Summary
In this lesson you learned the tasks involved with implementing Group Policy. The tasks are creating a GPO; creating a GPO console; delegating administrative control of the GPO; specifying Group Policy settings for the GPO; disabling unused Group Policy settings; indicating GPO processing exceptions; filtering the scope of the GPO; and linking the GPO to a site, domain, or OU.
In the practice portion of this lesson you implemented a Group Policy for your domain. You created a GPO, created a console for the GPO, delegated administrative control of the GPO, specified Group Policy settings for the GPO, disabled unused Group Policy settings, set the No Override option for the GPO, filtered the scope of the GPO, and linked the GPO to an additional OU. Finally, you tested the effects of the GPO.
EAN: N/A
Pages: 244