| In this section, you will create a live Windows Media stream on your authoring computer. That is, source audio enters your computer uncompressed and exits as an encoded live stream. The Windows Media streaming server forwards the live stream, in turn, to your listeners on the Internet. Make sure your audio source is plugged into your computer's audio input. Use the same audio input level guidelines that you used to create a digital file (see Chapter 2). Your source audio quality is crucial here. This is because no further opportunities (such as waveform editors) are typically available to optimize the signal between encoding and outputting that audio as a live stream. Make sure your signal is as clean as possible and that your level is set accurately not so low that it can't be heard and not so loud that it will distort; both scenarios prevent the encoder from doing a good job. You might want to place some audio hardware (such as a compressor) in your signal path to smooth the signal and increase the encoder's efficiency. (See Chapter 11, "Advanced Audio Optimization.") When sending a live stream to the Internet, your authoring computer's software (in this case, the Windows Media Encoder) needs to connect to a computer running Windows Media streaming server software. Therefore, an important early step is to either lease or borrow someone else's server, or have your own already configured. (See "Creating a Server" at the end of this chapter.) You'll also need a reliable Internet connection between the encoding authoring computer and the server computer. In addition, you'll need a valid username and password ready to plug in as you configure your Windows Media encoder to create a live stream. If you're running your own server, you should already have that information handy; otherwise, make sure you have received it from your server provider. Prior to beginning the live stream, it's strongly recommended that you have, if possible, another test computer available to do a listening test. Short of calling your friends on the phone (which also works), this is the best way to make sure your live stream sounds okay and is actually making it out to the Internet intact. The most realistic test is having your listening test computer on a completely different Internet connection from your live encoder computer. In addition, if you're encoding and streaming for modem users, make sure you test your live stream with a modem connection and not broadband or DSL to get a realistic experience. NOTE Although it's possible to use the same computer to simultaneously author from and run your streaming server, doing so is not recommended for handling more than a dozen listeners.
The Step-by-Step below walks you through the process of using the Windows Media Encoder to create a live stream suitable for streaming to 56Kbps dialup modem users. If streaming to 384Kbps DSL users, encode to a 128Kbps stream in step 6. STEP-BY-STEP: Using Windows Media Encoder to Author a Live Windows Media Stream -
Launch the Windows Media Encoder and open the New Session Wizard. Options are Broadcast a Live Event from Attached Device or Computer Screen, Capture Audio or Video from Attached Device or Computer Screen, or Convert an Audio or Video File into a Windows Media File. You will also see a check box for Begin Converting When This Wizard Finishes. Leave this box unchecked. -
Choose Broadcast a Live Event from Attached Device or Computer Screen (see Figure 4.12) and click Next. Figure 4.12. Select Broadcast a Live Event from Attached Device or Computer Screen from the Windows Media Encoder Recording Assistant. 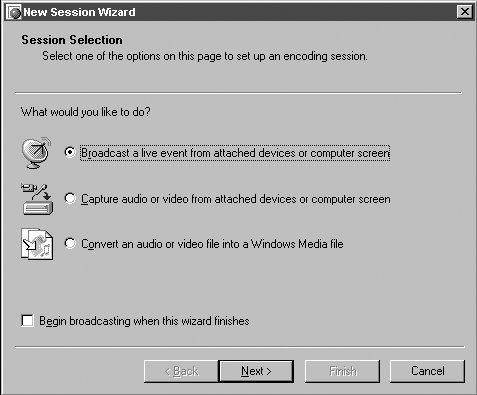 NOTE Back buttons are available at every step to change information. The Windows Media Encoder's New Session Wizard also includes a Help area for most questions. -
In the Device Options window (see Figure 4.13), uncheck Video. Audio is selected by default and cannot be unchecked. The default audio device (soundcard or software) should already be selected in the pull-down menu. Ignore the Configure button (the default settings should be just fine), and click Next. Figure 4.13. Uncheck Video and make sure Audio is checked within the Windows Media Encoder Device Options window. 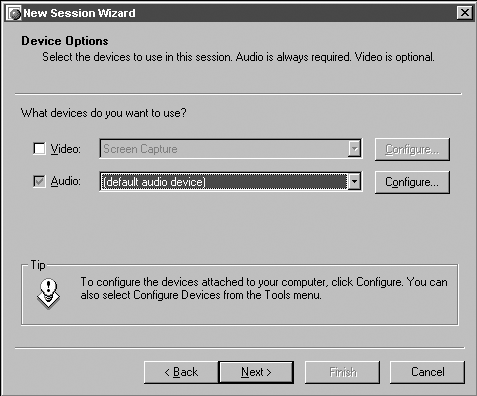 -
In the Broadcast Connection window, leave the default of 8080 for the HTTP Port option. NOTE If you're running another network service (another Web server) on your encoding computer that is already using port 8080, check the Find Free Port box and the encoder will choose a new port for you. If you're behind a firewall, make sure to choose a port that is allowed. Ports that are commonly used by Web servers (8080 or 80) are good ports to try. If necessary, consult your network administrator. -
Lower down in the Broadcast Connection window (see Figure 4.14) is the URL for your Internet or LAN connection. Make note of this URL you'll need it when you configure your Windows Media server to receive your live stream. If you're satisfied with these choices, click Next. Figure 4.14. Set your Windows Media Encoder Broadcast Connection settings according to the instructions in step 5. 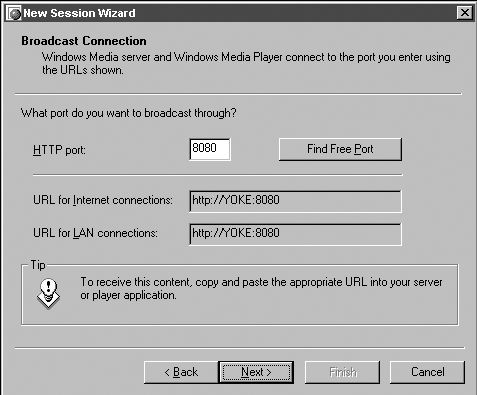 NOTE Your authoring computer name might not be displayed in the Broadcast Connection window as a full Internet host name. For example, it might display SERVERNAME instead of the full name SERVERNAME.MYDOMAIN.COM. Although it's sometimes possible to use the short name of your authoring computer on your Windows Media server, it's recommended that you always use its full host name or IP address. You can't change this value from the Windows Media Encoder it's pulled from the operating system's settings. If your authoring computer's name is only listed in its short form, don't worry. This host name (or IP address) can be entered into the Windows Media server configuration manually. If you aren't certain what your authoring computer's full host name or IP address is, ask your network administrator. -
In the Profile Selection window, specify the bit rate to encode your source audio. Choose from a menu of eight audio-only encoding choices. (You can ignore the video-relevant choices for now.) From the eight audio-only bit rate encoding options, choose Audio for Dial-Up Modems (56 Kbps Stereo) from the Profile Selection window (see Figure 4.15). Click Next. Figure 4.15. Choose Audio for Dial-Up Modems (56 Kbps Stereo) in the Windows Media Encoder Profile Selection window. 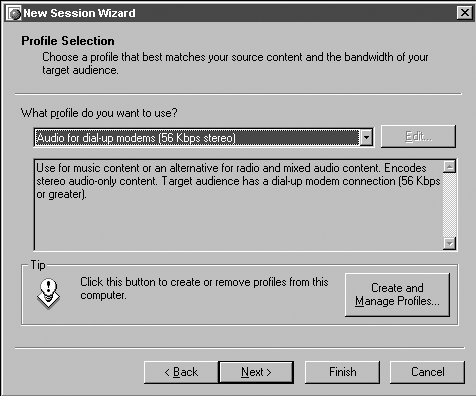 NOTE Advanced users can create custom profiles to control individual codecs, bit rates, sample rates, and number of channels (mono or stereo). -
From the Archive Option window (see Figure 4.16), you can choose to make a local copy (archive) of your broadcast as it streams. The broadcast archive can serve as a backup and can also be used later for on-demand listening. Choose your location folder for this archive file and remember to make sure you have enough disk space. Click Next. Figure 4.16. Select the location and filename to archive your live Windows Media stream. 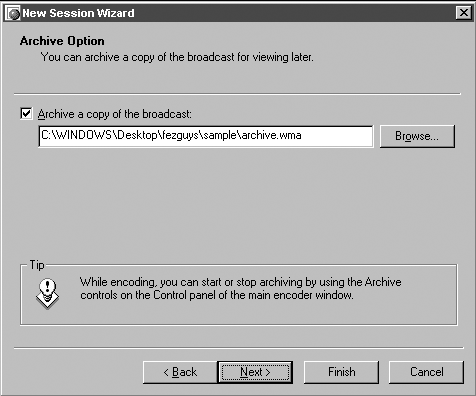 -
In the Display Information window, enter your file's attributes (see Windows Media Stream Attributes earlier in this chapter) including title, author, copyright, rating, and song description. Click Next. Figure 4.17. Enter your Windows Media file attributes in the Windows Media Encoder's Display Information window. 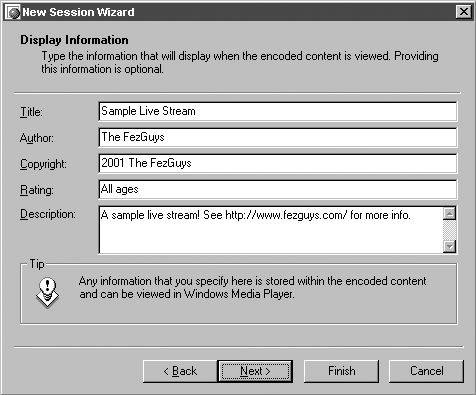 -
In the Settings window, you will find a summary of your configuration information. If everything looks as it should, click Finish. -
Check your audio input levels. Click the Mixer button under the Audio panel of the main Windows Media encoder window (see Figure 4.18) to launch the standard Windows audio mixer. The Windows Media Encoder saves you a step by automatically setting the mixer for input instead of output levels. (It will be titled Record Control.) Figure 4.18. Click the Mixer button to launch the standard Windows audio mixer and check your input levels. 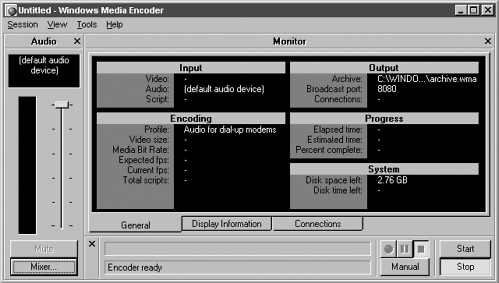 -
Select the correct input from the mixer window and move the Windows Media Encoder window and the mixer window so that they are side by side. Start your input source audio with the loudest musical section and click Start on the encoder. Observe the input levels and adjust them accordingly. NOTE Adjust the input level from the Record section of the standard Windows audio mixer (see Figure 4.19), not from within the Windows Media Encoder's Audio display. Windows Media Encoder's volume control and mute button don't appear to work reliably. Figure 4.19. Select your audio input and adjust your input recording levels. 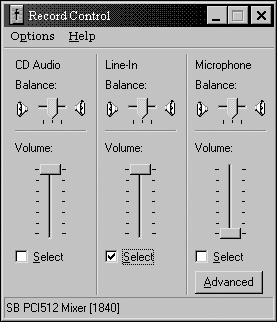 -
If everything looks healthy, press Stop and reset your source audio to the start point. When you're ready, click Start on the encoder and start your audio source (see Figure 4.20). The encoder begins streaming. (See " Creating a Server " for how to set up and configure a Windows Media Server.) Figure 4.20. Click Start in the Windows Media Encoder to begin streaming. 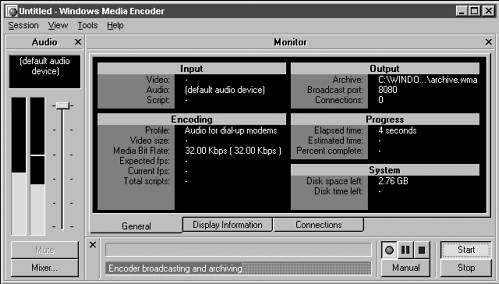 Test your live stream by plugging the URL that your Windows Media server administrator provides into your Windows Media player, ideally on a different computer with a different network connection (see Figure 4.21). If you're running your own server, see the following Step-by-Step tutorial on necessary server configuration. Figure 4.21. Use your Windows Media Player to test your live stream. 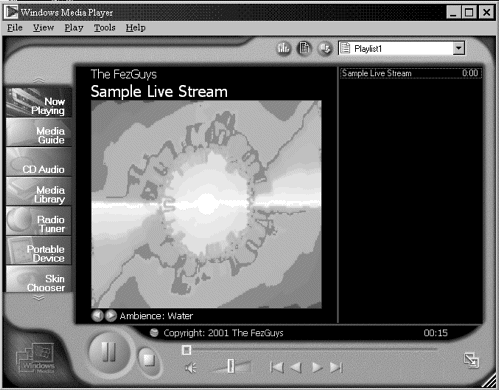 |