| Now that you have on-demand Windows Media encoded files or a live Windows Media stream on your authoring computer, it's time to serve it to your Internet audience. This means configuring and using (or leasing space on) a server computer to stream those files. This server (and the streaming software on it) is really a go-between that acts as the doorway between your stream's authoring point and the Internet. A limitation to using the Windows Media format is that only computers running Windows NT/2000 can run the Windows Media streaming server. If you wish to serve your live or on-demand streams via real-time streaming the Windows Media server is required. HTTP/Progressive streaming of on-demand Windows Media streams can be done through the Windows Media server or any Web server. You'll be using the Windows Media Server for all the Step-by-Step tutorials in this chapter. For more information on issues relating to streaming servers, see Chapter 7. STEP-BY-STEP: Creating a Windows Media Server (Windows NT/2000) NOTE Steps in the install process that are not mentioned here indicate that you should accept the default that the Windows Media Server installer offers.
-
Download the Windows Media Server software for your computer running Windows NT/2000 from www.microsoft.com/windowsmedia/download. (Reminder: The Windows Media Server is not available for Windows 98/ME.) -
From the download Web page, select Windows Media Services. -
From the download list, select the free Windows Media services for NT. If you need more advanced features, you can also download the Windows Media services add-in. -
Install the Windows Media server on your computer running Windows NT/2000. NOTE To install the Windows Media server, you need to be running NT v4.0 with Service Pack 4 or later, and be logged in from your authoring computer to your NT server as a user with administrator privileges. If you aren't familiar with this NT-specific process, refer to your NT manual. -
When prompted for the directory to store your content (Windows Media calls this your Home Publishing Point), enter the appropriate folder or keep the default. This is the directory where all of your Windows Media encoded on-demand files will be placed. -
You are asked if you want to enable HTTP streaming and distribution. If you aren't running a Web server on the same computer, you might want to enable this service, which allows the Windows Media server to act as a Web server and serve on-demand files using HTTP/Progressive streaming. If you already have a Web server running, you can use it for HTTP/Progressive streaming. -
An account for the Windows Media service must now be configured. Thankfully, the installer can take care of the finer points of account creation for you. Accept the default option and allow the installer to create a NetShowServices account. This prevents you from having to deal with some of the more arcane user account administration functions of the Windows Media Server within the NT/2000 operating system. If you absolutely must have all the power, select the account you want to use. -
Upon successful installation, you will be prompted to restart your server computer. After your server computer has rebooted, you need to configure your Windows Media server software via the Windows Media Server Administrator to do the following: -
Pull live streams from your authoring computer. -
Handle uploading of your on-demand files to the Home Publishing Point specified during this installation. More details on creating metafiles to access this content can be found in Chapter 7.
The following Step-by-Step walks you through the process of using the Windows Media Administrator to configure your Windows Media Server to serve a live stream. In our Step-by-Step, the same server computer will be used to run both the Windows Media Server and the Windows Media Administrator. NOTE Although it is recommended that you run the Windows Media Administrator and the Windows Media Server on the same computer, this won't always work. For instance, if your Windows Media Server is physically elsewhere, you can install the Windows Media Administrator on a Windows 98/ME computer and use it to remotely configure your Windows Media Server.
STEP-BY-STEP: Configuring a Live Windows Media Stream Using the Windows Media Administrator -
Launch the Windows Media Administrator by clicking Start, Windows Media, and Windows Media Administrator. -
On the main page, under Configure Server, click Unicast Publishing Points. -
Under Broadcast Unicast Publishing Points, make sure that the "Use wizard" checkbox is selected, and then click the Broadcast button and select New. This launches a QuickStart Wizard. Figure 4.22. Start the QuickStart Wizard by selecting New from the Broadcast Unicast Publishing Points pull-down menu. 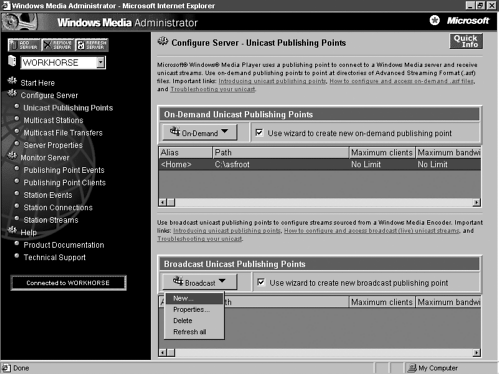 -
Verify that the Windows Media live stream from your encoding/authoring computer is running and click Next. -
Select Create a Broadcast Publishing Point from the QuickStart Wizard Select a Publishing Point window (see Figure 4.23) and click Next. Figure 4.23. Select Create a Broadcast Publishing Point from the QuickStart Wizard's Select a Publishing Point window. 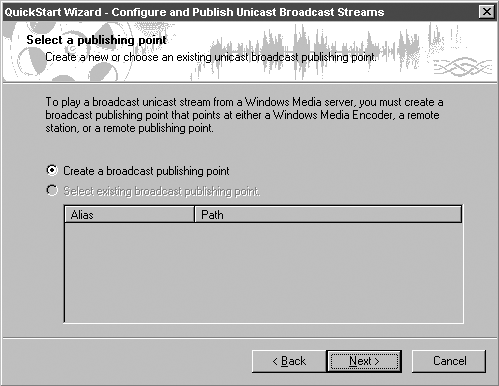 NOTE The first time you add a live stream to your server configuration, you will need to create a broadcast publishing point (BPP). A BPP is defined as a virtual directory for storing content that is available to clients or for accessing a live stream. The BPP is the folder where the encoded streams reside. That might mean your authoring computer (for live streams), a server computer (for on-demand files), or another computer. Listeners, or clients, reach a BPP through the BPP's URL. -
On the Specify Source window, select Windows Media Encoder (see Figure 4.24). This tells the server to redistribute a stream authored with the Windows Media encoder. Other choices are Remote Station and Remote Publishing Point for server-to-server broadcasting and more advanced server architecture. Click Next. Figure 4.24. Specify Windows Media Encoder as your encoding source from within the Windows Media Administrator. 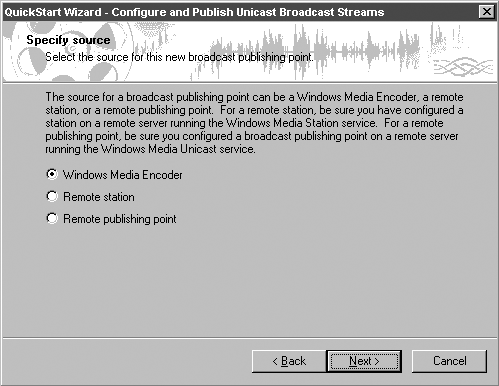 -
In the New Broadcast Publishing Point to a Windows Media Encoder window (see Figure 4.25), enter an alias (the name you give your Publishing Point). You can use the New Session Wizard's suggestion of LiveEvents. Figure 4.25. Name your publishing point and enter the URL and port to your encoding source in the Windows Media Administrator. 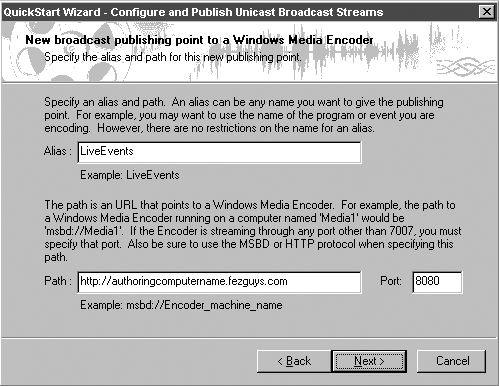 -
Now you must provide a path. This is the URL that points to your Windows Media Encoder (see steps 4 and 5 of the earlier Step-by-Step "Using Windows Media Encoder to Author a Live Windows Media Stream.") For this example, the URL is http://authoringcomputername.mydomain.com. -
Next, enter the port you selected on your authoring computer. If you used 8080, enter that here. Of course, if you used 80, enter that instead. Click Next. -
Within the Select Publishing Method page (see Figure 4.26), choose the default protocol of MMS and uncheck all publishing options. The publishing options are shortcuts to creating HTML and metafiles or copying related links to your Clipboard for linking Web pages to your live stream. (You will learn more about this in Chapter 7.) Note the MMS URL listed here. This URL will be used in a Windows Media player to test the live stream. Click Next. Figure 4.26. Select the MMS protocol, uncheck all publishing options, and edit your server name if necessary in the Publishing Method page of the Windows Media Administrator. 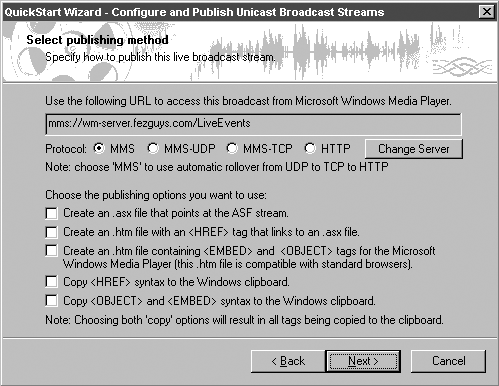 NOTE Your Windows NT/2000 server name might not show up as a full Internet host name on the Select Publishing Method page. This has to do with NT/2000 configuration, and you don't need to worry about it. If your server name is formatted as SERVERNAME instead of SERVERNAME. DOMAIN.COM, simply replace SERVERNAME with the server's complete host name or IP address. If you aren't certain what the full host name or IP address of the server is, ask your network administrator. If you need to change this to the full host name, you can click the Change Server button and enter it there. Doing so updates the URL displayed within the Select Publishing Method page. To be clear, you need two URLs: one to identify the authoring computer and the other to identify the server. -
If all of the information looks correct on the Ready to Publish page, click Finish. -
A Publishing Complete window appears, and the live stream becomes operational (see Figure 4.27). Buttons are available to test the stream from the Windows Media Administrator computer. Figure 4.27. The Publishing Complete window of the Windows Media Administrator displays a summary of your new publishing point and provides a link to test your live stream.  NOTE Unless you're running the Windows Media Administrator on a separate machine, it's recommended that you open a Windows Media player using a different computer and even a different connection from the server or the encoder. In the player, enter the MMS URL and test this way. If the stream comes through the player, all is well (see Figure 4.28). Figure 4.28. Test playback of your live stream using the Windows Media Player. 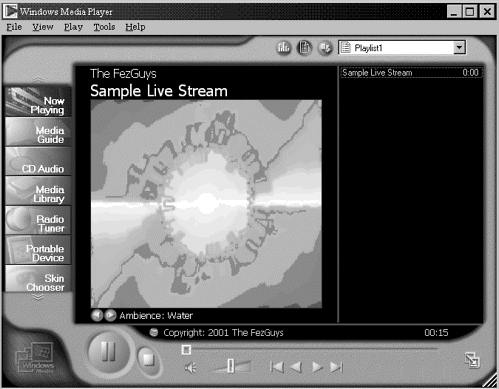 Under the Monitor Server link on the main Windows Media Administrator window are options that allow you to see what streams are running and who is listening to them. Select the Publishing Point Clients link to view current listeners. Congratulations! You are serving a live audio stream, encoded in the Windows Media format, over the Internet. This is no small accomplishment, especially when using the Windows NT/2000 environment. Give yourself a pat on the back. |