| If you have decided to author in the Windows Media format, you need to use the Windows Media Encoder tool or a third-party application that supports the Windows Media plug-in. This chapter walks you through using the Windows Media encoder and Sonic Foundry's Sound Forge. Sound Forge is shipped with the necessary Windows Media plug-in. Windows Media Encoder Microsoft's Authoring Tool Microsoft has its own innate encoding tool, the Windows Media Encoder, to author both live and on-demand Windows Media streams. One advantage to using the Windows Media Encoder is that you are assured of having the latest underlying codecs. Third-party applications typically take a little while to catch up. This chapter uses the Windows Media Encoder to encode a song with vocals for delivery to a target audience of listeners with connections ranging from dial-up (56Kbps) to broadband (DSL 384Kbps). (See Chapter 2, "Preparing Yourself," to learn how to create a WAV file.) Because this is an on-demand file, you are required to upload and stream it from a Windows Media Server. (See the section called "Creating a Server" later in this chapter and Chapter 7, "Serving Your Audio.") To download the free Windows Media encoder (v7.01 or later) on your Windows computer, go to www.microsoft.com/windowsmedia and click on the Windows Media Encoder link. After installation, follow this Step-by-Step tutorial. STEP-BY-STEP: Using Windows Media Encoder to Author an On-Demand Windows Media File  -
Launch the Windows Media Encoder on your authoring computer. The encoder opens a New Session Wizard, which speeds basic tasks. Options include the following: Broadcast a Live Event from Attached Device or Computer Screen, Capture Audio or Video from Attached Device or Computer Screen, and Convert an Audio or Video File into a Windows Media File. -
Choose Convert an Audio or Video File into a Windows Media File (see Figure 4.1). You will also see a check box for Begin Converting When This Wizard Finishes. Don't check this for now. Later, after you are more comfortable with the process, you might want to incorporate this time-saving feature. Click Next. Figure 4.1. Select Convert an Audio or Video File into a Windows Media File in the Windows Media Encoder Session Wizard. 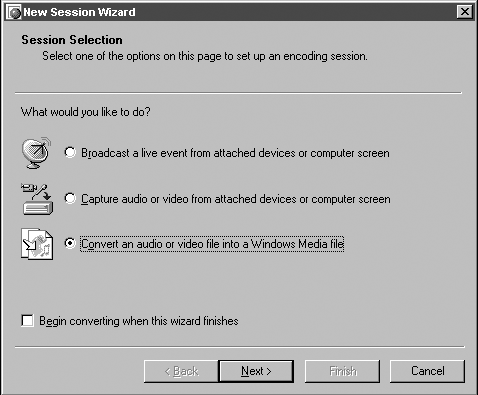 NOTE Back buttons are available at every step if you need to change information. The Windows Media Encoder's New Session Wizard also includes a Help area for most questions. -
From the File Selection page (see Figure 4.2), choose a file to convert by clicking Browse and locating your WAV file (see Chapter 2, " Preparing Yourself," to learn how to create a WAV file). Figure 4.2. Choose your source and destination filenames from the Windows Media Encoder's File Selection window. 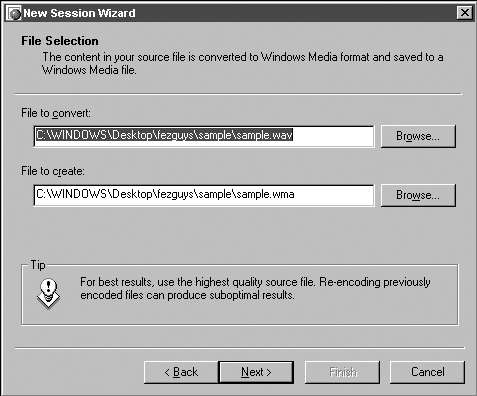 -
The Windows Media Encoder Wizard inserts its best guess for the filename and location for that soon-to-be-encoded file. If the Wizard's best guess is not what you want, click Browse, specify your desired destination file, and click Next. FezGuys' Tip  It's helpful to create a naming standard for yourself when encoding a single piece of source audio to multiple bit rates. You might want to try something along the lines of myfile-56k.wma or myfile-low.wma. Make sure that the filename ends in .wma. |
-
In the Profile Selection window (see Figure 4.3), specify the bit rate to encode your source audio. Choose from a menu of eight audio-only encoding choices. (You can ignore the video-relevant choices for now.) From the eight audio-only bit rate encoding options, choose Audio for Dial-Up Modems (56Kbps Stereo) from the Profile Selection window. Click Next. Figure 4.3. Choose Audio for Dial-Up Modems (56Kbps Stereo) in the Windows Media Encoder Profile Selection window. 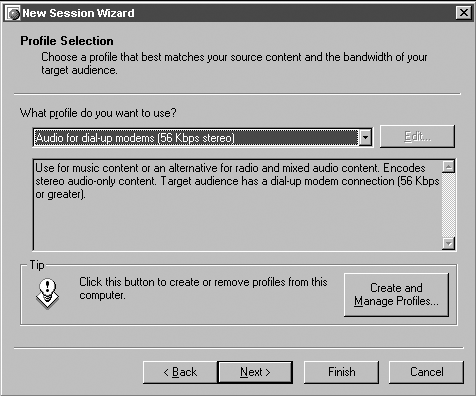 NOTE Advanced users can create custom profiles to control individual codecs, bit rates, sample rates, and number of channels (mono or stereo). -
In the Display Information window, enter your file's attributes (see Windows Media Attributes earlier in this chapter), including title, author, copyright, rating, and song description (see Figure 4.4). Click Next. Figure 4.4. Enter your Windows Media file attributes in the Windows Media Encoder's Display Information window. 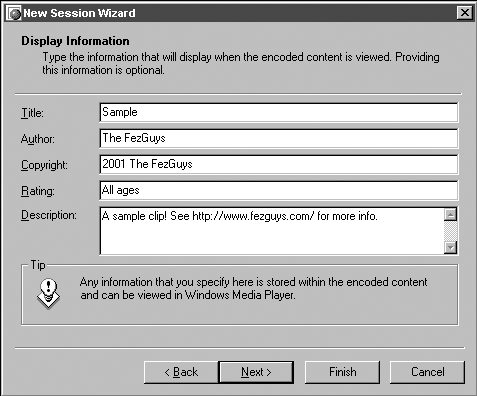 -
The Settings window displays a summary of your encoding settings. If the information is correct, click Finish. -
Click the Start button (which has blinked a few times to get your attention) to begin encoding your on-demand Windows Media file (see Figure 4.5). The progress bar and window show, among other things, the estimated time to the end of the encoding process, the percent of encoding complete, the bit rate chosen, the encoded file's destination (after it is complete), the amount of disk space remaining, and the audio level meters. Figure 4.5. Click the Start button to begin encoding your on-demand file. 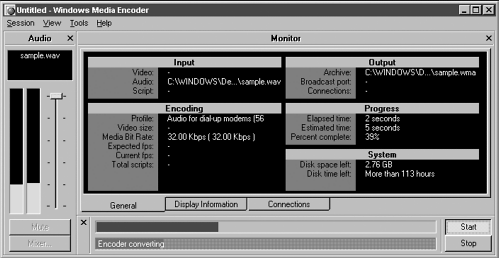 NOTE The Progress window is split up intelligently. It's easy to ignore if that's what you want, but interested users can find useful details during the quick encoding process. If you don't want to see this panel go to the View menu option and uncheck either Audio Panel, Monitor Panel, or Control Panel and uncheck areas you don't want. Keep in mind, however, that you need the Control Panel to click Start. -
After encoding has finished, an Encoding Results dialog box (see Figure 4.6) appears. If you don't want to see this dialog box again, you can uncheck the Show This Dialog Box When Encoding Finishes option. Figure 4.6. Windows Media Encoder: encoding results. 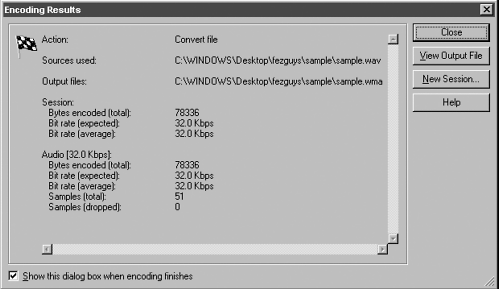 -
You now have a low bit rate Windows Media encoded file in a folder, ready for uploading to an on-demand Windows Media streaming server. Other options in the Encoding Results window (see Figure 4.6) are View Output File (to play your encoded file using your Windows Media player) and Select New Session (to repeat the process at another bit rate). -
Click Select New Session in the Encoding Results window to make a second file, this time a high bit rate on-demand Windows Media encoded file, optimized for broadband 384k DSL users. You can also start the New Session Wizard again by selecting Session, New Session Wizard (Ctrl+W). -
The New Session Wizard asks if you want to save the current session. Unless you want to repeat the exact encoding configurations for your next file, click No. FezGuys' Tip When encoding additional files, make sure to choose a different filename to avoid overwriting previous files. |
-
Go through the previous steps 2 10. When you reach the Profile Selection bit rate menu (step 5), choose Audio for CD-Quality Transparency (128Kbps stereo), which is suitable for broadband 384K DSL users. Click Next and continue steps 6 10. You now have two Windows Audio Media on-demand streaming files in your chosen folder, ready for uploading to a streaming server or Web site. Open them with your Windows Media player and verify that they sound okay (see Figure 4.7). Figure 4.7. Play back your on-demand files in the Windows Media Player to ensure they are okay. 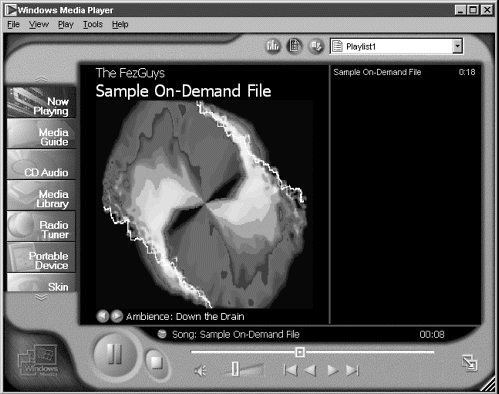 NOTE Upon launching your Windows Media encoder a second (and subsequent) time, there will be a different introduction screen with these options: Broadcast, Capture, or Convert a File Using the New Session Wizard; Create a Custom Encoding Session; Open an Existing Encoding Session; and Open a Recent Encoding Session. Choose the option Broadcast, Capture, or Convert a File Using the New Session Wizard until you're more comfortable with the software. If you don't want to see this pop-up window upon every launch, uncheck the box Show This Dialog Box at Startup. If you still want to use the Wizard, go to Session, New Session Wizard (Ctrl+W).
Using Sound Forge Sonic Foundry's Sound Forge is a popular Windows-only waveform editor. It can open and save to many file formats, including Windows Media. It's available at www.sonicfoundry.com and comes in two flavors: the full or the "streamlined" version. The following Step-by-Step uses the full version, Sound Forge 5.0. STEP-BY-STEP: Using Sound Forge to Author an On-Demand Windows Media File -
Open Sound Forge on your Windows computer. -
Within Sound Forge, open your source audio file. -
Choose Save As and then choose the file type to which you want to save (see Figure 4.8). In this case, select Windows Media Audio V8 or .wma. Figure 4.8. Select Windows Media Audio V8 in Sound Forge's Save As Type option list. 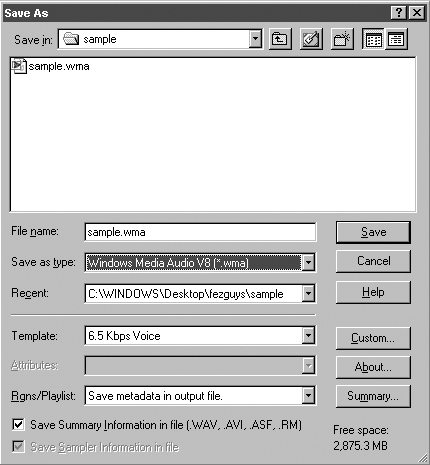 -
From the Template pull-down menu, choose 56 Kpbs Stereo for a target audience of 56 Kbps dial-up modem users (see Figure 4.9). Figure 4.9. Select the 56 Kbps Stereo setting in the Sound Forge Save As window. 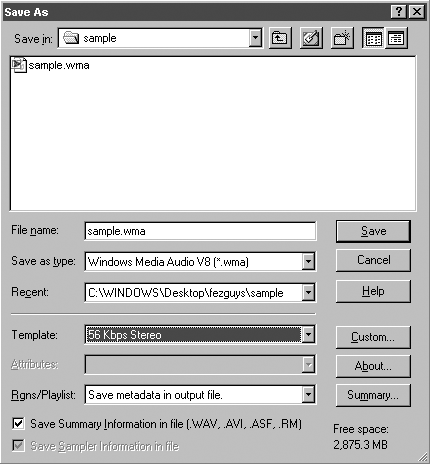 -
Click the Custom button to enter the Custom Settings window. The Audio tab within the Custom window is selected by default. -
Click the Summary tab and enter your file's media attributes, including title, author, copyright, description, and rating (see Figure 4.10). After filling in the information, click OK to close the Custom Settings window. Figure 4.10. Enter your Windows Media file attributes in the Summary tab of Sound Forge's Custom Settings window. 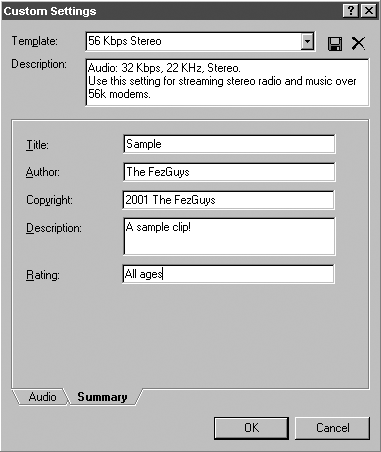 -
After verifying that the destination filename is correct, click Save to begin the encoding process. A horizontal progress bar marches across the bottom of the screen, detailing percent complete. A Cancel button is also available. -
After saving as a Windows Media encoded file, Sound Forge asks if you want to reopen the file from your newly encoded version. The application is asking if you want to close your raw audio and instead open the compressed Windows Media file. Because you will use the same source WAV file to author on-demand files at other bit rates, make sure to click No. Clicking Yes opens the completed and compressed Windows Media file. You don't want to recompress an already compressed file. -
Repeat steps 3 7 above to create an on-demand file for 384Kbps DSL users. In step 4, select the 128 Kbps CD Transparency Audio template and, in step 7, make sure to name the new encoded file something different from your 56K version so you don't overwrite it. NOTE The highest setting of the default encoding templates is 160Kbps, although Sound Forge can encode to 192Kbps through the Custom settings.
Verify that your Windows Media encoded files sound okay by playing back the newly encoded files in your Windows Media player (see Figure 4.11). Figure 4.11. Test your on-demand file with Windows Media Player. 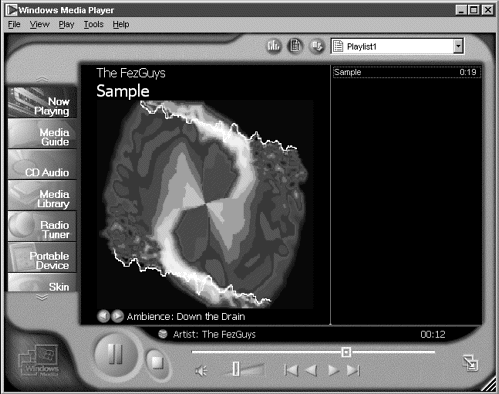 You now have two Windows Audio Media on-demand streaming files in a chosen file, ready for uploading to your streaming server or Web site. |